April, 2012 | DriverFinder - We Make Drivers Work for You

Check the Version of Your Apple Mobile Device Driver

All Apple devices that can be connected to a PC using the USB port will use the Apple mobile device driver for Windows. To check which version of this driver is installed, use the following steps:

  1. Make sure the iPad, iPhone or iPod is connected to the PC using a USB cable.
    (Otherwise it will not show up in the Device Manager, and you cannot check the version with these steps.)
  2. Open the Windows Device Manager from the Control Panel, or type “devmgmt.msc” at the Start menu.
  3. In the Device Manager, expand or open the Universal Serial Bus Controllers group.
    Apple USB Device
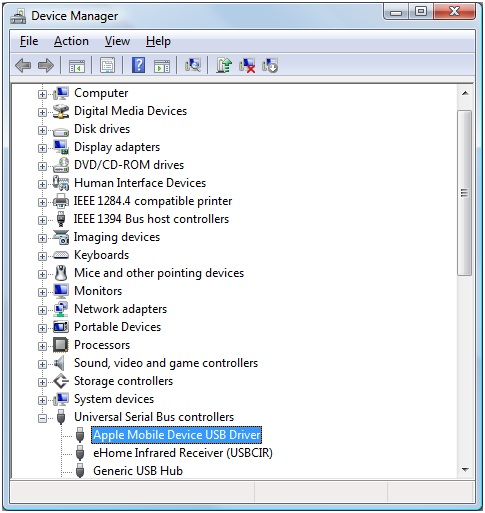
  4. Locate the Apple Mobile Device USB Driver, and right-click this device.
  5. In the popup menu, select Properties.
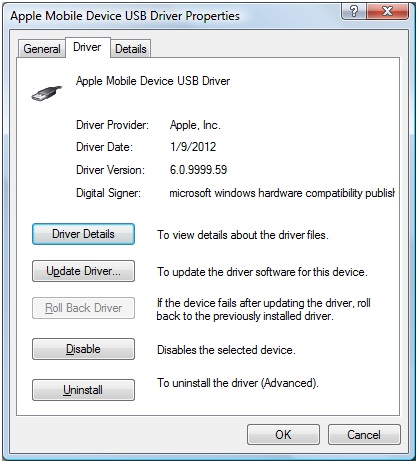
  6. Next select the Driver tab.
  7. Check the Driver Date and Driver Version of the Apple USB driver to see if you have the latest version of the driver.
    Apple mobile device driver

In case you do not see the Apple Mobile Device USB Driver under the Universal Serial Bus controllers category, it is possible that it is listed under the Universal Serial Bus devices categories.

Apple Mobile Device

The steps are the same, rick-click the Apple Mobile Device USB Composite Device, and in the popup menu select Properties and then select the Driver tab.

Apple Mobile Device driver

To update an Apple mobile device driver, you normally need to install the updated iTunes application. The iTunes software is quite large (install requires 400 MB of disk space), and you might not use it at all. So, if you download the stand alone Apple USB driver update using DriverFinder, you can simply update the driver without the need to download and install the complete iTunes software.

Once downloaded, simply run the AppleMobileDeviceSupport.msi (or AppleMobileDeviceSupport64.msi for 64-bit Windows versions) to install the new driver.

When you plug your iPod, iPhone or iPad, the new driver will automatically be used!

Skype Does Not Detect the Microphone

skype does not detect microphoneWe’ve all been there at one point; just when you’re seconds away from a Skype call, you realize that you’re freaking mic is not detected by Skype! This happens often especially if you have various audio devices connected to your PC. Following are three (3) simple things you can do to make Skype recognize your mic.

Three Ways to Make Skype Detect Your Mic

1. Check that the RIGHT audio device (mic) is selected by Skype.

  • Open Skype.
  • From the Tools menu, click Options and then select the Audio Settings tab.
  • Click the Microphone down arrow and then select the device that Skype should use. (As you can see on the screenshot below, since my microphone is connected to my PC via USB, I selected ‘Microphone (USB Audio Device)’.

2. Check that the correct recording device is selected on your PC. (The succeeding steps were done on a Windows 7 PC. The steps will be very similar for Windows 8.1 and Window 10. Minor differences in steps may be needed for Windows XP and Vista.)

    • From the Windows Start menu, click Control Panel.
    • Click Sound (if needed click Hardware and Sound first).
    • Select the Recording tab.
    • Select the microphone device you indicated in Skype (Step 1 above).
    • Click the Set Default down arrow and then choose Default Device.

  • Click OK to close the Sound window.

3. Update your sound card driver. Skype still not detecting your microphone after the above tweaks? Then perhaps you should update the drivers of your sound card.

  • Here’s the manual way to do this.
    • Check the brand and model of your sound card. You can do this by literally opening up your machine, taking out the sound card and checking it’s brand and model. Another way is to check your PC brand and model. You then go to the PC manufacturer’s website (e.g., Asus, Dell, Samsung, HP, etc.) and then check what sound card they put on your PC.
    • Now that you know the sound card brand and model, you can go to the website of the sound card maker (e.g., Realtek, Creative Labs, SoundMAX, etc.) and check if they have new sound card drivers for you to download.
    • If they do, download the new sound card driver and install it on your PC.
    • Restart your system.
  • Here’s the fast and automated way to do this.
      • You can use DriverFinder to update your sound card drivers. (In this screenshot, you can see that DriverFinder has detected the sound card device on my PC in seconds.)

    realtek-sound-card

      • After registering and activating the program, click the Start Scan button at the top to enable DriverFinder to look for new drivers for your PC. (In the screenshot below, new drivers for my Realtek sound card, as well as for other devices on my PC, have been detected.) You can download and install the recommended drivers for your PC in minutes.

    Update Realtek Audio Driver

That’s it. Try these tips and here’s to you getting Skype to recognize your mic once again!

Copyright 2009 and Beyond - DriverFinderPro.com - All Rights Reserved