Last week, on June 17, 2021, Microsoft has stopped accepting driver submissions for Windows Update for Windows 7 SP1 (and Windows Server 2008). As a result, there will be no more new Windows 7 drivers released through Microsoft Windows Update for your Windows 7 laptop or PC.
Of course, Microsoft already discontinued support for Windows 7 last year, in January 2020. So now the driver updates have also stopped.
The main reason for this step is security. Microsoft was using a Secure Hash Algorithm (SHA-1 ) trusted root certificate to allow signed drivers to be submitted for Windows Update. The SHA-1 algorithm, however, has become less secure and has been superseded by SHA-2. Microsoft has expired the SHA-1 trusted root certificate authority and will only allow SHA-2 signed drivers into Windows Update.
The switch from SHA-1 to SHA-2 was effective from May 9, 2021. All SHA-1 signed content is removed from the Microsoft Download Center.
What is the Impact on You?
If you have a Windows 7 PC, you will no longer receive driver updates via Windows Update.
It also means that if you reinstall a fresh copy of Windows 7, you might not be able to get all the necessary drivers you need automatically.
Manufacturers can still submit drivers for Windows 7 and Windows 2008 through the Windows Hardware Compatibility Program for now, but these will only be available to customers that use Volume Licensing and participate in the Extended Security Program.
Manually locating and manually installing drivers in Windows 7 remains possible though.
[More details on this Microsoft change can be found here.]
Windows 7 Driver Update Alternative
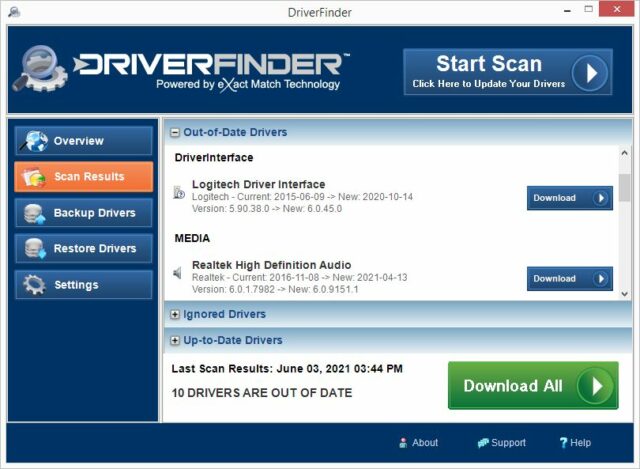
If manually searching, downloading, and installing drivers is not your thing… you can always use DriverFinder to help you.
The DriverFinder database contains ‘legacy drivers’.
Legacy drivers are drivers that are ‘older’ than the latest Windows OS version. Since we’re now on Windows 10, Windows 7 drivers can be considered legacy drivers.
By the way, drivers in the DriverFinder database are sourced DIRECTLY from hardware manufactures so rest assured that the right Windows 7 driver update is recommended.
Here’s how you can still have Windows 7 driver updates via DriverFinder (no manual searching!).
Install the Focusrite Scarlett 2i2 drivers in Windows to enable your audio interface to connect with your PC through a USB port. This makes recording from an instrument or from a microphone to your Windows computer possible.
The Focusrite scarlett 2i2 is a popular and long term favorite with musicians. Now in its 4th generation, the audio interface features high quality microphone and instrument inputs and a USB 2.0 port for PC connections.
The Focusrite Control software allows you to record and play back your music on a computer. Using older drivers on the latest Windows versions can result in audio problems like stutter or static. If disabling audio enhancements does not fix it, try updating the audio drivers and software.
Install the Focusrite Control Software
Installing the control software will install all the necessary requirements in your Windows computer. This includes the Focusrite USB drivers (PCIe drivers for other Focusrite controllers are also included).
Here are the steps to install the Focusrite Scarlett 2i2 drivers by installing the control software.
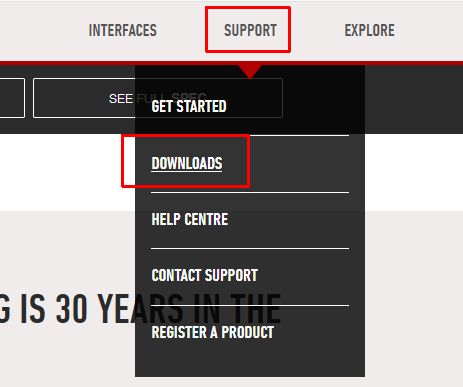
On the website, click SUPPORT in the top menu, and then select DOWNLOADS.
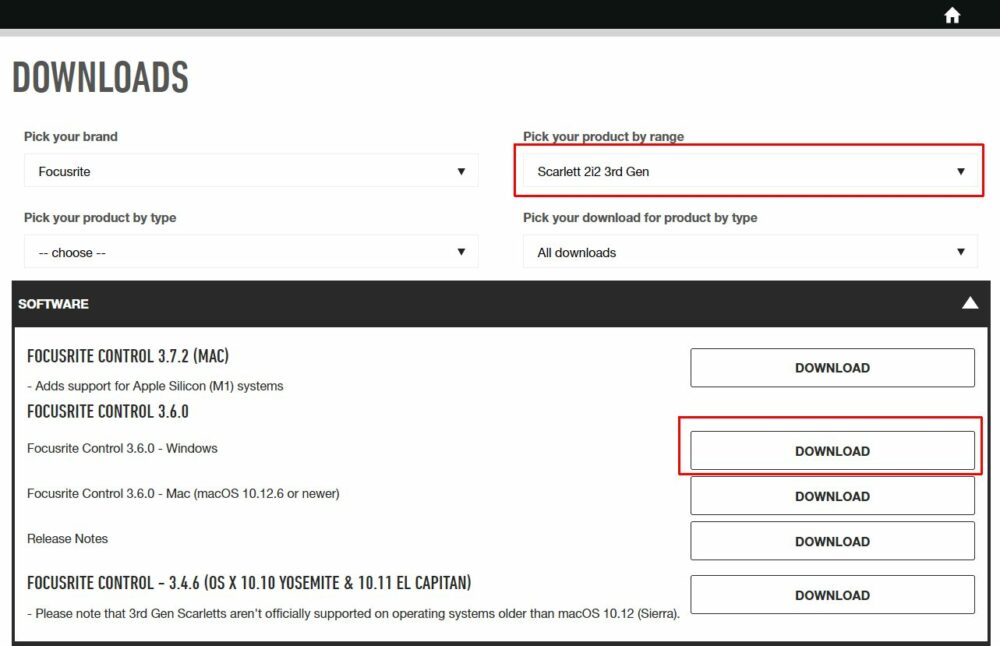
In the DOWNLOADS page, click the Pick your product by rage drop-down list, and then select the Scarlett 2i2 edition you have.
Under the SOFTWARE section, click the DOWNLOAD button (for the Windows option) to get the Focusrite Control software installer.
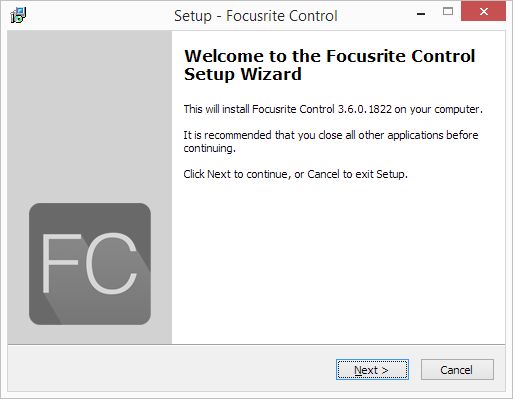
After downloading and saving the file on your computer, execute the installer and follow the on-screen instructions.
Automatically Find and Install Focusrite Scarlett 2i2 Drivers using DriverFinder
When you only need the USB drivers to be installed, either because they are missing, or you want the latest version of the USB drivers, you can use DriverFinder.
Acquire a license for the application and activate the software.
Run a Scan to check for updated drivers.
Download and install the recommended Foscusrite Scarlett 212 driver updates.
The benefit of this approach is that ALL your device drivers can get updated! The USB controller drivers and other audio drivers are also checked and updated when required.
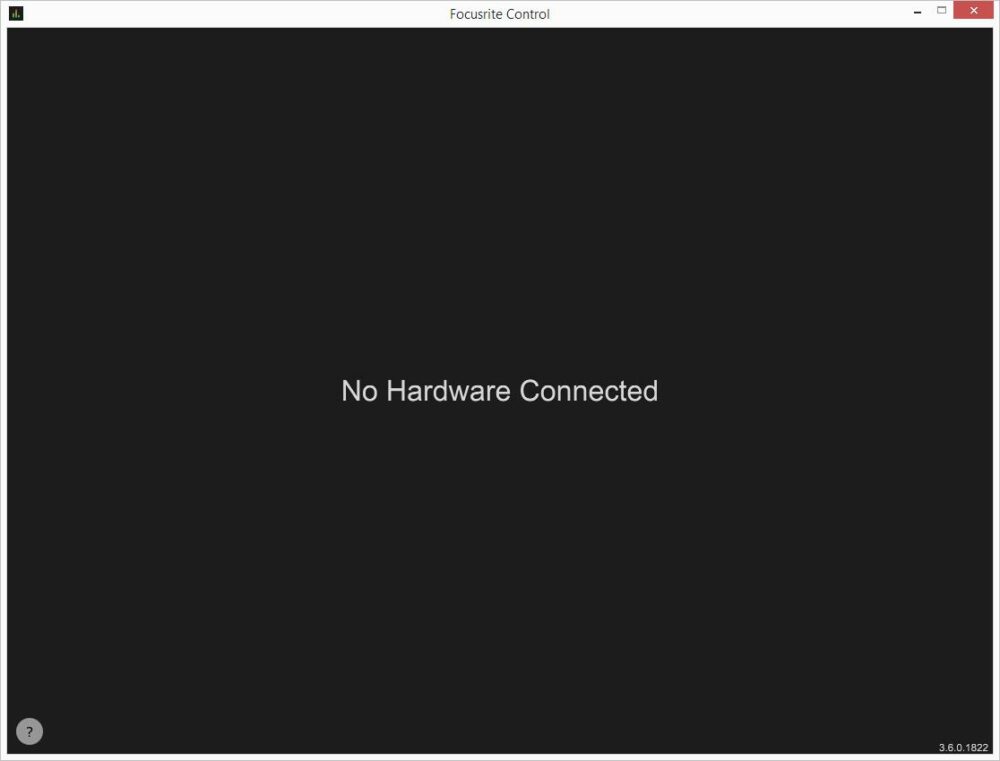
Error Message: Focusrite Scarlett 2i2 No Hardware Connected
When you start the Focusrite Control software, you might see a black screen with the message “No Hardware Connected”.
Firstly, ensure the Focusrite drivers are correctly installed. If necessary, open the Device Manager, uninstall the device and then reinstall the drivers. You can find the Focusrite USB Audio device under Sound, video and game controllers.
Secondly, check all connections. All physical connections need to be properly attached. Try a different USB port if you can.
For the USB audio interface, it is important to connect the USB cable from the Scarlett 2i2 directly to the computer. The USB port needs to be USB 2.0 or higher. It is also important to be aware that the device is powered through the USB port. So connect the USB cable to a USB port directly on the PC motherboard (back of the computer for most desktops). For laptops, it is recommended to plug the laptop to its power cord.
Do not use a USB hub unless it is really required. And if you do, make sure it has a separate power supply, to ensure it can feed the Scarlett 2i2 USB interface sufficient power.
Lastly, make sure you selected the right version of the Focusrite software. The latest Control software will not detect older versions of the Scarlett audio interface.
Is your AOC monitor not recognized by your PC? Then you need an AOC monitor driver for Windows.
Monitor drivers in general are the same across Windows versions. Drivers for Windows 7 will work in Windows 8.1 and Windows 10 as well. In many cases even older drivers will work fine. The reason for this is that monitor drivers only contain information about the monitor’s characteristics, like supported screen resolutions and color profiles. So a change in Windows versions does not mean your monitor is no longer usable.
In this article we’ll explain where you can find drivers for your AOC monitor and how to install it.
Manually Install a Monitor Driver for Your AOC Monitor Model
The first step is to identify your AOC monitor model. Simply look at the back of your monitor for the type indication.
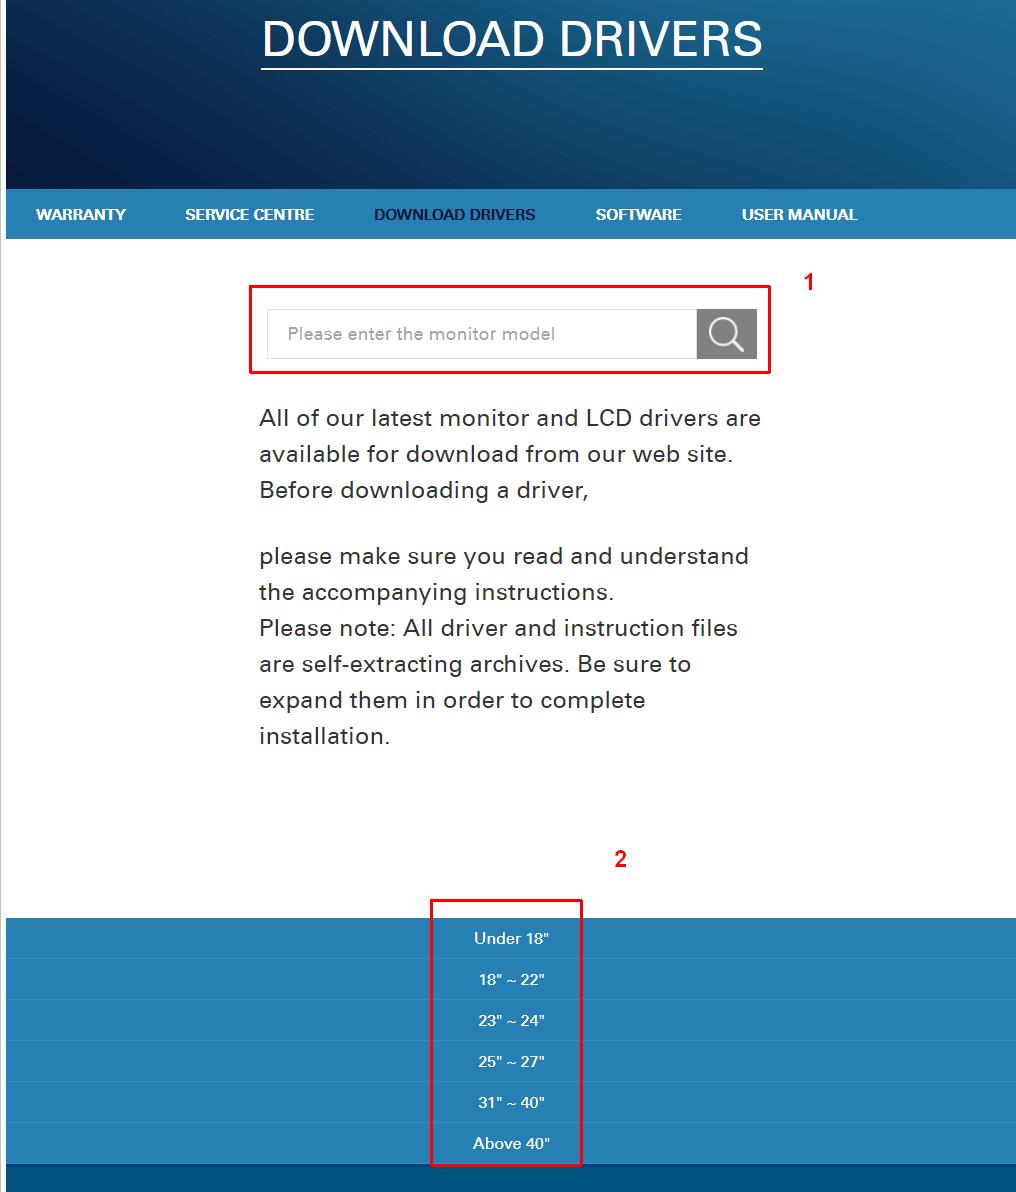
The next step is to find and download the appropriate AOC monitor driver. Go to the AOC driver download site. Enter your AOC monitor model number in the search field and click the search icon (1).
If you are not able to find the AOC monitor model using the search bar, you can locate it by browsing the size options below the search option (2).
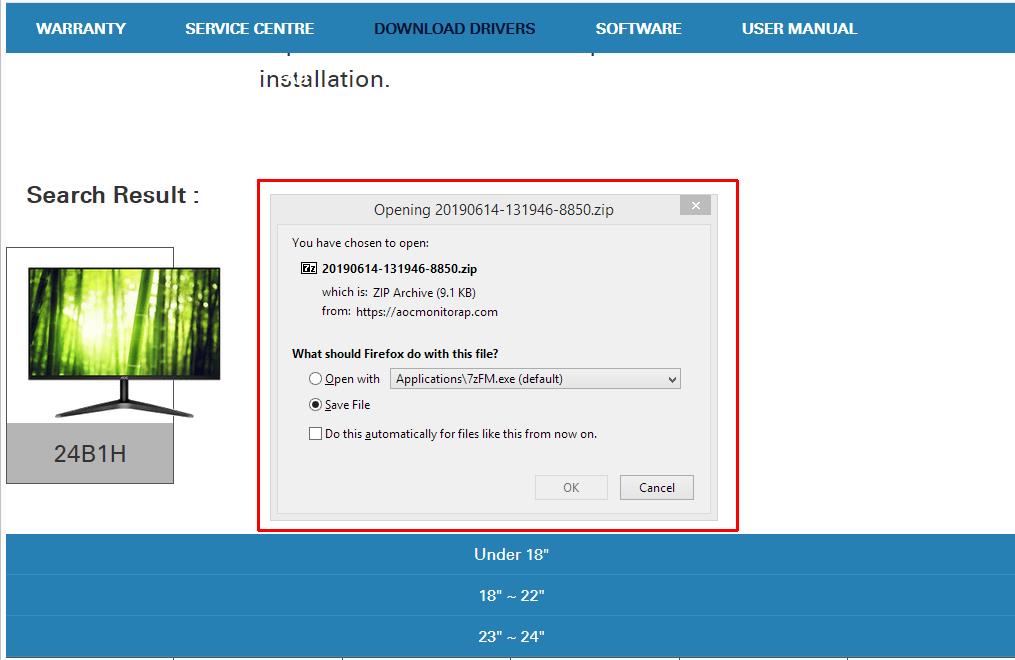
Next, click on the monitor icon on the webpage to download the driver file. Depending on the browser you use, you might need to choose a download location and confirm the file save operation.
The downloaded file is a ZIP file. Extract the contents to a folder and then manually install the AOC monitor driver in Windows.
Instructions: Don't know how to install monitor drivers? Click here to manually install a monitor driver in Windows 10. The instructions apply to most Windows versions, due to the nature of this type of driver.
Automatically Install a Monitor Driver for Your AOC Monitor Model
If you are finding it difficult to find the right driver for your AOC monitor, you can try our DriverFinder program. The program automatically identifies all hardware on your computer, including your monitor, and finds the right driver for it.
The licensed version of DriverFinder includes free technical support to help you install the drivers if you face any problems.
A side-benefit of this approach is that DriverFinder will enable you to update all your device drivers. So not only will your AOC monitor be properly supported by Windows, you will also have up-to-date graphics card drivers!
After installing the AOC monitor driver, Windows should now properly recognize your monitor. You can set the optimal resolution for your screen and rely on colors being correctly displayed.
I hope you enjoyed reading this article.
If you’re still having monitor issues, feel free to get in touch and I’ll do what I can to help you!
Microsoft Windows uses device drivers to communicate with hardware devices in the computer. One of the important devices in a computer is the PCI simple communications controller. If the PCI simple communications controller driver is not installed, the device will show an error. In addition, it can result in other devices depending on this device failing or not being recognized by Windows.
What is a PCI Simple Communications Controller?
PCI is short for Peripheral Component Interconnect and it is a bus that is used to connect hardware devices to a computer. The bus is inside the computer, on the motherboard, so you will not see it, like a printer or mouse. But it is a critical component to enable communication between the CPU and hardware devices. The PC simple communications controller is a controller chip that is part of the motherboard chipset. The device manufacturer is Intel.
If the right driver for the PCI simple communications controller is not installed, this will be visible in the Device Manager in Windows. The device will show an error or warning.
The device will be shown in the Other devices category instead of the System devices category. When you right-click the device and check the Properties, the error will often show “The drivers for this device are not installed. (Code 28)”.
Apart from this, other devices might not be recognized and show up as Unknown devices in the Other devices category as well.
Once the right driver for the PCI simple communications controller is installed, the other devices can be recognized by Windows as well and drivers for them can also be installed.
Solving the problem with the PCI simple communications controller is a matter of installing the right driver. The driver needed is the Intel Management Engine driver, which is a chipset driver.
To download the driver from the Intel support website, make sure you have a working Internet connection and visit the Intel download page.
In the search box, type “management engine driver” and then click the appropriate entry for your Windows version in the result list.
In the next page, select the driver that is right for your Windows version and click the link.
This will bring up the download page. Click the Download button to download the ZIP file to your computer. After agreeing to the Intel Software License Agreement, the download will start.
Unzip the downloaded file to extract the driver files. Navigate into the extracted folder (ME_SW_2216.16.0.2805 in this example) and then into the subfolder named ME_SE_DCH.
Install the drivers by executing the SetupME.exe file.
Once installed, restart your computer for the changes to take effect. Any devices depending on the PCI Simple Communications Controller should now also be recognized and their drivers installed.
Update the Driver from the Device Manager
Instead of manually downloading and installing the drivers for devices like the PCS Simple Communications Controller, you can also use the Device Manager to update the driver. Especially in later Windows versions, many drivers are automatically installed.
Open the Device Manager from the Start menu, or type devmgmt.msc in the Run box after pressing the Windows + R keys.
In the Device Manager, open the Other devices category.
Right-click the PCI Simple Communications Controller, and in the popup menu click Update driver (or Update Driver Software depending on your Windows version).
Choose the option to let Windows Search automatically for drivers (or Search automatically for updated driver software, again, depending on the Windows version).
Wait for the driver to be installed and then click Close to finish the driver update.
After this, reboot your PC to have the changes take effect and let Windows find any other hardware devices that may now be detected.
If the automatic update fails, make sure you have an active Internet connection. If that is the case, the other option is to choose the option Browse my computer for drivers in step 4 and select the path where you manually downloaded the latest driver for the device.
For finding the right drivers for your computer system, we recommend you use the DriverFinder utility. It scans your hardware devices and allows you to download the latest drivers for all devices.
Fix #1 – Check That Your Mic is Correctly Plugged to Your PC
This fix assumes that you have an external device you’re using as your microphone for your Zoom meetings. If that’s not the case, feel free to move on to the next recommended fix.
Unplug your microphone and plug it back in to ensure that it’s not just loosely connected.
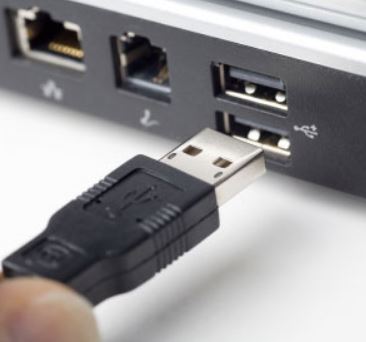
If you’re using a USB audio device, then try plugging it into a different usb port. Note: If you’re using a USB hub or USB extension cable, try plugging the device directly into your computer’s USB port.
For Bluetooth headsets, or microphones, make sure to PAIR the device with your Windows computer.
Fix #2 – Check that your Microphone Device is Not Muted
On the Windows Taskbar, right-click the speaker icon and then click Open Sound Settings.
Under Input, click the Choose your input device down arrow and select the microphone device you want to use.
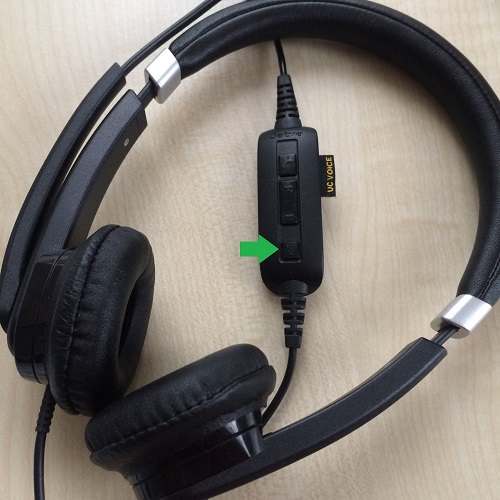
If you’re using an audio headset, check that its Mute switch – if it has one – is not turned on.
This is my Jabra headset and where the Mute button is on my device.
Fix #3 – Check that Zoom is Allowed to Use Your Microphone
Use the Windows search box, type microphone privacy settings and select this option when it appears.
Under Microphone, switch the Allow apps to access your microphone toggle to On.
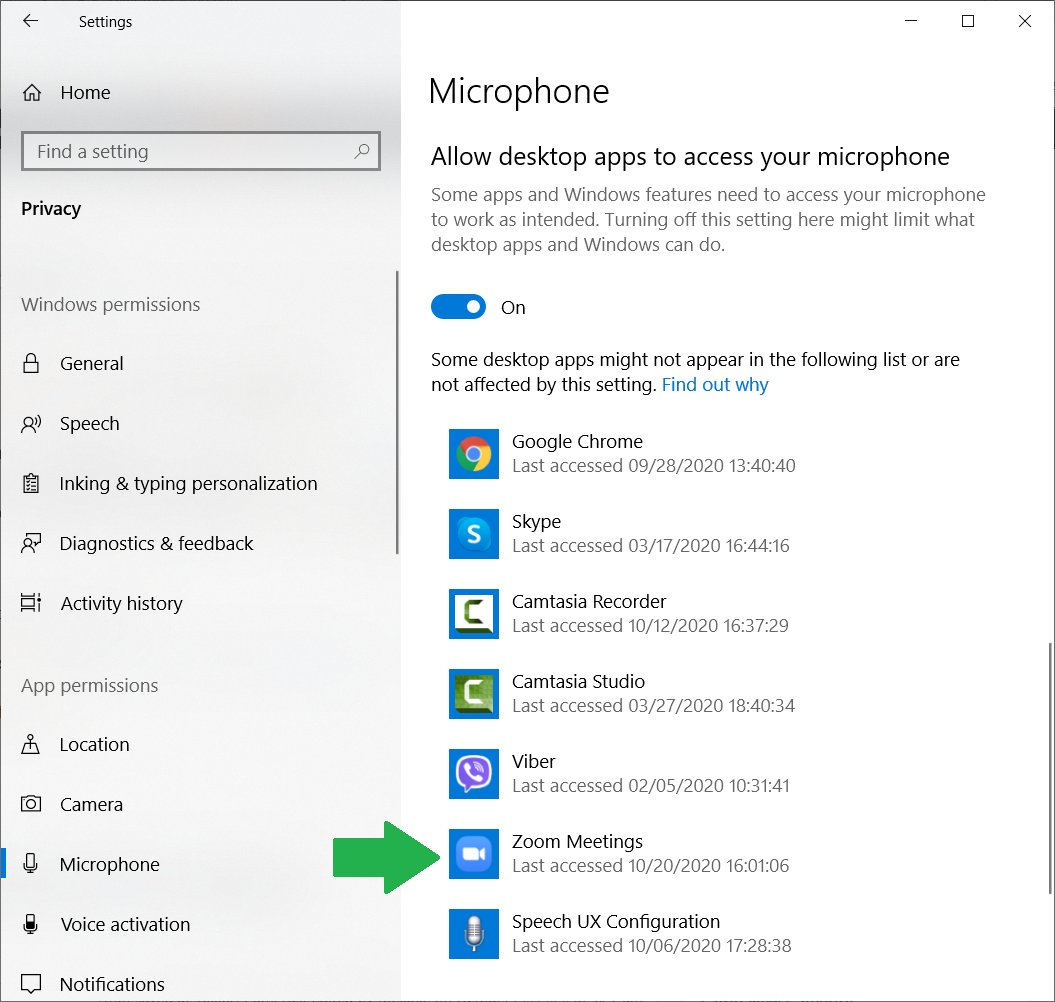
Scroll down further till you find Allow desktop apps to access your microphone, and then toggle that to On too.
Note: Ensure that Zoom Meetings is one of the desktop apps listed as allowed to use the microphone.
Tip: Is the Zoom app not listed under Microphone Privacy Settings?
Uninstall Zoom.
Restart your PC.
Re-install Zoom.
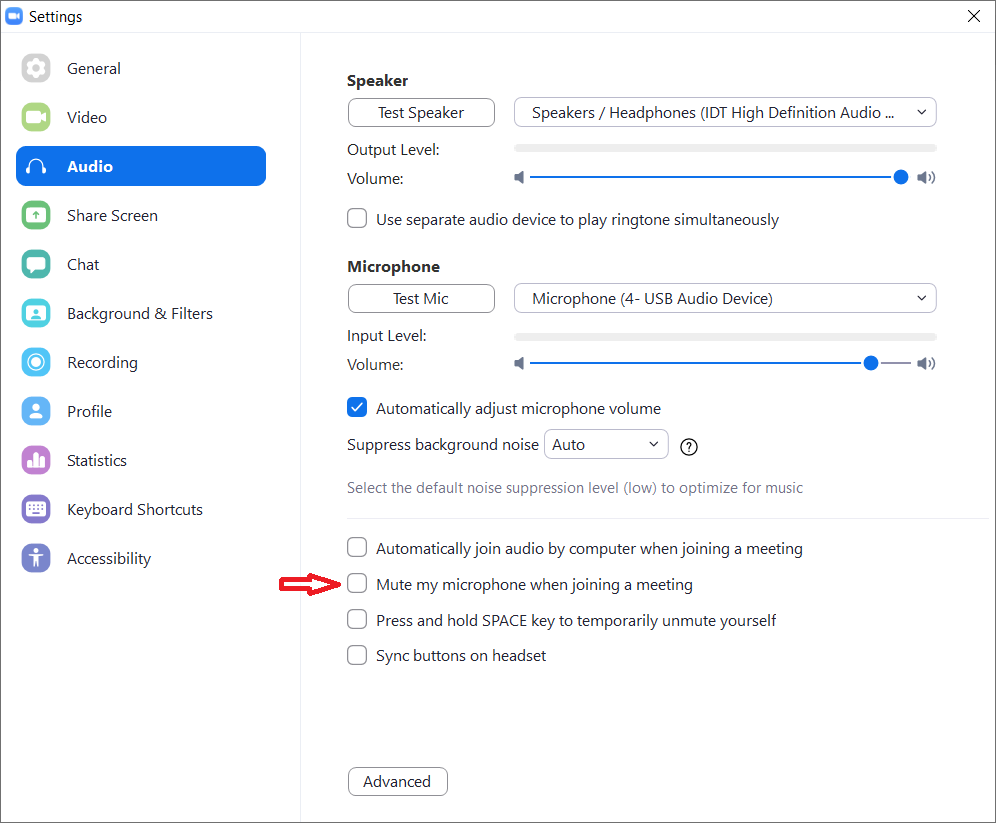
Fix #4 – Ensure that Zoom is Using the Default Microphone
Log into your Zoom desktop app.
On the right side of the Zoom pane, under your profile icon, click the Settings icon .
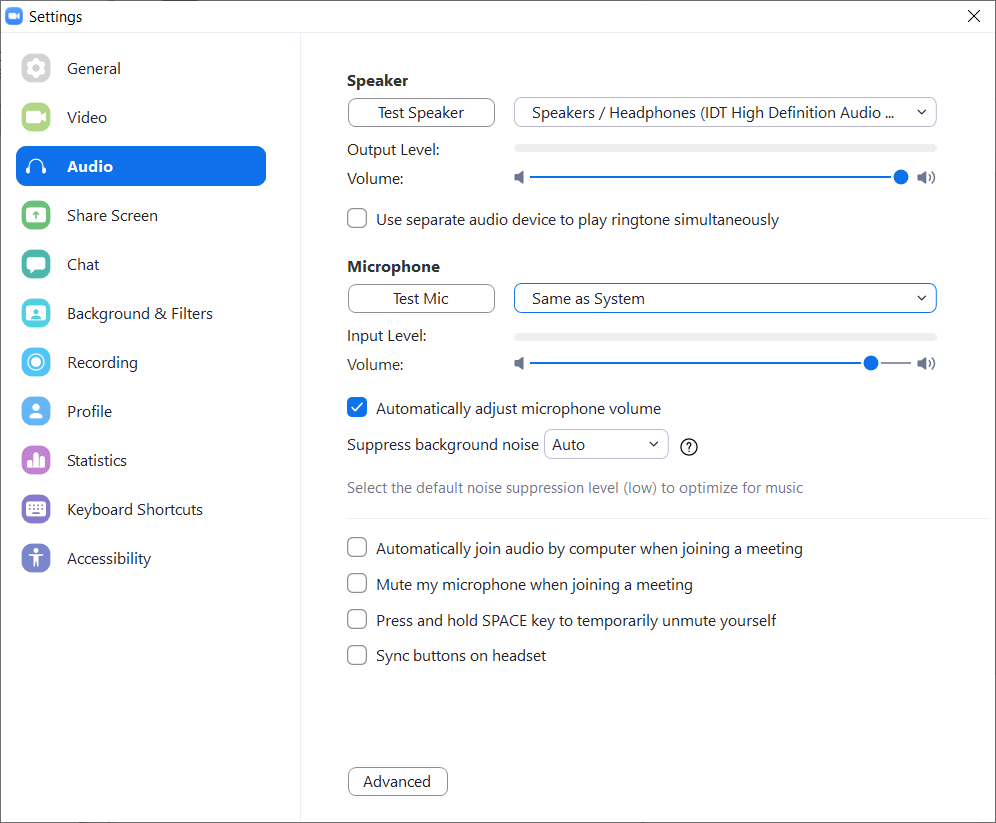
On the left pane, click Audio.
Under Microphone, ensure that audio device selected is the same device you chose under Fix #2 above. If not, click the down arrow and then select Same as System.
While you’re in there, perform a mic test.
Under Microphone, click Test Mic.
Say something into your microphone.
Whatever you say should be played back to you.
While you’re in there, check that the microphone is not automatically set to mute when you join a meeting.
Ensure that the setting Mute my microphone when joining meeting is off.
Note: By the way, the Meeting Host can mute meeting participants so be sure this is not the case.
Fix #5 – Update Your Audio Drivers
If you’re microphone is still not working with Zoom even after going through the Windows and Zoom solutions above, then you may need to update your device drivers.
Audio drivers ensure that Windows can recognize and operate your audio devices, including your microphone. In the same way, USB ports and Bluetooth also need device drivers to function.
Hardware manufactures release new device drivers all the time. This is their way of releasing new product features or new functionality for their devices, as well as fixing any bugs that may have been detected by consumers over use.
How to Update Drivers Manually
Normally, for sound problems you should go your PC manufacturer’s website and install the latest Windows 10 sound drivers available for your laptop or desktop PC. However, if you have a custom PC, or if you built your PC yourself (impressive!), you should probably head to your motherboard manufacturer’s website and download audio drivers from them.
If, like me, you’re using a USB microphone, try to download and install the recent release of USB controller drivers from the manufacturer’s website.
How to Update Drivers Automatically
If you don’t have time or the know-how to properly select, download and install the drivers you need, you can do this process automatically with DriverFinder. (Shameless plug!)
DriverFinder does exactly what its name suggests… instantly find the RIGHT device drivers you need. Once you install DriverFinder, it will automatically recognize your system info and details, as well as all the devices installed or connected to your PC.
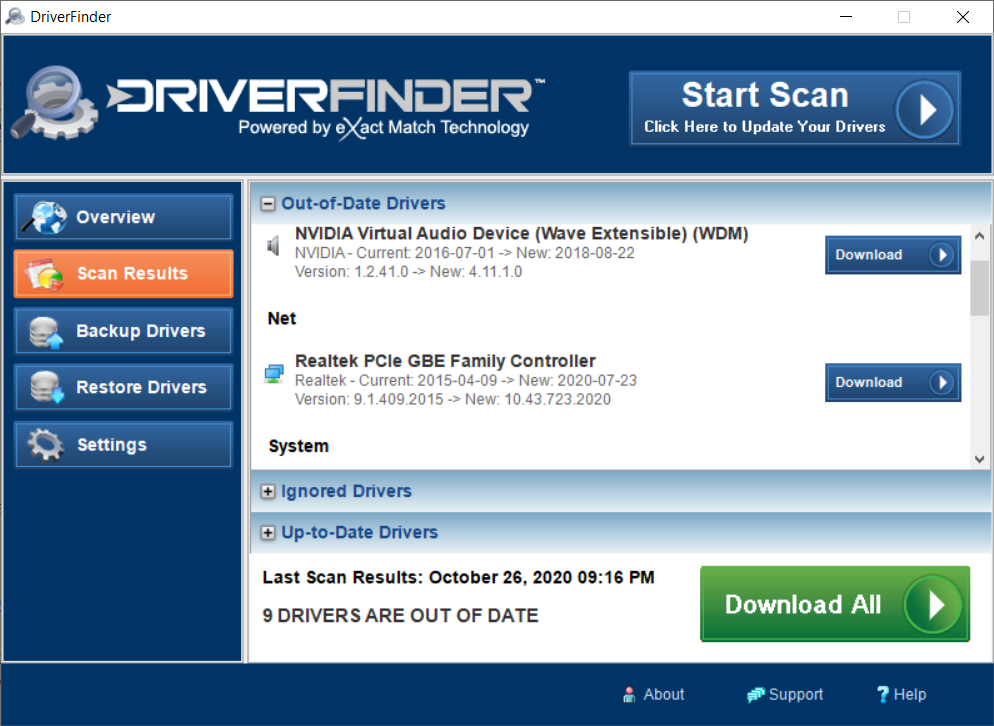
It will then compare the drivers installed on your system against our DAILY UPDATED and ever-growing driver database. From here, just download and install the latest audio driver found for your device.
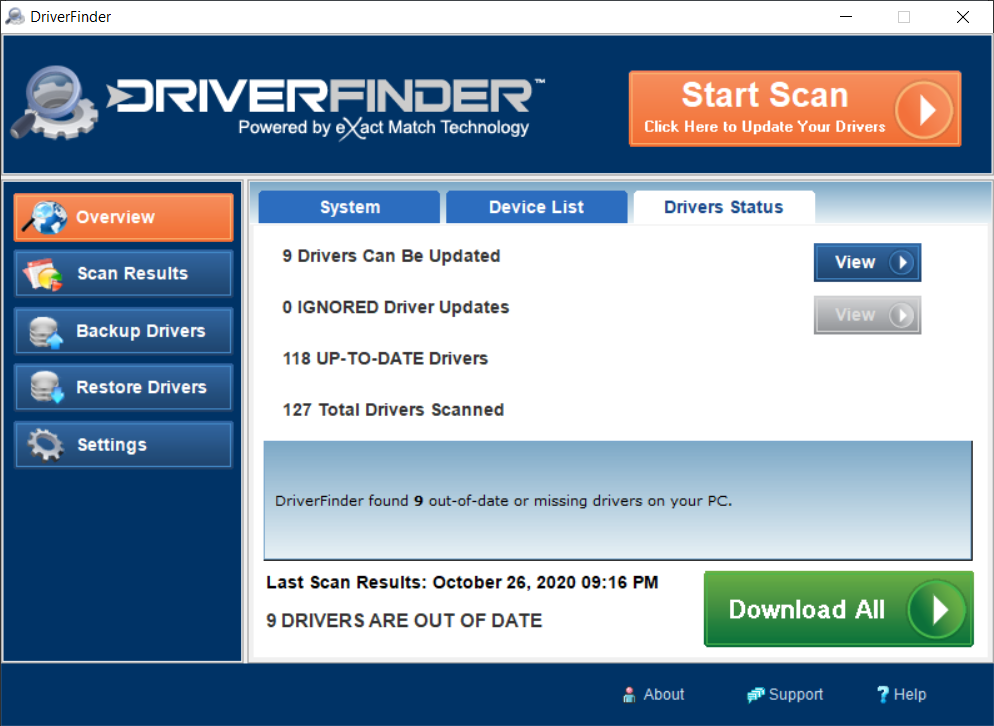
Click Activate to register your copy of DriverFinder.
Click Start Scan to check for new drivers.
Download and install the latest device drivers recommended for your audio/microphone device.
Fix # 6 – Quit Other Chat & Teleconferencing Software
You may not realize this but perhaps other apps are on/open and are ‘locking’ the use of your microphone. So if you have Skype,GoToMeeting, Microsoft Teams, Google Meet, etc. installed on your PC, ensure that all of them are completely closed.
Click the up arrow ^ on the Taskbar notification of Windows to see hidden icons.
If you see any chat or teleconferencing app there, right-click it and then click Quit or Sign Out.
Tip: If you want, you can also uninstall all other chat and teleconferencing apps you have installed on your PC to be sure, apart from Zoom of course. Reboot your PC and then perform a mic test again in Zoom.
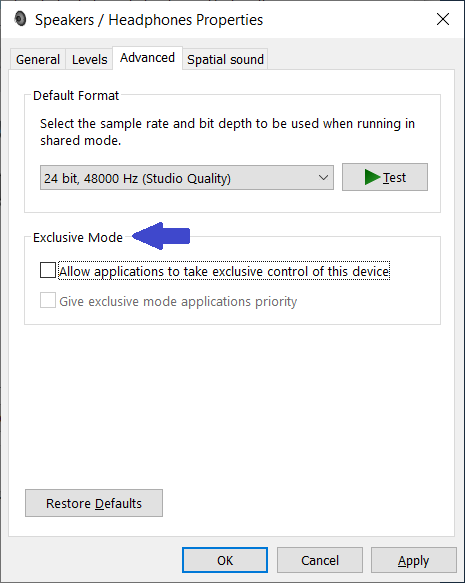
Fix # 7 – Disable ‘Audio Enhancement’ Settings
Disable ‘Audio Enhancement’ settings for your output.
On the Windows Taskbar, right-click the speaker icon and then click Open Sound Settings.
Under Output, click Device Properties.
In the DeviceProperties window, click Additional device properties.
Click the Advanced tab.
Uncheck Allow hardware acceleration of audio with this device and Enable audio enhancements.
Click OK.
Note: If you don’t see the above settings, look at the options under Exclusive Mode and uncheck those options.
Disable ‘Audio Enhancement’ settings for your input.
On the Windows Taskbar, right-click the speaker icon and then click Open Sound Settings.
Under Input, click Device Properties.
In the DeviceProperties window, click Additional device properties.
Click the Advanced tab.
Uncheck Enable audio enhancements.
Click OK.
Note: If you don’t see the above settings, look at the options under Exclusive Mode and uncheck those options.
Fix # 8 – Use Your Phone as Your Microphone
If you’re already in a meeting, we understand you’re in a pinch and just want to use any mic ASAP. In this case, you may want to use your phone as your microphone.
Download the Zoom app on your Android or iPhone.
On your phone, login into your Zoom account.
Go back to the Zoom desktop app.
Click on the arrow next to Mute, and then click Switch to Phone audio.
You will be given a meeting ID and password. Use it to join the meeting on your phone.
Fix # 9 – Run the Windows 10 Audio Troubleshooter
Windows 10 has a built-in troubleshooters that can help fix common issues. Especially for non-tech-savvy users the Windows troubleshooters are a good choice. Since there is a troubleshooter for Recording Audio, this can used used to troubleshoot and fix microphone problems.
To run the Windows 10 audio troubleshooter follow these steps:
In the Taskbar search box, type “troubleshoot setting”.
Click the Troubleshoot Settings icon in the search result.
In the Troubleshoot Settings window, click the Additional troubleshooters option.
Next, scroll down to locate the Recording Audio option and click it.
Finally, click the Run the troubleshooter button that appears.
The troubleshooter will execute and identify any problems with the microphone and related settings. In most cases any available fixes will be applied automatically. Just follow the on-screen instructions in case manual actions are required (like selecting the audio input device to troubleshoot).
Zoom Microphone not working on iOS devices
When using Zoom on an Apple iPhone or iPad, the microphone can also be muted.
The very first step is to allow Zoom to access your microphone. So when you see the message “Zoom” Would Like to Access the Microphone, make sure you click the OK option.
In addition the microphone access, the microphone can be muted within the Zoom app itself.
Follow these steps to make sure the microphone is not muted within the Zoom app on iOS.
Open the Zoom App.
Click the Settings icon in the lower-right corner.
Next, click the Meetings
In the Meeting Settings, make sure the option Mute My Microphone is disabled.
Start your meeting, or join your meeting with the Join with Audio option to make sure the audio (and microphone is enabled).
If you are still facing problems, try closing any other apps that might use the microphone. A last option is to restart the phone or iPad.
I hope this article has helped you with your ‘Zoom mic not working in Windows 10‘ issue. Do let me know below which fix worked for you! If you have any questions, or more suggested fixes please feel free to comment below as well.


![[Easy Fixes] Zoom Mic Not Working in Windows 10 – Updated 2022 Guide](https://driverfinderpro.com/driver-guide/wp-content/webp-express/webp-images/uploads/zoom-no-mic.jpg.webp)