Anthony Danes | DriverFinder - We Make Drivers Work for You

How to Fix Unknown USB Device – Device Descriptor Request Failed

Problematic USB devices in Windows can be a real puzzle sometimes. Several reasons can cause a USB device to not be recognized and shown as an unknown USB device. Windows will show an error code with a message. One such error message is Device Descriptor Request Failed, and it shows error code 43.

Device Descriptor Request Failed

We covered device manager error codes in an earlier article, but here we focus on solving the code 43 error specifically.

What does the Device Descriptor Request Failed error mean?

For USB devices, this error generally means a failure to initialize the USB device. Configuration conflicts or a wrong setting can be responsible. Often the trigger for the error is not even clear. One moment a USB device functions and the next it does not!

In one of my cases, the code 43 error occurred with a USB headset that I had plugged into a USB 3.0 hub. After putting the PC to sleep and waking it up, the headset was not working. But in this case, it was not even the headset that was the problem, it was the USB hub that was not recognized and shown as an unknown USB device!

Checking the error details

The first thing to do with any device error in Windows is to open the Device Manager and check the details. Right-clicking the device and clicking properties shows the General tab with the Device status.

USB device ocde 43 error

All this does is confirm the error, code 43, with a more specific “A request for the USB device descriptor failed”.

In normal cases, I also check the device ID to see which device is actually causing the error. You can select the Details tab in the device properties to see the various device properties. In this case, I select the Hardware Ids property.

USB device descriptor failure

But unlike a normal situation, the hardware ID does not show the unique identification information. Windows was not able to get the proper details, and as a result, the device could not be configured properly.

More useful information can be retrieved from the Events tab in the device properties.

USB device events

Here we can see more details about the device and the actions Windows took in getting the device to work. Click the various events for more information. Using this information, it should be possible to figure out what device is causing the error.

In most cases, the problematic device is already clear. It is not working, is it? But if you are dealing with a USB hub or USB port, then the actual USB device that is not working may not be the culprit.

Fixing the Device Descriptor Request Failed error

So, if the device was working before, how come it does not now? And how do we fix it?

Luckily, in the case of USB devices, this code 43 error can often be fixed easily!

Uninstall the device from the Device Manager

Since the problem is a software or configuration error, it can help to simply have Windows re-detect and reinstall the device. In the Device Manager, right-click the device and select the Uninstall device option.

Uninstall unknown USB device

Then click the Uninstall button to confirm uninstalling the USB device.

Confirm unknown USB device uninstall

This will remove the device from the Device Manager.

Next, use the Scan for hardware changes option in the Action menu of the Device Manager to detect the device again. The device will be added again and shown under the Universal Serial Bus controller category.

Alternatively, you can restart your PC. Windows will automatically scan for hardware changes and reinstall the device on restart.

Did not fix it? Read on.

Unplug the USB device

In my case, with the USB hub and external USB headset, the uninstall option did not work.

So, the next thing to do is to unplug the device completely, wait for it to disappear in the Device Manager, and then plug it in again. Make sure you give Windows enough time to actually remove the device. In a default configuration, Windows will show a taskbar notification when a device is removed.

To clarify, if you are using an external USB hub, like in my case, also unplug that as well.

If the USB device has an external power supply, unplug that as well. Unplugging just the USB hub did not fix the issue for me. Unplugging both the USB cable and the external USB hub power did solve it for me. After that, plugging the headset worked flawlessly.

External power supplies will typically be found on things like external USB hubs, older external hard disks, and other devices that require more power than the standard USB port can provide.

Restart Windows

This is a step that unfortunately is part of many Windows troubleshooting guides. But like with any software, a restart can do wonders! Rebooting the PC will ensure Windows reinitializes the software, including all device drivers.

Update or install USB device drivers

Many USB devices use the default USB drivers included with Windows. Especially in Windows 10 and Windows 11, a lot of drivers are included.

You can see the Driver File Details in the Device Manager as well. Right-click the device, and select Properties. Then click the Driver Details button in the General tab.

drivers provided by Microsoft

The Driver File Details window will show the Provider. In the example, Microsoft Corporation.

If the provider is not Microsoft, the device uses an external, manufacturer-provided driver. In these cases, it can help to install the latest driver to ensure the device is working properly.

You can use the Update driver option in the Device Manager popup menu to update the driver automatically. Alternatively, locate the driver manually, or use our DriverFinder program, to install the latest version.

Note: even if the driver is provided by Microsoft, it may be helpful to check for device-specific drivers from the manufacturer. Default Windows drivers do not always offer full support for all device features.

Preventing the device descriptor request failed problem

The device descriptor request failed error is often the result of a non-specific scenario. That means it can happen without a typical reason. In my case, the problem sometimes happens when the PC comes back from sleep mode, but not always.

It is recommended to let Windows power management power down devices to save power. For USB devices, this can be configured in the Device Manager. Select the Power Management tab in the Properties window (if the tab does not show, power management is not available for that device).

Make sure the checkbox for Allow the computer to turn off this device to save power is checked.

Device power management

If, however, the problems always seem to be related to a change in power (sleep mode, longer time of no use of the device), then it is worthwhile to change this setting and actually disable the power control.

Other than that, we recommend keeping your device drivers up-to-date with DriverFinder to prevent device issues, maximize device performance, and hopefully prevent device descriptor request failed errors!

How to Fix Problems with a Logitech Webcam in Windows

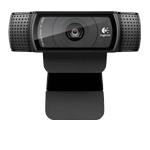
Logitech webcams have been a popular choice for external webcam solutions on Windows PCs. Not only are the newer models popular, but even the older Logitech c270 webcam and Logitech C920 webcam models are still in use. Particularly with older models, there can be issues with newer Windows versions. Logitech webcam drivers for older models and newer Windows versions are not available.

So how do we still get the webcam working? We’ll have a look at the possible solutions to get the Logitech webcam working in Windows.

Hardware

If you are certain your webcam is still in good working order, it is still worth having a look at the setup. Most webcams are connected to a PC using a USB connection. And for the older Logitech webcam models, like the c270 and c920, this is a USB 2.0 connection.

To have the best chance of a working webcam on a Windows PC, make sure to connect the webcam to a USB 2.0 port. Although USB 3.0 and USB 3.1 ports should be compatible, the best guarantee to a working webcam is to use the USB 2.0 port for older webcams.

For modern laptops, this may be a challenge, since they would only have a USB 3 port available, but chances are you would have a built-in webcam anyway.

A second thing to avoid is using a USB hub to connect the webcam to your PC. Although it may work in some cases, if you are having problems, plug the webcam into a USB port that is directly connected to your PC (motherboard). If you do need to use a USB hub, use a USB hub with external power to increase the chance of success.

Similarly, avoid using USB cable extensions. If the webcam cable is too short for your requirement, it is easy to get a USB extension cable to get the required length. This might have worked in the past, but with all electronics using low-power components, the cable length may pose a problem for an error-free connection.

Software

When we are talking about software for webcams there are really only three things: the driver, the recording/viewing software, and the Windows setting. Both can play a role in solving problems with webcams.

Logitech Webcam drivers

Depending on the Windows version, separate drivers for a Logitech webcam may not be required. The latest Windows versions, like Windows 10 and Windows 11, have compatible drivers installed. Most webcams will be plug-and-play.

Download and install Logitech Webcam drivers

For older webcam models or older Windows versions, this will be different. Simply visit the Logitech webcam support website, and choose your model to download and install the required driver.

Logitech Webcam Support site

If you do not see your model, type it in the search box to find the webcam.

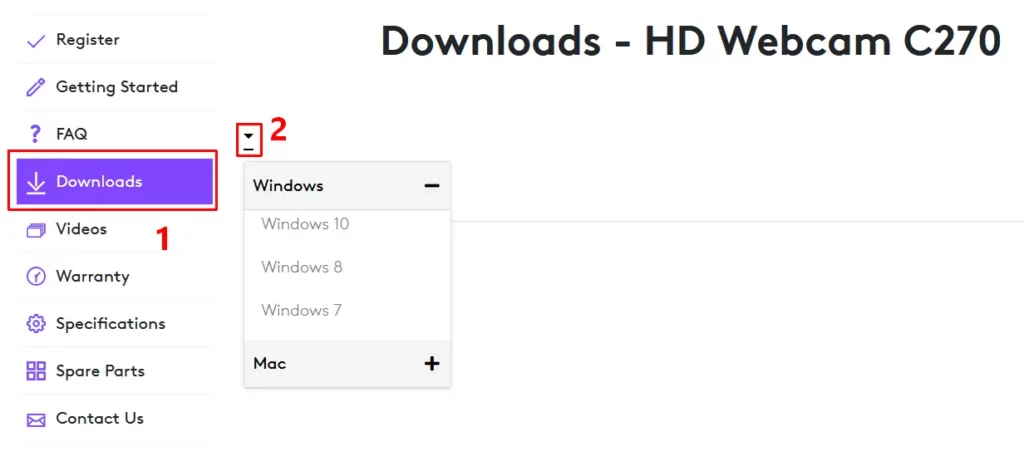
In the Logitech webcam details page, select the Download option on the left (1), and then pick the Windows version in the drop-down list (2). Next, you will see the available downloads for your webcam.

Download Logiech webcam driver

Reinstalling the Webcam device

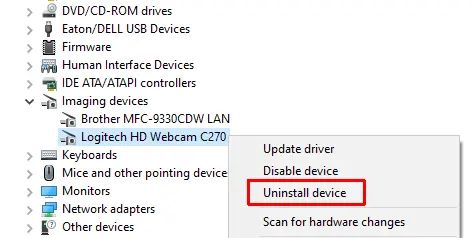
If the driver is present on your system, and the webcam is still not working, it can help to reinstall the device. For this, we uninstall the device from the Device Manager and then use the Scan for hardware changes in the Action menu to reinstall it. A restart of the PC will also let Windows reinstall the device and the driver.

Uninstall Logitech webcam device

Please note that depending on the Windows version, the Logitech webcam will be listed under either the Cameras or Imaging devices category.

Uninstall the driver for the webcam

Most newer Logitech webcams use the standard USB Video Class (UVC) driver. During installation of the device, a copy of the standard driver is made for the webcam to function. To solve problems with the webcam, it can help to uninstall the device and the UVC webcam driver and have Windows reinstall it.

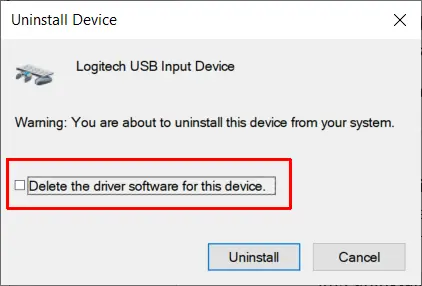
This is similar to the previous step, but in this case, make sure to select the option to uninstall the driver for the device to ensure a fresh copy gets installed and configured when the Webcam is detected again.

Uninstall Logitech webcam driver

Manually switch to the UVC driver

If the webcam uses a driver that is not working with your Windows version, and the webcam is compatible with the standard USB Video Class, it is possible to manually switch to the UVC driver for the webcam. This can help solve the webcam issue.

  1. In the Device Manager, right-click the webcam device.
  2. Next, click the Update driver option in the popup menu.
  3. Select the Browse my computer for drivers option.
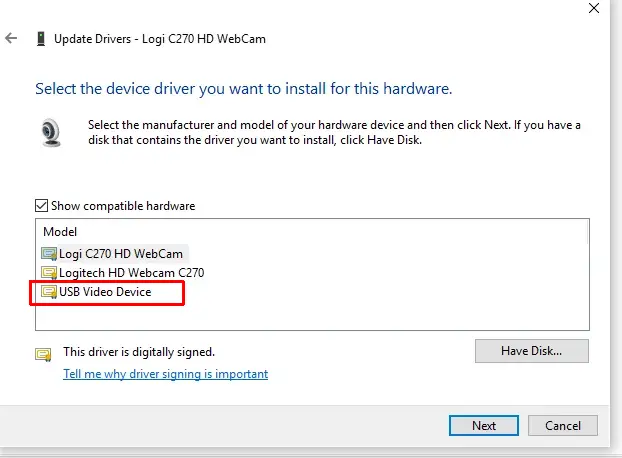
  4. Now click the Let me pick from a list of available drivers on my computer.
  5. In the Model list, select the USB Video Device option and click Next.
Logitech C270 HD webcam driver

After this, open the camera app or recording software and check if the webcam is working.

Logitech Webcam software

To check the proper functioning of the webcam in Windows, try different software programs. In general, it is best to use programs that are installed with Windows itself to ensure maximum compatibility. In the latest Windows versions, the Microsoft Camera app is the best place to start.

But it is also possible to test with other camera software. For Logitech webcams, the Logitech Capture software is recommended. It is compatible with Windows 7 up to Windows 11 and supports the C92x, BRIO, and StreamCam models. ManyCam and YouCam are other popular programs.

But, of course, you can also use your favorite video chat app to test your webcam. Skype, Teams, and Google Meet, all directly support your webcam if it is working.

Specifically for Logitech webcams though, it is sometimes useful to install additional specific Logitech software to configure and test the webcam. Logitech Camera Settings is a little older program that can be used to configure the specific settings of your Logitech webcam. Logi Tune is the more recent version of the Logitech software to use for Logitech webcams. Both these programs can quickly tell you if the webcam is working and allow control over various webcam display and recording settings.

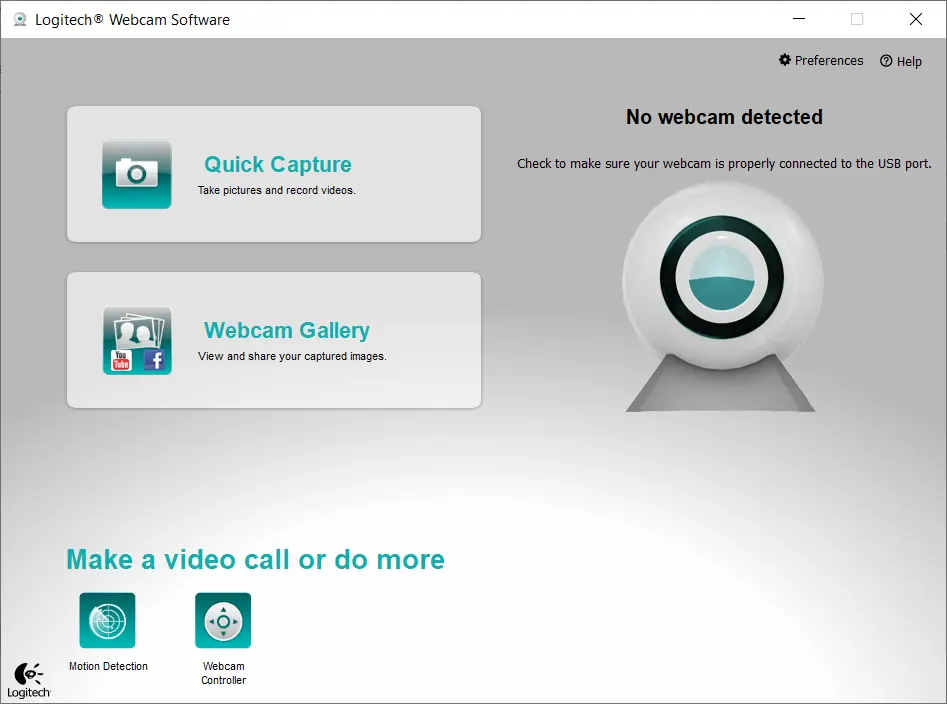
If nothing works, the last option is to install the older Logitech Webcam Software (LWS). The latest version is 2.8 and can still be downloaded from the Logitech support site. Especially for older Logitech webcam models, this software can provide a solution on the latest Windows versions if nothing else works. You may need to run it in compatibility mode to get it working on Windows 11.

Logitech Webcam Software 2.8

Windows settings

Something that can easily be overlooked when troubleshooting Logitech webcam problems is a setting in Windows. The latest Windows versions have more settings for privacy than earlier versions. That means you need to allow applications to access the camera device.

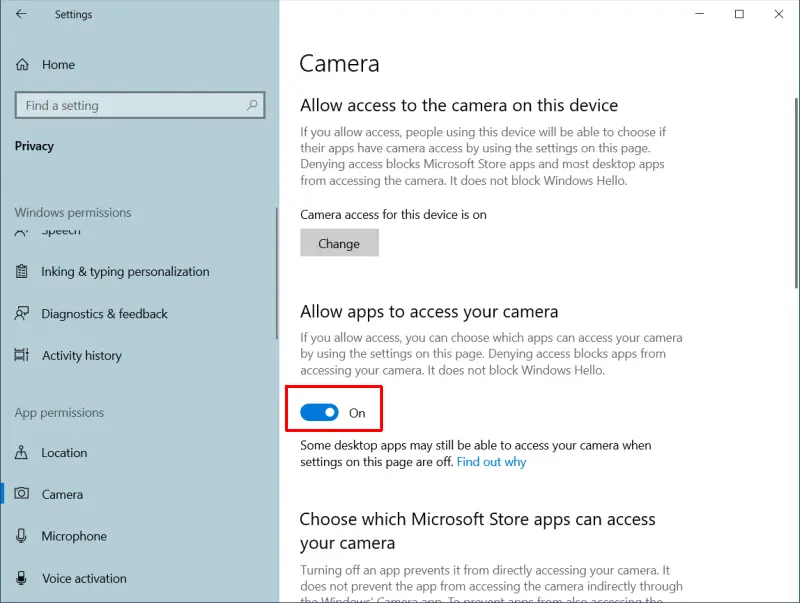
  • In Windows 10, open the Settings window and go to Privacy.
  • Under Privacy, click Camera.
  • Now make sure the Allow apps to access your camera is enabled.
Allow camera access in Windows 10

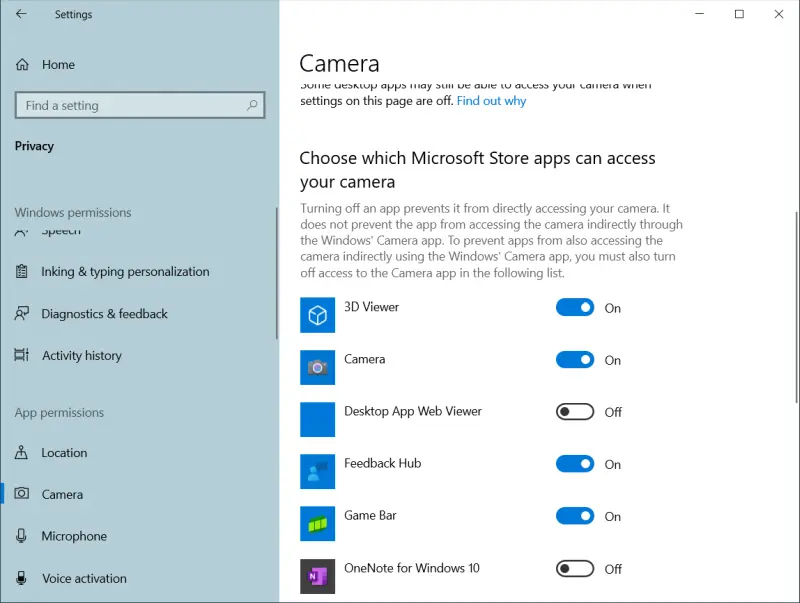
If you scroll down further, you can even pick which apps on your system can access the camera.

Select apps for camera access in Windows 10

For more tips on fixing webcam issues, check out this article on how to fix webcam problems.

As always, make sure you check for regular driver updates using our DriverFinder application to make sure you have the latest device drivers installed for all your devices!

Fix the Thread Stuck in Device Driver error in Windows

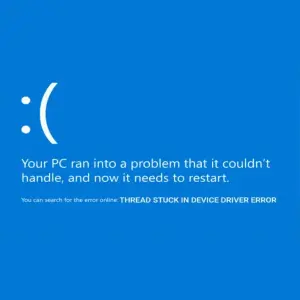
Out of all the errors you can get with Windows device drivers, the thread stuck in device driver error is one of the most serious ones. The reason is that this error results in a blue screen of death (BSOD), which requires a PC restart.

What is the Thread Stuck in Device Driver error?

As the name suggests, the error basically means that the device driver software is stuck in a loop waiting for a hardware device to respond. Although this could be caused by the hardware device itself, in most cases, it is the result of a problem with the device driver software.

Thread Stuck in Device Driver Error

The error can occur on all Windows versions and is often seen with high-utilization types of processing, like gaming, or high CPU or GPU type of processing.

Once you see the error, you’ll want to fix the error.

Here is what you can try.

Steps to Fix the Thread Stuck in Device Driver error

There are a number of things you can try to solve the error. We’ll list them in sequence, so you can spend the least amount of time possible in solving the driver error.

1 – Update Windows

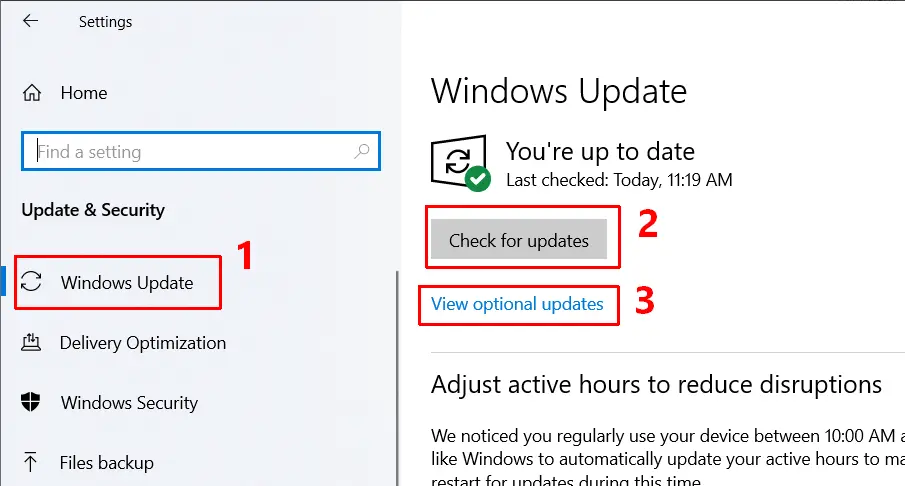
This may look like an obvious step, but it is so easy to overlook pending updates in Windows, especially in the latest Windows versions. So, make sure to go into the Settings (or Control Panel), and check for Windows Updates (1) and (2).

Check for Windows Updates

Tip: make sure to check for any optional updates (3), as Microsoft does not push all driver updates as mandatory! Optional driver updates will show here.

2 – Run the Troubleshooter

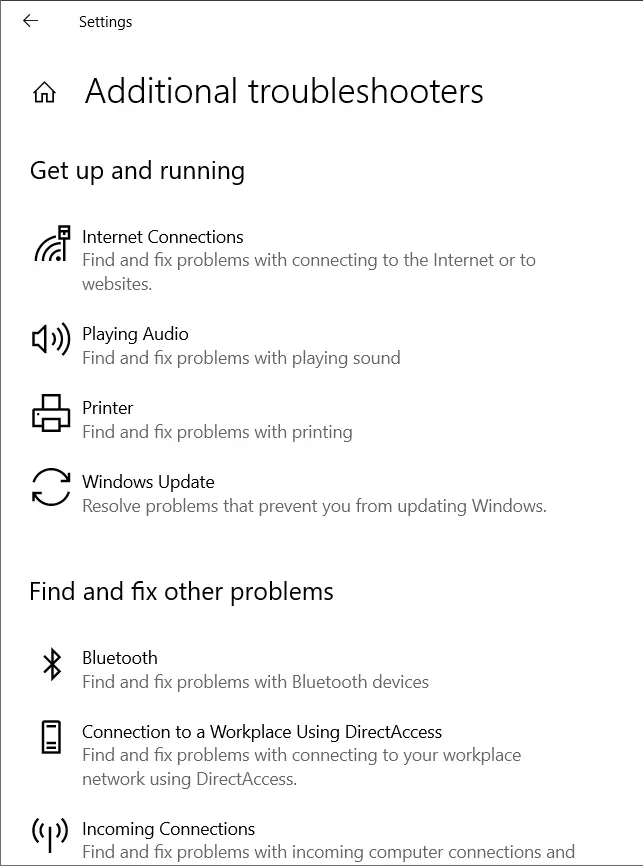
If you are running Windows 10 or Windows 11, you can try running the Troubleshooter from the Windows Settings. These built-in troubleshooters will check your system for common, known problems.

If a recommended troubleshooter is shown, (like the BSOD Troubleshooter), click the Run the troubleshooter button. If there is no recommendation, click the Additional troubleshooters link to pick one manually.

Apart from running the troubleshooter, Microsoft also recommends using the GetHelp app.

3 – Update your drivers

Even though you ran Windows Update, you may still be missing some important driver updates. Examples are:

  • drivers that are not distributed by Microsoft (non-WHQL)
  • drivers with newer generic device support that are not limited to specific hardware manufactures
  • drivers that are incompatible with the supporting software (like control panels)

It is best to check for additional driver updates. You can manually visit your PC manufacturer’s website and look for your PC model and any available driver update.

We recommend using our free driver finder software. DriverFinder will scan your PC for hardware devices and find the latest version of available drivers compatible with your Windows version. Simply download and install to make sure the latest driver is available for the device.

Tip: In some cases, it can be required to update the BIOS of your PC. Older BIOS versions may limit compatibility with newer Windows versions. Simply visit your PC manufacturer’s support website and see if an updated BIOS version is available for your model.

4 – Reinstall the device

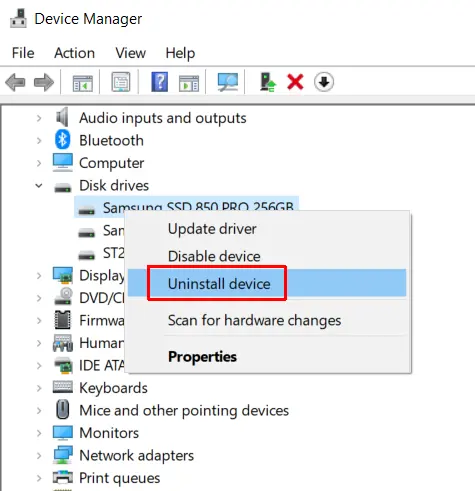
Using the Windows Device Manager, it is possible to uninstall a device (and optionally the driver). When Windows restarts, the device is then reinstalled. This can sometimes help with the device and driver configuration.

Simply start the Device Manager by searching for it in the Windows search bar. Then select the device that is causing the device error. Right-click the device, and in the popup menu select Uninstall device.

Next, restart your PC and check if the error persists.

5 – Analyze the system logs

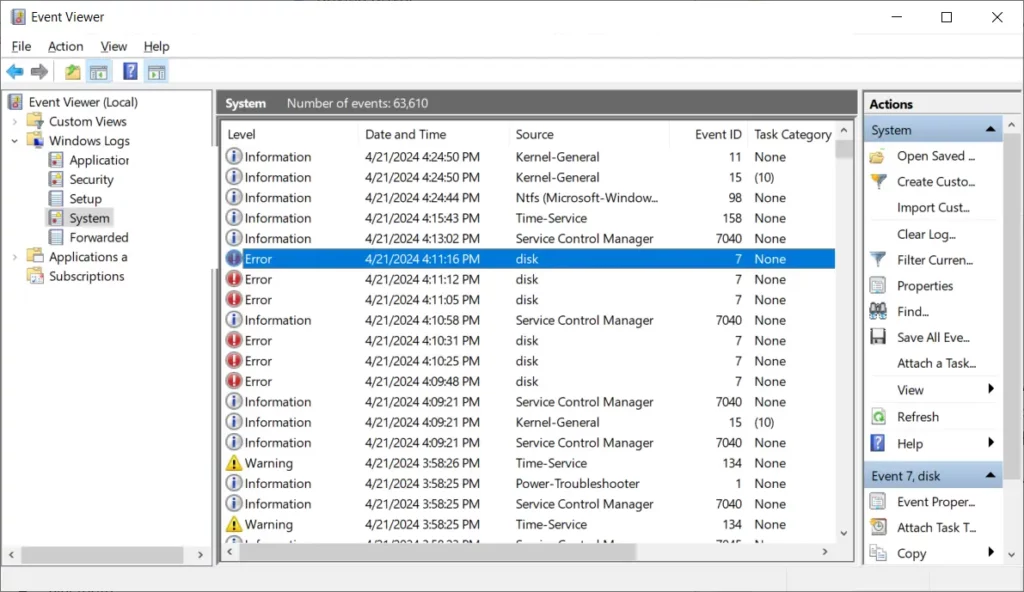
Unfortunately, this process requires technical skills. The first step is to look at the event viewer. This Windows software can help you pinpoint the cause of the thread stuck in device driver error. Looking through the System events, you can often pinpoint the device linked to the error. This in turn can then let you know which troubleshooter to run, or which driver to update.

Apart from the Event viewer, you can look at the minidump.

When a serious error occurs, like the thread stuck in device driver error, Windows creates a log file called a minidump. These files are stored in a folder called Minidump in the system root (typically C:\Windows\Minidump). The minidump filename will have the date in it and have an extension .dmp. If no such file is created, check the configuration for creating minidumps.

These crash dump files when generated as a result of the THREAD STUCK IN DEVICE DRIVER ERROR will often contain the filename, which in turn can help pinpoint the driver.

Reading and analyzing a minidump file is a rather technical process. Luckily, tools are available that can read minidump files and show the result in a more user-friendly way. Try BlueScreenView or WhoCrashed.

6 – Check the hardware

As mentioned earlier, the error is not often caused by a hardware error. But if you recently made changes to your system, like changing the video card, or adding memory, it is good to double-check. Make sure all hardware is properly inserted and compatible with your motherboard.

For disks, check the cables that connect them to the motherboard or disk controller.

7 – Disable GPU acceleration

The graphics processor is used for hardware acceleration by default. Disabling it, and effectively switching to CPU-based processing, can help solve the problem as well.

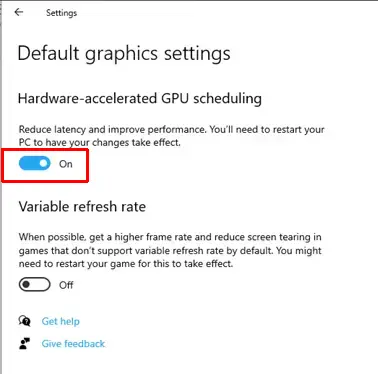
In Windows, open the Settings, and then select System -> Display. Then scroll down and select Graphics or Graphics settings.

Toggle the option Hardware-accelerated GPU scheduling from On to Off.

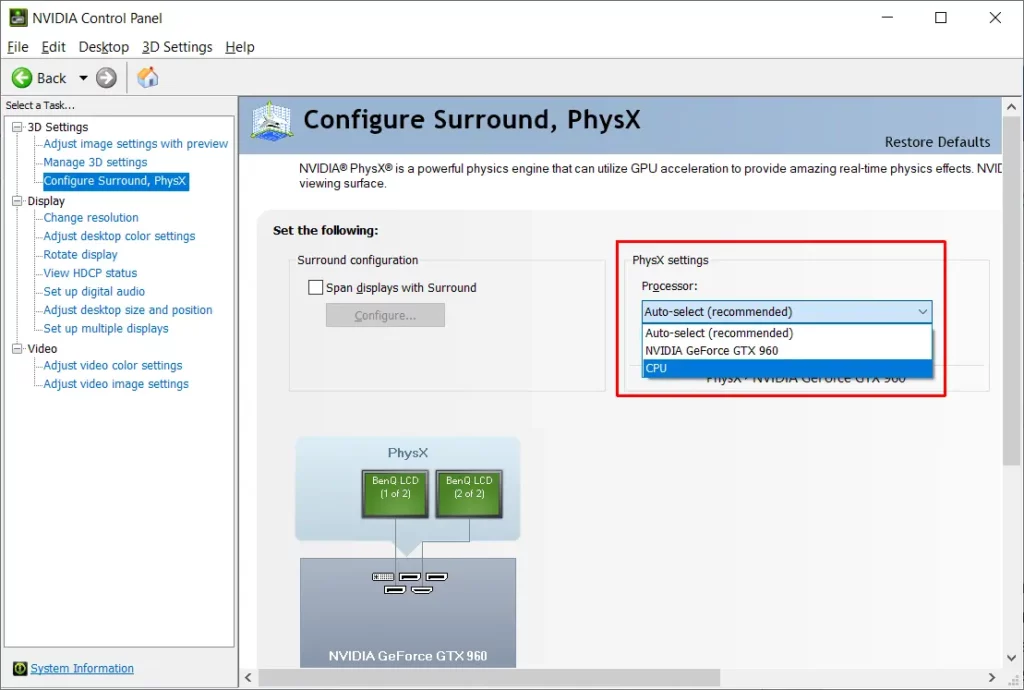
It is possible that this option is overruled by your display control software. For Nvidia, you can check the PhysX settings in the NVIDIA Control Panel. Switch it to CPU to disable the use of the GPU.

Note: disabling hardware acceleration can have a significant impact on the graphics performance. Even if this is a solution, it is best to look for an updated, compatible driver to enable the hardware acceleration again.

Hopefully with all these steps you will be able to solve the thread stuck in device driver error and prevent further blue screen occurences.

FT232R USB UART Driver for Windows

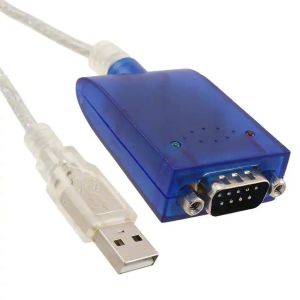
The FT232R UART device is a USB to serial interface chip from a company called Future Technology Devices International, or FTDI. The chip is used in a lot of USB-to-serial dongles that are needed for devices with a serial port. Since most modern computers don’t have a serial port (COM port) anymore, using a USB dongle enables such devices to connect to a computer. For this type of dongle to be used with Windows, an FT232R USB UART driver for Windows will be required.

Installing an FT232R USB UART driver

To manually install a Windows driver for this type of device, you will first need to download the driver. In some cases, the dongle manufacturer will offer a driver download. Just visit the support site for the manufacturer and download the driver for your specific Windows version.

After downloading, run the driver executable, or follow the manual driver installation instructions to install the driver.

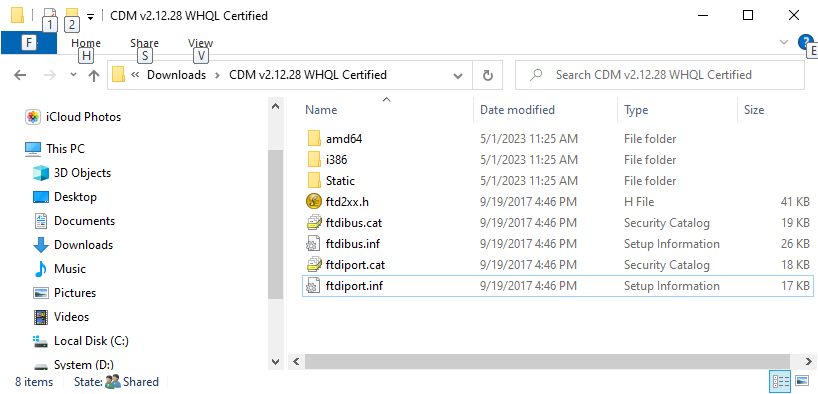
If the dongle manufacturer does not offer drivers, visit the FTDI site for the latest generic FT232R USB UART Drivers. You can use either the Virtual COM port drivers or the D2XX Direct drivers. After downloading, extract the ZIP file contents to a folder. Next, use the instructions from the link above to manually install the driver in Windows.

FT232R USB UART Driver

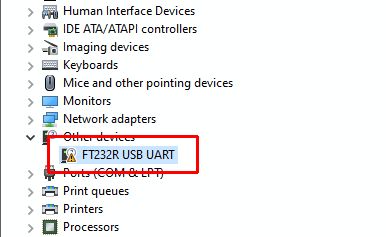
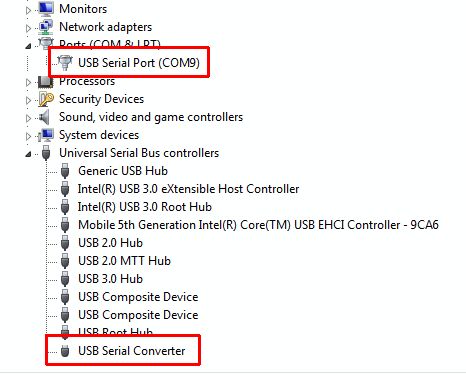
In the Device Manager, the dongle may show as an Unknown device, a FT232R USB UART device, or as a USB Serial Converter. If the device does not show, use the option Show hidden devices in the View menu, or add a setting to the System variables to show non-present devices.

FT232R USB UART device


USB serial convertor

If want to automatically find and download the latest FT232R USB UART driver for Windows, we recommend using our DriverFinder program. Based on all the hardware devices in your PC, the program will find the latest drivers for those devices and recommend driver updates.

For more on USB to serial converters and their drivers, also check the article on the Prolific PL2303 driver for Windows.

The Wi-Fi 7 standard

Wireless communication is so common nowadays that we don’t think about it anymore. Whether it is outside on our mobile phones, using it at home on our laptops and tablets, or using portable devices on Bluetooth, wireless communication is just always there. We expect it to be available and fast. To make that possible, development never stops. The newest development now? Wi-Fi 7.

What is Wi-Fi 7?

Wi-Fi 7 is like you would expect, the successor of the previous Wi-Fi standard, Wi-Fi 6 (and Wi-Fi 6E). Wi-Fi 7 will be known as the 802.11be standard. It will use the 2.5, 5, and 6 GHz frequency bands, which is the same for the 6 and 6E versions. Nothing new there.

What is new in the Wi-Fi 7 standard is the use of a 320 MHz channel in the 6 GHZ band. So, more bandwidth for data, which will benefit high-demand data streams. At the same time, Wi-Fi 7 will be downwards compatible, so it can be used with all devices that only support older Wi-Fi standards.

The biggest improvement I believe is the changes in the Multi-User, Multiple Input, Multiple Output (MU-MIMO) support. The number of channels is increased from 8 to 16. This together with the addition of Multi-Link Operation (MLO) improves the data transfer and reduces the latency. MLO allows the switching (or even parallel) use of the band used for data transfer rather than a single one.

What are the benefits?

With the wider frequency channels on the supported bands, together with the multi-link options, the main advantages of Wi-Fi 7 over the previous Wi-Fi versions are improved speed and reduced latency.

In theory Wi-Fi 7 will enable transfer speeds up to 46 Gbps. Compared to the 9.6 Gbps of the Wi-Fi 6E standard, that is a significant increase. Intel expects a typical laptop to have a data transfer rate of up to 5.8 Gbps). Although the support of a 320 MHz channel contributes to this, the Multi-Link Operation (MLO) is the main reason for these improvements.

A secondary benefit of the new Wi-Fi 7 standard is the new feature called Restricted Wake Time, which will help your devices save battery. Devices will be in power save mode as much as possible since the awake time allows access points and routers to manage the network activity (Also see Target Wake Time – TWT).

The last new benefit of Wi-Fi 7 is that it will support more simultaneous connections. So I you plan to connect all devices in your home (or have a lot of parties with guests that use your Wi-Fi connection), the new standard will help ensure speed and latency are optimal.

When will Wi-Fi 7 be available?

Routers that will support Wi-Fi 7 will become available are expected later in 2023, with all major manufacturers planning releases.

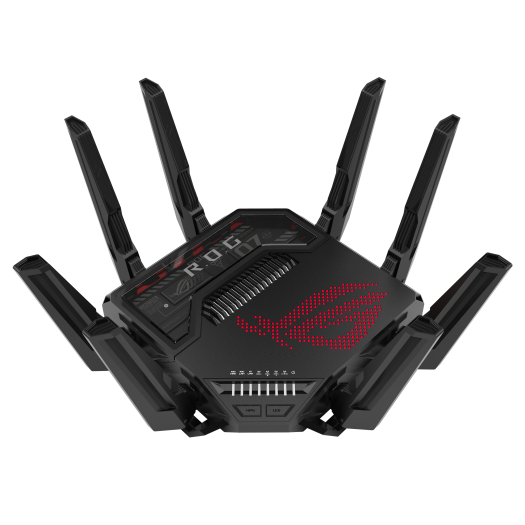
Qualcomm will have Wi-Fi 7 chipset available that enables speeds up to 33 Gbps. Linksys is planning to use this chipset in their new routers, even though they have not announced any releases. TP-Link (Archer BE900), Netgear (Nighthawk RS-700), Asus (ROG Rapture GT-BE98), and MSI (RadiX BE22000 Turbo) did already announce new products with Wi-Fi 7 support.

Wi-Fi 7 Router

Do I need Wi-Fi 7?

Currently? Maybe not. In the future, more likely, yes. As is clear from the above, the benefits are speed, multi-device support, reduced latency, and more bandwidth. If you are an avid gamer, low latency is important. Other things that might be considered for upgrading are video streaming (with 8K becoming more common), or the internet of things (IoT) where we connect all our devices to the Internet (your fridge ordering your groceries for example).

As always with device upgrades, the need to upgrade will also depend on the current situation. If you plan to upgrade or replace an older router, waiting for the new Wi-Fi 7-enabled routers would be a good idea. If you don’t think you will need the advantages the Wi-Fi 7 standard offers, your ISP speed is low anyway, or the cost of a router is a consideration, getting a Wi-Fi 7-enabled router would not be recommended.

Do keep in mind that all your other wireless devices will also need support for Wi-Fi 7. The latest mobile phones and laptops might have it, but a lot of other wireless devices will currently not include support.

Copyright 2009 and Beyond - DriverFinderPro.com - All Rights Reserved