Anthony Danes | DriverFinder - We Make Drivers Work for You - Part 3

Windows Device Manager Error Codes

The Device Manager is a program to control all devices in a Windows system. It has been part of Microsoft Windows since Windows XP and is still present in Windows 11. Under normal circumstances, the Device Manager is not used, but if you have a problem with a device, the Device Manager can be used to solve it. The Device Manager error codes show the problems with hardware devices or drivers.

What are Device Manager Error Codes?

The error codes for devices in the Device Manager show the type of problem the device is experiencing. Although a lot of device issues are driver-related, devices can also show errors that are the result of hardware conflicts or resource problems. The error code shows the type of error, accompanied by an error message. If more details are available, the message can include an additional error message.

How Can I View a Device Error Code?

To view the error code for a device that has a problem, you can use the Device Manager program which is part of Windows. Here are the steps.

  1. Open the Device Manager. Press the Windows + R keys simultaneously. In the Run dialog box, type “devmgmt.msc” and click Run or press Enter.
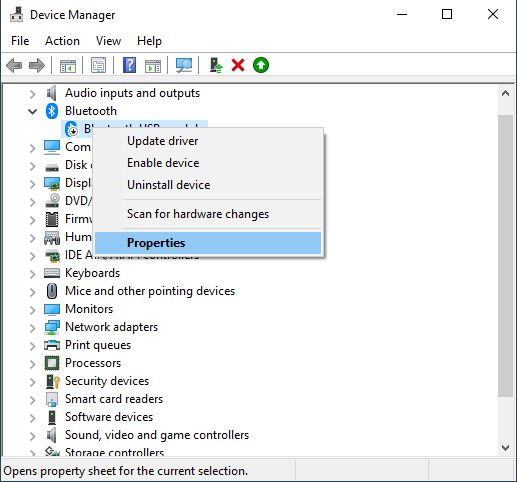
  2. The Device Manager window will show. Locate the device with the error and right-click it.
    Tip: click the arrows to the left of the device category to show all devices in that category.
  3. In the popup menu, select Properties.
    Device Manager device properties
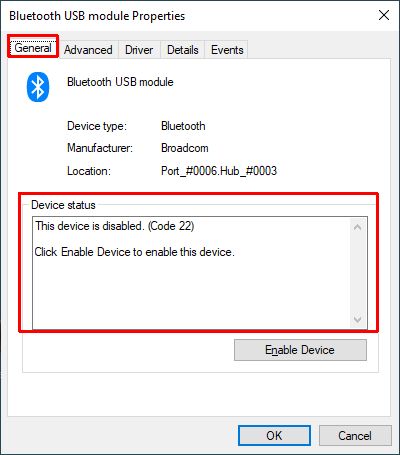
  4. Make sure the General tab is active (this should be the default).
  5. You can see the device error code in the Device status section of the dialog box.
    Device Manager error codes
    Tip: You can select and copy the text in the Device status section to use it for searching or communicating with support. Simply click and drag over the text with the mouse cursor and press Ctrl + C to copy it to the clipboard.
  6. Close the device Properties dialog box when done. And then close the Device Manager window.

Note: In case you do not see the device in the tree list in the Device Manager, use the Show -> View hidden devices option to show all installed devices. After that, all devices that are not connected (or better: not seen as connected by Windows), will be included and shown in a lighter tone thant the other devices.

Show hidden devices in Windows device manager

List of Device Manager Error Codes

To solve a problem with a device, you will need to know what the error code means. Below is a list of all possible error codes for Windows devices with their meaning and possible solutions.

Code 1This device is not configured correctly. (Code 1)

This is a driver-related problem. The steps in the how to fix section should help solve the code 1 error.

Code 3 – The driver for this device might be corrupted, or your system may be running low on memory or other resources. (Code 3)

This is either problem with limited available resources (memory) or a driver-related problem. The steps in the how to fix it section should help fix code 3 errors.

Code 9Windows cannot identify this hardware because it does not have a valid hardware identification number. For assistance, contact the hardware manufacturer. (Code 9)

If a device cannot be identified by the hardware ID, Windows cannot find a driver for it. As a result, the device cannot work. Either the hardware is faulty, or a firmware update is required.

Code 10This device cannot start. Try upgrading the device drivers for this device. (Code 10)

This is a driver-related problem. The steps in the how to fix section should help solve the code 10 error. If the fix does not work, the device might be defective.

Code 12This device cannot find enough free resources that it can use. If you want to use this device, you will need to disable one of the other devices on this system. (Code 12)

This is a problem related to the resources assigned to a device. Conflicting or inadequate I/O addresses, interrupts, or memory space are common causes of code 12 errors. This error does not happen much on modern PCs but can be found with older Windows systems using older hardware.

Code 14This device cannot work properly until you restart your computer. To restart your computer now, click Restart Computer. (Code 14)

As the error indicates, restart your Windows PC to solve code 14 errors.

Code 16Windows cannot identify all the resources this device uses. To specify additional resources for this device, click the Resources tab and fill in the missing settings. Check your hardware documentation to find out what settings to use. (Code 16)

This error indicates that the device needs more configuration. In normal circumstances, devices are plug-and-play, and resources are assigned/allocated automatically. The Device Manager can be used to assign resources manually to the device. Again, this would only occur with older systems with older Windows versions.

Code 18Reinstall the drivers for this device. (Code 18)

This is a driver-related problem. The steps in the how to fix section should help solve the code 18 error.

Code 19Windows cannot start this hardware device because its configuration information (in the registry) is incomplete or damaged. (Code 19)

This is a driver-related problem. The device driver configuration information is not complete or has duplicate entries. Uninstalling the device and reinstalling the drivers should fix code 19 errors. If not, a system restore point can be used to restore a working configuration.

Code 21Windows is removing this device. (Code 21)

This error is a temporary one. Once the device is removed by Windows the error will automatically disappear. Rebooting the system will ensure the error clears as well.

Code 22This device is disabled. (Code 22)

Use the Device Manager to re-enable the device.

Code 24This device is not present, is not working properly, or does not have all its drivers installed. (Code 24)

This is a device or driver-related problem. If the device is not needed, remove the device. Otherwise, make sure you install the drivers to allow the device to properly function.

Code 28The drivers for this device are not installed. (Code 28)

This is a driver-related problem. The steps in the how to fix section should help solve the code 28 error.

Code 29This device is disabled because the firmware of the device did not give it the required resources. (Code 29)

Windows detects a device, but it does not respond as it should. It can be defective, but it could also simply be disabled in the BIOS of the motherboard (e.g. for audio, network, or video devices). Enable the device in the hardware configuration of the BIOS, and follow the steps in the how to fix section.

Code 31This device is not working properly because Windows cannot load the drivers required for this device. (Code 31)

This is a driver-related problem. An incorrect or outdated driver can cause this error. The steps in the how to fix section should help solve the code 31 error.

Code 32A driver (service) for this device has been disabled. An alternate driver may be providing this functionality. (Code 32)

This is a driver-related problem. Each driver is configured in the Windows Registry as a service (under the key: Computer\HKEY_LOCAL_MACHINE\SYSTEM\CurrentControlSet\Services\). That service has a start type. If the start type is set to disabled, the code 32 error will show. Possible values are: Boot (0), System (1), Automatic (2), On demand (3), and Disabled (4).

The steps in the how to fix section will solve the code 32 error (use the device uninstall option).

Code 33Windows cannot determine which resources are required for this device. (Code 33)

This is a device configuration error, or the device is faulty. Communication with a device requires things like interrupts, I/O ports, direct memory access, and more. If these values cannot be identified for the device, it will not function and result in the code 33 error. Check the hardware and its configuration in the BIOS. Possibly reset the BIOS or update the firmware for the device and or motherboard.

Code 34Windows cannot determine the settings for this device. Consult the documentation that came with this device and use the Resource tab to set the configuration. (Code 34)

This error is similar to the code 16 error. Additional device configuration settings are required that need to be manually configured in the Resource tab for the device in the Device Manager.

Code 35Your computer’s system firmware does not include enough information to properly configure and use this device. To use this device, contact your computer manufacturer to obtain a firmware or BIOS update. (Code 35)

This is a hardware configuration problem. Try loading default BIOS settings, or upgrading the BIOS of the motherboard. Code 35 error is normally only found on older systems.

Code 36This device is requesting a PCI interrupt but is configured for an ISA interrupt (or vice versa). Please use the computer’s system setup program to reconfigure the interrupt for this device. (Code 36)

This error is a hardware misconfiguration error. Interrupt assignments can be checked and changed in the BIOS. If the settings cannot be changed, a BIOS upgrade may help solve the problem. Code 36 errors will typically only occur on older systems since modern motherboards do not have ISA slots anymore.

Code 37Windows cannot initialize the device driver for this hardware. (Code 37)

This is a driver-related problem. The steps in the how to fix section should help solve the code 37 error.

Code 38Windows cannot load the device driver for this hardware because a previous instance of the device driver is still in memory. (Code 38)

Reboot your system to solve the code 38 error. This will clear any previously running instances of the device driver.

Code 39Windows cannot load the device driver for this hardware. The driver may be corrupted or missing. (Code 39)

This is a driver-related problem. The steps in the how to fix section should help solve the code 39 error.

Code 40Windows cannot access this hardware because its service key information in the registry is missing or recorded incorrectly. (Code 40)

As has been mentioned in the code 32 error description, each device has a service associated which is configured in the Windows Registry. The code 40 error can be solved by reinstalling the driver. See the how to fix section.

Code 41Windows successfully loaded the device driver for this hardware but cannot find the hardware device. (Code 41)

If a driver is not automatically installed for a device, it needs to be manually installed. This can happen for non-plug-and-play devices. Once the driver is installed and no device is present, the code 41 error is the result. Make sure the device is connected and turned on (if applicable). Then reboot. If that does not work, reinstall the driver.

Code 42Windows cannot load the device driver for this hardware because there is a duplicate device already running in the system. (Code 42)

This is a driver-related problem. It can be a bus error or a duplicate device error. Both are normally resolved by restarting the computer. In some cases, an actual power down is required before restarting the computer.

Code 43Windows has stopped this device because it has reported problems. (Code 43)

In the case of USB devices, the status will often say “A request for the USB device descriptor failed.”.
Unknown USB device device descriptor request failed

First, try the steps in the how to fix section. If the error persists after those steps, it is most likely a hardware problem. Check the device manual or contact the hardware manufacturer.

Code 44An application or service has shut down this hardware device. (Code 44)

This is a temporary error status. Once the system is rebooted, the device should be working as before. If a reboot does not help, power down the PC before restarting. If the problem persists, you need to identify the service or application responsible for shutting down the device. The Windows Event Viewer can be helpful for this.

Code 45Currently, this hardware device is not connected to the computer. To fix this problem, reconnect this hardware device to the computer. (Code 45)

The error message indicates the problem, a device is installed but not present in the PC. Reconnect the device to solve the code 45 error. The error is normally associated with Bluetooth devices or USB devices, but the error can occur for all types of devices. For devices that cannot manually be connected to the system, follow the steps in the how to fix section.

Device Manager Error Code 45

Code 46Windows cannot gain access to this hardware device because the operating system is in the process of shutting down. The hardware device should work correctly next time you start your computer. (Code 46)

This error code is self-explanatory and would not be seen in normal Windows operating conditions.

Code 47Windows cannot use this hardware device because it has been prepared for safe removal, but it has not been removed from the computer. To fix this problem, unplug this device from your computer and then plug it in again. (Code 47)

This error code indicates that the device has been selected for Safe Removal. The Safe Removal action is used for USB storage devices like USB sticks and external hard drives. If access to the device is required, first try unplugging it and then plugging it back again. If that does not work, restart the PC.

Code 48The software for this device has been blocked from starting because it is known to have problems with Windows. Contact the hardware vendor for a new driver. (Code 48)

This is a driver-related problem. The driver software for the device is not compatible with the Windows version you are running. This can happen after a Windows upgrade, for example. Install an updated, compatible driver to solve the code 48 error. For older systems, make sure to check for architecture compatibility (32-bit / 64-bit). In some cases, older driver software can still be used when executed in compatibility mode.

Code 49Windows cannot start new hardware devices because the system hive is too large (exceeds the Registry Size Limit). (Code 49)

This error is a system error related to the Windows Registry. The system hive mentioned in the error message is a part of the registry that contains all critical information for Windows to function. If it becomes too large, the best way to address it is by removing any devices that are no longer used. This will free up the necessary space in the system hive to allow new hardware to be added.

Code 50Windows cannot apply all of the properties for this device. Device properties may include information that describes the device’s capabilities and settings (such as security settings for example). To fix this problem, you can try reinstalling this device. However, we recommend that you contact the hardware manufacturer for a new driver. (Code 50)

This is a driver-related problem. The steps in the how to fix section should help solve the code 50 error.

Code 51This device is currently waiting on another device or set of devices to start. (Code 51)

This is a rare error, and according to Microsoft, there is no solution to the problem. Try the steps in the how to fix section if you see this error. Microsoft recommends checking for other devices in the same device category for errors. If there are any, solve those first. Since it is a temporary problem, waiting it out can also automatically solve the problem.

Code 52Windows cannot verify the digital signature for the drivers required for this device. A recent hardware or software change might have installed a file that is signed incorrectly or damaged, or that might be malicious software from an unknown source. (Code 52)

Device drivers run at a high privilege level in the Windows operating system. As such, they need to function reliably and need to be safe. For this reason, digital signatures are used to secure the device driver files. Without a digital signature, drivers cannot be installed in the latest Windows versions. Make sure you get a signed driver for your device to solve error code 52. If signed drivers are not available you can install unsigned drivers with additional steps.

Code 53This device has been reserved for use by the Windows kernel debugger for the duration of this boot session. (Code 53)

This error would not be visible in normal Windows operating modes. Developers may see the error if using kernel debugging. Disabling the debug mode will fix the code 53 error and let the device operate normally.

Code 54 – This device has failed and is undergoing a reset. (Code 54)

This error indicates that the device failed to respond correctly to an ACPI reset. Since the device is not functioning after that, a code 54 error is shown. To solve the problem, restart the PC. If that does not solve the issue, shut down the PC before restarting.

What Are Common Device Errors?

From all the listed device manager error codes, the most common ones are code 10, code 22, code 28, and code 39. You can follow the links to see specific steps that can be used to solve these errors. For all other errors, please follow the steps below to fix them. Some of the errors can happen for all types of devices, while other errors are more common with a specific device type.

How to Fix Device Errors?

To solve device-related problems several steps can be used. Even though the causes are different, the solution to many of these problems requires the same actions.

  • Reboot the system. This will ensure that no current state issues are causing the problem. Pending driver installs or uninstalls, pending reboot after update or software removal, and plugging and unplugging of devices, are all examples of situations that can require a restart to make sure the system is error-free.
  • Check for Windows Updates. Occasionally, pending updates can cause device errors. When a driver update is pending that addresses a problem for example. But even Microsoft generic system patches can address errors related to devices and drivers.
  • Run the Windows troubleshooter. This option is available for the latest Windows versions. Microsoft has included a troubleshooter function to solve common problems, including devices. The troubleshooter can reset a driver, restart a service, modify the registry, and others to try to solve the device problem.
  • Reinstall the driver for the device. As mentioned early on, a lot of device-related problems are caused by a device driver. Use the Device Manager to uninstall the device (and optionally the driver software). Then reboot or scan for hardware changes (using the Action menu) to reinstall the device with appropriate drivers.
    In the case of USB devices, uninstalling the parent device (USB Hub or USB Host Controller may be required as well).
  • Use a System Restore point to bring the Windows PC configuration back to a previous, working state. This solution can work for errors related to previously working configurations. Having the system restore option enabled is also a pre-condition.
  • For specific error codes, special steps may be required which will typically be indicated in the error message. E.g. if more memory is needed (code 3), if a reboot is required (code 14), or if a hardware device needs to be connected (code 45). Simply execute the indicated actions.

How to Uninstall Devices in Windows

All hardware in a Windows PC is registered as a hardware device. Windows uses device drivers to communicate with these hardware devices. New drivers are added when new hardware is detected. New drivers can be installed automatically if device support is included with Windows. If not, drivers need to be installed manually. But what happens if you remove a hardware device or no longer use a device? Do you need to uninstall devices in Windows, or does that happen automatically?

For onboard hardware, like a CPU, bus controllers, and similar hardware, it is simple. The hardware is present in the system, so the device and driver need to be configured in Windows. But for external hardware (printers, scanners, mobile phones, and others) this is not straightforward. A lot of external devices are connected through USB, Bluetooth, or Wi-Fi. There is no automatic way to know if these devices are still being used.

Steps to uninstall devices in Windows

When a device is either present in a PC or connected to the PC, the device will show up in the Device Manager. To uninstall the device the Device Manager can be used. Right-clicking a device in the Device Manager will show a popup menu with the option to uninstall it. When selected, you can also confirm whether the driver software should be removed.

But what if the device is no longer present in the PC? Or the hardware is not connected and not available anymore? In that case, the device will not show up in the Windows Device Manager. But the device configuration and driver still exist on the system.

To remove a device from Windows when the hardware is no longer present, we first need to tell Windows to show these non-present devices in the Device Manager.

Note: These instructions apply to all Windows versions. Variations in the text on buttons, confirmations, and popup menus can be present.

  1. Press the Windows + R keys to show the Run dialog.
  2. Type cmd, click the Run button, or press Enter to open a Command Prompt window.
  3. In the Command Prompt window, type set devmgr_show_nonpresent_devices=1 and press Enter.
    What this does is set an environment variable in Windows that is used by the Device Manager to show the non-present devices.
    Tip: Type set and press Enter to see all environment variables. This allows you to check that the value was set properly.
  4. Close the Command Prompt window by typing exit and pressing Enter.
    Note: For Windows 7 and earlier, skip this step, as Windows clears the devmgr_show_nonpresent_devices flag automatically when the Command Prompt window is closed.
  5. Next, open the Device Manager. Either use the Start menu or type devmgmt.msc in the Run box like in step 1.
  6. In Device Manager, click the View menu and then click Show hidden devices.

    Show hidden devices in Windows 
    You will now be able to see devices that are not connected to the computer.
  7. Expand the category for the device to uninstall.
    Non-present devices will show with a grayed-out icon.
    Non-present Devices in Device Manager
  8. Right-click a non-present device.
  9. In the popup menu, choose Uninstall device.
    Uninstall hardware devices
  10. Confirm the removal of the device by clicking the Uninstall button in the Uninstall Device window.
    Confirm Device Uninstall
    Note: For some devices, the Uninstall Device confirmation window will also show a checkbox to delete the driver software for the device. Select that if the driver for the device is no longer needed.
  11. The Device Manager window will refresh and the uninstalled device will no longer be shown.
  12. Close the Device Manager window when done.

Why uninstall devices in Windows?

The need to uninstall a device in Windows is not common. In many cases, hardware devices are managed automatically, or only need to be dealt with one time during installation.

But there are two cases where uninstalling a device is required.

Reset the hardware device

If a device is showing an error or is not functioning properly, it can often be a problem with the device configuration or the driver software. Using the steps to uninstall a device in Windows, the device configuration is reset and the driver can also be reloaded (with the driver software uninstall option). Many device-related errors can be solved this way, so knowing how to uninstall a device in Windows can be very useful.

Solve error code 49

Error case 49 in the device manager means that Windows cannot start a new hardware device. This is a specific error that can occur when a new device is added and needs to be configured. All device configuration is stored in the Windows Registry. And since device information is critical for Windows to operate, the configuration details are stored in the System Hive. This is the core part of the Windows Registry that is kept in memory for quick access.

If the System Hive grows too large, it will exceed the size limit. That will then result in error code 49 if a device is attempted to be started. This error happens more on older Windows versions, simply because resource limits and size limits for the registry storage space could be a problem.

If a device shows a code 49 error, the solution is often to remove all non-present devices to free up space in the System Hive. If that does not solve the problem, try cleaning up the registry to free up more space.

How to Fix Driver PNP Watchdog Error on Windows

Critical errors in Windows result in a blue screen showing the error details. The DRIVER PNP WATCHDOG error is one of these types of errors. Depending on the Windows version it will also show error code 0xc1900101. As the error message already indicates, the error is related to a driver and to something called PNP. PNP refers to plug-and-play and is basically a concept that allows devices in computers to be automatically detected and installed.

Driver PNP Watchdog error

The error mostly occurs during a Windows installation or an upgrade. Since the error relates to a driver, which operates on a high-security level in Windows, the error results in the operating system being halted.

Causes for the Driver PNP Watchdog Error

Like any BSOD error on Windows, it is best to check the crash dump or minidump if available. The Microsoft WinDbg tool can be used to analyze a crash dump file. This process will help identify which driver caused the crash. That does not always mean the driver itself is causing the problem, but it helps pinpoint where to look for a solution.

The most common causes for this problem are disk or disk controller related. The inability to read or write data at some point can cause the blue screen error. Disk controllers, USB controllers, Raid controllers, and SATA controllers, all need the right driver to prevent problems. But even a faulty SSD can cause this type of error!

Steps to fix the error

I suggest you also have a look at the article to solve the BSOD related to power state failures. In this, the general approach to fixing BSODs is outlined and many of those steps will apply to the PNP Watchdog error as well.

Windows will not boot at all

If your Windows device does not start at all, this will limit the troubleshooting options. The first thing to try is to start Windows in Safe Mode. If that succeeds, you can execute some, if not all, of the steps in the section Windows will still boot.

If Windows will not start at all, the only options are to use a bootable USB stick for your Windows version.

  1. Make sure you can boot from the USB by configuring the BIOS options.
  2. Make sure you have a UB stick with a bootable copy of Windows on it.
  3. Plug the USB stick into a USB port and reboot the device.
    Boot Windows from USB
  4. When the screen shows Press any key to boot from USB, press a key.
  5. When the Windows install screen comes up select the option Repair your computer in the bottom left. This will restart the device again and get you to Advanced Recovery.
  6. Select the Advanced options to see more troubleshooting options.
  7. Next, select Troubleshoot.
  8. You can now try the Startup Repair option, use the Command Prompt for disk checking options, Uninstall Updates to revert to a previous configuration, change UEFI Firmware settings to configure the hardware of the device, or use System Restore if you have any previous restore point that can be used to restore the system.
    Windows Startup Advanced Options
    Note: For Windows 10, the options are slightly different, but offer similar recovery and repair options.

If none of these steps work, try resetting the BIOS or UEFI to load the default options. The Advanced Configuration and Power Interface (ACPI) feature of the BIOS will allow devices to be configured automatically in most cases, which will ensure correct settings. Apart from that, try the diagnostic options in the BIOS/UEFI to test the hardware. If a problem is found at the hardware level, a component might need to be replaced. Setting a SATA controller to IDE has also helped some people solve this problem.

Although a bit more hands-on, check the cables in the system. A loose connector on any of the internal devices (not just storage related) can cause the error.

If the solutions so far don’t work, the only remaining option is to completely reinstall Windows from the bootable USB. I would recommend formatting (or initializing) the drive you will install Windows on. If there are any problems with the disk they can be detected during that process.

Windows will still boot

If you can still start Windows, there are more options to troubleshoot and fix the Driver PNP Watchdog error. Use the steps below to try and solve the error. The sequence is not critical, as any of these steps can provide the solution to the error depending on the actual cause of the problem.

  1. Use the Disk Manager to make sure the disks in the system are properly detected and file formats are correct.
    Windows 11 Disk Management
    Disk Management can be started by right-clicking the Start menu button in Windows 11 and selecting Disk Management in the menu. It is also accessible in the Computer Management
  2. If you are using an SSD, check your drive with a third-party tool. Most manufacturers provide software for this (e.g. Samsung Magician, SanDisk Dashboard, Intel – Solidigm Storage Tool).
    These tools can tell you if the SSD is functioning properly and if the drivers are working correctly.
  3. Use the standard Windows command line tools to check the disk and check the system files.
    Run a command prompt with administrator-level privileges and then run these commands:
    CHKDSK /F /R
    SFC /SCANNOW
    The first command runs a disk check with options to fix errors on the disk and locate bad sectors. The second command scans for the integrity of the Windows system files and repairs any errors found as far as possible.
    Run chkdsk at Windows restart
    Note: If the drive is in use, you can opt to run the disk check at the next startup. This will happen when you run the chkdsk command on a system drive.
  4. Use the Device Manager to check the device drivers.
    Open the Device Manager from the Start
    In the Device Manager window, right-click the devices and use the popup menu option Update driver to make sure the latest driver is installed for the device.
    Update device drivers
    Start with the devices under the Storage controllers and Disk drives categories.
    If you were able to use the WinDbg tool to pinpoint the driver causing the crash, then focus on that device. It may also be possible that you need to do a driver rollback rather than an update. A newer version of the driver can just as easily cause the error as an older version.

Hopefully, the above tips will help you solve your Driver PNP Watchdog error and enable normal use of Windows. If you have any different experiences with this type of error, including alternate solutions, please do leave a comment.

For help finding any new, missing and updated drivers, we suggest using the DriverFinder software.

How to Update Realtek Bluetooth Driver – Windows 11

Realtek Bluetooth

The Bluetooth interface is used on Windows 11 (and Windows 10) systems to connect Bluetooth devices. Mobile phones, speakers, printers, or even another computer. Bluetooth wireless communication is ideal for short-range wireless communication. And like all hardware devices in Windows, the Bluetooth device needs a Bluetooth driver to function. The most common Bluetooth chips used in PCs are from Intel and Realtek.

If no driver is installed, Windows will not recognize the device, or Bluetooth will not function properly. So, if Bluetooth is not working in Windows 11, you might need to update the Bluetooth driver. In this article, we’ll show you how to update the Realtek Bluetooth driver. Of course, we also have instructions on updating the Intel Bluetooth driver.

Note: These instructions apply to both Windows 10 and Windows 11. It is important to update the Realtek Bluetooth driver on Windows 10 already, since the upgrade to a later Windows version can be blocked because of an old driver!

Windows 10 Update Problem Realtek Bluetooth

Updated Bluetooth drivers can solve this type of problem. Updated drivers will also make sure that any known bugs in previous versions are fixed, and performance and connectivity are maximized.

Automatically Update Drivers

Windows 10 and Windows 11 include support for a lot of devices by default. Drivers for the devices are either included in the Windows installation or retrieved during the Windows Update process.

If the Realtek Bluetooth driver needs to be updated, the first step is to run Windows Update. Also make sure that drivers updates are included in Windows Update, as automatic driver updates can be disabled in Windows!

Apart from Windows Update, a driver can also be updated from the Device Manager in Windows 11 directly.

  1. Press the Windows + R keys to bring up the run dialog box.
  2. Type devmgmt.msc in the Run field and press Enter or click the OK button.
  3. In the Device Manager window, locate the device for which to update the driver. Right-click the device, and in the context menu select Update driver.
    Update Realtek Bluetooth driver
  4. Next select the option to let Windows Search automatically for drivers.
  5. Click the Close button when done.

For more details, also see installing driver updates using the Device Manager in Windows 11.

Another method to automatically update Windows drivers is to use the DriverFinder program. This software automatically scans all hardware devices in your PC and then recommends the appropriate device drivers for them. It will not just update the Realtek Bluetooth drivers, but allow you to update all your device drivers.

Manually Update the Realtek Bluetooth Driver

Manually updating drivers in Windows means downloading the driver installation files and running an installer or updating the driver from the Device Manager.

Driver files for Bluetooth devices can be available on the PC manufacturer’s website or the Realtek website. First, visit the support site of your PC manufacturer and check for updated drivers of your model. If they are not available, or still not the latest version, you can visit the Realtek website.

Realtek offers support for most of its devices online. This support includes the option to download Windows drivers for many of their devices.

Using the Realtek Support site

  1. Open a web browser and navigate to the Realtek software download page.
  2. On the Realtek web page, use the Product Line dropdown box to select Wireless Lan ICs.
    Realtek Wireless device support
    Note: Bluetooth is a wireless technology, so support is combined with Wi-Fi devices.
  3. Now select the Realtek Wireless LAN IC from the list on the web page that matches the device in your PC. Click the Software link next to it.
    Realtek Wireless LAN ICs
  4. On the specific Realtek LAN IC software page, locate the Bluetooth driver you need and click the download icon.
    Download Realtek Bluetooth driver
    Note: Most onboard Bluetooth solutions use a PCI Express implementation. External, pluggable solutions will use the USB option.
  5. On the Agree the Terms and Download page, select the checkbox I accept the above and then click the Download this file button.
  6. Finally, enter the Captcha and click the Go button.
    Realtek download Captcha
  7. Wait for the file to be downloaded and if required, select the location on disk to save the file. (This will depend on the browser being used.)
  8. Open a File Explorer and browse to the downloaded file. If the downloaded file is executable (EXE file extension), simply double-click the file to execute the driver installation and follow the on-screen instructions.
  9. If the downloaded file is an archive (ZIP file extension), right-click the file and select Extract All in the context menu.
    Extract Realtek driver files
  10. Select the location where to extract the files, and then click the Extract button.
    Extract ZIP archive
    Note: The default suggestion is okay in general, as it is a subfolder of the file’s current location.
  11. Double-click the subfolder in the opened File Explorer
  12. Now locate the setup.exe file in the subfolder and double-click it to execute the driver installation process. Follow the instructions on screen.
    Realtek Bluettoth Driver Installer

With the above instructions, you can download and install updated Realtek Bluetooth drivers for Windows. This should solve any issues you have with Realtek Bluetooth not working in Windows 11.

How to Update an Intel Bluetooth Driver – Windows 11

The Intel Bluetooth interface is part of the Intel wireless adapters in PCs with an Intel wireless chipset. The appropriate driver needs to be installed to ensure the Intel Bluetooth device functions on Windows 11. Windows 11 will normally install supported drivers automatically, but if you need to update an Intel Bluetooth driver on Windows 11, follow these instructions.

Manually Update the Bluetooth Driver

To update the Intel Bluetooth driver, we first need to download the latest version from the Intel website. In some cases, your PC manufacturer will also have a driver available for the Bluetooth interface in your PC. Make sure to check the available versions on both websites to see which version is required.

  1. Open a web browser and navigate to the Intel download center.
  2. On Intel the web page, use the Search option to locate the latest Bluetooth driver. Type “bluetooth” and press Enter.
    Search Bluetooth Intel support
  3. In the list with search results, locate the Intel® Wireless Bluetooth for Windows 10 and Windows 11 entry and click it.
    Intel Bluetooth driver download link
  4. On the web page for the intel® Wireless Bluetooth® for Windows 10 and Windows 11, click the Download button for the installer.
    Note: The downloaded version will be the latest available. If you need an older version, use the Version drop-down field to select a previous version.
    Download Intel BT Driver
  5. Click the I accept the terms in the license agreement button in the windows that show next.
  6. The Intel Bluetooth installer file will start downloading.
    Note: Depending on the browser being used, you may need to select a destination on disk for the downloaded file.
  7. Once the download completes, open a File Explorer and browse to the downloaded file.
    Intel Bluetooth Installer File
  8. Double-click the downloaded file to execute the driver installation and follow the on-screen instructions. If the UAC screen shows, click the Yes option to continue.
  9. If a driver is already installed for the Intel Bluetooth device, a popup will show to confirm the upgrade from the existing version to the new version of the driver. Click Yes to confirm.
    Intel Bluetooth Driver Upgrade
  10. After this, follow the on-screen instructions in the Intel® Wireless Bluetooth® Setup window.
  11. Once the installation of the Intel Bluetooth driver completes, click the Finish button to close the setup window.
    Bluetooth Setup Complete

Note: Always make sure to check which wireless adapters are supported by the driver version. If your device is not listed, chances are that the driver will not work. For version 22.160.0.4, as shown in the instructions, the devices supported are:

Intel® Wi-Fi 6E AX4111, AX2111, AX2101
Intel® Intel® Wi-Fi 6 (Gig+) Desktop Kit1
Intel® Wi-Fi 6 AX2001, AX2011
Intel® Wireless-AC 95601,-AC 94621, 94611, 92601
Intel® Dual Band Wireless-AC 82651,-AC 82601, 3168
Intel® Wireless 7265 Family
Intel® Dual Band Wireless-AC 3165

Automatically Update an Intel Bluetooth Driver

To automatically update the Intel Bluetooth driver on Windows 11, run Windows Update. First, make sure automatic driver updates are not disabled.

  1. Open the Windows 11 Settings by pressing the Windows + I keys (or use the Start menu).
  2. Click Windows Update in the left-hand panel in the Settings window.
    Start Windows Update in Windows 11
  3. Next, click the Check for updates button in the right-hand panel.
    Check for updates in Windows 11
  4. Wait for updates to be downloaded and installed.

A second option to automatically update the Intel Bluetooth drivers is to use a program like DriverFinder that will automatically find the latest version of the Bluetooth driver for your PC.

Update the Intel Bluetooth driver using the Device Manager

The last option to update the Intel Bluetooth driver is to use the Device Manager. The Device Manager has been part of Windows since the initial Windows versions. It allows you to see all devices that are present in the system. For each device, the drivers can be checked and updated.

  1. Open the Device Manager by right-clicking the Start menu button and selecting Device Manager in the menu.
    Windows 11 Device Manager from Start menu
  2. In the Device Manager, expand the Bluetooth category.
  3. Right-click the Intel® Wireless Bluetooth® device, and in the context menu select Update driver.
    Intel Bluetooth Update Driver
  4. Click the option Search automatically for drivers and wait for the driver to be updated.
  5. Click Close when done, and then close the Device Manager window.

Tip: Use the Uninstall device option to remove the device from the Windows configuration. Combined with the option to remove the driver software for the device, this can help solve problems by doing a fresh install of the driver.

With the above instructions, you can download and install the Intel Bluetooth driver for Windows. This should solve any issues you have with Intel Bluetooth not working in Windows.

How to Uninstall Intel Wireless Bluetooth Software

As mentioned in the previous section, sometimes it is necessary to remove the Intel Bluetooth driver before installing a new version. If you find that the Intel Bluetooth driver update cannot be installed, try removing the software first using these steps.

Uninstall Intel Wireless Bluetooth software
  1. Open the Settings window from the Start menu.
  2. Select Apps in the left-hand pane (1).
  3. Select Installed Apps in the right-hand pane.
  4. Type intel in the Search apps box (2).
  5. In the apps found, click the three dots icon next to Intel(R) Wireless Bluetooth(R) (3).
  6. Select Uninstall in the context menu.
  7. Click Uninstall again in the confirmation popup.

Wait for the software to be uninstalled. After that rebooting the device is recommended to make sure all components are removed. If any part of the software is in use, a reboot will make sure it gets removed when Windows restarts.

Copyright 2009 and Beyond - DriverFinderPro.com - All Rights Reserved