Anthony Danes | DriverFinder - We Make Drivers Work for You - Part 3

Fix Video DXGKRNL Fatal Error in Windows

The DXGKRNL fatal error in Windows is a Blue Screen of Death error (or STOP error) that will halt the operating system. A critical error in the DirectX software system causes this error.

When this error occurs, you will see the BSOD with the error message. Depending on the Windows version, the system will halt, or Windows will try to recover by scanning for problems.

Video DXGKRNL Fatal Error

Cause of the DXGKRNL Fatal Error

As mentioned, the problem is related to the DirectX graphics system that is installed in Windows. DirectX is a library that enables software to interact with the PC’s video and audio hardware. It is mainly used by gaming software. DirectX has been part of Windows since XP (version 9.0) until Windows 11 (version 12).

DirectX allows software to use the multimedia accelerator features of your video and audio hardware for great performance. But to do this, DirectX operates at a high security level in the operating system. So, if something goes wrong, problems are serious for the operating system.

What can go wrong? Well, mainly device drivers and DirectX itself. DirectX uses objects and drivers that execute at kernel level, and it also interacts with devices through device drivers for the video and audio hardware. Any problem with the DirectX file or configuration, or a problem with the device drivers can cause the DXGKRNL fatal error.

Solving the DXGKRNL Fatal Error

There are two main solutions to fixing the error. The first is updating or reinstalling DirectX, and the second is updating or reinstalling the device drivers for video and audio hardware.

If you can still boot into Windows, you can execute the steps to solve the error. If Windows won’t start anymore, try using the Safe Mode boot. In that startup mode, Windows only uses a standard video driver with minimal features. For Windows 7 and Windows 8, the steps are different. Press F8 during boot to get into the Advanced Boot Options screen and select Safe Mode.

DirectX in Windows

With most software, you would simply say: uninstall it, reboot, and then reinstall it. That was possible for older versions of DirectX as well, but not in the latest Windows versions. DirectX is an integral part of Windows in the latest Windows versions.

For Windows 7 there was still a separate update that can be downloaded to install DirectX 11.1.

For later Windows versions, you simply need to make sure you run Windows Update.

In Windows 10, open Settings, select Update & Security and click Check for updates.

In Windows 11, open Settings, select Windows Update and click Check for updates.

DirectX Diagnosis

To check the version, and any potential problems, you can use the DirectX Diagnostic Tool. This tool is part of the DirectX installation and can be started by typing “dxdiag” in the Start menu search box.

After starting the dxdiag app, you will see the details of the DirectX installation.

DirectX dxdiag

With the System tab active, the DirectX Version can be seen at the bottom of the list with System Information.

Use the Next Page button to jump through the pages, or simply use the tab selectors to switch directly to the Display, Sound, or Input options.

In the Display tab, you can see which features are enabled. The Notes section will show any problems with the DirectX functionality. The Notes section is present for all tabs.

DirectX Diagnostic Tool

If a DirectX feature is Disabled, it might either disabled in the settings, not be supported by your PC hardware, or not supported due to driver limitations.

Update the Display Driver

If the DXGKRNL fatal error is caused by a device driver, the first step is to update the driver to the latest version. Updated drivers can have bug fixes, performance improvements, and feature enhancements.

To update the display driver in Windows, use the Device Manager.

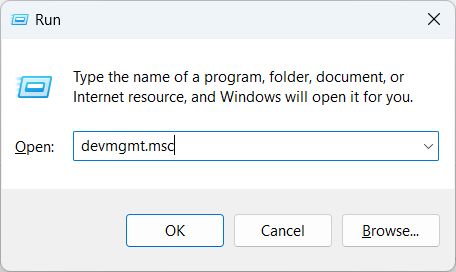
  1. Open the Device Manager using the search box in the Start menu, or press the Windows key + R and type devmgmt.msc in the Run box followed by the Enter key.
    devmgmt.msc in Windows 11
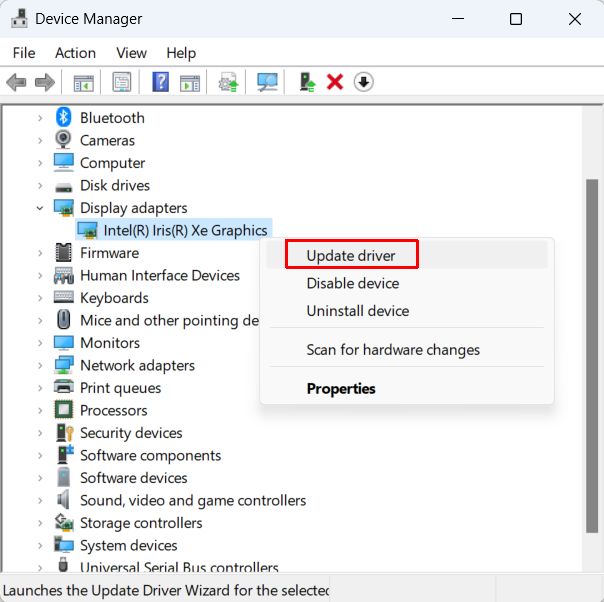
  2. In the Device Manager, expand the Display adapters category by double-clicking it.
  3. Next, right-click the listed graphics adapter, and in the popup menu, select Update driver.
    Update display driver
  4. Use the option Search automatically for drivers to let Windows check for graphics driver updates automatically. If you have downloaded the latest graphics driver for your computer manually, use the option Browse my computer for drivers and select the location.
  5. Once the updated driver is installed, click Close and close the Device Manager.

Next, restart the computer and see if the problem is resolved.

Uninstall the Display Device to fix the DXGKRNL error

There may be no driver update available for the graphics card. Or an update is available, but the update did not fix the problem. In that case, the driver configuration may be a problem. Uninstalling the display device can then help solve the error.

Uninstalling a device and then restarting the PC will force Windows to reinstall the graphics device. If the driver was also deleted during uninstall, the driver will also be downloaded and installed again.

  1. Use the instructions from the previous section to open the Device Manager and expand the Display adapters
  2. Right-click the graphics adapter, and in the popup menu select Uninstall device.
  3. In the Uninstall Device window that shows next, make sure to select the option Attempt to remove the driver for this device.
    Note: for previous Windows versions this option is worded a little differently.
    Uninstall device and remove driver
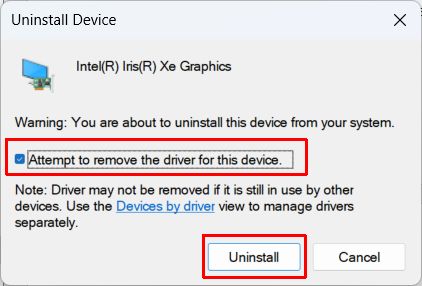
  4. Click the Uninstall button to continue.

Once the device is uninstalled, restart Windows. The display device will be reinstalled during the restart with the latest driver.
Note: in case the display device is not automatically reinstalled, use the Scan for hardware changes in the Action menu of the Device Manager to force the device installation.

System Restore

None of the solutions so far working? If your Windows configuration is using System Protection, you can try the System Restore option to revert to an earlier, working configuration.

With every change, Windows can create a restore point that will help bring back a previous configuration. Here are the instructions for Windows 11.

  1. Open Settings from the Start
  2. Select System, and then About.
  3. Scroll down to the Related links section, and then click Advanced system settings. This will bring up the System Properties.
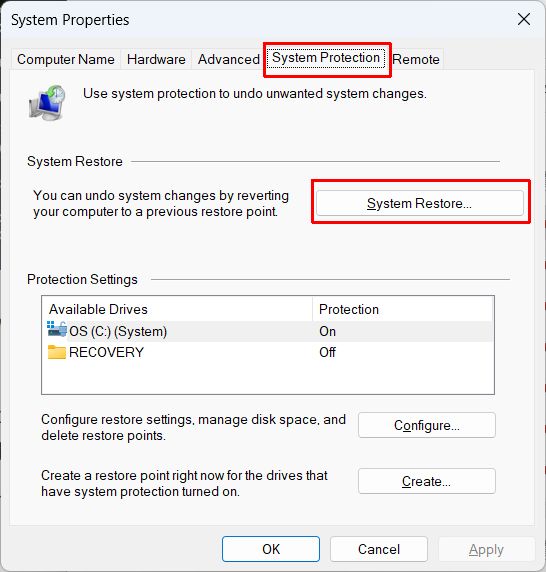
  4. In the System Properties window, select the System Protection
  5. Next, click the System Restore button.
    Windows 11 System Restore
  6. Click Next to show the list of restore points on your computer.
  7. Select which restore point to use, and then click Next.
  8. Click the Finish button to confirm the restore operation.
  9. Click Yes in the confirmation window.

Windows will now create a restore point. Your PC may restart during the process. Just be patient and let the system restore complete.

After the final restart, see if the problem is solved.

Although this specific error is related to the display aspect, DirectX also uses sound and other media and input drivers. It is recommended to keep all device drivers up to date using DriverFinder.

cFosSpeed Driver for Windows preventing Windows 11 update

When you are finally ready to upgrade from Windows 10 to Windows 11 and your system is meeting the system requirements, you can still run into issues that prevent the upgrade. The cFosSpeed Driver can prevent the upgrade to Windows 11, as the Windows Update process will report it as something that needs your attention. Essentially it states that “a service isn’t ready for this version of Windows 10”.

Widnows cFosSpeed driver

What is the cFosSpeed driver?

The cFosSpeed driver is an Internet accelerator software solution. It optimizes Internet traffic on a Windows PC by installing a driver. The traffic shaping software has some advanced network analysis and optimization integrated, but it also allows for the prioritization of streams or protocols. Great for video streaming and gaming.

How did cFosSpeed get on my system?

The solution is integrated with quite a few OEM vendors. Parties like MSI, Asus, ASRock, and Gigabyte include it in their driver bundles for their motherboards. In the case of Asus, you might know it as Turbo LAN, which is a rebranded version of the cFosSpeed software. With MSI it is part of the Dragon Center.

Fix cFosSpeed from blocking the Windows 11 Update

Considering the problem, there are two solutions to the issue with the cFosSpeed driver. The first is to update it to a version that does not block the Windows 11 update. The second option is to uninstall the cFosSpeed driver from your Windows installation.

Update the cFosSpeed driver

The first option to update the driver is to check the OEM support site for an updated version of the software that includes the cFosSpeed driver.

For Asus, check their support site and look up your model to see if a new version is available. If so, download it and install it and then try the Windows 11 upgrade again.

For MSI, download and install the latest version of the MSI Dragon Center and after completing the installation, try the Windows 11 upgrade again.

For Gigabyte you will need to download the cFosSpeed Internet Accelerator Software from their site.

For ASRock, the cFosSpeed driver is part of the XFast Lan solution. It can be downloaded from here.

The last option is to download the latest cFosSpeed software from the vendor’s site and install it. Take note that this is a shareware version, which is valid for 30 days. But it should update your cFosSpeed driver so that you can upgrade to Windows 11.
Update: the software is now owned by Atlas Tech Solutions and their latest version is 13.

If you have the original cFosSpeed software installed and running, you can click the cFosSpeed icon in the Taskbar, and then in the popup menu select Get latest version.

Update cfosspeed driver

Uninstall the cFosSpeed driver

If the driver update did not solve your issue, and you can still not upgrade to Windows 11, the best option is to uninstall the cFosSpeed driver altogether.

Steps to uninstall cFosSpeed in Windows 10:

  1. Open Settings from the Start
  2. In the Settings window, select Apps.
  3. By default, Apps & features should be selected. If not, select that option in the left-hand panel.
  4. Now scroll down in the apps list until you see the cFosSpeed entry (it will include a version number in the name).
  5. Click it, and then click the Uninstall
    Uninstall cfosspeed
  6. When prompted “This app and its related info will be uninstalled.”, click the Uninstall button.
  7. When the UAC (User Account Control) windows pops up, click the Yes option to allow the uninstaller to run.
  8. Follow the instructions in the cFosSpeed Uninstall Wizard to uninstall the app.
    Uninstall cfosspeed 12If for some reason this does not work, it is also possible to uninstall the cFosSpeed from the Network Properties.

Open the network properties for an active adapter, select the cFosSpeed for faster Internet Connections (NDIS 6) entry, and then click the Uninstall button.

Uninstall cfosspeed network driver

You will again be prompted for a confirmation. Click the Yes option to uninstall the cFosSpeed driver.

After completion, the entry will no longer show in the Network Properties list.

There is no need to repeat this for any other active network adapters. Once uninstalled, it will be removed from all network devices.

Note: Uninstalling the cFosSpeed software using the network option will only remove the Lan Manager component, which is the network driver. The cFosSpeed main application, if installed, will still remain. So, if possible, use the App uninstall option to uninstall cFosSpeed.

After uninstalling the software, try the Windows 11 upgrade again.

If the upgrade still fails, you may need to consider doing a fresh install of Windows 11 rather than an upgrade from Windows 10.

Make sure to also check the article about TMP drivers and how they can affect the Windows 11 upgrade.

Windows Security through Driver Block Rules

Many computers are used for critical tasks or to process sensitive data. To protect a system, especially a portable system, that is running Windows, Microsoft has several security features in the latest Windows releases. Most people know about Microsoft Defender and biometric access, but in Windows 10 and Windows 11, there is also something called driver block rules.

Are Drivers Dangerous?

Device drivers are not dangerous per se. But device drivers, like many other critical components in the Windows operating system, run with a kernel-level execution priority. That means that even if drivers are not malicious, they can allow elevated control access.

Modern device drivers are all digitally signed, and often verified by Microsoft. And in the latest Windows versions unsigned drivers are not allowed to be installed unless special steps are taken to disable driver signature enforcement.

But even with a digital signature, there is no guarantee that the driver is completely safe. Digital signatures can be stolen (hacks of hardware/software companies, like Nvidia recently).

Recent malware attacks have leveraged the vulnerabilities of drivers to compromise system security. It makes a lot of sense to increase the protection of these system components.

What are Driver Block Rules?

Driver block rules are a set of rules that are recommended by Microsoft to block drivers that are malicious or not trusted. Drivers can be submitted to Microsoft for review and analysis and bad ones are added to the vulnerable driver blocklist. Hardware manufacturers and OEM partners will play a big role in keeping the rules actual and relevant.

How to use Driver Block Rules?

Microsoft is including a setting in the Windows Defender configuration to turn on this new feature called Microsoft Vulnerable Driver Blocklist. That means turning it on will activate the protection.

Windows Driver Block Rules

This new feature will be only activated by default on special Windows editions. Windows 10 S mode, and devices that have the Memory Code Integrity feature (or HyperVisor-protected Code Integrity – HVCI).

For Windows systems where the S mode or HVCI is not possible there is another option, which is using the Windows Defender Application Control (WDAC) policy. Details about how to use WDAC and the list of rules can be found on the Microsoft website.

WDAC is all about preventing apps or processes to run kernel level. Use and deployment of the rules is something that will typically be used by organizations with IT staff to implement this.

Driver BlockList Limitations

Although the concept the blocklist is good, the method strongly depends on the quality of the list. It was already found that the blocklist is not including all drivers that need to be blocked. Apparently new Windows versions were being issues a list from 2019! Microsoft already confirmed the issue and will address the problem in the Windows October updates to ensure the list is new and in sync across Windows 10 and Windows 11.

In addition, the block list is now on by default in Windows 11 (version 22H2). It also seems the option to disable the list is no longer present. Is Microsoft finally able to prevent the Blue Screens showing Stop errors caused by drivers?

For people still wanting to disable the list on Windows 11 version 22H2, there might be a workaround through the registry. But it is not an official and documented option.

Use the Registry Editor to find the folloing key:

[HKEY_LOCAL_MACHINE\SYSTEM\CurrentControlSet\Control\CI\Config]

And create a DWORD Value in it named VulnerableDriverBlocklistEnable with a data value of zero (0).

How to Manually Install Drivers in Windows 11

With each new version of Windows, more devices are automatically supported. This is also the case for Windows 11. But if your device is not supported, or not automatically installed,  you may need to manually install drivers.

The need to manually install drivers in Windows 11 can also come up when a non-supported device needs to be installed. If hardware is not compatible with Windows 11, but there are drivers for the hardware for previous Windows versions, these older drivers can often be used.

For Windows 11, Windows 10 drivers are almost always compatible. But even Windows 8 or Windows 7 drivers can often be used. Just make sure the right architecture is supported. For Windows 11 all drivers need to be 64-bit since that is the only Windows 11 version available.

Steps to manually install drivers in Windows 11

First, make sure you have the driver file available on your Windows 11 system. Download it from the hardware manufacturer’s website. If possible, use the installer that came with the driver. If that does not work, the manual install process is required.

  1. Make the driver files available in the installable format. That means you need to see files with a .SYS, .CAB, and .INF file extension. File extensions can be made visible in the File Explorer by clicking the View menu, followed by clicking Show in the dropdown menu, and finally selecting File name extensions.
    Windows-11 Show File ExtensionsDepending on the file format of the downloaded drivers, the driver files need to be extracted. For archived files, Windows 11 offers direct support. But other formats might need a separate program to extract them. (.7Z file extension – 7-Zip; .RAR file extension – WinRAR).
    I would recommend installing the 7-Zip program, as it actually supports many archive and compression formats. Even .ISO and some .EXE files can be extracted with it.
  2. Once the driver files are available, open the Device Manager. Press the Windows + R keys, and type msc in the Run window. Press Enter or click OK.
    Windows-11 Start Device Manager
  3. In the Device Manager, select the device for which you need to install the driver.
  4. Right-click the device, and in the popup menu click Update driver.
    Windows-11 Update Driver
  5. In the window that shows next, click the option Browse my computer for drivers.
    Browse my computer for drivers
  6. Next, use the Browse button to select the file location that contains the driver files (as downloaded and extracted earlier).
  7. Once selected, click the Next button.
    Manually install drivers in Windows 11
  8. Windows will analyze the driver files and match them with the selected device. If the drivers are compatible with the device, the drivers will be installed and the device should work after this.
  9. Click the Close button to close the window.
  10. Finally, close the Device Manager.

Hopefully with above steps you can find and install the required drivers for Windows 11. This way you can often keep using older hardwar, even not directly supported by Windows 11.

As always, if you have trouble finding support for your hardware in Windows, try using our DriverFinder software to automatically analyze the hardware devices and look for available and compatible drivers.

Windows TPM Drivers

If you are upgrading to Windows 11, or want to secure your PC, dealing with TPM is inevitible. We’ll explain what TPM is all about and what TPM drivers are needed for Windows.

What is TPM?

TPM is short for Trusted Platform Module. TPM is implemented using a hardware chip on the motherboard of a computer. The TPM chip is used to provide a hardware-level security to Windows. It generates encryption keys, which are not accessible from outside of the computer hardware.
Most modern computers (required since 2016) will have a TPM chip on board. In some older systems a TPM chip can be added when not present. Manufacturers of TPM chips include Infineon, STMicroelectronics and Nuvoton. In the Windows device details the manufacturer can also show Intel or AMD.
In older boards, it is often possible to add a TPM module using a pin header.

TPM Module pin header

What is TPM used for?

As mentioned the TPM module enable implementation of hardware-level security, which typically used for encryption of data. Practically speaking, TPM is used for Windows Hello (face recognition, finder print recognition, iris login), and BitLocker (drive encryption).

TPM is partly convenience, as it is performing a task which otherwise would need to be performed by the CPU and software. And it is partly increased security, decryption of encrypted data is only possible in the system itself (containing the TPM module used for encryption).

Windows 10 already had functionality that used the TPM module, but with Windows 11, Microsoft has made the presence of TPM mandatory. To be specific, Windows 11 requires TPM version 2.0. Version 1.2, which is also present on a lot of older systems is not enough.

The differences in version 2.0 vs version 1.2 are that the new version offers better security features. If you want to know the exact details, Microsoft has more information on TPM.

Tip: Not installing a TPM 2.0 module, or disabling the TPM option (or setting it to version 1.2 compatibility) is a method to prevent a Windows 11 upgade. If you would want that.

What TPM version do I have?

Before you check the version, you need to know if TPM hardware is present. Since physically checking the motherboard is not all that practical, the best step is to check the BIOS/UEFI settings.

One thing to keep in mind is that older BIOS versions might not directly support TPM, while the motherboard does. In that case you first need to update the BIOS to access the TPM features of the motherboard.

Check BIOS/UEFI

You can access the BIOS/UEFI through the computer startup process. When rebooting, press the required key (typically F2 or Delete, but it can also be Esc, F10).

Once the BIOS/UEFI screen shows, locate the security settings and then select the TPM, or Intel Platform Trust Technology, or AMD fTPM. If none of these are available, you can safely assume your computer does not have a TPM chip. If the setting is available, make sure it is turned on. The BIOS/UEFI settings for TPM will generally also show the version.

Note: If you have the AMD fTPM option available, you may want to use a separate hardware-based TPM solution. There have been issues with the AMF fTMP solution. At least make sure to upgrade to the latest BIOS version before using fTMP.

Security Settings in Windows 10

If you are running Windows 10, you can also check the TPM status and version using the Windows Settings option.

  1. Open Settings from the Start
  2. In the Settings window, click Update & Security.
  3. Next, click the Windows Security option in the left-hand pane.
  4. Finally, click the Device security option in the left-hand pane to show the details of your TPM configuration.

If there is no TPM support, you will see “Standard hardware security not supported”. This could mean there is no TPM chip, or it is not enabled in the BIOS/UEFI.

No TPM device

In the case that there is a TPM chip onboard, and it is enabled, you will see the details and version supported.

TPM 2.0 installed

Using the Trusted Platform Module Management

Windows has a special management console for the TPM. This can also be used to check the TPM version details.

  1. In the Start menu, select the Run option (or press Windows key + R).
  2. Then type TPM.MSC and press Enter.

This will bring up the TPM Management window, there you can see the Specification Version for your TPM module.

Truster Platform Module Management Console

Window TPM Drivers

Since the TPM chip is a hardware device, Windows needs to be able to communicate with the device. For this device drivers, or TPM drivers, are required. Although there are different manufacturers of TPM chips, the drivers needed by Windows are the chipset drivers.

Installing the latest Intel chipset or AMD chipset drivers would normally be sufficient to enable support for the TPM functions within Windows 10 or Windows 11.

TPM 2.0 device driver

The Device Manager can be used to check if the drivers for the TPM device are correctly installed. The TPM device will show under the category Security devices as Trusted Platform Module 2.0 (the name can vary depending on the manufacturer).
Some manufacturers provider their own driver installers for TPM modules from Nuvoton, Atmel or other third party TPM manufacturers. Check the manufacturer support pages for these.

TPM Firmware

Apart from installing the chipset device drivers, it is may also be needed to update the TPM firmware. This will make sure the TPM device is up to date with the latest security patches and supports Windows 11 requirements.

For Infineon based TPM solutions, the best place to start is their TPM update page. It contains links to different vendors with direct installers for TPM updates.

A recent vulnerability in TPM 2.0 would also require an update in the firmware. Hardware manufacturers may warn about the security risk (like Lenovo did), but the real solution is updated firmware.

After updating the firmware you need to clear the TPM. If it is not a new PC, make sure to back up your data first before performing these steps.

  1. In the Windows Settings window Security processor details (see previous steps), click the link Security processor troubleshooting.
  2. Under the header Clear TPM, click the button Clear TPM.
    Clear TPM
  3. In the confirmation windows that follows, click the Clear and restart button.

With the above information, we hope you can get TPM working in Windows 10 to enable the upgrade to Windows 11. Do not forget to check the other Windows 11 requirements before you upgrade!

And as always, we recommend you keep your drivers up to date with DriverFinder.

Copyright 2009 and Beyond - DriverFinderPro.com - All Rights Reserved