Anthony Danes | DriverFinder - We Make Drivers Work for You - Part 5

How to solve a DRIVER POWER STATE FAILURE Error

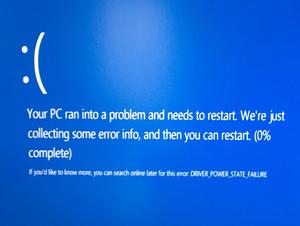
Blue screen errors in Windows are notorious. There are different causes, but in general, they are serious errors. When you see a DRIVER POWER STATE FAILURE error on the blue screen, the error is caused by a device driver.
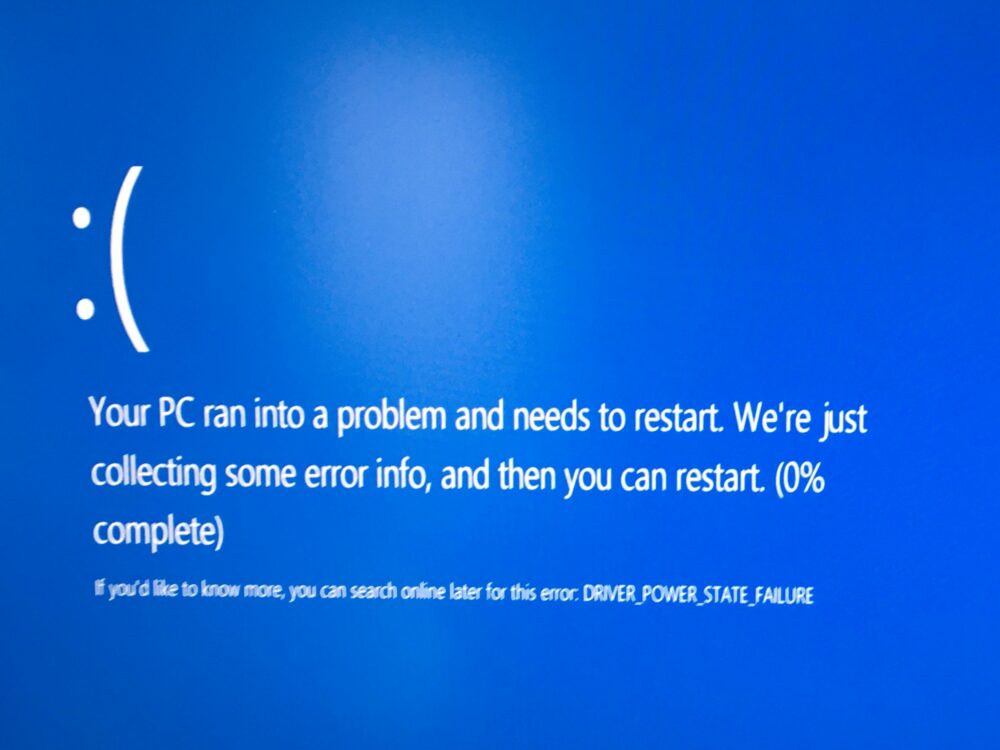
DRIVER_POWER_STATE_FAILURE

Depending on the Windows version, you could also see the stop error code  0x0000009F.

What is a Blue Screen Error?

Blue Screen Of Death (or BSOD in short) errors are caused by stop errors. These are the types of errors that cause the operating system (Windows) to crash. Stop errors causing blue screens have been part of Windows since Windows XP and can happen even on the latest versions.

Since these errors are critical, the blue screen is shown with an indication of the stop error details. A stop error code, which can be a code or description is shown to inform the user. Further processing is halted to prevent damage or data loss if things were to continue processing.

Causes for the DRIVER POWER STATE FAILURE error

The error driver power state failure on Windows 10 indicates that the PC has an inconsistent power state. Typically this happens when the PC changes its power mode. It could be going from sleep (or hibernation) to an active state or the other way around.

When a power transition happens, the hardware in the PC is directly affected. To communicate the power state change, Windows tells the hardware to change accordingly. This is where device drivers come into play. Communication from Windows to the hardware happens through these device drivers.

So, essentially the error is caused by non-expected behavior from a device driver. This can either mean that the hardware itself is causing it, or there is a problem with the driver.

What to do to fix it?

Although it might seem strange, in many cases the problem is not consistent and can be a one-time occurrence. Simply letting the PC reboot might result in Windows restarting without problems.

Considering the severity of the error, however, it is best to find out the cause and try to solve the issue. Device drivers operate at a high-security level in the operating system. This is why Windows will not keep running, but stops and shows the error.

Troubleshooting the Driver Power State Failure error

To see which driver, and as a result, which hardware device, has caused the error we need to find more details.

The most automated, hands-off approach is to use the Windows Troubleshooter. It is available in the latest Windows versions, and can be started from the Settings. Microsoft is also recommenind the GetHelp app to automatically find solutions to Windows problems.

To find more information on the cause of the driver power state failure manually, you can use the Event viewer and something called a minidump.

When a stop error occurs, Windows creates a log file called a minidump. These files are stored in a folder called Minidump in the system root (typically C:\Windows\Minidump). The minidump filename will contain the date and have a file extension .dmp. If no such file is created, check the configuration for creating minidumps.

These mindump (or crash dump) files when generated as a result of the DRIVER POWER STATE FAILURE error will often contain the filename causing the error, which in turn can help pinpoint the driver.

Reading and analyzing a minidump file is a rather technical process. Luckily, tools are available that can read minidump files and show the result in a more user-friendly way. Try BlueScreenView or WhoCrashed.
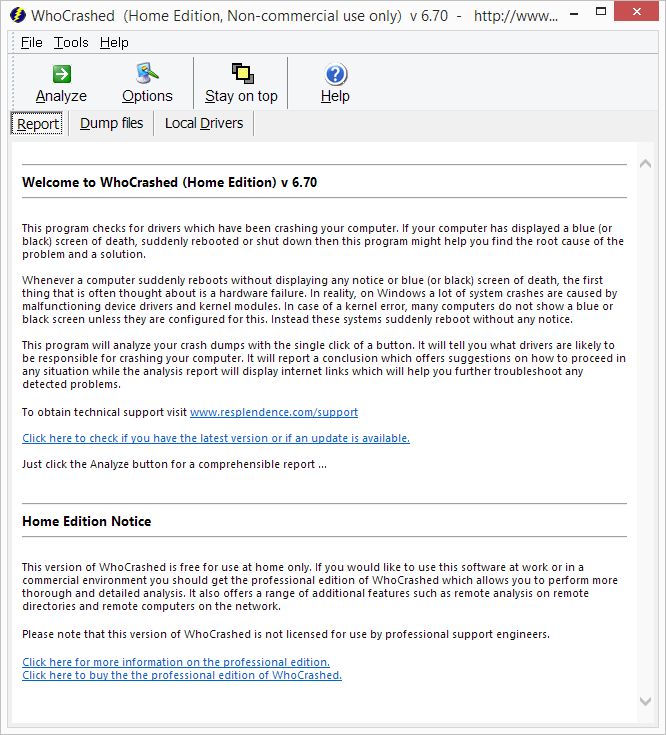
WhoCrashed minidump analysis

Fixing the DRIVER POWER STATE FAILURE error

Once you know which driver caused the error, you can take action. To identify the driver in a minidump file, look for the .SYS file extension. A few examples:

BTHUSB.SYSBluetooth device
NVRAID.SYSNVIDIA nForce RAID Device
RTWLANE.SYSRealtek Wireless LAN 802.11 PCI-E Adapter
IntcSST.SYSIntel® Smart Sound Technology
HIDIR.SYSInfrared HID Device

In most cases the .SYS file name will be a good indication of the device name to look for in the Device Manager. If it is not clear, simply do an online search for the file name to identify the device.

The first step is to roll back the driver for that device using the Device Manager. This will undo the most recent update of the driver and bring back the previous (hopefully stable) version.

  1. Open the Device Manager.
  2. Locate the device that caused the stop error.
  3. Right-click the device, and in the popup menu click Properties.
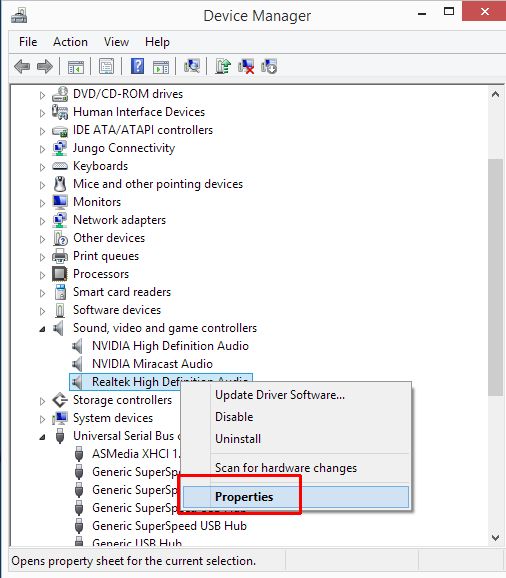
    Device Driver Properties
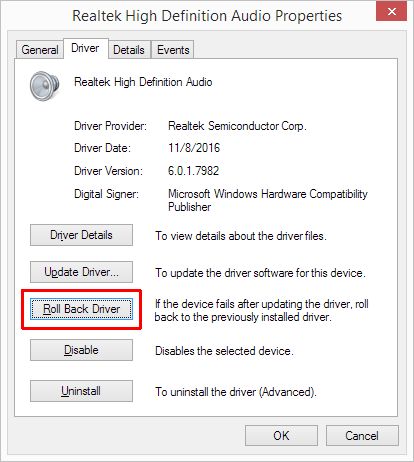
  4. In the device properties window, select the Driver tab.
  5. Click the Roll Back Driver button.
    Roll Back Driver
  6. Click the Yes button to confirm the driver rollback.
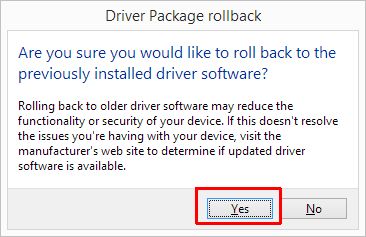
    Roll Back Driver Confirm

If there is no option to roll back the driver, that means the original driver is installed. The option in that case, is to update the driver for the device to a newer version. Driver updates are released to fix know issues and make sure the driver is compatible with the latest Windows version. So, installing an updated version of the driver can also help solve the DRIVER POWER STATE FAILURE error.

Driver not known

If the minidump did not provide the name of the driver or device that caused the stop error, you need a different approach to solving the issue.

The first step is to roll back drivers for any new devices, or updated driver versions.

For updating drivers, in addition to Windows Update, you can use DriverFinder. The program will automatically find the latest versions of device drivers for all hardware devices present in your system.

If rolling back and updating does not fix the problem, here are two more suggestions to fix stop errors in general.

  • Run a Windows check for missing or corrupt Windows components using Deployment Image Servicing (DSIM).
    Open a Command Prompt window with administrative privileges, and then type: DSIM /online /cleanup-image /restorehealth and press Enter.
  • Run a system scan to fix any Windows system file issues.
    For this, again you need to open a Command Prompt window with administrative privileges, and type: SFC /scannow at the prompt. Wait for the command to finish after pressing Enter.
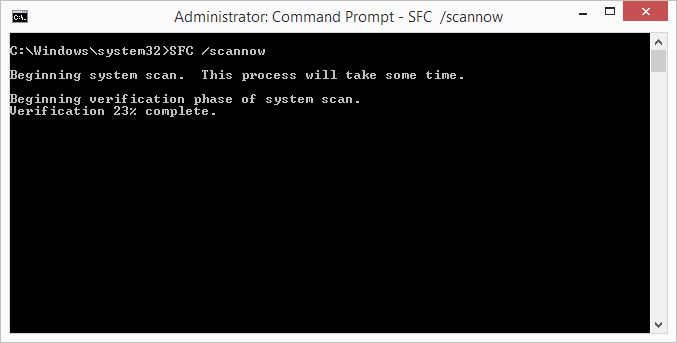
    sfc scannow

It is suggested to run these commands in this sequence since the DSIM service is a more recent option with better results for the latest Windows versions. Please note that you will need an active Internet connection for the first command. For Windows versions older than Windows 10, you will first need to install the Windows Assessment and Deployment Kit.

Note: Both commands can take some time to complete.

Disable power saving altogether

In general, disabling the power saving is not the desired option, but it can actually be used to solve the DRIVER POWER STATE FAILURE error. By disabling all power-saving options, no power changes take place, and as a result, devices do not cause this error.

You can use the Control Panel in Windows to change the power settings.

  1. Open the Control Panel by pressing the Windows + R keys and typing “control panel” in the Run box. Press Enter to confirm.
  2. In the Control Panel click the option Power Options.
    Note: You may need to change the View by option from Category to Large icons or Small icons.
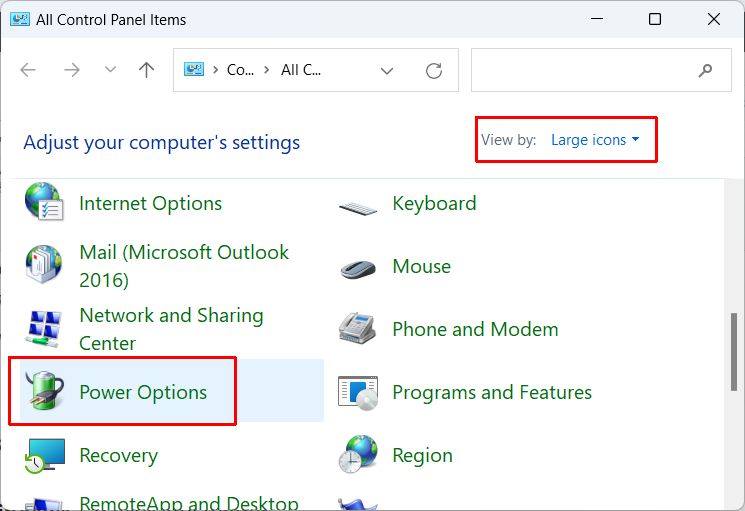
    Control Panel Power Options
  3. In the power plan selection pick either Balanced or High performance.
  4. Next, click the Change plan settings link for the selected option.
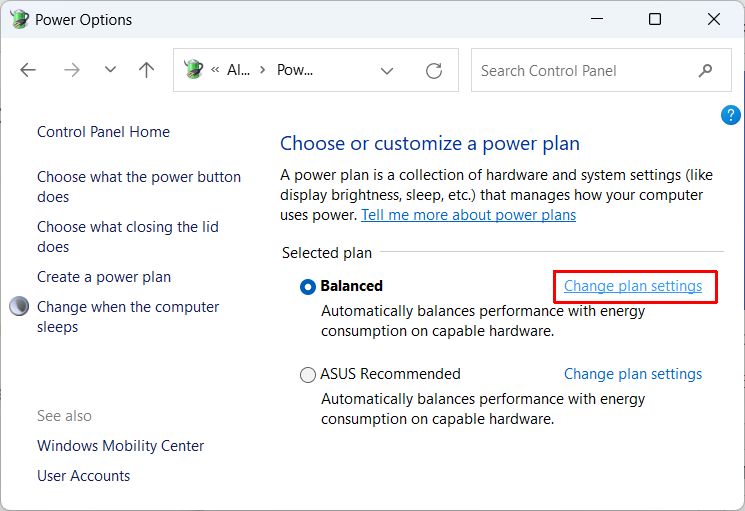
    Change power plan settings
  5. In the Edit Plan Settings window, change the time for the options Turn off the display and Put the computer to sleep to Never.
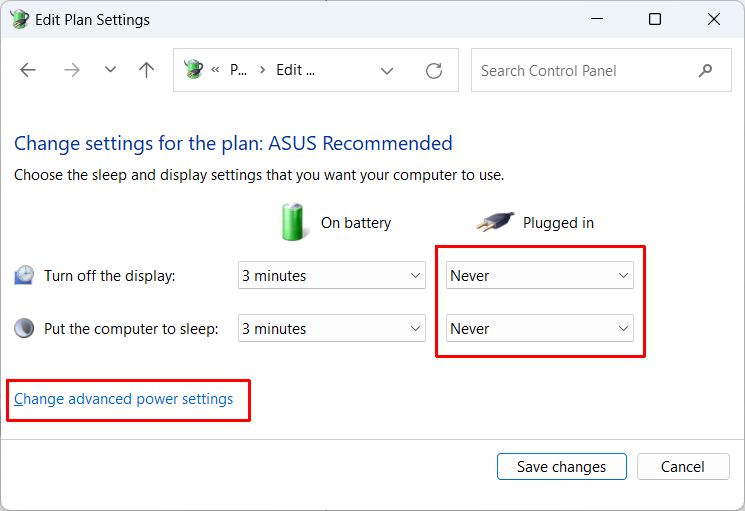
    Keep display on and no sleep mode
    Note: The On battery options will only show for laptops and portable devices.
  6. Next, click the link Change advanced power settings.
  7. In the Power Options window, open up the PCI Express category, click the Link State Power Management and select the option Off to disable it.
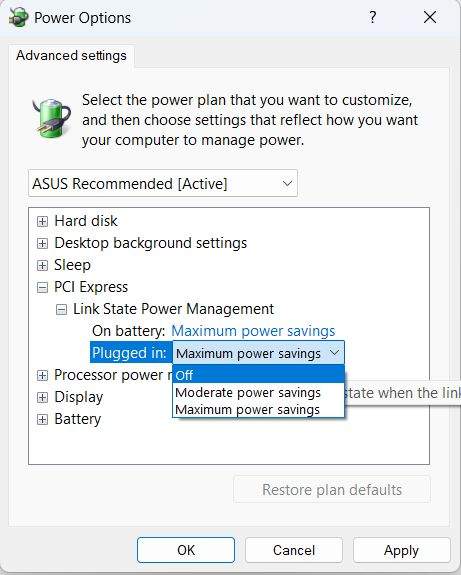
    disable link state power management
  8. If there is a USB or Wireless category, also disable power management in those, or set it to maximum performance.
  9. Click OK to close the Power Options window.
  10. Click Save changes to close the Edit Plan Settings window and update the changed settings.

Keep in mind that this is more of a workaround than an actual solution. Even if you can prevent the error from happening, the core cause of the error is still unaddressed. It is best to still pinpoint the device or driver causing the issue and fix that, so the power management can be enabled again.

Windows will not start

If the DRIVER POWER STATE FAILURE error is happening consistently, Windows might not start, or run long enough for you to take action. In that case, there are a few things to try:

  • Unplug external devices. The error is often caused by USB devices, so disconnecting external storage devices is essential in this case.
    After this, you can try starting Windows normally, and if that still does not work, try the next step.
  • Start Windows in Safe Mode.
    Safe Mode is a Windows state where not all device drivers are loaded. This way you will be able to make changes that are not otherwise possible.
  • Use a System Restore point to bring Windows back to a previous state.
    If System Restore is active, driver updates are generally proceeded by Windows creating a system restore point. So, reverting to a previous system restore point is similar to a driver rollback.
  • Reinstall Windows. Not something anybody wants, but as a last resort, this has to be mentioned. Reinstalling Windows will ensure that all drivers are original versions and device configuration is reset. Make sure to make a backup of your data first!

Once you have Windows running again, you can roll back any new drivers as mentioned earlier, or update drivers depending on their version.

Windows USB-C Driver

To get the benefits of a USB device with a type-C connector, the USB-C driver for all USB-C devices should be installed on your Windows PC. Download and install the USB-C drivers for the controller and the connected USB-C device to get things to work.

What is USB-C?

USB-C is a huge improvement over older USB standards both in terms of practical use as well as in performance.

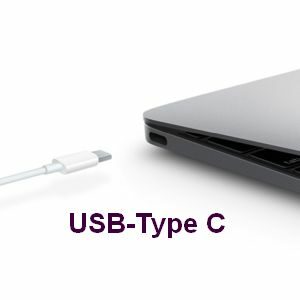
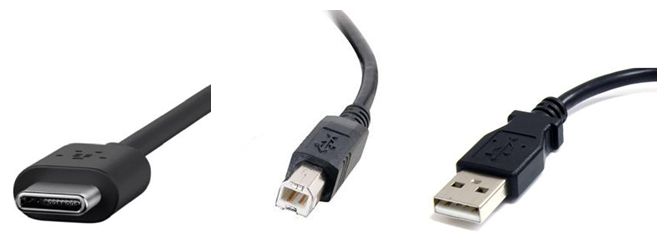
USB-C refers to the type-C connector, where older USB versions use the type-A and type-B connectors. The biggest advantage of the type-C connector is that you cannot plug it wrong, it is a reversible connector.

USB-C connector typesUSB-C is downward compatible with USB 2.0, but for full support, USB version 3.2 is needed. USB 4.0 takes things a step further with increased data transfer speeds and Thunderbolt 3 compatibility.

Other USB-C benefits:

  • Transfer speeds for USB-C devices can vary from 5 Gbit/s to 20 Gbit/s depending on the USB version.
  • 100 Watts of power (20V, 5A) with two-way charging.
  • DisplayPort over USB for ports supporting the USB-C Alt Mode. Allows for connecting video sources and display devices.

The USB-C connector type was created by the USB Implementers Forum (USB-IF). USB-IF is a group of companies creating computer hardware and software (including Apple, HP, Intel, Lenovo, Microsoft, and many others). The USB-IF group is also responsible for issuing USB vendor IDs that are used to uniquely identify hardware devices.

For USB-C ports and devices to work, a USB controller is required to be functional. It is often referred to as a Host Controller Interface (HCI), or these days an eXtensible Host Controller Interface (xHCI). Modern Intel and AMD chipsets have onboard USB controllers. But there are also other vendors of USB controllers (Texas Instruments, Analog Devices, Cypress Semiconductors, and others).

It is important to be aware that not all USB-C type ports support all possible USB-C type features. DisplayPort and Thunderbolt for example are not implemented by all USB controllers. And if they are, installing the right driver for your USB-C type controller is critical for things to work properly.

Where do I find USB-C?

Most modern computers and devices are using a USB-C type port. You can recognize it by the connector type as outlined above. Be aware that Thunderbolt ports look the same and might not implement the USB-C functionality.

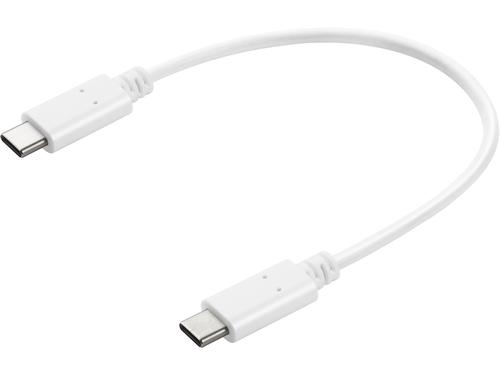
USB-C cable

If your computer does not support USB-C devices, it can be added using a docking station, or internal extension card (desktop computers). There are many manufacturers that offer solutions for this.

Popular external devices that are connected to a computer using a USB-C type connection are game controllers, portable storage (SSD, flash drive), smartphones, and tablets. But even keyboards, mice, and printers can be connected through a USB-C connection.

Update USB-C Drivers in Windows

There are a few different ways in which USB-C drivers can be updated on Windows. In the latest Windows versions, the USB-C drivers should be installed automatically.

But if things are not working the USB-C type drivers might need to be manually updated, or use a program to update the USB-C drivers.

Make sure to update the USB controller drivers as well as any USB device-specific drivers.

Manually update a USB-C driver using the Device Manager

  1. Open the Run box by pressing and holding the Windows logo key Windows Logo key and then pressing the R key at the same time.
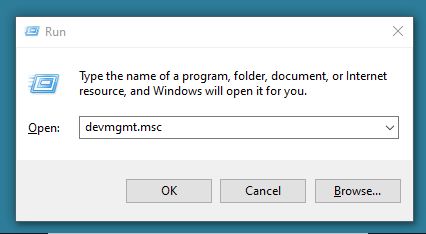
  2. In the Open box, type devmgmt.msc, and then click the OK button or press the Enter key.Run Device Manager
  3. In the Device Manager window, click Universal Serial Bus controllers to show all USB devices.
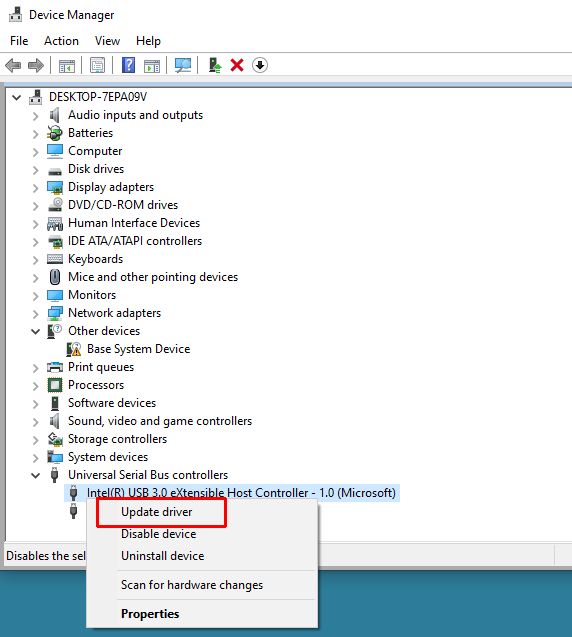
  4. Right-click the eXtensible Host Controller device, and in the popup menu, click Update driver.Update USB-C driverNote: The example shows the Intel® controller, but it can display other manufacturers like AMD, NVidia, or ASMedia as well.
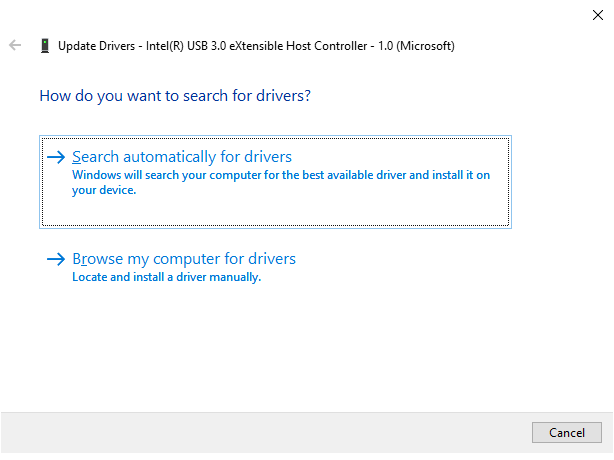
  5. The next step is to select where to search for drivers. Select Search automatically for updated driver software to use the Microsoft Windows Update server to search for USB-C driver updates.
    If you have a downloaded copy of the USB-C driver for your computer or controller, select the second option: Browse my computer for driver software.
    Windows Search for USB-C driver
  6. After selecting an option, follow the on-screen instructions to search for an updated driver.
  7. Click Close when done.
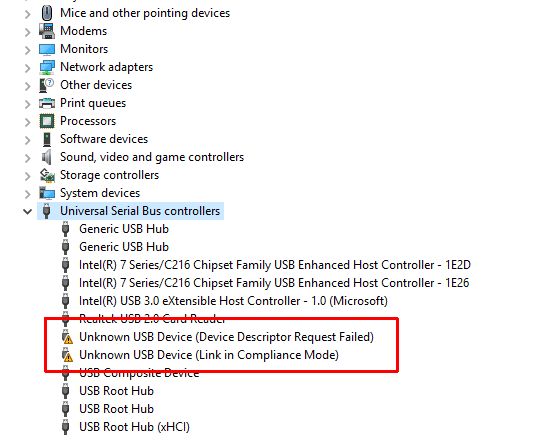
  8. If necessary, also update the drivers for the USB devices that are not recognized by Windows. Apart from the USB controllers themselves, some USB-C devices require additional drivers to function.
    Unknown USB-C device

Automatically searching for a USB-C driver

If the solution from the previous step did not work, you can try using a program like DriverFinder instead.

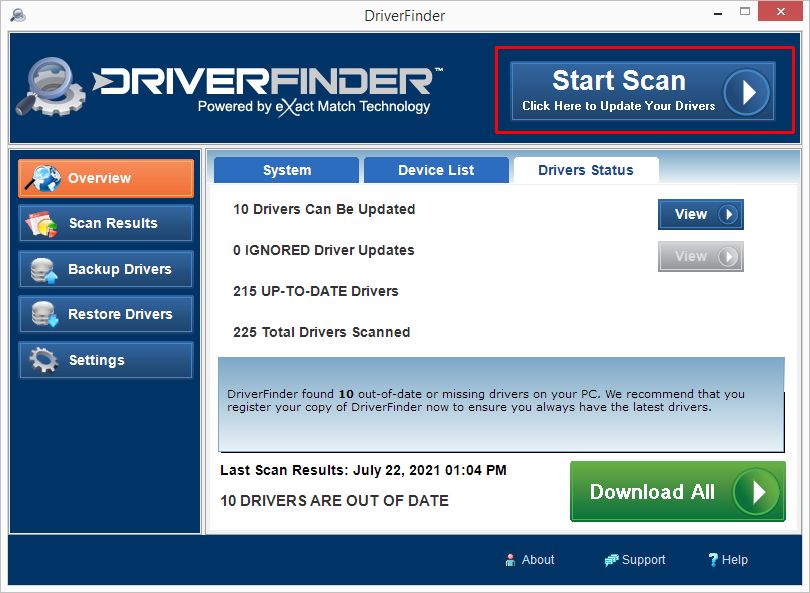
DriverFinder will scan all your computer hardware and identify the devices. After that, the program will automatically find the right drivers for your PC hardware and Windows version.

DriverFinder Start ScanSimply download and install the program, activate it, and run a scan to download all required drivers.

The benefit of DriverFinder is that it will detect all hardware, so you do not need to manually search for third-party drivers if Windows has no native support for devices.

Windows 7 Drivers

Windows 7 drivers are needed for the hardware in a computer to function. Drivers, or device drivers, enable the operating system to communicate with all devices.

Although many users have upgraded to Windows 10, there are also still a lot of computers that are running Windows 7. According to Statcounter information, over 10% of systems running Windows worldwide is still running Windows 7. Reasons might be personal preference, software compatibility, or hardware restrictions.

Windows 7 included drivers

With the evolution of Windows versions, Microsoft has added support for more hardware with each version of Windows. As a result, Windows 7 supports a lot of hardware directly.

Even if devices are not immediately recognized in Windows 7, it is often possible to get Windows 7 drivers by running Windows Update.

But even after running Windows Update, there still may be unsupported devices in Windows 7. Some devices do not have Microsoft-certified drivers and as a result, are not included in the Microsoft update catalog. Microsoft refers to tested and signed drivers as WHQL drivers. This means Windows Hardware Quality Labs, a set of tests and certification for hardware drivers.

Important to keep in mind with Windows 7 drivers is that Microsoft has stopped adding Windows 7 drivers. So support for newer hardware might be limited if available.

Where to find Windows 7 Drivers

So what if you are left with devices that are not recognized or not working in Windows 7? Where do you find the required drivers?

The first place to look is the support site for the computer brand. Check PC your brand and model at the back or bottom of your PC. In general, there is a label with detailed information.

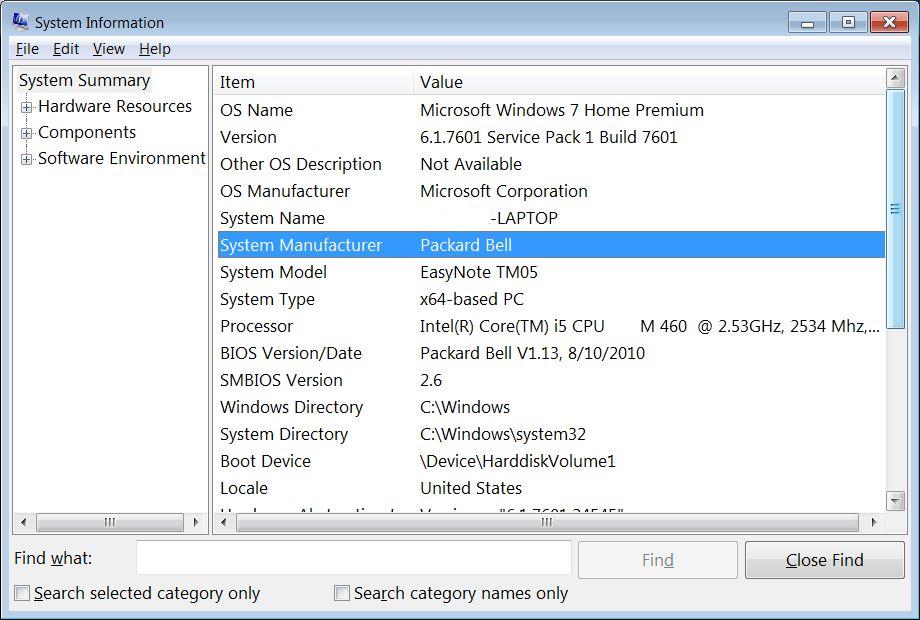
You can also type “msinfo32” at the Run option in the Start menu to get the system details.

Windows 7 System Information

The System Information tool will show the system manufacturer, system model, and architecture (32-bit or 64-bit).

Using this information it is possible to check for Windows 7 drivers on the manufacturer’s website.

If Windows 7 drivers are not available, you can also try Windows Vista drivers, as they are often compatible.

The benefit of this method is that manufacturers offer full installers for the Windows 7 drivers, including any required, or recommended extra software. Although the extra software is not always required, it can offer options to tweak, or enable, device features.

If the PC manufacturer does not offer Windows 7 drivers for your computer, the next step is to check the device manufacturer’s website (e.g. Intel, Realtek, Nvidia). If you know the details for the hardware component, you can check for Windows 7 drivers there.

Cannot find the Windows 7 driver

Still cannot find a driver for Windows 7 for your device? As mentioned before, check if Vista (or even Windows 8) drivers are available. It is possible these work on Windows 7 as well.

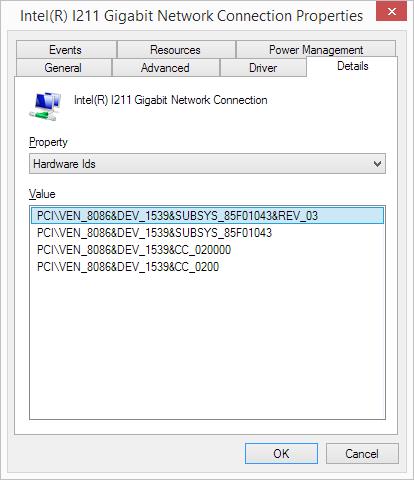
If no drivers are available, the next step is to search for Windows 7 drivers based on the hardware ID (or compatible hardware ID) of the devices. These are unique identifiers for each device.

Use the Device Manager to check the Properties of a device using the Details tab.

Windows 7 Drivers - hardware ID

With this information, you can try and find a driver online. In this case, you are looking for a Windows 7 driver that is not necessarily from the same computer manufacturer. For example, Dell might offer Windows 7 support for a device that is not supported by Lenovo.

Always be careful to only download drivers from reputable sources. There are many sites that include extra software or links in driver downloads.

Use DriverFinder to find Windows 7 drivers

If manual searching for a Windows 7 driver is not giving any results, you can try DriverFinder. DriverFinder is a program that does the searching for you. Using the computer, device, and Windows version information, the program locates drivers for your devices.

The benefit of using DriverFinder is that it uses a proprietary repository of drivers. Driver and device information from Microsoft and most PC and hardware manufacturers is included to find the right driver for your Windows 7 PC.

And unlike many other solutions, DriverFinder provides full installers when available (not stripped down driver with essential files only – INF, SYS, and CAT files).

To try it, download DriverFinder and install the program.

Lenovo Webcam Driver for Windows

Most Lenovo notebooks and laptops come with integrated webcams. As such, it’s important to install the correct Lenovo webcam driver for Windows.

Different Lenovo devices use different webcams. This means they require require different drivers too. Depending on the Windows version installed on your device, drivers may be included with Windows itself – or require a separate download and install.

Lenovo uses multiple hardware vendors for integrated webcams. So depending on your device model, you might need a Realtek, SunPlus, LiteOn, Chicony, Vimicro, or Ricoh camera driver. Lenovo itself will refer to the camera as an Integrated Camera driver, Easy Camera driver, or even just USB Camera driver.

Manual: Download Lenovo Webcam Drivers from Lenovo PC Support

To download drivers for your Lenovo ThinkPad, IdeaPad, Yoga, or other portable device from the Lenovo Support site, follow these steps.

  1. Open a web browser.
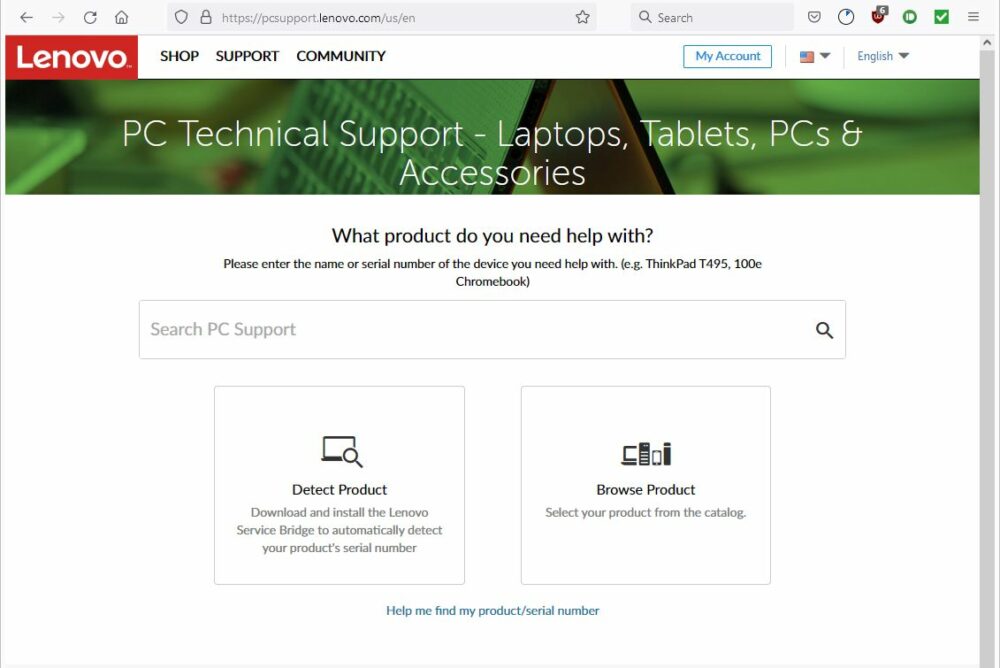
  2. In the URL, type “pcsupport.lenovo.com” and press Enter.
  3. Wait for the support site to load. The URL should redirect to your localized version of the Lenovo support website. If not, you can change the country and language in the top-right corner of the website.
    Lenovo PC Support site
  4. Next, enter the device model in the search box, or click the Detect Product or Browse Product to locate the support page for your Lenovo device model.
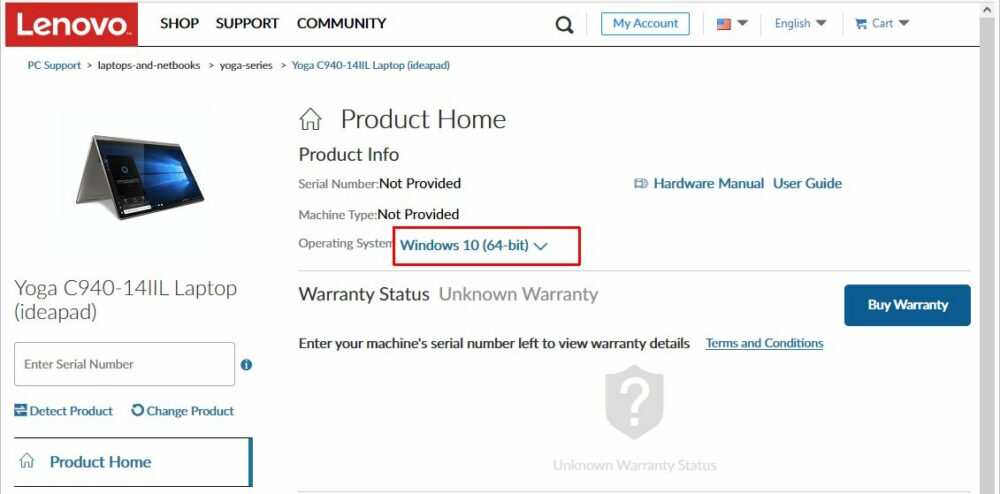
  5. On the device support page, select the Windows version.
    Lenovo Select Windows Version
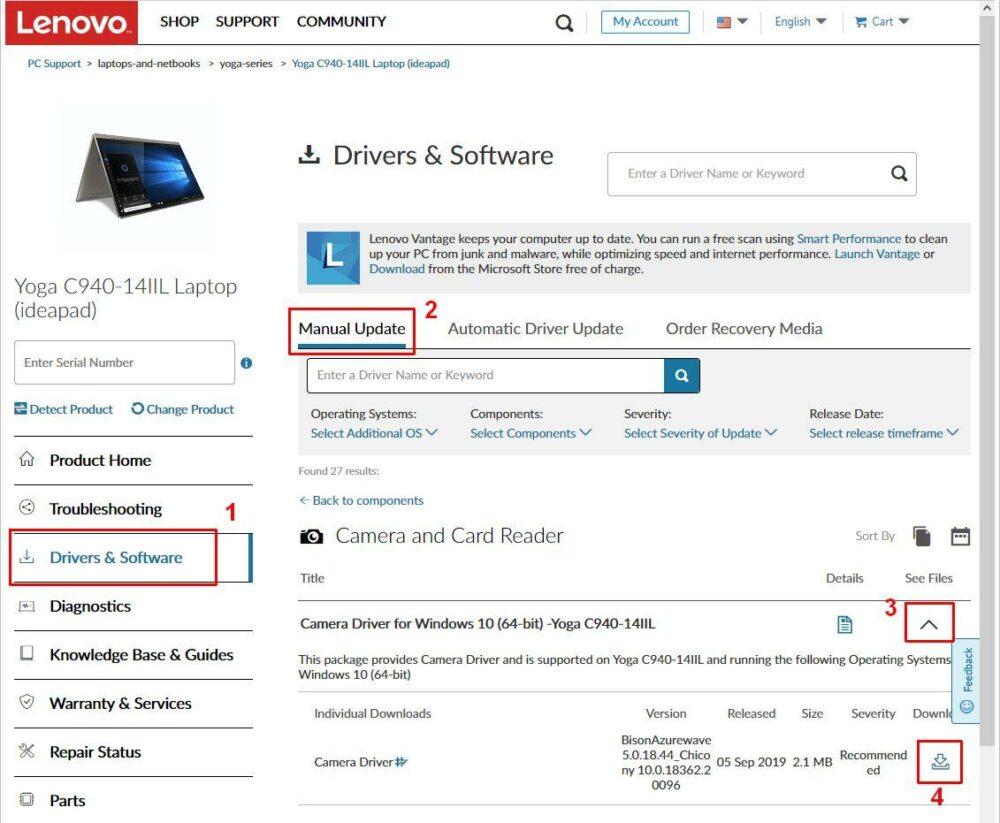
  6. On the updated page, click the Drivers and Software link (1) on the left-hand side, then select Manual Update (2) and pick the driver category.
  7. Click the symbol (3) to show the files, and then click the download button (4).
    Download Lenovo Webcam Driver
  8. Once the download is complete, execute the downloaded file to install the Lenovo webcam driver.

Automated: Find and Download Lenovo Webcam Drivers Using DriverFinder

If you cannot find the webcam driver for your Lenovo device, you can use DriverFinder to find the driver for you. DriverFinder automatically scans your computer devices (working or not working) and finds the right driver for your device and Windows version.

Using a third-party application can be very useful, especially when Lenovo doesn’t support your device anymore nor the Windows version you have installed your device.

Simply download the DriverFinder program installer and execute the downloaded file to install the program. Activate the program after installation, and then run a scan (click the Start Scan button).

DriverFinder Start Scan

DriverFinder will show a list of devices found in (or connected to) your computer and a list of suitable drivers for download.

Click the Download button for the Lenovo Webcam and install the driver.

Troubleshooting: Lenovo Webcam Problems

If your webcam still not working after you’ve downloaded and installed the appropriate driver?

Here are some quick troubleshooting tips to get your Lenovo webcam to work.

  • Make sure nothing is blocking the device. Some devices have a protection/privacy slider. (It’s also possible that someone put a protection sticker on it for privacy reasons.) Remove it.
  • Use the Fn key on your keyboard to turn on the webcam device. This is not applicable to all devices. Just check your keyboard for a camera symbol (in most cases it is F8).
  • Both Windows 8.1 and Windows 10 have Privacy Settings that can prevent access to the webcam. Settings -> Privacy -> Camera: Let Apps use my camera should be On.
  • After installing the driver, the device should automatically start using the driver. If not, it can help to run a Scan for hardware changes in the Device Manager (in the Action menu). This option is not available in all Windows versions.
  • In Device Manager, right-click the camera device and in the popup menu, select Uninstall. Reboot the device and the camera should get reinstalled. This resets the driver configuration, and can help fix the issue.


[Easy Fixes] Windows Update Failed

If you have been working with Windows for some time, you will probably have faced this scenario: Windows Update Failed. For some reason, the  updates failed partially, or did not get installed altogether.

And although Microsoft has been trying to improve things, failed updates happen will all versions of Windows, up to Windows 10.

Windows Update Failed – Common Error Codes

The reasons why Windows Update Failed are various. And as a result, there are many error codes associated with this problem. Some are generic, while others pertain to a specific update or specific problem.

Here are some examples of error codes that are linked to failed Windows updates:

0x800705b4 – related to Windows Defender
0x800F0906, 0x800F081F, 0x800F0907 – .NET framework related
0x800F0922 – Windows 10 upgrade related
0x80240034 – downloading of update(s) failed
0x80242006​ – update contains invalid metadata
0x80244018​ – Internet connection related
0x80070070​ – disk space related
0x80070103 – driver related

Some other examples are: 0x8007000E, 0x80D02002​, 0x8007000D​, 0x80246008​, 0x80096004​.

This list is definitely not complete. Sometimes there is a useful error description, but often it is not quite clear what caused the Windows Update process to fail.

Windows Update Failed – Common Causes

The obvious question to ask is: what caused the Windows Update to fail?

As in many cases with complex software, there can be quite a few causes. It is important to realize that the update process is basically a sequence of downloading and installing software. So availability of the source, a reliable connection for the download, and storage space for the download are the first essentials. But after that, the execution of the update installation can still cause problems.

To sum it up, the common causes for Windows Update to fail are:

  • Insufficient disk space – space is needed for storing the downloaded updates, as well as for the execution of the update installation.
  • Dependencies – An update can depend on something like a specific version of the .NET framework being installed, or a specific service having been started.
  • Failed previous updates – If a previous update has failed, it might have left (partial) installation files behind, or installed only partially causing problems with the next update.
  • Install sequence – If you have a lot of updates pending, all are downloaded in one go and installed once downloaded. If a specific sequence is required for some updates, this might fail.
  • Hardware incompatibility – In general, Windows prevents installing updates on incompatible systems. But there is a reason why Windows 10 is not supported on older systems. Hardware conflicts and limitations can definitely cause problems with software being installed.
  • Driver incompatibility – Windows 10, by default, includes device driver updates in the install process. If a new driver version is incompatible with the hardware version present, the update may fail. Trying to install a driver that is a lesser match than the installed driver can cause error 0x80070103.
  • Corrupt update files – This can be the result of download issues, where the update files did not completely download correctly.

Given the possible causes above, this also means that there are some relatively simple steps that can help solve Windows Update Failed situations.

Windows Update Failed – SIMPLE FIXES to Try Immediately

Try these steps – preferably in this sequence – to see if they are the cause of your Windows Update problem.

Check your disk space and free up space if needed. Although Windows Update reserves space for update files, it is still possible that a disk space limitation is the cause of the problem. Just check the available disk space on the system drive (check the Properties for the C: drive in most cases). And run a disk cleanup to free up some more space.

Restart your PC and try again – If the installation sequence is important for the updates being installed, simply reboot your computer and restart Windows Update to fix the issue.

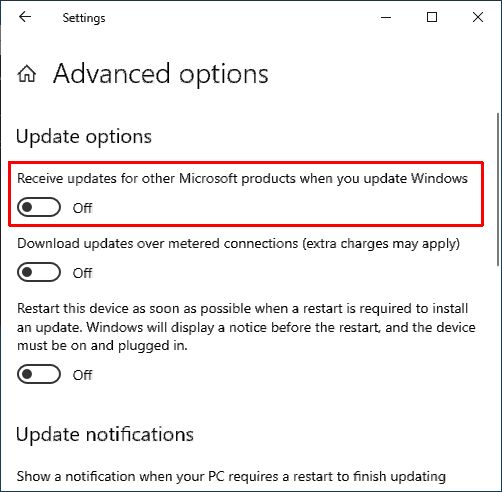
Select which updates to install – If you are running other Microsoft software (like Office), it can help to limit Windows Update to the core only.

Using the Advanced options in Windows Update, you can tell Windows to not Receive updates for other Microsoft products when you update Windows.

Disable updates for other MS products

Unplug external devices – In most cases, this will pertain to USB devices. Examples are printers, scanners, webcams, end external drives. Make sure not to unplug the mouse and keyboard if they are connected through a USB port, because then you can’t reboot the PC anymore.

Unplugging external devices can also help in case the Windows Update failed as a result of driver updates, or hardware incompatibility. It is also possible to disable automatic driver updates in Windows. That will prevent new driver updates from being downloaded automatically. Simply update the drivers after the Windows Update problems are resolved.

We recommend downloading DriverFinder for this. DriverFinder is a separate driver update program that will find the right – and latest – drivers for all your hardware.

After unplugging the devices, restart your PC and try Windows Update again.

Windows Update Failed – DEEP DIVE Fixes

Reset the Windows Update Cache

As with many computer actions, the Windows Update process uses temporary storage. One such element is called the Windows Update Cache. It is also referred to as the SoftwareDistribution directory.

Clearing the Windows Update cache is really nothing more than deleting the SoftwareDistribution directory (or its content). But since this file location is used by the Windows Update service, you can’t delete it when this service is running.

To delete the SoftwareDistribution directory:

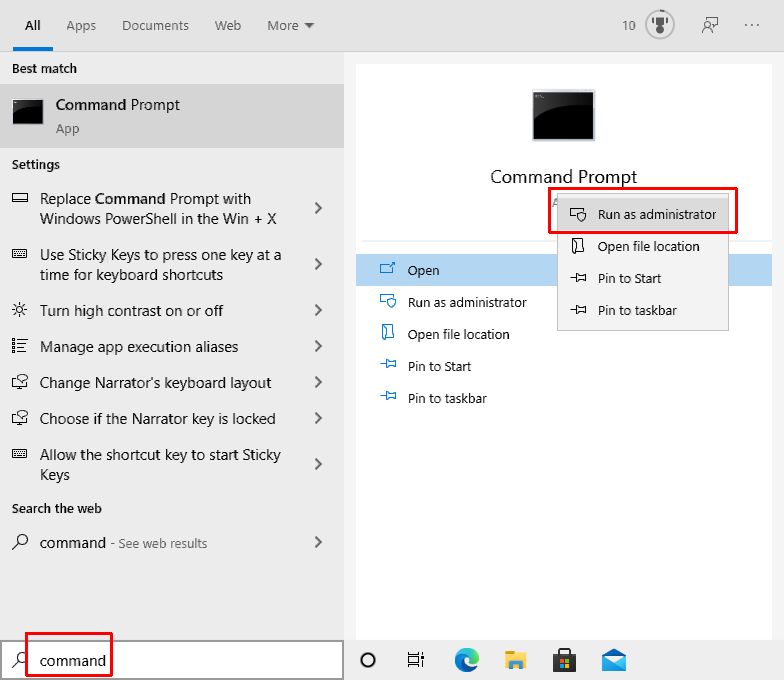
  1. In the Search box on the taskbar, type ‘command’.
  2. In the Search results, right-click the Command Prompt.
  3. In the popup menu, click Run as administrator.
    Windows 10 Administrator Command Prompt
  4. When the User Account Control window shows, click the Yes button.
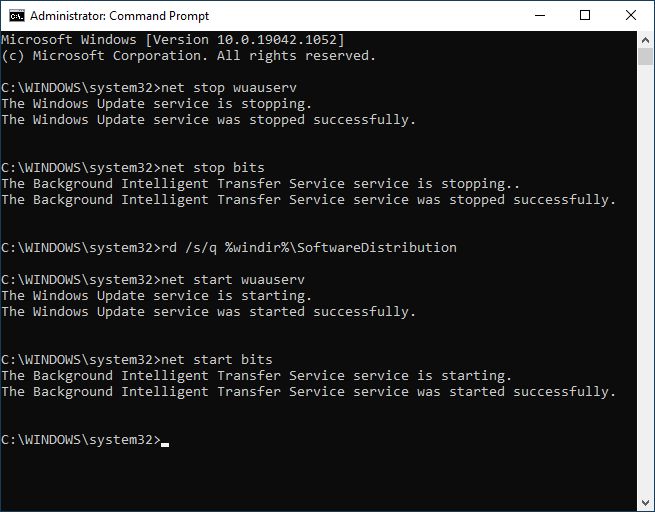
  5. Once the Command Prompt window shows, type the following commands (press Enter after each command).
    net stop wuauserv
    net stop bits
    rd /s /q %windir%SoftwareDistribution
    net start wuauserv
    net start bits
    Windows 10 - Clear Update Cache
    Note: If you are not comfortable deleting the SoftwareDistribution directory, you can rename it rather than deleting it (ren %windir%SoftwareDistribution SoftwareDistribution.bak).
  6. Close the Command Prompt window, and then retry Windows Update.

If for some reason these steps fail or seem too complicated for you, there is another way.

To ensure the SoftwareDistribution directory can be deleted, you can start your PC in Safe Mode.

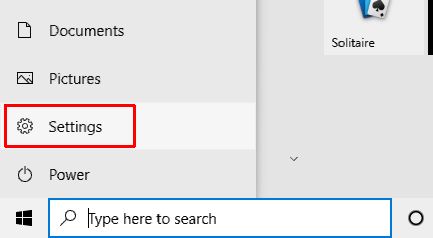
  1. Click the Start menu icon, and in the Start menu click Settings.
    Windows 10 Settings
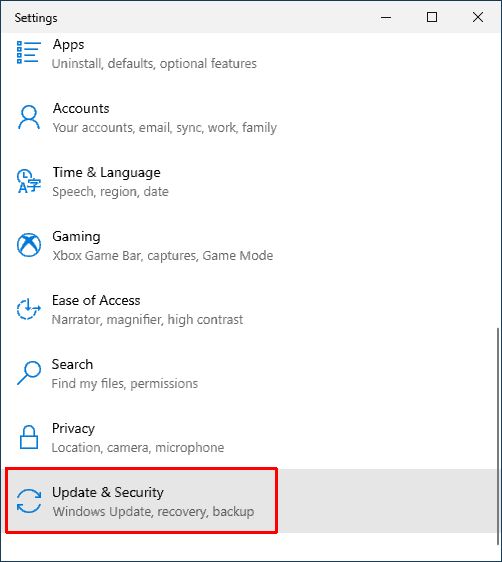
  2. In the Settings window, click the Update & Security option (last entry, so depending on the size of the window, you might need to scroll down).
    Windows 10 Update & Security
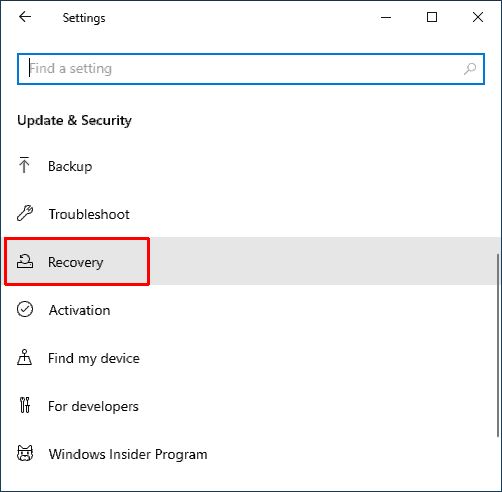
  3. Next, select the Recovery option.
    Windows 10 Update Recovery
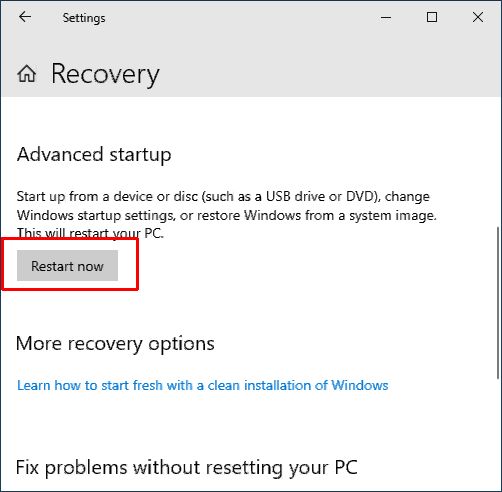
  4. And finally, click the Restart now button in the Recovery window.
    Windows 10 Recovery Restart
  5. Once your PC restarts, you will see the Choose an option screen. Select Troubleshoot.
  6. In the Troubleshoot screen (next step), select Advanced options.
  7. In the Advanced options screen, select Startup Settings.
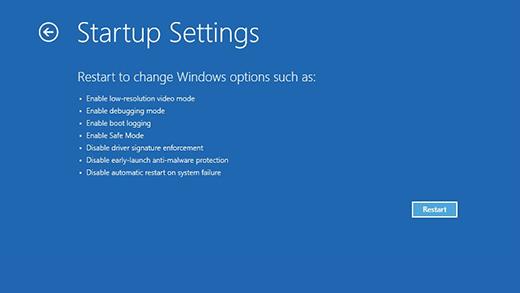
  8. The last step here is to click the Restart button in the Startup Settings screen.
    Windows 10 Recovery Restart
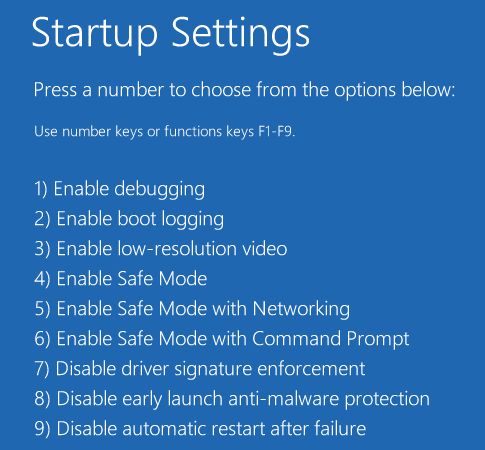
  9. Again the PC will reboot, after which you will see a list of options. Press the 4 or F4 key on your keyboard to start the PC in Safe Mode.
    Windows 10 Startup Settings
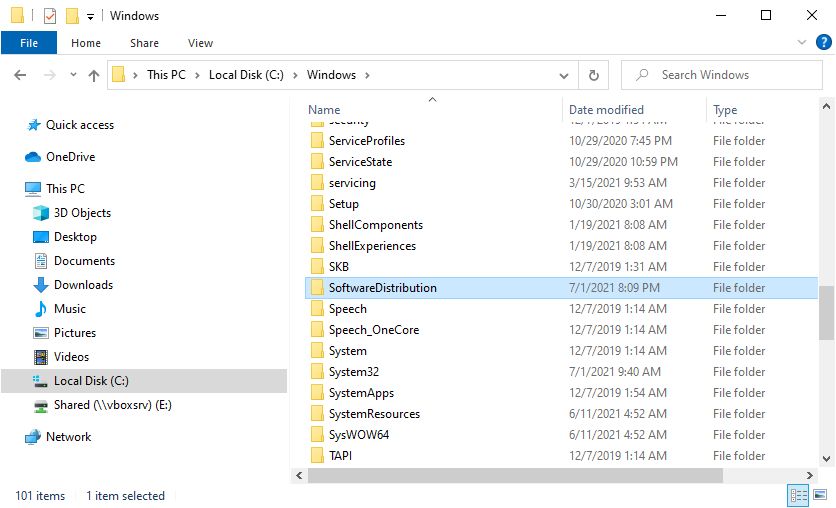
  10. Once Windows starts, you can open a File Explorer window, navigate to the Windows folder (typically C:Windows) and delete the SoftwareDistribution folder.
    Tip: Press and hold Shift and then Delete to permanently delete the folder rather than moving it to the recycle bin.
    Winodws 10 SoftwareDistribution folder
  11. After this, reboot your PC again (it will start in normal boot mode), and retry the Windows Update.

Run the System File Checker

The System File Checker, or SFC, does exactly what the name says: it will check and repair system files. This tool has been part of Windows since Windows XP and is still present in Windows 10.

The exact function of the tools is described as “Scans the integrity of all protected system files and replaces incorrect versions with Microsoft versions”. This is a useful tool to use for many Windows problems, not just if Windows Updates failed.

How to run the System File Checker.

  1. Open a Command Prompt window with Administrator access.
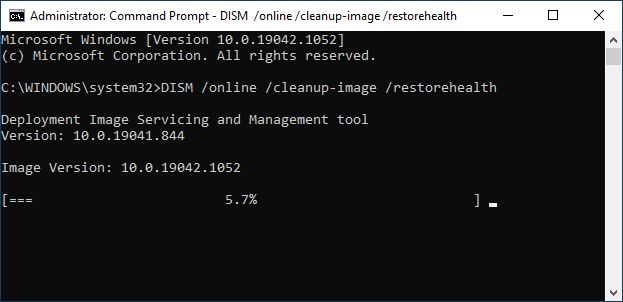
  2. For Windows 8 and later it is recommended to run the DSIM tool before running the SFC tool. DSIM (or full: Deployment Image Servicing and Management) can be executed using the command: DISM /online /cleanup-image /restorehealthWindows 10 run DSIM
    Note: Like the SFC command, the DSIM command can take a bit of time to complete.
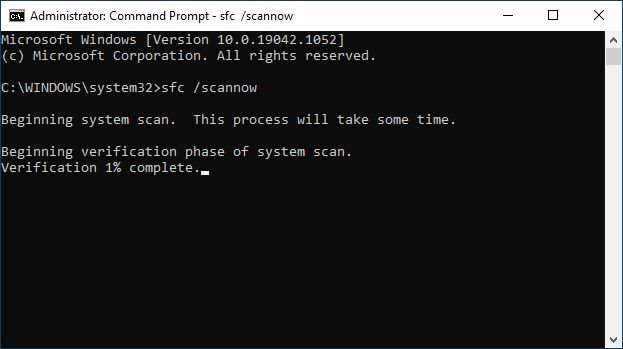
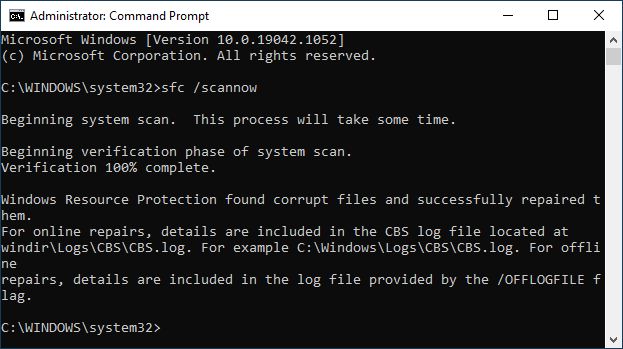
  3. In the Command Prompt window type the command: SFC /SCANNOW and press the Enter key.
    Windows 10 run SFC / SCANNOW
  4. Now, wait for the command to complete. This can take some time.
    Windows 10 SFC complete
  5. Once the command completes, close the Command Prompt window and restart the computer.

Run the Windows Update again after this to check if the issue is resolved.

Download and Install Updates Manually

Although it is best to have the automatic update process install Windows updates, it is possible to download and install them manually.

Microsoft has a download page for Windows 10. This page can be used to download the Windows 10 upgrade tool and Windows 10 installation media. Useful if you need a copy of Windows 10 installation files to recover corrupted system files, or if you need to reinstall Windows 10.

Apart from that, major updates can also be downloaded from there.

For individual Windows Updates, you need to visit the Windows Update Catalog. There you can search for individual updates (KB numbers).

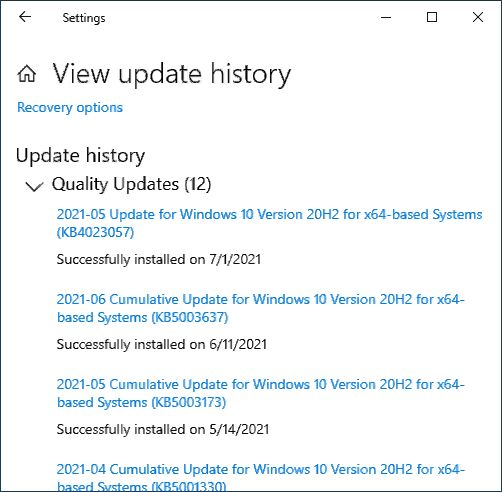
To know which updates to search for, simply go to the View update history (in the Windows Update settings).
View Windows 10 Update History

Look for the entries that show “Failed” instead of “Successfully” and take note of the KBxxxxxxx number.

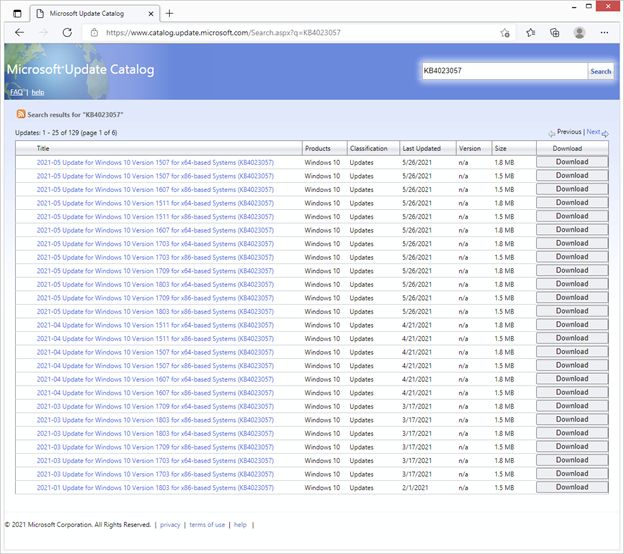
Now visit the Windows Update Catalog in a browser. Type the KB number in the search field, and click Search.
Microsoft Update Catalog

Use the Download button to download the update manually. If more than one result shows, you typically want to download the top one (newest date).

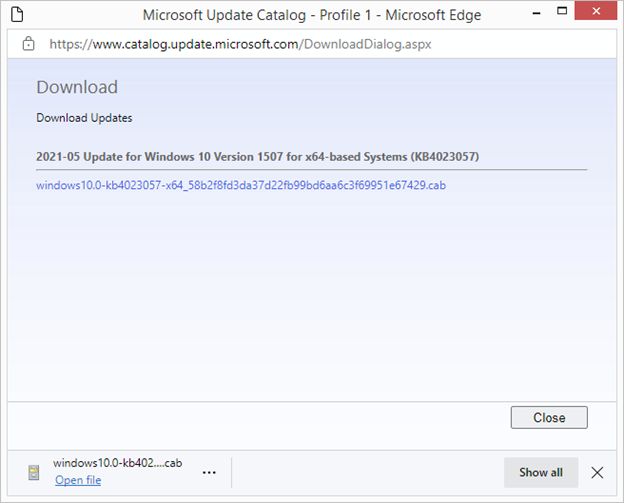
After you click the Download button, a new window will show with a link to the .CAB file. Click the link to download the file.
Download Cab file from MS Update Catalog

Once the file completes downloading, you can open the file. In this example, which uses an Edge browser update, simply click the Open file link. This will open a Windows Explorer window with the default download folder selected.

The file should be an .MSI file (Microsoft Installer), which can be executed by double-clicking it. You can also select it and press Enter on the keyboard.

Follow the installation instructions presented to complete the installation of the Windows Update.

Disable Your Anti-Virus Software

This solution should really only be used if all others fail since you will put your PC at risk for a short while. But in some cases, the download of Windows Update files does not complete due to Windows Defender or another AV program.

IMPORTANT: Make sure you re-enable the your anti-virus software immediately after completing the Windows Update!

How to disable Windows Defender in Windows 10.

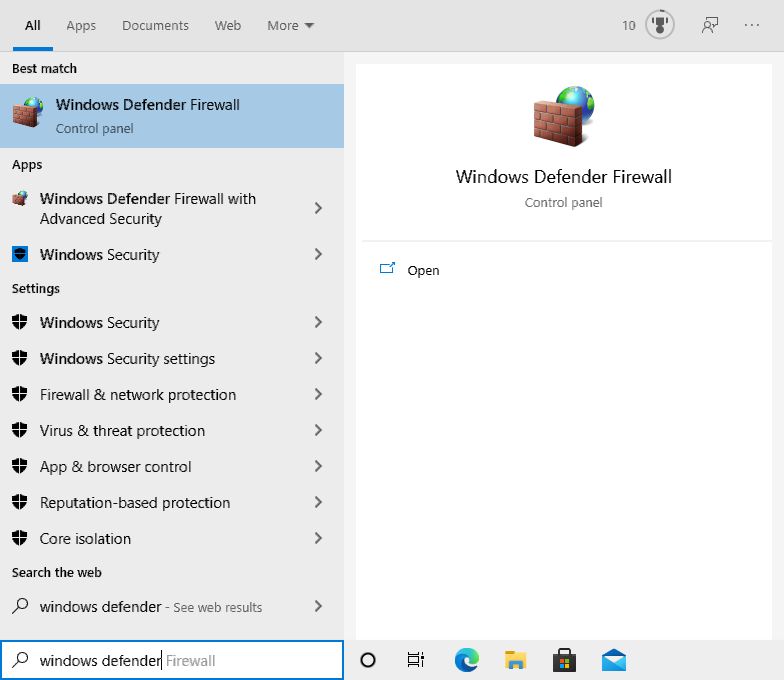
  1. In the Search box on the taskbar, type ‘windows defender’.
  2. In the Search results, click the Windows Defender Firewall icon.
    Windows 10 Open Defender
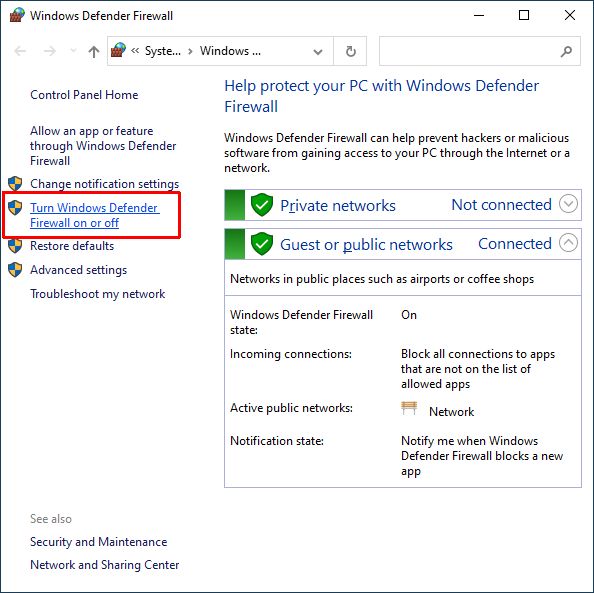
  3. This will bring up the Windows Defender Firewall windows. Click the link named Turn Windows Defender Firewall on or off.
    Windows Defender Settings
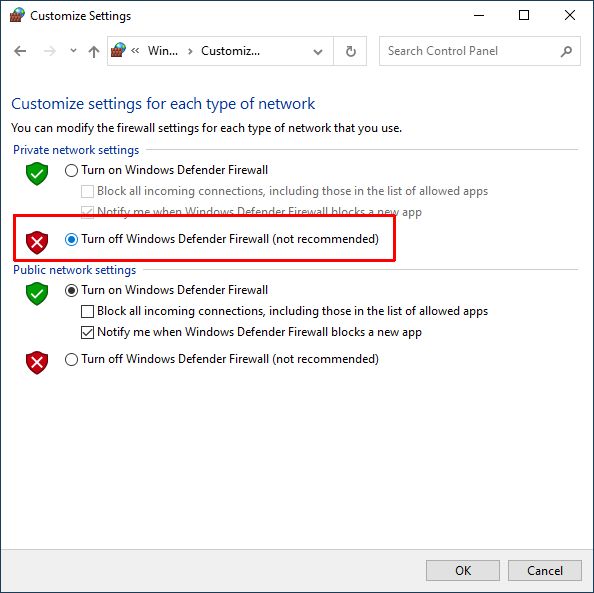
  4. In the Customize Settings window, select the radio button labeled Turn off Windows Defender Firewall (not recommended) in the Private network settings section.
    Windows 10 Disable Windows Defender
  5. Click the OK button to confirm.
  6. Close the Windows Defender Firewall window.

With Windows Defender disabled, run Windows Update again to see if the problem is resolved.

For other Anti Virus software, please check the vendor’s instructions on how to temporarily disable their software. Many solutions have a taskbar icon which shows a popup menu when clicked (or right-clicked). The menu often has an option to disable the AV software for a limited time.

Check Your PC’s Download Settings

Disable LAN-Proxy Settings

If you’re using a proxy, try disabling it to see if it will fix the update failure issue.

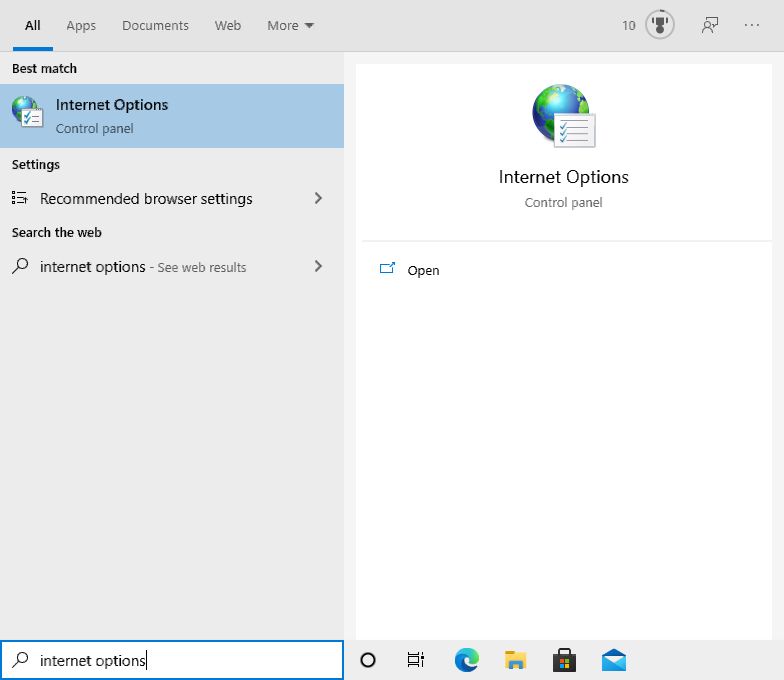
  1. In the Search box on the taskbar, type ‘internet options’.
  2. In the Search results, click the Internet Options icon.
    Windows 10 Internet Options
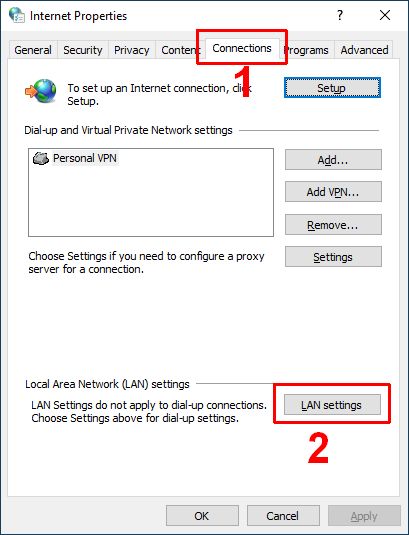
  3. This will open the Internet Properties dialog box. Select the Connection tab (1).
  4. Now click the LAN settings button (2).
    Internet Connection Properties
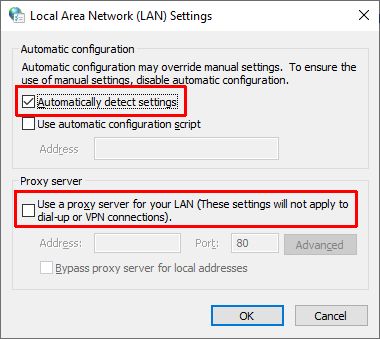
  5. This will bring up the Local Area Network (LAN) Settings window. Make sure you have the checkbox named Automatically detect settings selected.
  6. In the same window, also make sure you have the checkbox named Use a proxy server for your LAN (…) unchecked.
    LAN Disable Proxy
  7. Click the OK button to confirm.
  8. Click the OK button in the Internet Properties dialog box.

After this, try Windows Update again.

Background Intelligent Transfer Service

BITS is short for Background Intelligent Transfer Service. Windows update uses this service to download updates in the background, while you can still actively use your Internet connection.

So just make sure the BITS service is running properly on your system using these steps:

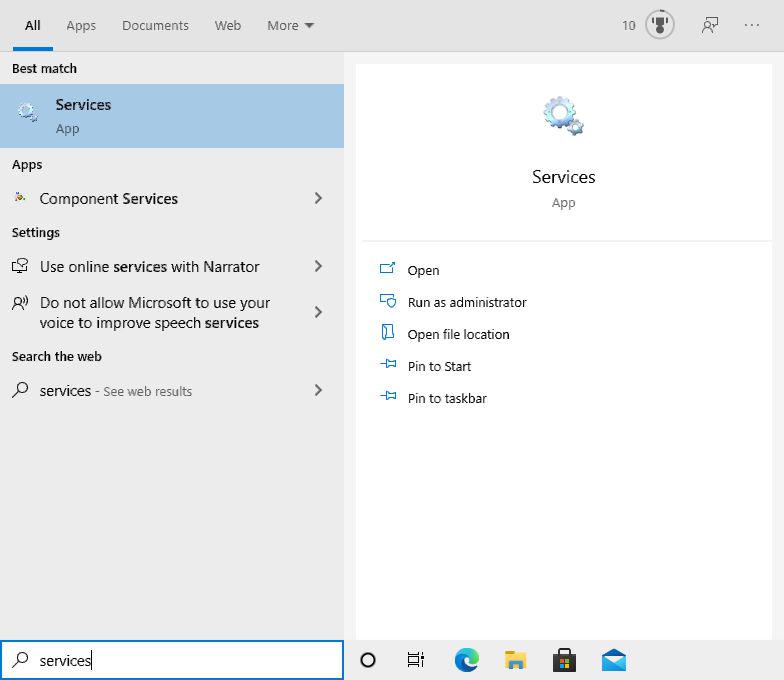
  1. In the Search box on the taskbar, type ‘services
  2. In the Search results, click the Services App icon.
    Start Windows 10 Services App
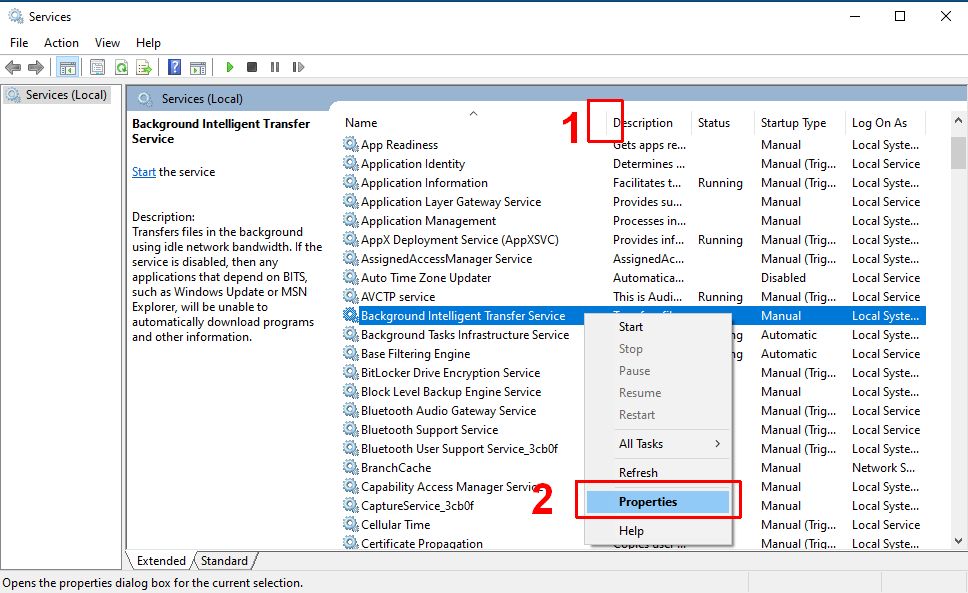
  3. This will bring up the Services window. Scroll down in the list until you see the Background Intelligent Transfer Service.
    Tip: You can widen the Name column by clicking and dragging the header separator (1).
  4. Right-click the Background Intelligent Transfer Service line, and in the popup menu, select Properties (2).
    BITS service
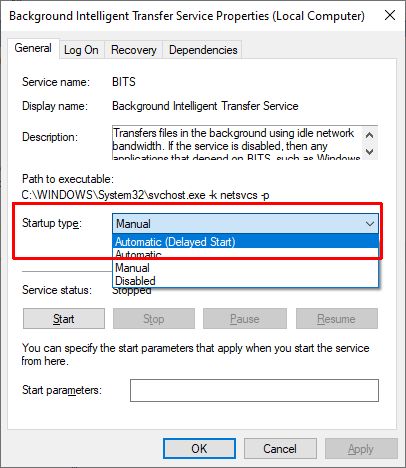
  5. This will bring up the BITS Properties window, with the General tab selected. Change the Startup type to Automatic (Delayed Start).
    Automatically start BITS in Windows 10
    Note: This change will ensure the BITS service is started automatically when the computer starts. The Delayed Start option will result in the service being started after all other services, which can reduce startup times.
  6. Click the OK button to confirm.
  7. Finally, close the Services window.

After this,  restart your system and try Windows Update.

Hardware Devices and Drivers

As mentioned earlier, hardware device and driver compatibility issues can Windows Updates to fail.

Drivers are a critical part of the Windows operating system as they ensure all devices function properly. But that also results in driver problems often being the cause for failed Windows Updates.

Unplugging external, non-essential devices is a first step in trying to fix Windows Update failed errors (if caused by devices or drivers).

Disabling automatic driver updates in Windows is another step to exclude drivers from being updated by Windows. This will help if the hardware device that is causing problems cannot be disconnected/removed.

After either of these two steps, run Windows Update again to see if the problem is fixed.

If none of the above works, try the Windows Update Driver Cleanup feature.

If driver updates are a reason for a Windows Update to fail, you can try to clean up existing or old driver installation files. It can be done with a single command.

  1. Simply open a command prompt with administrator-level access (see earlier instructions in this article).
  2. In the Command Prompt window type the command:
    rundll32.exe pnpclean.dll,RunDLL_PnpClean /DEVICES /DRIVERS /FILES /MAXCLEAN
    And then press the Enter key.
    Note:
    The command will complete without showing any output in the Command Prompt window. The result of this command is actually added to a log file C:WindowsINFsetupapi.dev.log. So if you are interested in the details, open that file and scroll down to the bottom of the file for the latest changes.
  3. Close the Command Prompt window.

After that, run the Windows Update process again to see if your problem is solved.

Specific Tips for Windows 10

NOTE: ALL of the above troubleshooting tips can also be tried if you’re using Windows 10. The following though are specific to this particular Windows version.

In Windows 10, Microsoft has incorporated a special Update Troubleshooter. It analyzes the system for common causes and problems related to failed Windows Updates. If it finds a problem, it will try to fix it automatically.

Run the Windows Update Troubleshooter

  1. Click the Start menu button, and in the Start menu, click Settings.
  2. In the Settings window, select Update & Security.
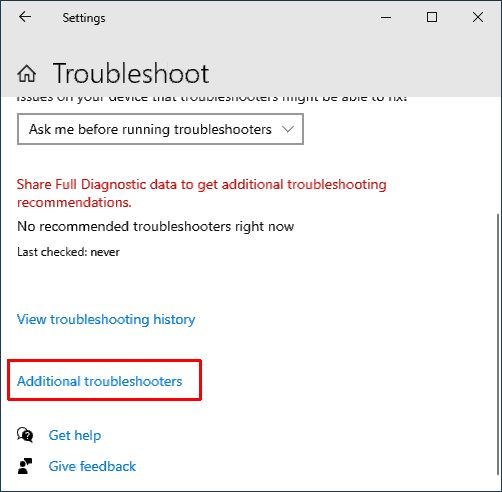
  3. Next, select Troubleshoot, and then click the link called Additional troubleshooters.
    Windows Update Failed - addional troubleshooters
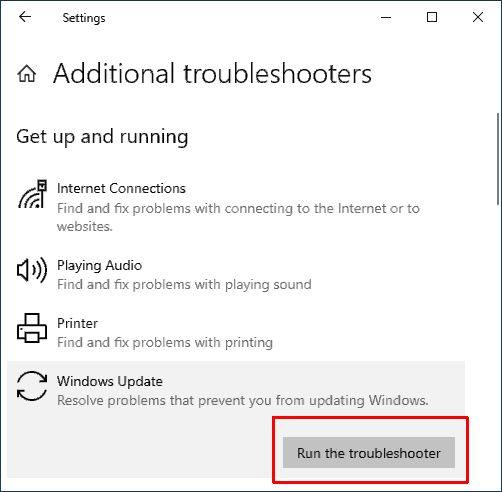
  4. Now, click the Windows Update option under Get up and running, and then click the Run the troubleshooter button.
    Run Windows 10 Update Troubleshooter
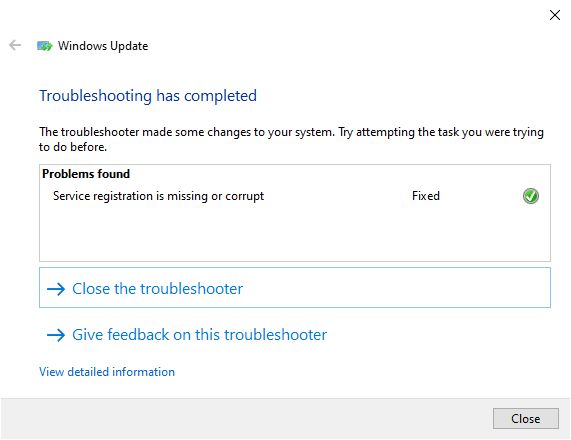
  5. The Windows Update troubleshooter will start analyzing the system. Wait for it to complete. Any problems that were found (and fixed) are shown in the window.
    Windows 10 Troubleshooter Complete
  6. After completion, click the option to Close the troubleshooter.
  7. Restart your PC and run the Windows Update again.

If after restarting, Windows Update fails again, try running the Windows Update troubleshooter a second time.

Pause and Un-Pause Windows 10 Updates

Although this might seem like a strange suggestion, pausing the updates will clear the downloaded updates. So un-pausing the updates after this might fix your problems with Windows Update.

In Windows 10 follow these instructions:

  1. Click the Windows Start button, and then click Settings.
  2. In the Settings window, click Update & Recovery.
  3. Next, select Windows Update.
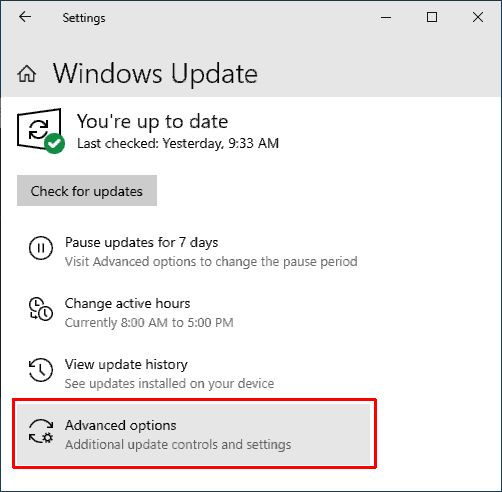
  4. In the Window Update window, select Advanced options.
    Windows Update Advanced options
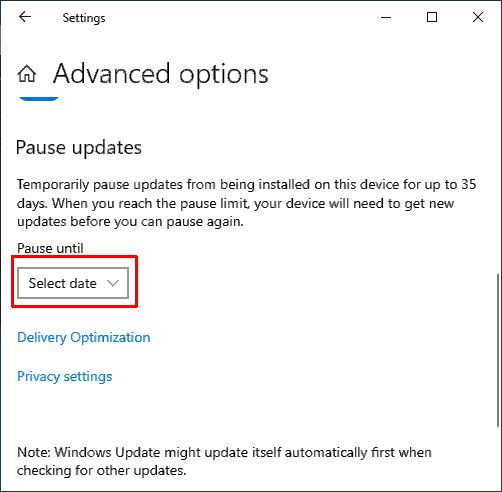
  5. In the Advanced options screen, scroll down until you see the Pause updates option.
  6. Click the Select date control and simply select a date in the future. Since we are just pausing the updates briefly, the duration of the pause period does not matter.
    Windows 10 Pause Updates
  7. No need to save anything. Once you changed the date, close the Settings window and restart your PC.
  8. After the PC restarts, go to the Settings again, select Update & Recovery, and then Windows Update.
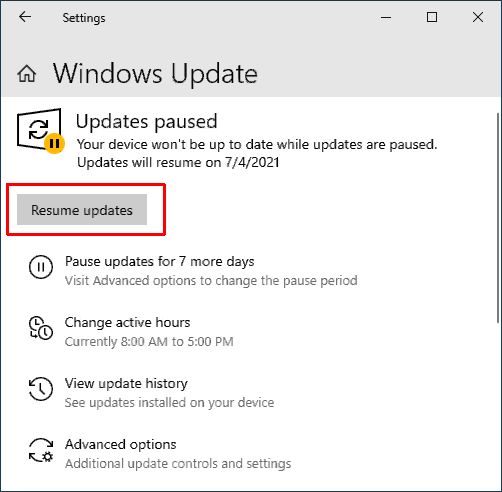
  9. It will show Updates paused. Click the Resume updates button to un-pause the Windows Update process.
    Windows 10 Resume Updates

Windows will immediately start checking for updates again and hopefully complete downloading and installing updates after this.

Windows Update Failed – Still Not Solved?!?

If Windows Update still keeps failing, try skipping an update.

Of course, this needs to be assessed on an individual scenario basis. Critical security updates should not be skipped, while optional, non-essential updates can be.

If nothing works, and critical updates fail, or too many updates fail, the only real solution might be to do a fresh install of Windows on your system.

Copyright 2009 and Beyond - DriverFinderPro.com - All Rights Reserved