Hi Folks! I'm Anthony Danes and I'm a Technical Writer. I have been writing for various tech sites since 2007!I grew up with PCs and Windows, and have been a full-time programmer in the past. This has made writing about anything 'tech' a natural by-product :)
Is your AOC monitor not recognized by your PC? Then you need an AOC monitor driver for Windows.
Monitor drivers in general are the same across Windows versions. Drivers for Windows 7 will work in Windows 8.1 and Windows 10 as well. In many cases even older drivers will work fine. The reason for this is that monitor drivers only contain information about the monitor’s characteristics, like supported screen resolutions and color profiles. So a change in Windows versions does not mean your monitor is no longer usable.
In this article we’ll explain where you can find drivers for your AOC monitor and how to install it.
Manually Install a Monitor Driver for Your AOC Monitor Model
The first step is to identify your AOC monitor model. Simply look at the back of your monitor for the type indication.
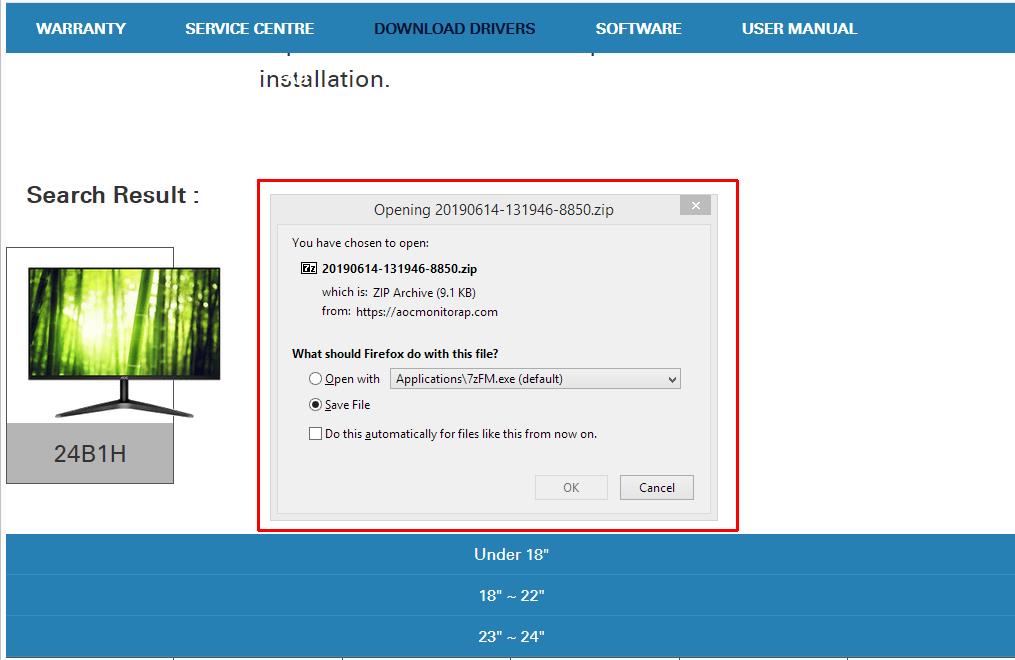
The next step is to find and download the appropriate AOC monitor driver. Go to the AOC driver download site. Enter your AOC monitor model number in the search field and click the search icon (1).
If you are not able to find the AOC monitor model using the search bar, you can locate it by browsing the size options below the search option (2).
Next, click on the monitor icon on the webpage to download the driver file. Depending on the browser you use, you might need to choose a download location and confirm the file save operation.
The downloaded file is a ZIP file. Extract the contents to a folder and then manually install the AOC monitor driver in Windows.
Instructions: Don't know how to install monitor drivers? Click here to manually install a monitor driver in Windows 10. The instructions apply to most Windows versions, due to the nature of this type of driver.
Automatically Install a Monitor Driver for Your AOC Monitor Model
If you are finding it difficult to find the right driver for your AOC monitor, you can try our DriverFinder program. The program automatically identifies all hardware on your computer, including your monitor, and finds the right driver for it.
The licensed version of DriverFinder includes free technical support to help you install the drivers if you face any problems.
A side-benefit of this approach is that DriverFinder will enable you to update all your device drivers. So not only will your AOC monitor be properly supported by Windows, you will also have up-to-date graphics card drivers!
After installing the AOC monitor driver, Windows should now properly recognize your monitor. You can set the optimal resolution for your screen and rely on colors being correctly displayed.
I hope you enjoyed reading this article.
If you’re still having monitor issues, feel free to get in touch and I’ll do what I can to help you!
Going through Windows 10 PC won’t wake up from sleep mode problems? Solve this issue using these easy-to-follow fixes with pictures.
What do you do if your Windows 10 PC won’t wake up from Sleep Mode?
Sleep Mode is very useful for saving battery life on a laptop because saving on electricity is a good thing. More battery juice, longer laptop use. Yey!
It’s also also useful for desktop PC’s. Windows uses Sleep Mode to save the current status of your PC and easily restore it on wake-up. Wake-up is typically achieved with the move of the mouse, or tap of a key on the keyboard.
But sometimes… these ‘wake up’ things you need to do don’t work at all. So what do you do? Let’s begin…
Quick fix: Reboot!
Press the power button for about 10 seconds. That should power down the system completely. Press the power button again to restart it. After that, you can use the tips in this guide to figure out why your Windows 10 PC won’t wake up from Sleep Mode to prevent it from happening again.
Note: you should always try to shut down your system the normal way. Do this force shutdown tip only when necessary. Also, pls. don’t revert to this ‘fix’ as your go to solution for Sleep mode problems. That won’t fix the problem and can harm your system if you do it often.
Is your PC in Sleep or Hibernate mode?
First though, please note that there is a difference between your PC going into Sleep Mode or Hibernate Mode. Both are meant to save power and allow for easy continuation of work by starting Windows faster. In Sleep Mode the computer still uses a little power since the state is stored in RAM (computer memory), while in Hibernate Mode the state is saved to disk (a hibernation file), and then PC turns off.
On a laptop though, even if a computer goes into Sleep Mode, Windows will still go into hibernation mode if the battery runs out.
Waking up from Hibernation mode
Waking up from hibernation not only takes longer, but it also requires different actions. On a laptop, you obviously first want to make sure there is sufficient power, so plug it first to charge the battery.
Opening the lid on your laptop will normally bring Windows back on from hibernation mode. If that does not work, press the power button. On a desktop, the power button should be used.
Waking up from Sleep mode
To wake up a laptop from SleepMode you use the same actions as on a desktop (mouse or keyboard). Some PCs have a separate sleep button. If so, you need to press that to wake up the laptop from Sleep Mode.
Ok, say you’ve established that your system is truly into Sleep Mode, and it really won’t wake up. Now what? Read on for the fixes folks!
Check your mouse or keyboard settings
Often, it’s your mouse or keyboard that’s the problem. To fix this, follow these steps.
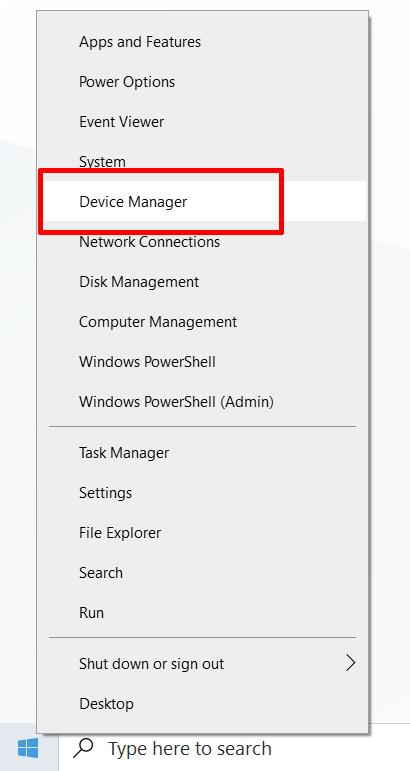
Right-click the Start menu button and select Device Manager.
In Device Manager, you will see a list of device categories. Open the category called Keyboards. (Click the down arrow in front of it).
Next, right-click your keyboard device in the list, and in the popup menu, select Properties.
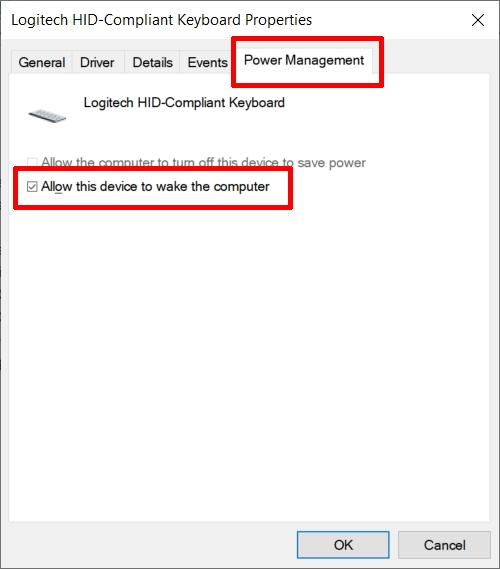
In the keyboard Properties window, select the Power Management tab.
After that, make sure the checkbox named Allow this device to wake up the computer is selected.
Click OK to confirm.
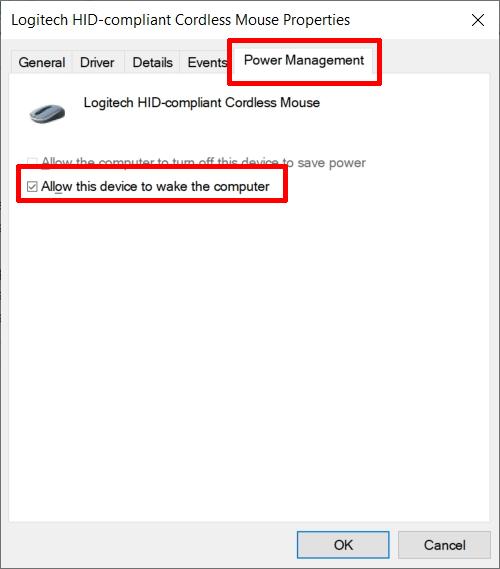
Repeat these steps for the category called Mice and other pointing devices, with your mouse device.
Now try again if you can wake up your Windows 10 PC using the mouse and keyboard. In most cases this should fix the issue. If not, please try the steps below.
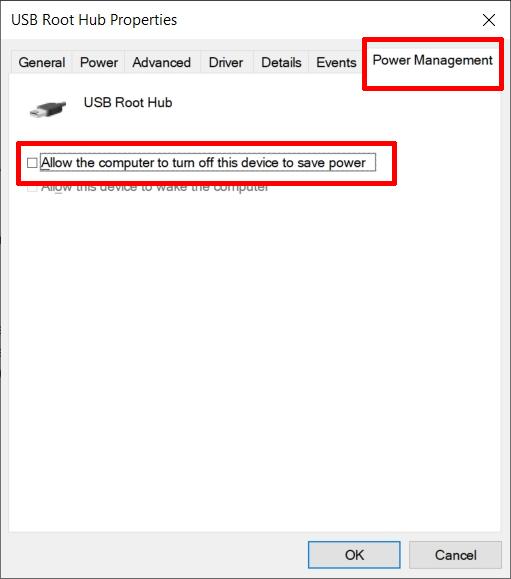
In Device Manager, open the category called Universal Serial Bus controllers.
Right-click the USB Root Hub device and click Properties. Note: If there are multiple devices, repeat these steps for each until you have pinpointed the right one.
Select the Power Management tab.
Now clear or uncheck the checkbox named Allow the computer to turn off this device to save power.
Click OK to confirm.
This will ensure that the USB port remains powered, so the keyboard and mouse devices will still work when in sleep mode. Even when using a wireless mouse, the receiver is still connected to a USB port.
If you are using a Bluetooth mouse, you might need to perform these steps for the Bluetooth USB module device in the Bluetooth category instead.
Configure your Power Options
To configure which power mode Windows uses, follow these steps.
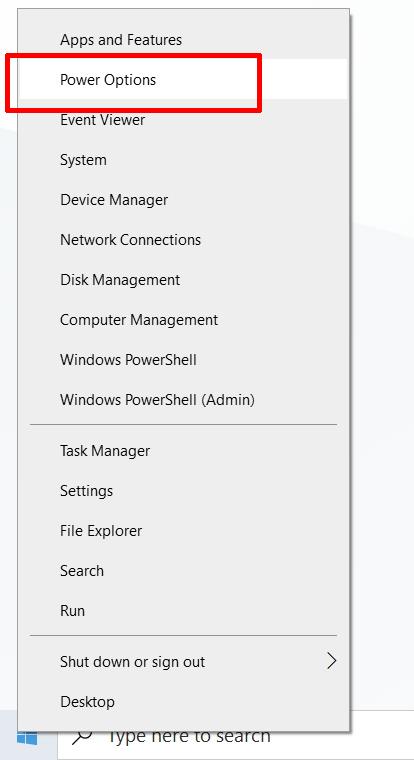
Right-click the Start menu button, and click Power Options.
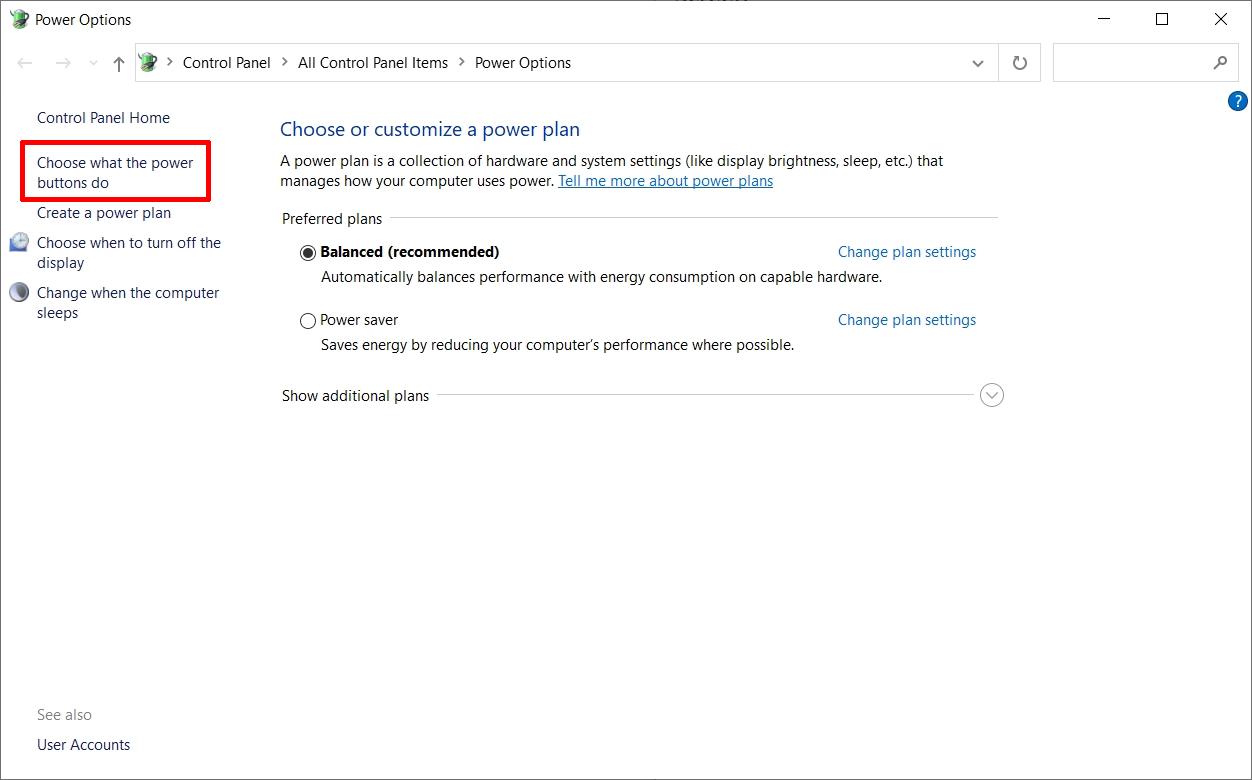
In the Power Options window, click Choose what the power buttons do. Note: On a laptop, you can also use the Choose what closing the lid does option. This will show you the same options, but now includes an option for closing the lid and differentiates between On battery and Plugged in modes as shown below.
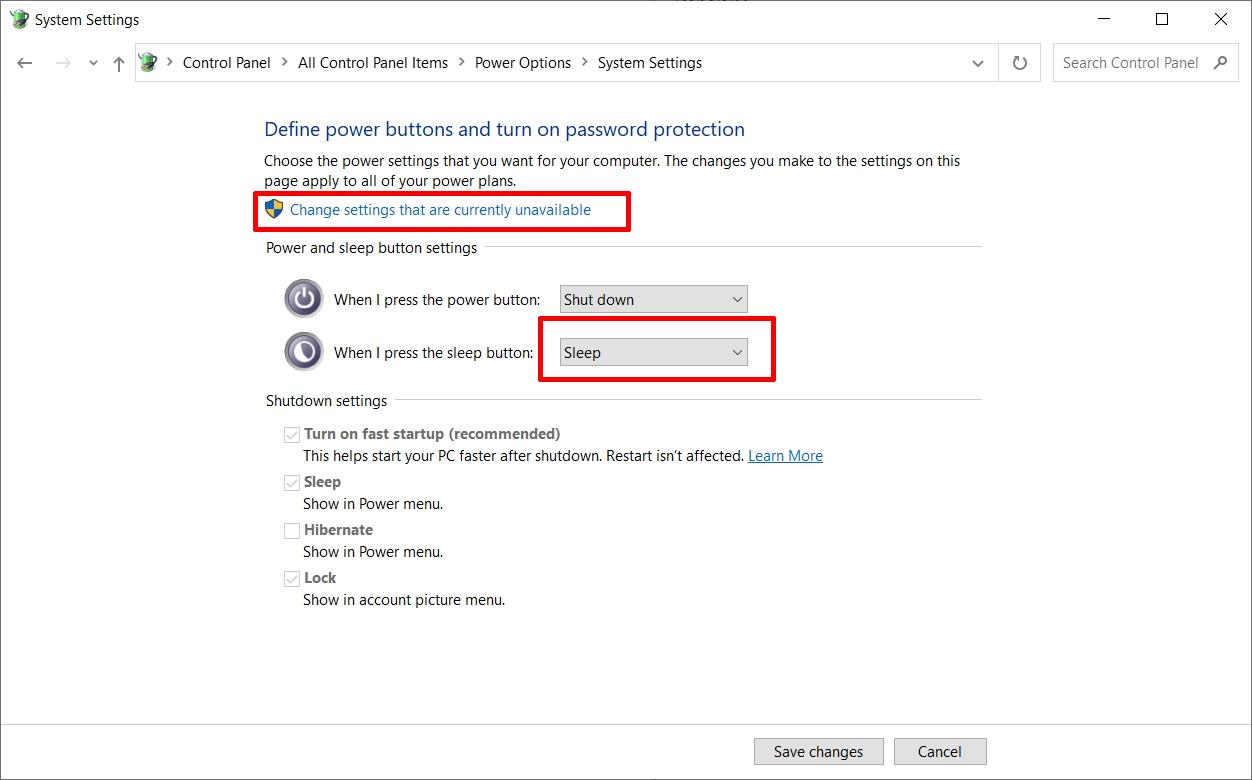
In the next window, ensure that the option selected next to When I press the sleep button is Sleep. (If not, then change it to Sleep.)
Next, click Change settings that are currently unavailable. (This will enable the options under Shutdown settings.)
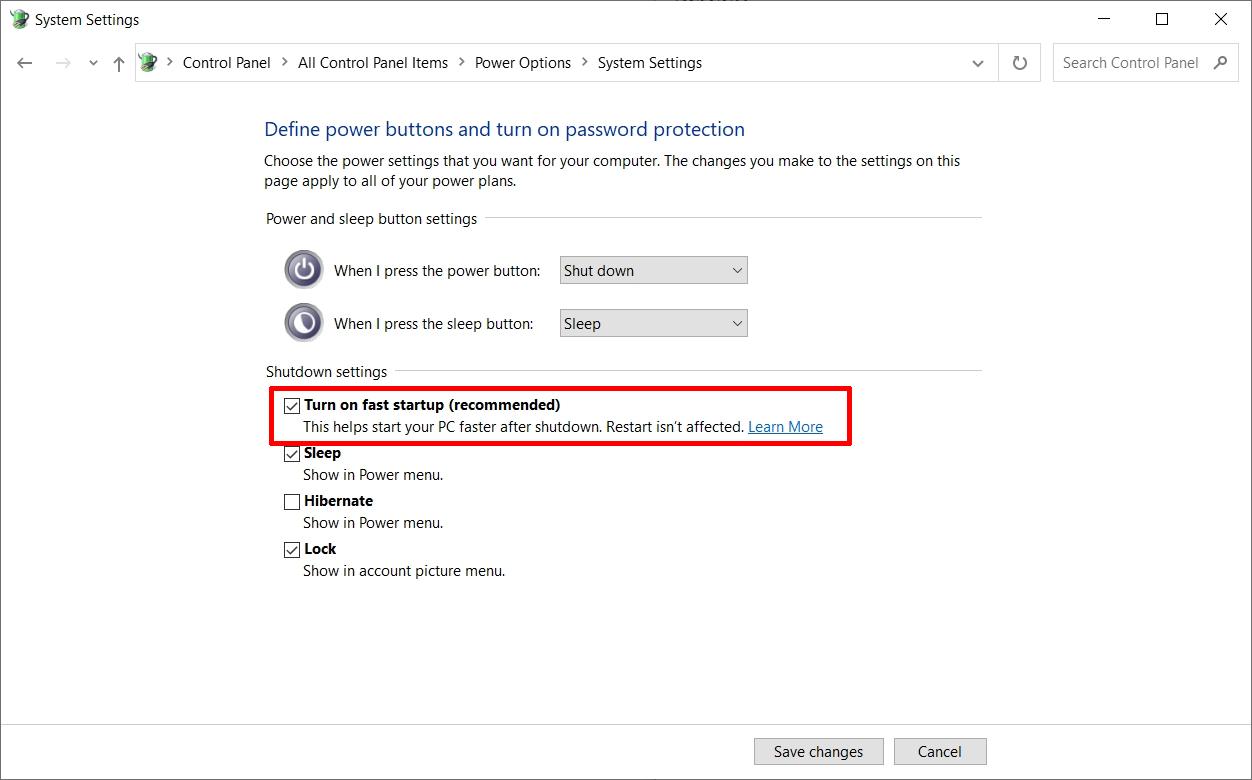
Clear (uncheck) Turn on fast startup (recommended).
Click Save changes to confirm and close this window. Note: If after this change the Windows 10 sleep mode error is not resolved, you can re-enable this option. The Fast Startup option can cause problems, that is why it is mentioned as a tip here to fix wake up problems. But when it is not the cause of the wake up problem, it is beneficial to keep it turned on.
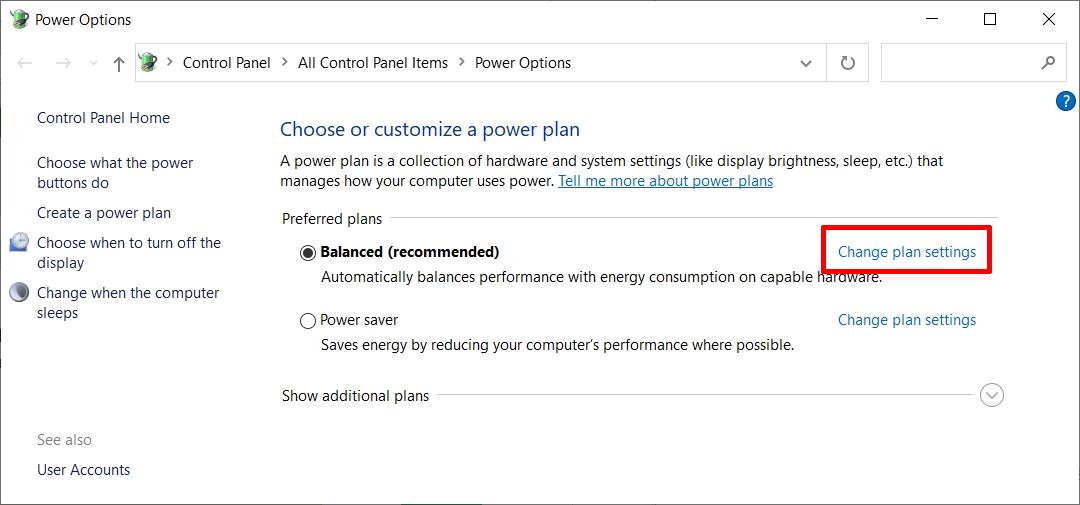
Back in the Power Options window, click the Change plan settings for the current power plan being used.
Now click the Change advanced power settings.
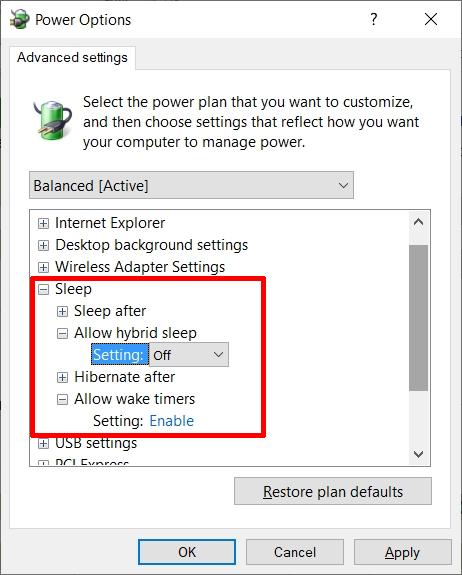
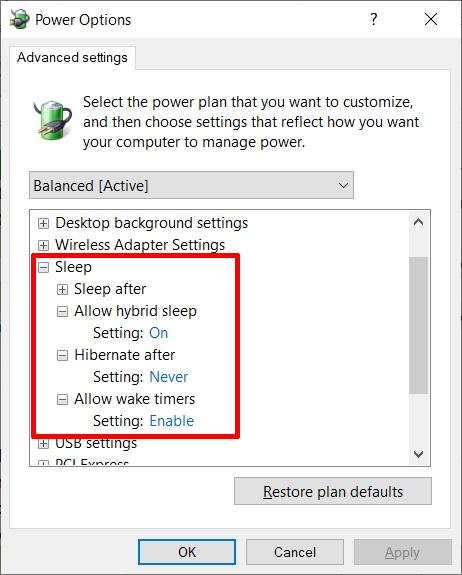
Verify the settings for Allow hybrid sleep, and Allow wake timers.
You want to make sure that the Allow hybrid sleep setting is turned Off, and that Allow wake timers is set to Enable. Click the + symbol to open the option and then click the setting to change it.
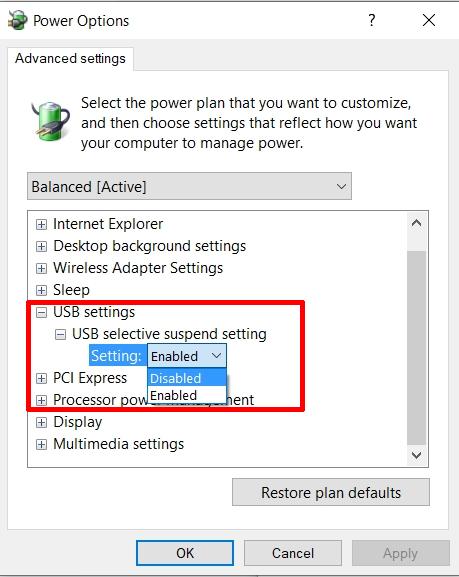
If these changes still don’t fix your Windows 10 PC won’t wake up from sleep problem, then Disable the USB selective suspend setting.
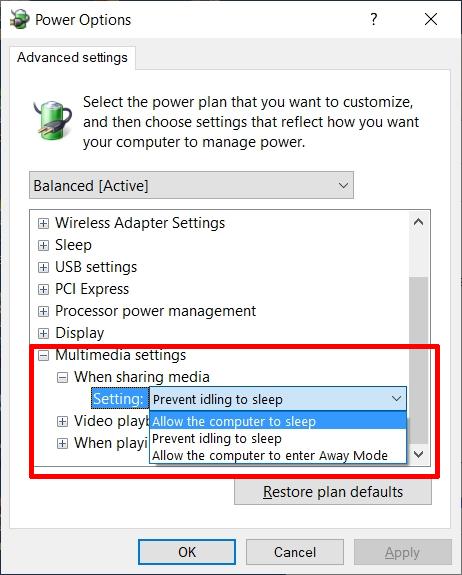
A less common setting that can cause issues with Sleep mode in Windows 10 is the multimedia sharing setting.Allow sleep during media sharing
Open the Multimedia settings. Click the When sharing media option, and then change the setting to Allow the computer to sleep.
Click OK to confirm and save the settings.
You may need to restart your PC for the changes to take effect.
Hibernate mode – disable, reboot, enable
If your PC uses the Hibernate option for power saving, it can help to disable and re-enable this option. If none of the previous steps have solved the Windows 10 wake up from sleep problem, it is useful to try this, especially on laptops where Hibernate mode is used frequently.
The easiest way is to use the Advanced settings in the Power Options menu.
Right-click the Start menu button, and click Power Options.
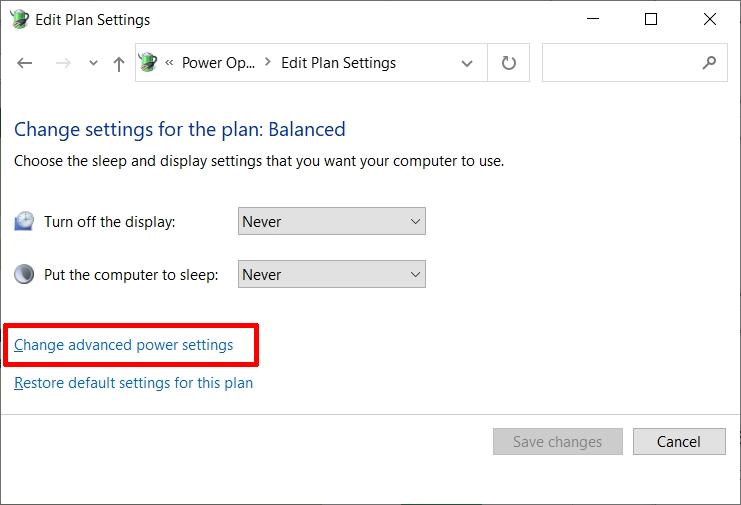
Click the Change plan settings for the current power plan being used.
Click Change advanced power settings.
Under the Sleep category, open the Hibernate after option and then change the Setting to Never.
Click OK to save and confirm.
Reboot your PC.
Now re-enable this Hibernate option again, by changing the Setting to the previous value.
Update your device drivers
Windows controls devices using device drivers. This includes the power management control on devices; because of this, it is important to ensure that you have the correct drivers installed for your devices.
You can use the Windows 10 Device Manager to update the drivers individually, or get the latest drivers from the PC manufacturer.
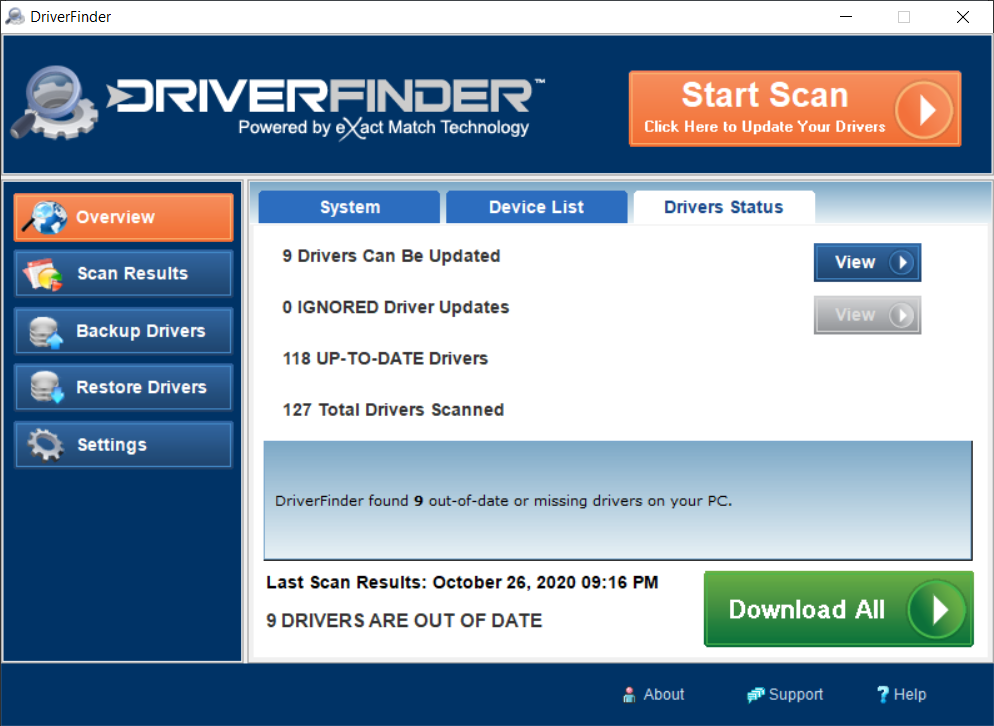
If you don’t have time or the know-how to properly select, download and install the drivers you need, you can try using DriverFinder.
DriverFinder will automatically recognize your system and find the correct and most-updated drivers for it.
Click Activate to register your copy of DriverFinder.
Click Start Scan to check for new drivers.
Download and install the latest device drivers specifically recommended for your system.
Restart your PC or laptop.
Check the BIOS resume settings
Ok, this fix is really more for older PC systems. And although Windows 10 is not often run on older computers due to compatibility issues, I still want to mention it here, especially since many of these steps are also useful on troubleshooting the same issue on older Windows versions.
If the above fixes didn’t solve your Windows 10 PC won’t wake up from sleep mode, reboot your PC and go into the BIOS (press Esc, Del, or F2 during startup in most cases).
Look for the settings pertaining to the Resume from S3 By USB Device or something similar, and make sure the setting is Enabled. Please note that the location and name of the option depend on the BIOS version.
Note: If you are using a cabled mouse or keyboard with PS/2 connection (typical the green and purple connectors), then make sure to enable those options in the BIOS as well.
Press the F10 key to save the setting after changing it, and then reboot the computer.
Windows 10 PC won’t wake up from sleep mode – what if the problem is the monitor?
When Windows 10 wakes up from sleep mode, the PC starts, and the screen comes on. So what if the PC starts and it is only the screen that does not power up?
This is not something that would happen with laptops a lot, but in case of a desktop, it is very possible. The PC starts (you can either hear the fans or the hard disk spinning up), but there is no display.
The first thing to try is to simply turn off the monitor, and turn it back on again. This way, you at least know that this is the problem you are dealing with. If that does not work, following are other possible solutions.
Monitor Settings
A common cause of the monitor not waking up from sleep is a setting called “auto-detect” on the monitor. This setting helps the monitor detect the signal on the connections and use the proper input for the video signal. Go into your monitor settings and disable this feature. After that try the wake up from sleep mode again and see if it is fixed.
Note: Instructions for this will vary a lot depending on the monitor type. In most cases there will be buttons on the monitor on the bottom or side of the monitor to access the settings.
More Power Settings
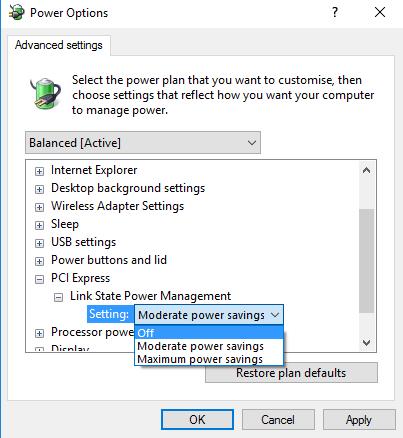
Windows 10 has some more advanced Power Options that control how power is saved and restore to the PC hardware. A setting that can affect the graphics card, and thus the monitor, is called Link State Power Management in the PCI Express category.
Disable this option with these steps:
Open Power Options from the Control Panel.
Select the option Change plan settings for the current power plan.
Next, click the Change advanced power settings
In the Power Options dialog box, in the Advanced Settings tab, scroll down to the PCI Express entry and click the + sign to open it.
Now click Link State Power Management, and clickSetting to change it to Off.
Click OK to confirm, and close the open windows.
After this, try putting the computer to sleep again and wake it up to check if the monitor comes on as well.
Trigger the graphics driver to rebuild the screen
If the permanent settings in the earlier steps do not help with the problem of waking up the monitor, then triggering the graphics driver to refresh the screen could help.
This is actually a Microsoft recommended solution to deal with a black screen problem. Simply press the Windows Logo + Ctrl + Shift + B keys all at the same time.
The computer might beep, and the screen flash, but hopefully the monitor will show your Windows Desktop again.
This solution has been introduced with Windows Vista, when the Desktop Window Manager (DWM) was added to Windows. It acts like a graphics reset.
Check the monitor cable
This might seem like an odd suggestion. But it is definitely possible to have a defect or non-standard cable that causes the problem of the monitor not waking up on a Windows PC. If you have tried all other solutions, do consider this option too. Ideally, try a cable from which you know it works correctly on a different system.
If you are using a converter for your PC display output to the monitor display input, you should also check it. Converters from Display Port, HDMI, DVI and VGA (and vice versa) are not always compatible with the power options offered by Windows 10.
Is your USB drive not showing in Windows 10? Here’s a quick step-by-step fix… with pics!
External storage devices like USB Flash drives and external hard disk (HDD) or SSD drives are quite handy and popular. They’re commonly used for backups, or as simple storage devices. Normally, when you plug a USB device, its corresponding drive simply shows up in File Manager. So what do you do if the USB drive is not showing up on your Windows 10 computer?
#1 – Check the USB Device.
The first thing to do is to check if the USB device itself is okay.
You can do this by connecting the USB drive to a different computer. If it is correctly recognized there, then you know the USB drive itself is fine and that the problem is with your Windows 10 system.
If the device is an external hard disk (or SSD), or ZIP drive, also check if the cable is defective by exchanging it with a different cable if possible. This is a less frequent cause, but not something to be ignored.
Also make sure to connect the USB device directly to a USB port on the Windows 10 PC, not through an extension cable or USB hub. Long cables, extra connections, or insufficient power can also be a cause for problems with USB drives (this is especially true for the older USB 1.1 and USB 2.0 ports and devices).
#2 – Check Your PC.
Unless you made changes, there is normally no reason to assume anything is wrong with your computer. However, for older PC’s it can be helpful to turn the PC off, remove the USB devices, and completely unplug the PC.
While troubleshooting the issue with the USB drive, leave other USB devices disconnected (unless you really need them, like a mouse or keyboard).
If you did make changes to your computer, like putting additional hardware, upgrading its firmware, or changing its BIOS settings, then try reverting these changes and testing the USB drive again to ensure that these changes have not caused the issue.
#3 – Check Windows 10 Settings.
If your USB driver is still not showing in Windows 10, then it’s time to to get into the Device Manager.
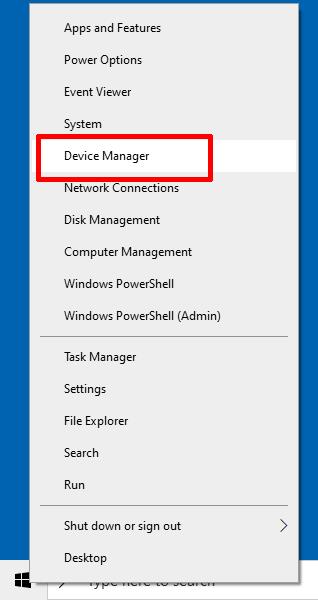
Right-click the Windows Start button, and in the popup menu, select Device Manager.
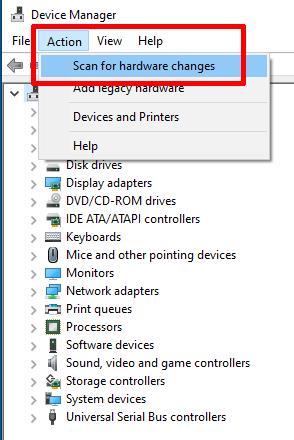
In Device Manager, click the Action menu, and then click Scan for hardware changes.
Once complete, check if the USB drive is showing up in Windows Explorer. If not, try the next step.
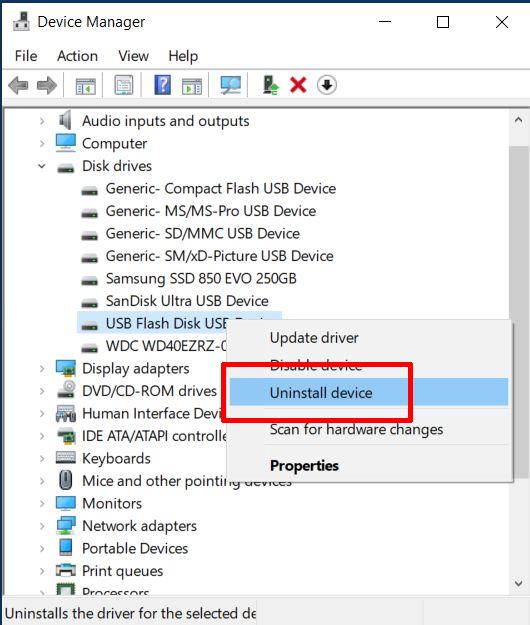
In Device Manager, open up the Disk drives list, right-click the USB drive, and then click Uninstall device.
Next, restart your PC. When Windows 10 restarts, it will automatically re-detect the USB device and install the available driver for it. This step can solve configuration issues with the USB drive, so it will show up again.
If your USB drive is still now showing up, try updating the driver for the USB device.
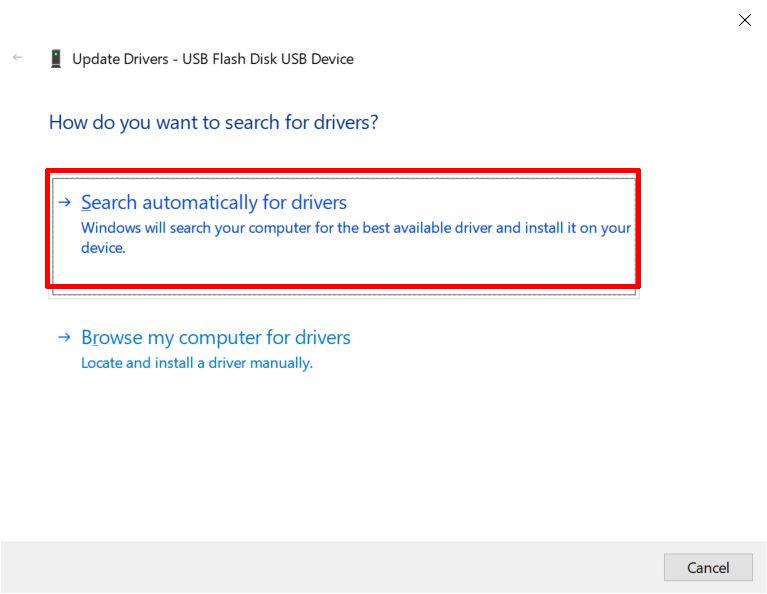
This can be done from the Device Manager. Simply right-click the USB drive in the list of Disk drives, and in the popup menu, click Update Driver.
Next, click the option Search automatically for drivers, and wait for the driver update to complete.
Be aware that this step only checks for updated USB device drivers. In most cases the correct operation of USB devices depends on the USB controller, which is a system device. So it is best to check for updated chipset drivers as well.
If the USB device is working properly, but the drive is now showing up in Windows Explorer, it is possible that the drive has no drive letter assignment.
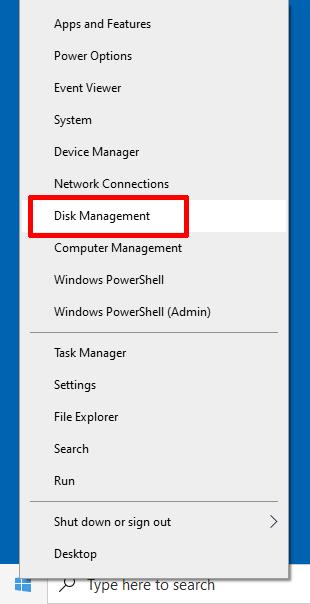
Right-click the Windows Start menu, and then click Disk Management.
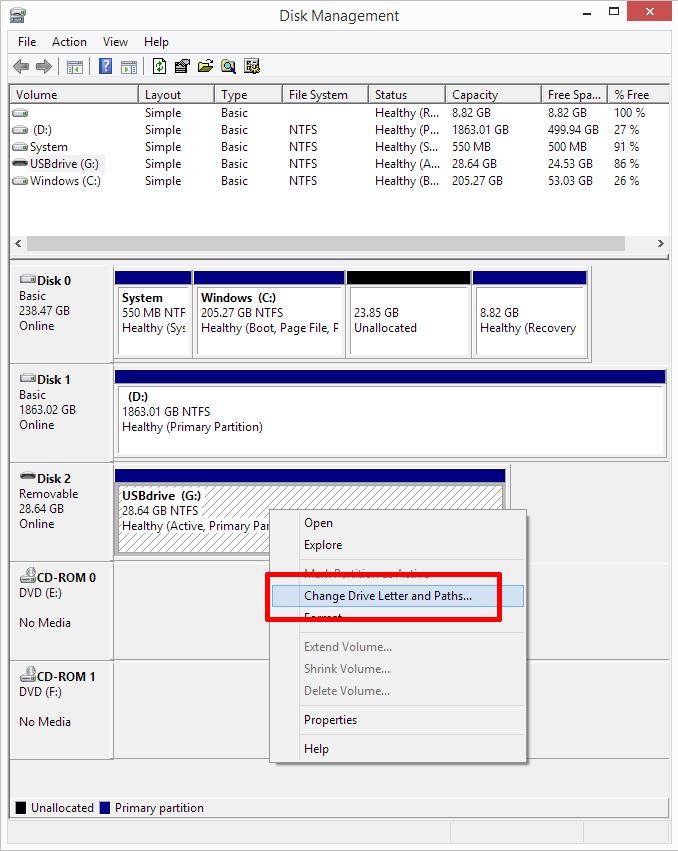
Once the Disk Management window opens, you will see all disks present in the PC.
Find the disk that represents the USB drive and check that it has a drive letter assigned to it. In the screenshot above, Disk 2 is the USB device and it has the drive letter G assigned to it.
To find your USB drive, check for a disk that is listed as “Removable” (although it can also be listed as “Basic“), and compare the size to that of your USB drive. If you are not sure, compare the Disk Management screen with the USB drive that’s not connected.
If there is no drive letter assignment, simply right-click the partition (the block next to the disk with the blue bar at the top), and in the popup menu, click Change Drive Letter and Paths.
Next, click the Add button.
Next, change the drive letter (or leave it as is to get a default assignment), and then click OK .
Even if there is already a drive letter assigned to the USB drive, it is still useful to try and change it. The reason for this is that it is possible that there are drives using the same drive letter assignment. Even if another USB device with the same drive letter assignment is not present at the moment, the configuration could still cause conflicts.
To change the drive letter to a higher character, click the Change button rather than the Add button. After that, the steps are the same; i.e., change the drive letter and click the OK button.
Note: If the partition for the USB disk shows as a black bar, rather than a dark blue bar and is listed as Unallocated, that means the drive formatting is not recognized. This means that the disk needs to be formatted before it can be used. If there should be data on the USB drive, a data recovery tool needs to be used for retrieval of the files.
If the USB disk is still not showing up in Windows Explorer, a final step is to try the Windows 10Hardware and Devices Troubleshooter. Just type “troubleshoot” in the Search box in the Windows Task Bar to start the Troubleshooter.
This article discusses the new WiFi standard – WiFi 6E. Find what it is and if it’s supported in Windows 10.
What is WiFi 6E?
WiFi 6E is a new WiFi standard that includes support for the 6GHz band (in addition to the 2.4GHz and 5GHz bands). The technology used is the same as on the 5GHz band, so the maximum speed is the same, 9.6Gbps.
Essentially WiFi 6E is the same as WiFi 6 but with the addtional 6GHz band included. The WiFi 6 standard is identified as 802.11ax. WiFi 6E will use the same identification.
What is the Benefit of WiFi 6E for Wireless Networking?
The main benefit is speed. The 5GHz band has a limited spectrum, which affects WiFi signals. Having the additional 6GHz band available will allow for more devices and faster connections. Remember that the 2.4GHz band offers more range, but the 5GHZ (and 6GHz) bands allow for faster connections.
In the 5GHz band, the spectrum is limited to about 400MHz, while the FCC is opening up 1200MHz of spectrum in the 6GHz band. That means the channel size will increase (7 channels of 140MHz), resulting in performance improvements, and even range benefits.
One of the main benefits that will come from the new WiFi standard is the improved support for MU-MIMO technology (Multi-User, Multiple-Input, Multiple-Output). This allows multiple users to access a wireless network at the same time. With more devices, more speed means better support for multi-user home networking, or online classrooms. This is great news in this time of the COVID-19 pandemic and good news for the Internet-Of-Things, where all home devices will be connected to the Internet.
The benefits of WiFi 6E will benefit services that need high-speed bandwidth, like video streaming, virtual reality and gaming.
Since WiFi 6 is backward compatible, new devices will still be compatible with older hardware, although the limitations of the older hardware will then apply.
Are There Any Limitations to this WiFi Standard?
Well yes. The 6GHz band is approved for unlicensed use by the FCC in the US. In other countries the use of the 6GHz band will also need to be allowed. For European countries, that could be expected this year. For other countries, the approval will also need to be given before the WiFi 6E can be used. UK and South Korea are other early adopters of the standard.
When Will WiFi 6E be Available?
Manufacturers have already started adopting the new WiFi 6E standard and are supporting it in their devices. Companies like Intel, Realtek, Broadcom and Qualcomm have committed devices to be compatible with the new standard. Router companies like Netgear and Linksys will also support the new standard in their new or updated products. Cell phone companies will also adopt the new standard based on its approval in various countries.
Support for WiFi 6E is starting to be available this year. Samsung is expected to include support in their new Galaxy S21 series phone, and others will surely follow soon.
The same applies to routers and network cards. Netgear routers with support for WiFi 6E are expected in Spring 2021. TP-Link, Asus and Linksys routers will also be available during Spring or Summer of 2021.
The card has a M.2 2230 interface, so you’ll need a motherboard that supports a M.2 WiFi module. But it supports the 802.11ax protocol.
Other manufacturers have also used the Intel chipset to create WiFi 6E cards, like the OKN Intel WiFi 6E AX210. Most new cards also support the Bluetooth 5.0 standard, and this OKN device even supports Bluetooth 5.2 (high-speed transfer, low latency).
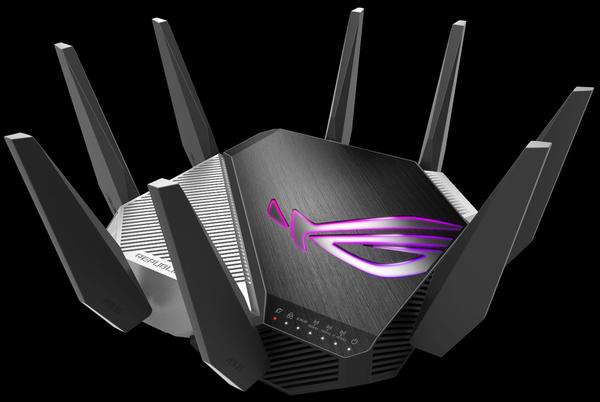
On the router front, the Asus ROG Rapture GT-AXE1 1000 Gaming Router is one of the first that has support for the WiFi 6E standard.
ASRock has also released new motherboards that support WiFi 6E (and Bluetooth 5.2). The Z590 Extreme WiFi 6E for example.
What Does this Mean for Windows 10 Support?
For Windows 10 support of the new WiFi 6E standard, all that is required will be a compatible device and updated device drivers. That means a laptop, notebook or portable device that uses a chipset with WiFi 6E support, or for a desktop computer, adding a wireless network card that supports the new WiFi 6E standard.
For the Intel AX210 based M.2 cards, the latest Intel Wireless drivers are required, which support the 802.11ax protocol.
For other manufacturers, updated drivers will need to be installed for the WiFi 6E compatible devices when they become available.
If you cannot manually find a driver for your WiFi 6E device, download DriverFinder and let it find a wireless driver for you automatically, and find updates for other device drivers at the same time.
How Can I See If I’m Connected to WiFi 6 in Windows 11?
To check if your PC is connected to a WiFi 6 network, simply check the properties of the wireless connection in Windows 11.
Right-click the wireless icon on the right side of the taskbar (1).
Click Network and Internet settings in the context menu (2).
This will open the Settings window.
Click the Wi-Fi option to show the currently active wireless network.
Next, click the properties option for the current wireless network (identified by the network SSID).
Scroll down to the section that contains the Protocol. It will show Wi-Fi 6 (802.11ax) when the connection is using the WiFi 6 protocol. Tip: Further down in the wireless properties you can also see the driver version for your wireless adapter!
Backup and restore drivers in Windows 10. Manual and automated ways are discussed so you can keep a copy of your driver files and restore them when needed.
There are a couple of reasons why knowing how to backup and restore drivers in Windows 10 can come in really handy. For instance, you may want to re-install Windows or upgrade your hard drive to an SSD. It’s also just plain good practice to backup drivers once in a while.
Manually Back Up Drivers Using ‘DriverStore’
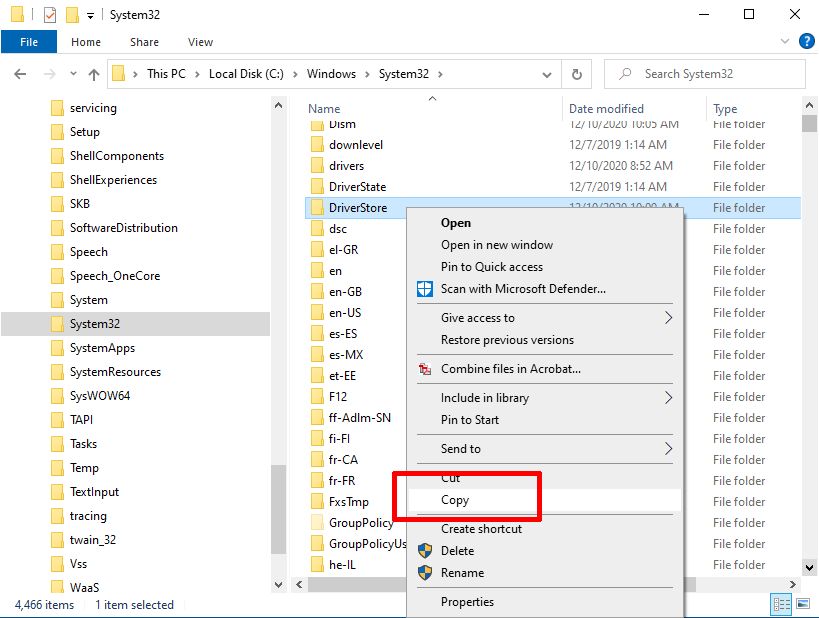
To manually backup driver files in Window 10 is to simply copy the DriverStore folder. This folder is located in C:WindowsSystem32 (assuming the C: drive is your system drive).
Use File Explorer and navigate to C:WindowsSystem32 folder, locate the DriverStore folder, and then right-click it to Copy it.
After that, navigate to a backup location (a USB stick or external drive is a good idea), and then right-click the storage location and select Paste.
Keep in mind that the DriverStore folder can be large (several GB), so it is a good idea to right-click it first and select Properties to see the size. That way you can make sure there is enough space available in the backup location.
Manually Back Up Drivers Using the Deployment Image Servicing and Management Tool (DISM)
Another method to manually backup drivers in Windows 10 is to use the DISM tool. This will make a backup of all third-party drivers. Windows will install any directly supported devices automatically from the installation location, or from the Windows Update service. So getting a copy of only the installed third party drivers can make sense.
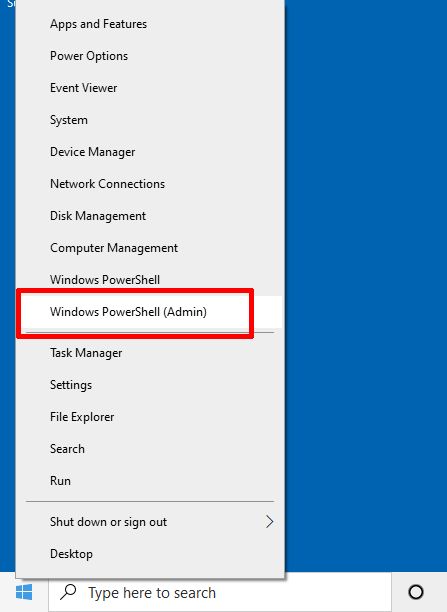
For this driver backup method, you will need to start the Windows PowerShell with administrator rights.
Right-click the Windows Start button, and in the Start menu, click Windows PowerShell (Admin).
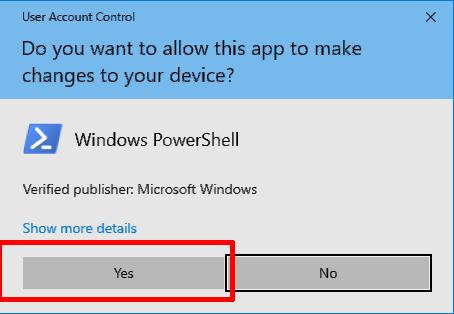
This will open a new PowerShell window (similar to a command window). You will first be prompted by the User Account Control to confirm starting the PowerShell with admin rights. Click the Yes button to confirm.
In this PowerShell windows, type the command -> DISM / Online /Export-Driver /Destination:C:\DriverBackup
C:\DriverBackup in this example is the destination location for the driver backup files. You can change this to the backup location for your drivers. Make sure it is an existing, valid path, or the command will not work.
Press Enter after typing the command, and then wait for the operation to complete. This can take a bit, depending on the number of drivers and the speed of your destination location.
Once the command completes it will show a message stating “The operation completed successfully.”
After that, you can type Exit and press Enter to close the PowerShell.
How to Install Drivers from a Backup in Windows 10
To install drivers from a back up to a Windows 10 installation, you need to load all the driver packages back into the driver repository. Once there, they can be used to install devices that match those drivers.
As expected there is an option to add drivers using the DISM tool that was described earlier to create a back up. The limitation of that however, is that you can only add drivers to a Windows Image file using this method. Not to a live Windows installation.
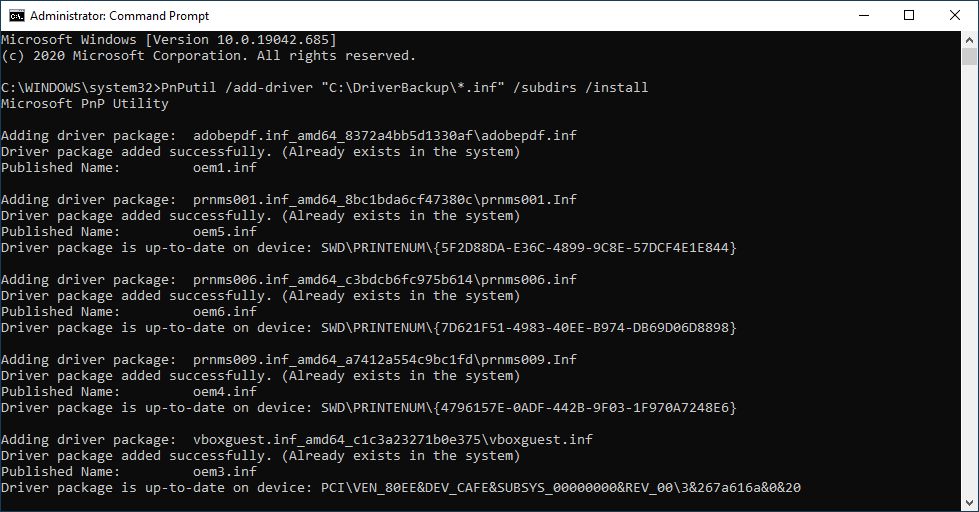
So the tool to use to install drivers from a driver backup location into Windows 10 is called PnPutil. This is a command line tool to perform actions on driver packages, and it is included in all Windows versions, starting with Windows Vista.
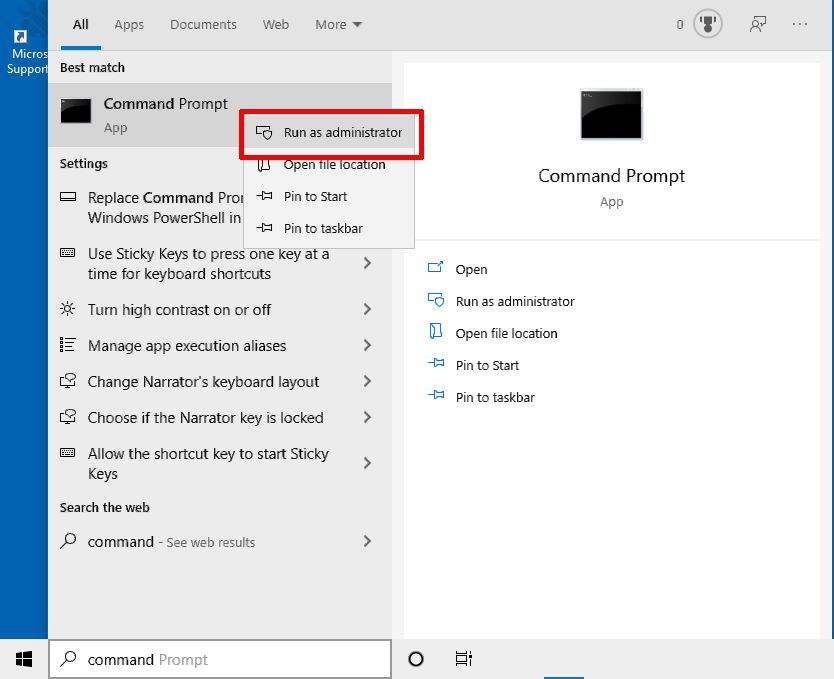
Open a Command prompt with administrator rights (right click the command prompt icon and in the popup menu, select Run as administrator). Confirm the UAC message by clicking Yes.
Now type the following command -> PnPutil /add-driver “C:\DriverBackup*.inf” /subdirs /install /reboot
Again, change the C:DriverBackup path to where your driver backup is located. The /reboot is not required, but recommended since driver installation often requires a reboot to complete. You can also manually reboot the computer afterwards of course.
The /subdirs parameter will ensure that all subfolders are also included for available driver INF files, while the /install parameter ensures that any devices that are compatible with the added drivers get installed in the process.
After pressing Enter, the command will start adding the driver packages from the specified backup location back into the driver store.
Although in most cases installing drivers from a backup into Windows 10 using this method will work, be aware that you have no control over the sequence of the driver installation. In many cases it is recommended to install the chipset drivers before any of the other drivers.
If that is a cause for things to fail, you might want to install some drivers manually first. Simply right-click the INF file and in the popup menu, select Install.
You will again be prompted by the User Account Control to confirm. Simply click Yes to continue.
Sometimes, you may not get any message whether a driver installation is successful or not. Just reboot your computer and check the Device Manager to see if the newly installed driver is active for the device it is intended.
How to Automatically Backup and Restore Drivers
Are the above steps getting a bit too technical for you? No problem because you can simply use DriverFinder (free version!) to backup and restore drivers in less than 60 seconds!
Click here to download and install DriverFinder on your Windows 10 computer.
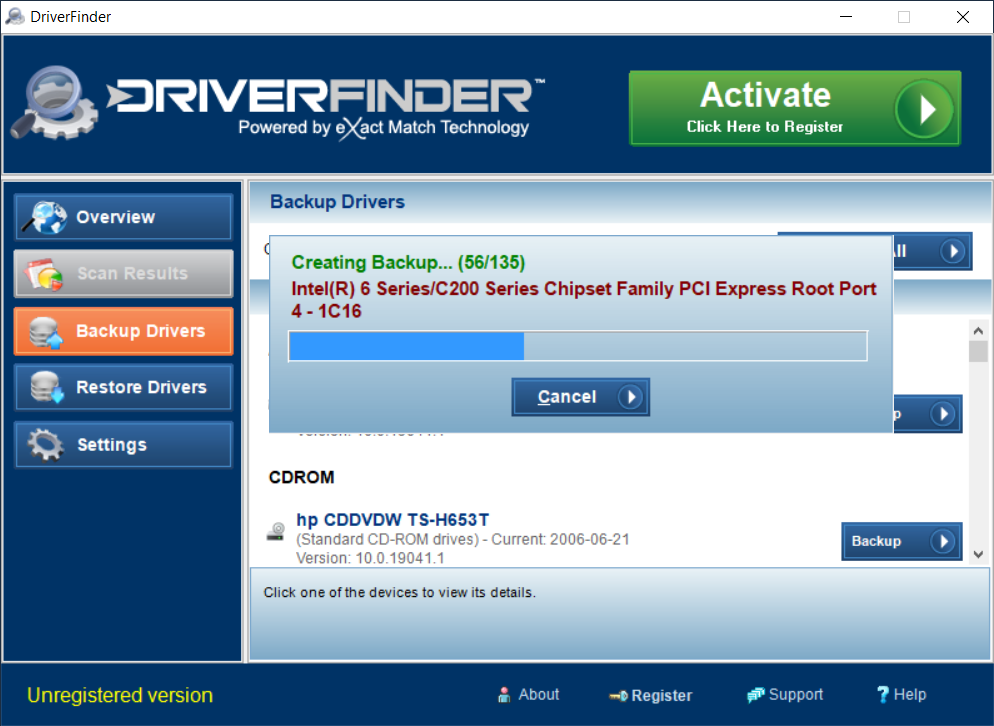
On the left side, click Backup Drivers.
If you want to back up a single driver, scroll to find that driver and click the Backup button beside it. To back up ALL your windows 10 drivers, click Backup All.
The driver backup process just takes a few seconds. Wait till DriverFinder confirms that the backup completed successfully.
That’s it! In the process above, backing up the 135 drivers in my Windows 10 system took just 56 seconds!
So now that you’ve backed up your drivers using DriverFinder… where are the backups?!? Glad you asked :)
On the left-side of DriverFinder, click Settings. Here you’ll find where the driver backups are located.
You can keep your driver backups here or you can copy or move them to another storage device (e.g., CD, DVD, USB, etc.)
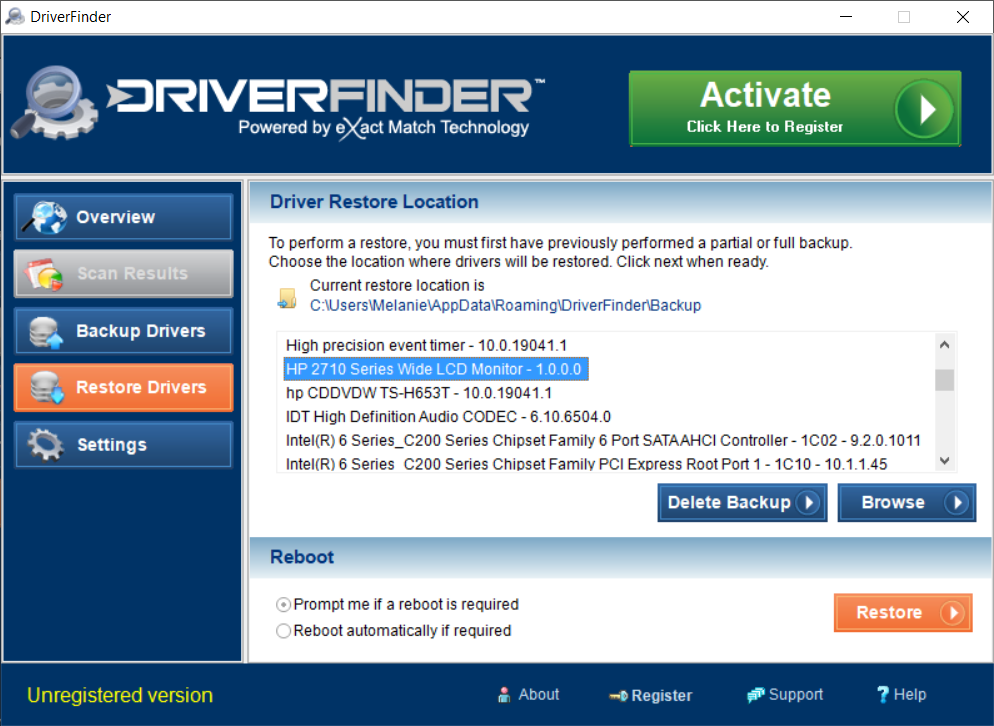
Now, if you ever need to restore a driver, simply click Restore Drivers on the left side of DriverFinder.
Select the driver you want to restore and then click Restore. Simple.
You can backup and restore Windows 10 drivers using the free version of DriverFinder any time.

The Registered/Pro version enables you to run a driver scan so you can update all your drivers before you back them up.


![[Fixed] Windows 10 PC Won’t Wake Up From Sleep Mode](https://driverfinderpro.com/driver-guide/wp-content/webp-express/webp-images/uploads/windows-sleep.jpg.webp)