Anthony Danes | DriverFinder - We Make Drivers Work for You - Part 7

How to Open Disk Management in Windows 10 – Manage Your Disk Drives

Disk Management in Windows 10 is used to manage your disk drives and volumes. Learn how to open Disk Management in Windows 10 in different ways and pick the one you like best. Clear instructions with illustrative images.

In Windows 10, there’s a built-in mechanism that can help you easily manage your disk drives. It’s called Disk Management. But first, how to open it?

The easiest way to open Disk Management in Windows 10 is by using the Quick Access menu.

Right-click the Windows Start button on the bottom-left corner of your screen. This will show the Quick Access menu. From here, click Disk Management.

Disk Management from Quick Access Manu

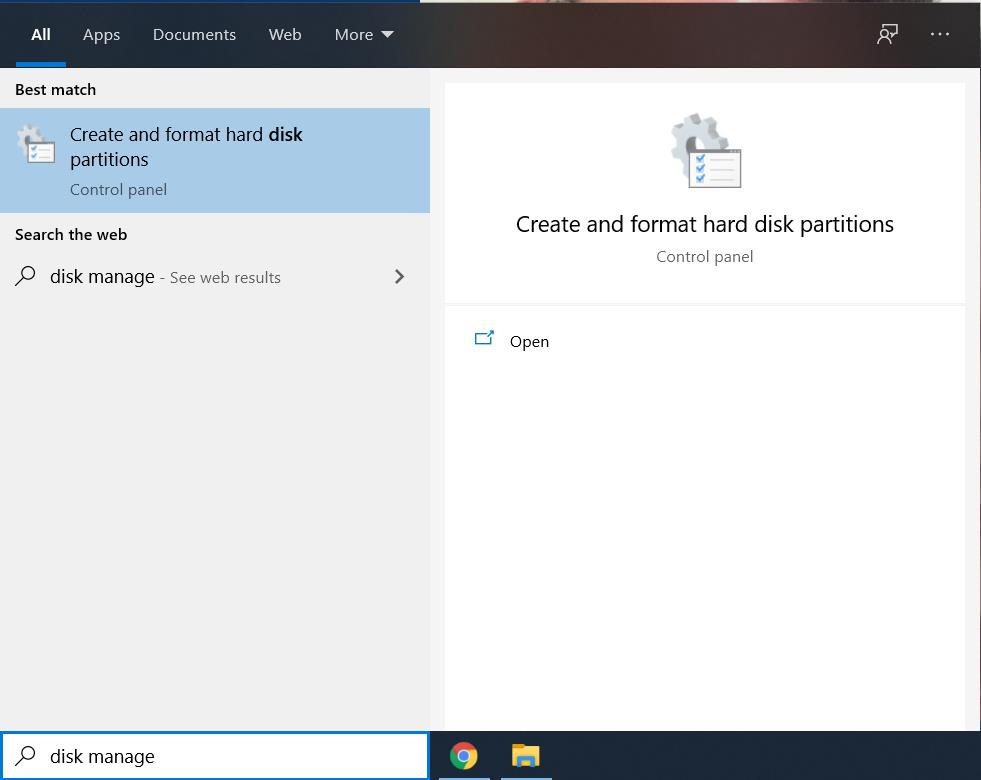
If you prefer using the keyboard, you can also use the Search box in the taskbar. Type disk management in the search box and when shown, select Create and format hard disk partitions in the search results.

Disk Management from Search

Another keyboard method to open Disk Management in Windows 10 is to press the keyboard combination Windows + R, which will open the Run window. Next, type diskmgmt.msc and then click OK.

Disk Management from Run

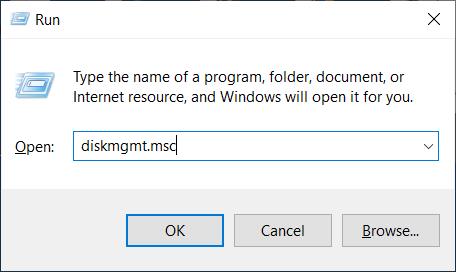
If you can remember the exact command this is a good alternate to the search option.

download-windows-10-drivers

The Disk Management Window

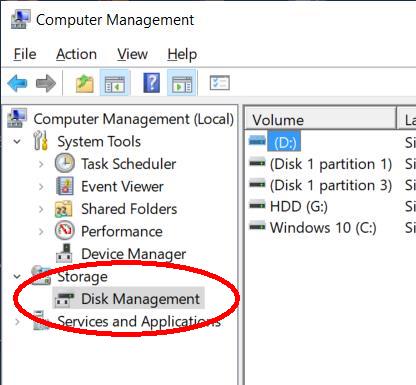
Another way to open Disk Management in Windows 10 is to use the Computer Management option. You can access Computer Management from the Quick Access Menu as well.

Once the Computer Management window is open, navigate to Storage -> Disk Management on the left-hand panel and select it. Please note that depending on the computer configuration, it can take a moment for disk management details to show.

Computer Management window

Once the Disk Management window shows, you will see all the disks and volumes (or partitions) in your computer.

Disk Management Window

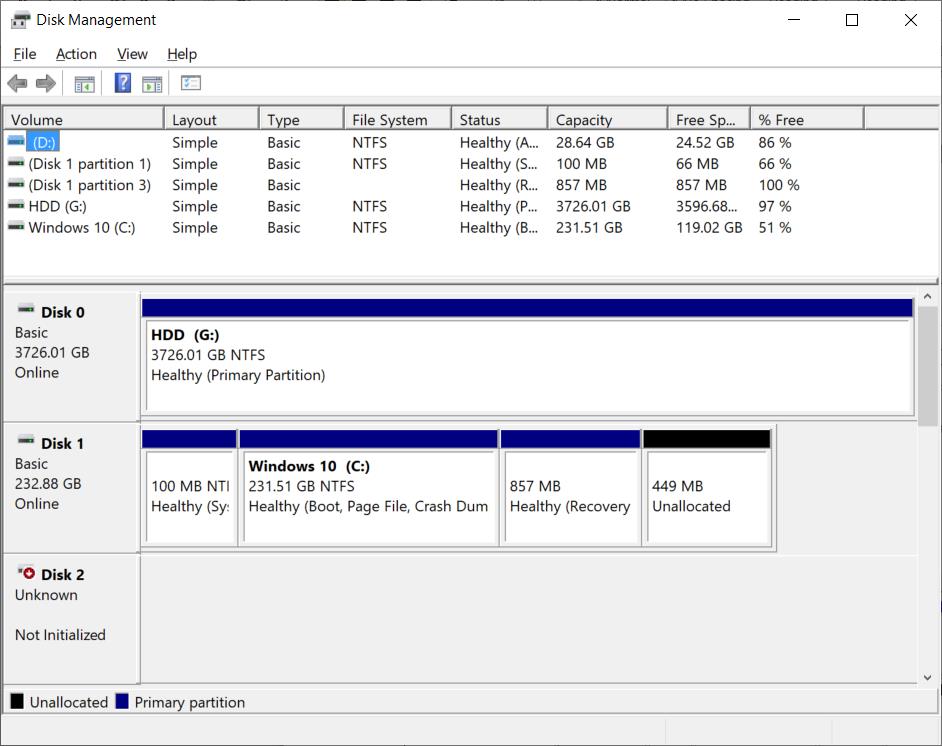
The top table shows the volumes with the file system and available disk space.

In the bottom section, you will see the disk drives in the computer, and how the storage space on the disks is allocated to the different volumes (partitions).

Why Use Disk Management in Windows 10?

Normally you would only use disk management when you install a new version of Windows, or when you add or replace a disk drive to your computer.

But there are also scenarios where Disk Management in Windows 10 can be useful during normal computer usage.

  • Changing a drive letter for a volume can be helpful to prevent external drives not being recognized due to drive letter conflicts. If a USB stick or external USB drive is plugged but does not show up in Windows Explorer, check the drive letter assignment first!
  • Simply changing the name of a volume to a more useful indication of what is stored on the drive is another example.
  • And, maybe less frequent, you might need to change the size of a drive.

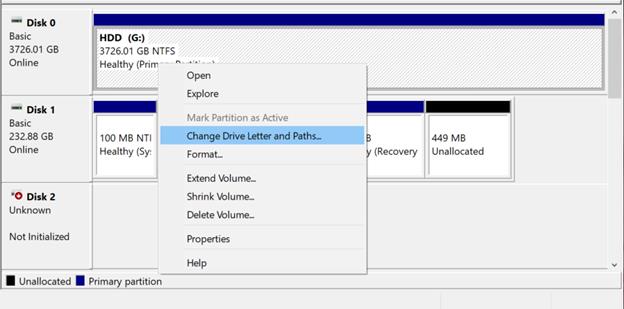
In all these cases, simply right-click the volume in the disk management window and select the option in the popup menu.

Disk Management Popup Menu
Note: Use the Properties option to change the name of a volume.

I hope this article has helped you guys when trying to find the Disk Management tool in Windows 10. If you have any questions, feel free to let me know in the comment section below, and I’ll do my best to answer them!

How to Disable Automatic Driver Updates in Windows

By default the latest Windows versions automatically install new updates, including driver updates. Updating your PC software in general is a good idea to ensure maximum security and performance. But there are cases where driver updates are not desirable, and you need to disable automatic driver updates.

Some hardware only operates with a specific driver version. Other hardware devices need a specific driver version to ensure all functionality is available. You wouldn’t want a driver update to suddenly remove features, or introduce device problems.

Steps to disable driver updates

If you find yourself in a situation where you want to decide which driver updates to install and which ones not, you can disable automatic driver updates in Windows.

  1. To do this, open the Control Panel and go to System and Security.
  2. Next, select the System option, and click Advanced system settings.
    Tip: type “sysdm.cpl” in the Run or Search field in Windows, followed by the Enter key to open the System Properties directly.
    Open System Properties from Run or Search
  3. In the System Properties windows, you need to select the Hardware tab.
  4. Now click the Device Installation Settings button.Windows System Properties
  5. This will bring up the Device Installations Settings window. Here you will need to change the option from Yes, do this automatically to No, let me choose what to do. And then select the option Never install driver Software from Windows Update. Next, click the Save Changes button.Disable Automatic Driver Updates

After this Windows will still install regular software updates through Windows Update. But the drivers on you system are no longer automatically updated.

Disable automatic driver updates in Windows 10

For Windows 10 the steps are almost identical.

  1. Start the control panel by typing “control panel” in the Seach box.
  2. Click the Control Panel app in the search result.
  3. In the Control Panel window, click the System icon.
  4. In the Settings window, scroll down to the Related settings, and click Advanced system settings.
    Windows 10 Advanced System Settings
  5. From here on the steps are the same as step 3 above. The only difference is the Device installation settings window looks a little different.
    Disable Automatic Driver Updates Window 10

Disable automatic driver updates in Windows 11

The instructions for Windows 11 are almost identical to the instructions for Windows 10. Here are the quickest steps to disable the automatic driver updates.

  1. In the Search box on the taskbar type “change device installation settings“.
  2. In the search results, click Change device installation settings to bring up the Control panel dialog for Device installation settings identical to step 5 in the previous section.
  3. Select the No (your device might not work as expected) option and click the Save Changes button.

Hide specific driver updates in Windows 11

Perhaps disabling all automatic driver updates in Windows 11 is not what you want. If only one specific driver update is causing a problem on your system, you would rather just not install that.

This can also be achieved. Ignoring a driver update (or any update for that matter) is possible in Windows 11 by hiding the update.

Here are the steps to do that:

  1. Download the wushowhide.diagcab file from the Microsoft download page.
  2. After the download completes, execute the file by double-clicking it in the File Explorer.
    wushowhide.diagcab
  3. In the Show or hide updates window, click the Next button.
  4. Next, select the option Hide updates.
    Windows 11 Hide Updates
  5. Once the Hide updates option shows with the list of updates, select the update to hide and click Next again.
    (In the example screenshot we have selected the Intel wireless driver update.)
    Hide update in Windows 11
  6. Once complete, the window wil show Troubleshooting completed and show the update as Fixed. The update will now be ignored in the Windows Update process.
    Windows 11 Update Ignored
  7. Click the Close button to finish and close the window.

Note: If you want to enable the update again, simply run the wushowhide.diagcab file again. This time, select the Show hidden updates option to re-enable the hidden update.

Keep in mind that if a newer update for the driver becomes available, that will not automatically be ignored as well. These steps pertain to the specific update selected only.

Of course we recommend checking and updating your drivers with our DriverFinder software. That way you can decide which updates to install and which not!

How to disable driver signature enforcement in Windows 10

When device drivers are not available (yet) for Windows 10, you can often install drivers that are meant for Windows 8, or even Windows 7. In most cases that works without any problems, but in some cases you need to run the driver installer in compatibility mode. This can be achieved by right-clicking the installer. But when the driver does not install even when running the driver installer in compatibility mode, you might need to disable driver signature enforcement. Basically the driver signature ensures that the device driver is original and reliable, since it is guaranteed to originate from the manufacturer that put the signature on it.

But in some cases a signed driver is not available, or even the signed driver fails to install on Windows 10.

To disable the driver signature enforcement in Windows 10, follow these steps:

  1. Click the Start button in the taskbar.
  2. Click the Settings icon in the popup menu.
    Windows 10 Settings
  3. In the Settings window that comes up, click the option Update & Recovery option.Update & Recovery
    Note: You need to scroll down in the Settings window to see this option.
  4. Next, click the Recovery option.
  5. In the Recovery window that comes up, you need to click the Restart now button under the heading Advanced startup.
    Windows 10 Advanced Startup
  6. Once the PC has restarted, you will see a screen that says Choose an option. Here you click the Troubleshoot option.
    Windows 10 Troublsheet
  7. Under Troubleshoot you select Advanced options.
    Windows 10 Advanced Options
  8. Next, click the Startup Settings option, followed by the Restart button.
    Restart with Startup Settings
  9. After restarting a list with Startup Settings comes up. In the list you select option 7 to disable driver signature enforcement. You can either press the 7-key or use the function key F7 for this.
    Disable Driver Signature Enforcement
  10. Your PC will again need to restart, after which you can install the driver.

When installing the drivers, make sure to continue with the installation, even if Windows shows a warning regarding the unsigned drivers.

Searching for drivers for Windows 10? Download and use DriverFinder to find them!

List Drivers in Use on Windows

Using the Device Manager, you can easily check the details for each device on a Windows computer. But If you want list drivers in use by the system, the Device Manager is not suited for that.

However, in Windows Vista, Windows 7, Windows 8, and Windows 10 you can create list of all device drivers in use by using a simple internal command.
To do this, first start a command prompt with administrator rights (right-click the command prompt icon and select Run as administrator in the popup menu).
Once the command prompt window opens type:

driverquery.exe /v /fo csv > c:\temp\driverlist.csv

This will instruct the command to list all drivers, and use the CSV output format. The greate-than symbol (>) is used to redirect the output of the command to the file specified (in this case driverlist.csv ). Make sure you include a path for the output file, otherwise the file will be stored in the default path of the command prompt (typically C:\Windows\System32 ).

For a full specification of the possible parameters for the driverquery command see the Microsoft website.

Now you can open the driverlist.csv file with Microsoft Excel (or any other program supporting comma-separated-values), and check the details of the drivers in one overview.

List Drivers in Use
MS Excel view of the resulting Windows driver list

Check the column named State to see if a driver is in use (Running), or not (Stopped).

The Path columns will show the location and file name of the actual driver file (.sys). Drivers that are included in the Windows installation typically will have C:\Windows\System32\ are the folder location, while additionally installed drivers will resider in C:\WINDOWS\system32\DriverStore\FileRepository\.

Copyright 2009 and Beyond - DriverFinderPro.com - All Rights Reserved