Melanie | DriverFinder - We Make Drivers Work for You - Part 6

How to Install a Driver Update in Windows

Driver updates normally come as one, often big, single file. If the driver file has the extension “.exe”, that means the driver file is a self-installing driver file or a self-extracting driver file. Simply double-click the driver file to execute the driver installation process. Follow the instructions of the installation program to complete the hardware driver installation. A reboot might be required on the end of the driver installation.

In the case of a self-extracting driver file, executing the “.exe” file will result in the extraction of the compressed driver files. You often need to specify a destination for the driver file extraction. Once the files are extracted, you will see the driver files that are required to install the driver update.

However, if the driver update file has a “.zip” or “.rar” extension, you need to manually uncompress the driver files. Windows supports the “.zip” extension, but if required get a program like 7-Zip to uncompress the driver files.

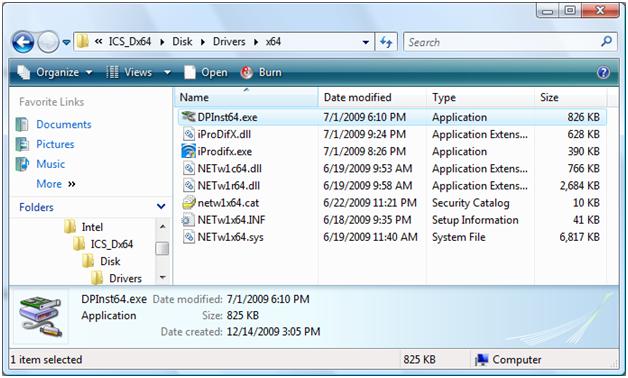
Within the folder with the driver files, you would typically find a driver installation program. In most cases it will be called “setup.exe” or “install.exe”, but other program files with the “.exe” extension are also possible. Again, simply double-click these installer programs to install the hardware driver update. An installation wizard will guide you through the driver install process.

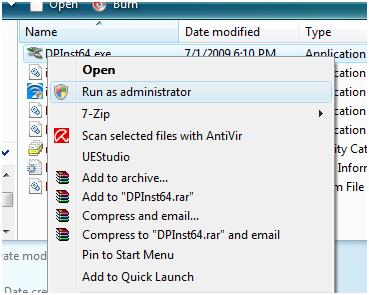
In the example below the “.exe” file is called “DPInst64.exe”.

install-drivers

Note: Make sure that you are logged in with Administrative rights when you want to install a driver in Windows Vista or Windows 7. Another option is to right-click the “.exe” file and in the popup menu, select Run as Administrator.

windows7-drivers

If there is no file with the “.exe” extension in the folder with driver files, you will need to manually install the driver update.

Installing Drivers in Vista and Windows 7

Open the Control Panel from the Windows Start menu. In the Control Panel, select Hardware and Sound. Next, select Device Manager. If the UAC message comes up, click the Continue button.

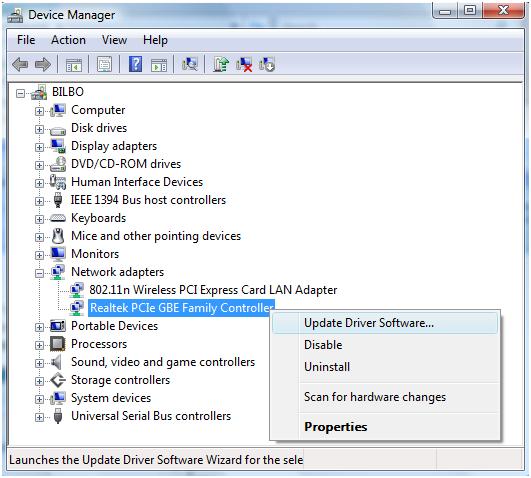
In the Device Manager, select the device for which you want to update the drivers. Right-click the device, and in the popup menu select Update Driver Software.

realtek-drivers

In the next screen, select Browse my computer for driver software. Click the Browse button, and select the location where you extracted the driver files.

After you selected the driver file location, click the Next button to update the drivers.

Installing Drivers in Windows XP

In Windows XP the steps to install a hardware driver update manually are almost the same, but the screens and selections differ a bit.

In the Start menu, select the Control Panel. Next, select Printers and Other Hardware. Next, select System in the left-hand panel (If you use the classic view, you can click System immediately).

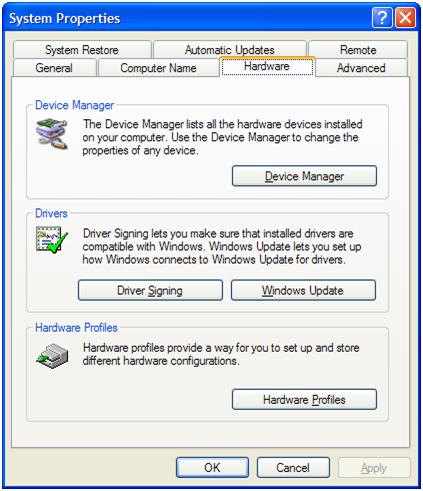
In the System Properties window, select the Hardware tab. Next, click the Device Manager button.

device-manager

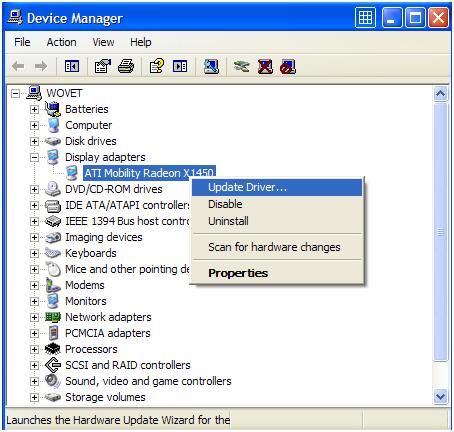
In the Device Manager, select the device for which you want to update the drivers. Right-click the device, and in the popup menu select Update Driver.

update-drivers

In the Hardware Update Wizard, select the option “No, not this time”, and click Next.

In the next screen, select “Install from a list or specific location (Advanced)”, and then click Next again.

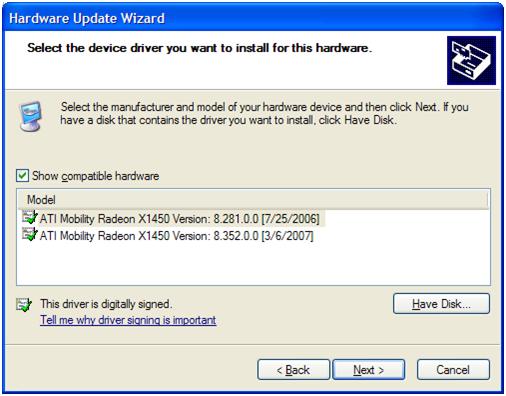
Then select “Don’t search, I will choose the driver to install”, and click Next again. Now you need to select the hardware category to which your device belongs, and click Next. If you do not know the category, simply select the default Show All Devices.

In the next screen, select the Have Disk button.

hardware-update

The Hardware Update Wizard will now show an Install From Disk window, where you need to click the Browse button.

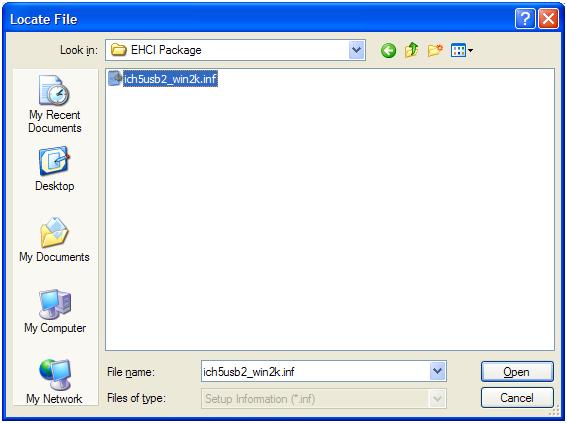
Using the file browser, you will now navigate to the location where you extracted the driver update files. The file browser will look for a file with the “.inf” extension.

inf-file

Once you have selected the file with the “.inf” extension, you click the Open button and the click the OK button. Windows will then show you the list of devices supported by the driver update, from which you need to select your device. Then click Next to proceed with the driver installation. When the driver installation is finished, click the Finish button.

How to Control Driver Installation in Windows 7

People who have used Windows a bit longer are familiar with the concept of hardware and device drivers. Device drivers are critical software components that make sure your computer can communicate with all hardware devices.

As an example, without a printer driver,  your printer and computer cannot relate to each other and thus, you cannot print anything.

Now, by default, Windows supports a lot of hardware, but not ALL hardware. A lot of drivers are available for Windows XP, and the same is true for Windows Vista. Windows 7 now claims to support even more hardware by default, but that does not mean things will always work with the default drivers.

Controlling how devices are installed in Windows 7 can help solve driver problems. Instead of using the default drivers, you can instruct Windows 7 to handle device installation in a less automated way, giving you control about the specific driver to install.

Basically, you want to tell Windows 7 which drivers to use specifically and not just any ‘default driver’.

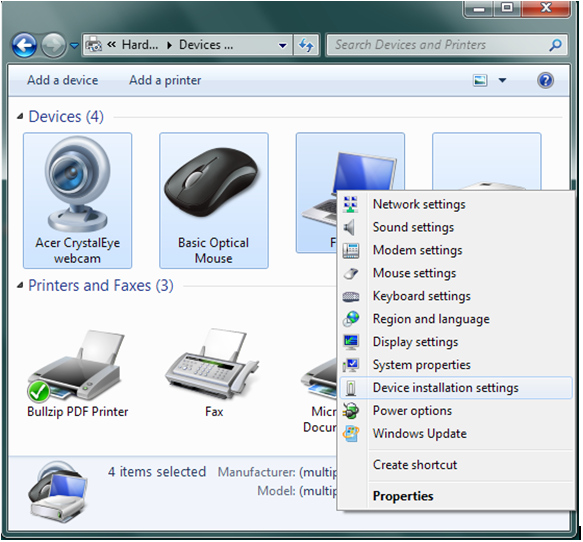
Firstly, open the Control Panel, and then select View devices and printers under the heading Hardware and Sound.

Now right-click your computer icon and in the pop-up menu, select Device installation settings, as shown below.

device driver installation

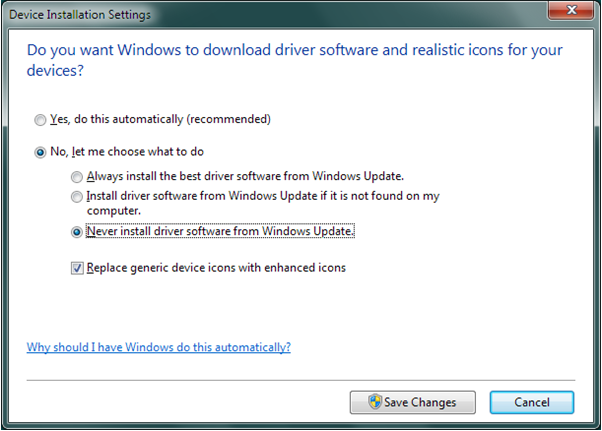
This will bring up the Device Installations Settings dialog box, which controls how the drivers from Windows Update are used on your Windows 7 computer.

Assuming you want to disable the use of drivers from Windows Update, change the default section from Yes, do this automatically (recommended) to No, let me choose what to do.

Next, select Never install driver software from Windows Update.

install device driver

Click Save Changes to save the new settings.

Do keep in mind that this should only be used if the driver that is installed by Windows Update is giving you problems and you want to manually install a different driver. Good luck!

>>> Download Windows 7 Drivers

DriverFinder Support for Windows 7

In keeping with its goal of always providing the best for its clients, DriverFinder is Windows® 7 compatible.

windows 7San Francisco, CA – December 3, 2009 — DriverFinder, the fastest, safest, and easiest way to update your device drivers, is Windows® 7 compatible.

People who want to upgrade to the latest Windows® 7 operating system, can do so knowing that they can easily find compatible drivers using DriverFinder. Further, the program can be used on both the 32-bit and 64-bit versions.

The 64-bit architecture allows users to address and use over 4GB of RAM (memory) in Windows®. With memory becoming cheaper and cheaper, more computers come with larger amounts of memory. As a result, 64-bit versions of Windows® 7 come pre-installed.

In the past, 64-bit versions of drivers have always been problematic due to limited use of these architectures in Windows® XP and Vista. Since Windows® 7 seems to be more easily adopted by users, hardware manufacturers are expected to provide more 64-bit driver versions.

And as such, you need a driver update utility such as DriverFinder to detect and find those 64-bit drivers for you.

Here are the other operating systems supported by DriverFinder:
Windows 2000, Windows XP (32- and 64-bit) and Windows Vista (32- and 64-bit).

About DriverFinderPro.com
DriverFinderPro.com is the official website of DriverFinder.
DriverFinder is a product of DeskToolsSoft.

About DeskToolsSoft, Inc.
Although launched officially in 2009, DeskToolsSoft is backed by almost 20 years of experience in the IT industry. The company was established with one aim: to provide desktop utilities that do exactly what ‘it says on the box’; namely, to optimize computers on various, specific levels so that users get the most performance out of their machines. The DeskToolsSoft goal is not only to produce software to help clients with system maintenance but to produce software that UPLIFTS their computing experience.

Contact:
media (at) desktoolssoft (dot) com

Windows 7 Driver Compatibility

When you choose to run the new Microsoft Windows 7 operating system, you can very well run into some compatibility problems. And this does not only apply to programs or applications installed on your PC, but to incompatible hardware devices as well.

Windows 7 supports more devices by default than Windows Vista, but not all manufacturers have teamed up with Microsoft to include their drivers with Windows 7.

Furthermore, hardware manufacturers often only update their drivers if they have new or recently released hardware. If THEIR hardware is the same, then they may feel no need to update their drivers because you have decided to upgrade your operating system to Windows 7.

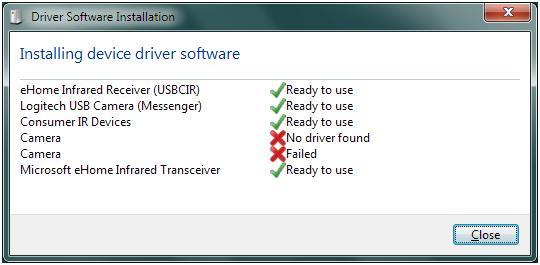
As a result, a device installation may fail in Windows 7 as shown below.

failed-driver-installation

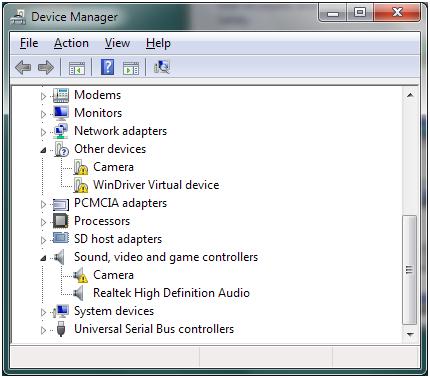
In the Windows 7 Device Manager, the devices will be listed under the Other devices category.

windows-7-device-manager

So what do you do if you upgraded to Windows 7 and are now encountering driver incompatibility issues?

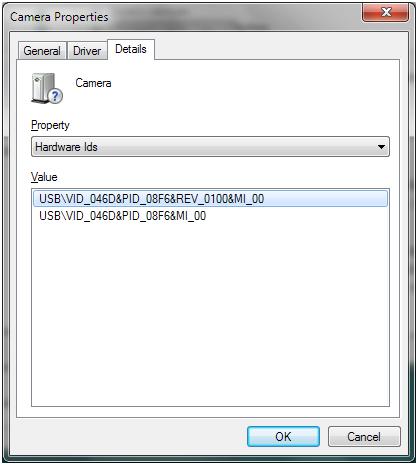
1) You can contact the hardware manufacturer and find out if they have a Windows 7 driver, or if they even plan to create one for your device! You can check the device properties for the hardware id to contact the manufacturer.

driver-hardware-id

2) You can try a Vista driver for the device. It is said that Vista drivers will work in Windows 7. The technical architecture for both these Windows versions is very similar, so some Vista drivers MAY be used in Windows 7. You simply have to give this solution a try to see if it works I’m afraid.

3) Hell, why not try a Windows XP driver while you’re at it. Even a Windows XP driver can be tried under Windows 7. Especially for ‘simple’ hardware (many USB devices), this can work. If the driver is not accepted, try running the device driver installer in the Windows XP compatibility mode.

Now… if there really are no drivers for Windows 7, nor compatible older drivers and the hardware vendor indicates that they will not be created, I’m afraid it’s the end of the road for alternative solutions. You really need to replace the hardware with a Windows 7 compatible version.

Windows 7: Should you go for 32-bit or 64-bit?

When you upgrade to Windows 7, you have the choice between a 32-bit and 64-bit version. You may be tempted to go for the 64-bit version due to the increased RAM available but note that more drivers may be available or compatible with the 32-bit version!

Even in Vista, the 64-bit version has always struggled with device driver availability for many types of devices. So if you have a choice, consider your computer hardware before deciding. Checking in advance can save you a lot of headaches. Remember, 32-bit drivers CANNOT be used in 64-bit versions.

One of the reasons drivers for 64-bit versions are not always available is that all kernel mode drivers need to be signed. Unsigned drivers are not accepted. For mode details on driver signing, visit the Microsoft website.

Resources for Windows 7 Compatibility

The Microsoft Windows 7 Compatibility Center (no longer available) was the first place to look to check if your device is really compatible with Windows 7, or not.

For specific hardware compatibility questions, you can also try the Microsoft forum.

Many hardware and computer manufacturers have their own information on whether or not their devices are compatible with Windows 7. Check the manufacturer’s websites for details.

>>> Download Windows 7 Drivers

Video Drivers and their Importance

Video drivers need to be specific to the video card, also known as a graphics card or display adapter. If you are installing a graphics card in to your system, you should first check to make sure it will be compatible with your motherboard. Conflicts, while rare if you are using up-to-date components, can occur and can be difficult to handle.

The graphics card you have purchased should have been supplied with its own video drivers in form of either a CD or floppy disk. The video drivers can be installed in your operating system after you have inserted the card in to the motherboard.

The video drivers will enable you to configure the graphics on your system correctly and set the colors and refresh rate to the video card’s limits. A graphic card or video card will require video drivers to enable the card to send the graphics to the processor and then to your monitor or other viewing component.

Some operating systems will have a list of video cards in the device manager to choose from. You can also match up your card by its manufacturer and model number. The operating system will use the video drivers in which it has stored to enable your graphics to function correctly.

Video Drivers for On-Board Video

Video drivers for on board video should have been supplied with the system board or motherboard, whatever you want to call it. There is no card to remove; the video graphics are actually built right in to the board itself. This allows for more open slots for other type of expansion cards.

Video drivers can be found within the operating system in this case as well. If you can not choose a manufacture or model number, the operating system would just automatically pick up the video drivers and load them as the default.

If you are still in need of video drivers for your onboard video, you would check to make sure you do not have the motherboard driver CD; this would be where you find the drivers. If the CD can not be located, you can download video drivers from the internet from the manufacturer’s site. There are some instances where you can not locate the board manufacturer. In this case you would want to do a search for it on the internet. Include in your search video drivers, so that you would have the correct ones available to you.

How to Update Video Drivers

Video drivers should be updated often either (1) by using the automatic update software that was available when installing the graphics card, (2) by going to the manufacturer’s site and checking for updates, or (3) using third-party software like DriverFinder™ to automatically update not just your video drivers but any and outdated or corrupt driver on your system.

With the changing face of gaming and other graphic software, such as photo editors, and graphing or blueprinting software, the need for updates are quite frequent (almost inevitable really). And as manufacturers try to keep up by releasing new products and/or new features to existing products, we just have to ensure that  we have access to most updated video drivers out there.

>> Download Video Drivers

Copyright 2009 and Beyond - DriverFinderPro.com - All Rights Reserved