How To | DriverFinder - We Make Drivers Work for You - Part 3

How to Install a Synaptics Touchpad Driver

Most touchpads on laptops and notebooks are using a Synaptics device. For the touchpad to work, Windows will need a Synaptics touchpad driver to be installed. The driver ensures the touchpad is recognized as a pointing device, replacing the need for an external mouse.

But even if you prefer an external mouse, it is good to have the touchpad working so that you have a working pointing device in case you forget the mouse. And don’t forget about all the extra features modern touchpads offer (e.g. multi-finger gestures, area taps, etc.).

Install a Driver Using the Device Manager

Depending on the Windows version you’re using, support for many devices is included. As such, it’s possible to use the Windows Device Manager to install the Synaptics touchpad driver.

It is not guaranteed that the driver will be the latest version from the manufacturer, nor may it offer all features. However, in many cases, a working pointing device can be achieved this way.

For Windows 10:

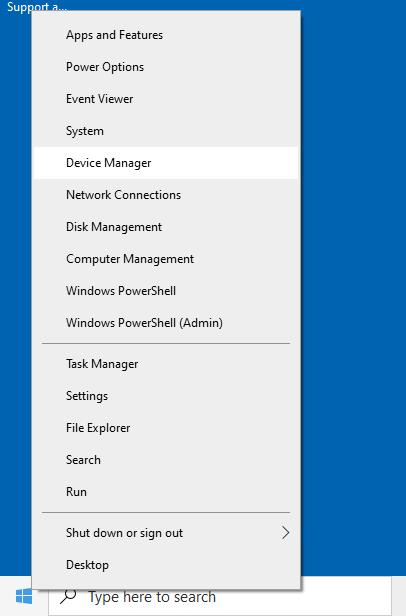
  1. Right-click the Start button.
  2. In the popup menu that appears, click Device Manager.
    Windows 10 Start Menu
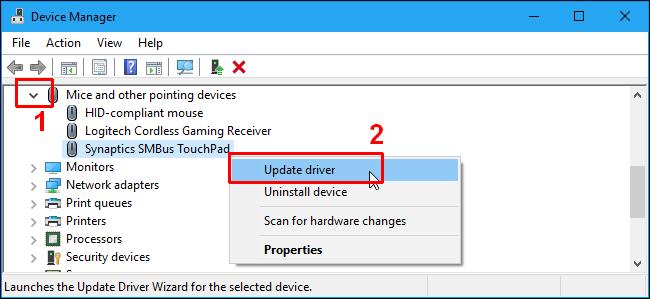
  3. In Device Manager, locate the entry called “Mice and other pointing devices”, and then click to expand that category.
  4. The Synaptics pointing device should be listed here as something called “Synaptics SMBus Touchpad”.
    Note: If the Synaptics SMBus Touchpad is not listed in this category, check if a category called Other devices exists, and then open that (1). The device will be listed here with a different name, most likely as Unknown device. Just click that and then follow the next steps.
  5. Right-click the device and then click Update driver (2).
    Synaptics Touchpad Driver
  6. Next, select the option to Search automatically for drivers.
    Search for drivers automatically
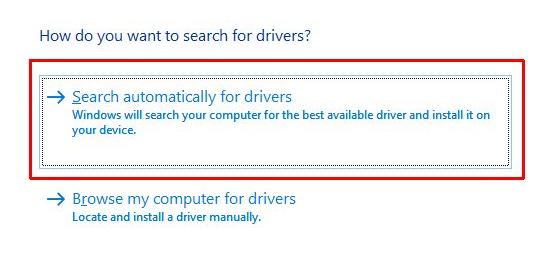
  7. Wait for Windows to search for the driver and install it.

Enabling the Synaptics Touchpad Driver

If no device is shown in the Device Manager at all, make sure you haven’t disabled the touchpad on your laptop.

Some laptop manufacturers have incorporated special function keys to disable and enable the touchpad (Asus laptops use FN + F9, Dell uses Fn + F3, Lenovo uses F6, etc. – see your laptop manual for details).

Check if the touchpad is enabled in Windows 10, by using the Windows search bar and then typing “touchpad settings”. Click Touchpad settings under the best match results, and make sure that Touchpad (1) is set to On.

Windows 10 Touchpad Settings

In addition, check whether the setting for ‘Leave touchpad on when a mouse is connected‘ (2) is enabled or disabled. If it is disabled, and an external mouse is connected, the touchpad will also be disabled.

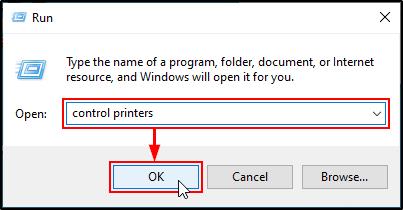
How to Manually Install a Synaptics Touchpad Driver from the Manufacturer

To manually install a Synaptics touchpad driver, you first need to download the driver installer from the laptop manufacturer. Using the specific touchpad driver from the manufacturer will guarantee that all functionality is available. Manufacturers often offer features beyond the standard Synaptics touchpad driver, even though it is not always the latest version of the Synaptics driver.

  1. Locate the support website for your laptop brand.
  2. Look up the laptop model.
  3. Download the touchpad driver.
  4. After downloading, run the driver installer and follow the on-screen instructions.

Here are some of the more common support sites for laptop manufacturers:

Lenovo  (For the Synaptics UltraNav Driver for Windows)
Hewlett Packard (HP)
Asus
Toshiba
Samsung

How to Automatically Install a Synaptics Touchpad Driver

If you’re not sure about the exact brand and model of your laptop, or you find manually installing a touchpad driver tedious. You can use DriverFinder to automatically locate the driver for you.

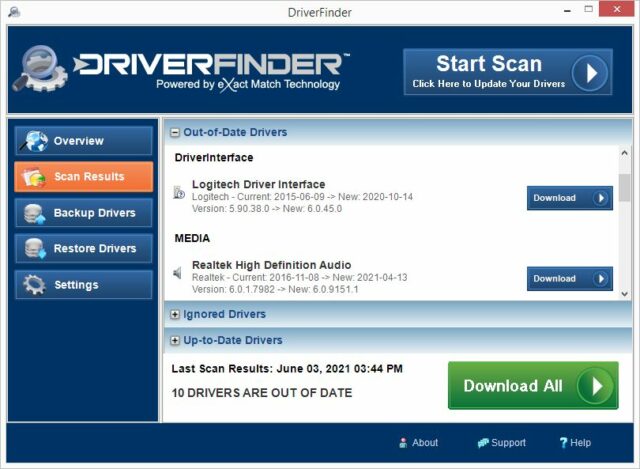
The DriverFinder program scans your laptop for all hardware devices that are present. Using its own device driver database, it locates the appropriate driver for the devices. This includes Synaptics touchpad drivers.

Note: Drivers in the DriverFinder database are sourced DIRECTLY from hardware manufactures so rest assured that the right driver update is recommended.

  1. Download the DriverFinder program.
  2. Get a license and Activate the program.
  3. Run a Scan using the program.
  4. Download the driver(s) from the scan results.
    Download Synaptics Touchpad driver using DriverFinder
  5. Run the driver installer.

Another benefit of using DriverFinder is that you can update ALL the drivers for your laptop (including sound drivers, video drivers, etc.), and not just the Synaptics touchpad driver.


Top 25 Zoom Questions Answered (Beginner Level)

zoom-q&aWith more and more… and more! people working from home nowadays, one of the communications apps that has seen tremendous growth is Zoom.

Zoom primarily gained traction as a video conferencing software program that enables anyone (with an Internet connection) to e-interact with workmates when face-to-face meetings aren’t possible. However, Zoom has also proven itself great for organizing social events and even for day-to-day personal use.

As a cloud-based audio and video conferencing service, it was not surprising that many people found a need to update their audio drivers and video drivers too.

Remember, many did not have suitable – let alone ‘high-tech’ or updated – office set-ups at home. So when people started downloading Zoom and setting it up on their home laptops and computers, audio and video issues came to the fore.

Many used our software – DriverFinder (I know, shameless plug!) – to update their audio and video drivers. But A LOT of non-driver related inquiries landed on our Customer Support team as well :)

So we’ve decided to sort of group these common ‘Beginner Level’ questions people have about Zoom and put them together here!

Resources:
You can download Zoom here.
You can download DriverFinder here.
Quick read: How to Effectively Work from Home During COVID

Top 25 Zoom Questions Asked… and Answered

Download and Install Zoom For Windows

  1. Go to Zoom’s download page – https://zoom.us/download
  2. Under Zoom Client for Meetings, click Download.zoom-download
  3. Navigate to where you want to save the Zoom installer on your PC, and then click Save.
  4. Go to where you saved the installer (exe), and then double-click it.
  5. Click Run and wait for the installation to finish.

Sign Up For a Free Zoom Account

  1. Go to Zoom’s official website – https://zoom.us/ – and then click SIGN UP, IT’S FREE
  2. Provide your birth date details, and then click Continue.
  3. Type your work email address in the space provided, and then click Sign Up.
  4. A prompt will show asking for your permission for Zoom to send you tips on how to use the software, click Confirm.Tip: If you don’t want Zoom to send you messages, click Set Preferences. Select Unsubscribe me entirely, and then click Submit.
  5. Check your messages for the Zoom verification email. Click the confirmation link inside that email to activate your Zoom.
  6. Clicking the email confirmation link will send you to a Zoom web page asking you to complete your registration by providing your name and a password to use Zoom.
  7. Click Continue.
  8. You can invite colleagues at this stage and click Invite, or you can click Skip this step.
  9. Click Start Meeting Now.
  10. Click Open Zoom Meetings to start this test meeting.
  11. Click End when done testing.

Schedule a Zoom Meeting Over the Web

  1. Log into your Zoom account online.
  2. Click Schedule a Meeting.
  3. Type a Topic for your meeting.
  4. Type a Description for your meeting (optional).
  5. Select a date and time for your meeting.how-to-sched-meeting
  6. Click Save.

Schedule a Zoom Meeting via the Desktop App

  1. Sign into your Zoom desktop app.
  2. Click Meetings at the top.
  3. On the left pane, click the plus sign, and then click Schedule Meeting.
  4. Enter the details of your meeting and then click Schedule.

Invite Participants to a Meeting via the Web Portal

  1. Sign into your Zoom account online.
  2. Under Personal, click Meetings.
  3. Click the meeting for which you want to invite participants.
  4. Scroll down to Invite Link, and then click Copy Invitation.
  5. Click Copy Meeting Invitation and close that window.
  6. Open your email client (e.g., Outlook, Mail, etc.), paste the Zoom Meeting Invitation into the body of your email, and then send the email to your intended recipients.

Invite Participants to a Meeting via the Desktop App

  1. Sign into your Zoom desktop app.
  2. Click Meetings at the top.
  3. Click the meeting for which you want to invite participants.
  4. Click Copy Invitation.
  5. Open your email client (e.g., Outlook, Mail, etc.), paste the Zoom Meeting Invitation into the body of your email, and then send the email to your intended recipients.

Add a Meeting to Your Google Calendar via the Web Portal

  1. Sign into your Zoom account online.
  2. Under Personal, click Meetings.
  3. Double-click the meeting you want to add to your Google calendar.
  4. Under Time, click Google Calendar. add-zoom-to-google-calendar
  5. Sign-in to your Google account.

Note: If this is the first time you’re adding a Zoom event, a prompt will appear asking you to give Zoom permission to access events on your calendar. Click Allow if you want to proceed to adding the Zoom meeting to your Google Calendar. (You may need to re-confirm this action by clicking Allow again on the next prompt.)

  1. You will now see details of the meeting on your Google Calendar, click Save.

Add a Meeting to Your Outlook Calendar via the Web Portal

  1. Sign into your Zoom account online.
  2. Under Personal, click Meetings.
  3. Double-click the meeting you want to add to your Outlook calendar.
  4. Under Time, click Outlook Calendar.add-zoom-meeting-to-outlook
  5. Save the file on your PC.
  6. Open the Outlook email client on your PC.
  7. From the File menu, click Open.
  8. Click Open Calendar.
  9. Locate and select the Zoom calendar file you downloaded.
  10. Click Save and close.

Add a Meeting to Your Yahoo Calendar via the Web Portal

  1. Sign into your Zoom account online.
  2. Under Personal, click Meetings.
  3. Double-click the meeting you want to add to your Yahoo calendar.add-zoom-to-yahoo-calendar
  4. Under Time, click Yahoo Calendar .
  5. Sign-in to your Yahoo
  6. The Zoom meeting details will appear, click Save.zoom-meeting-for-yahoo

Add a Meeting to Your Google Calendar via the Desktop App

  1. Sign into your Zoom desktop app.
  2. Click Meetings at the top.
  3. Click the meeting you want to add to your Google Calendar.
  4. On the right-side pane, click Edit.
  5. Under Calendar, click Google Calendar.
  6. Click Save.
  7. Sign-in to your Google account.

Note: If this is the first time you’re adding a Zoom event, a prompt will appear asking you to give Zoom permission to access events on your calendar. Click Allow if you want to proceed to adding the Zoom meeting to your Google Calendar. (You may need to re-confirm this action by clicking Allow again on the next prompt.)allow-zoom

  1. You will now see details of the meeting on your Google Calendar, click Save.

Add a Meeting to Your Outlook Calendar via the Desktop App

  1. Sign into your Zoom desktop app.
  2. Click Meetings at the top.
  3. Click the meeting you want to add to your Outlook Calendar.
  4. On the right-side pane, click Edit.
  5. Under Calendar, click Outlook.
  6. Click Save. This will open the Outlook email client on your PC, showing the meeting event.
  7. Click Copy to My Calendar. zoom-to-outlook
  8. In the Outlook prompt that appears, click Accept the meeting.
  9. Click OK, and then click Yes.

Test Your Microphone Before a Zoom Meeting

  1. Sign into your Zoom desktop app.
  2. Click the Settings gear icon on the top right .
  3. In the Audio section, click Test Mic. test-microphone
  4. Say something to your microphone.
  5. Zoom will play back what you said if your mic is working properly. If not, select a different microphone until you find the one that works.
  6. Close the Settings window to save your selection.
FIX IT -> Zoom Mic Not Working in Windows 10 (With Pics!)

Test Your Speakers Before a Zoom Meeting

  1. Sign into your Zoom desktop app.
  2. Click the Settings gear icon on the top right .
  3. In the Audio section, click Test Speaker.test-speaker-for-zoom
  4. Zoom will play a test audio clip, if you hear this click Stop. If you don’t hear the audio clip, select a different speaker until you find the one that works.
  5. Close the Settings window to save your selection.
FIX IT -> Still having audio problems in Zoom? Click here to update your audio drivers.

Begin a Meeting

  1. Sign into your Zoom desktop app.
  2. Click Meetings at the top.
  3. Under the Upcoming tab, select the meeting you want to start.
  4. Click Start.

Join a Meeting without Signing Into the Desktop App

  1. Open or launch the Zoom desktop app.
  2. Click Join a Meeting.join-zoom-meeting
  3. Type the Meeting ID number for the meeting and your display name.
  4. Choose if you want to turn on audio and/or video on your end for the meeting and then click Join.

Join a Meeting via the Desktop App

  1. Open or launch the Zoom desktop app.
  2. Click Sign In to log into your Zoom
  3. Type your Zoom email and password, and then click Sign In.
  4. Click Join.
  5. Type the Meeting ID number for the meeting and your display name.
  6. Choose if you want to turn on audio and/or video on your end for the meeting and then click Join.

Join a Meeting Using Google Chrome

  1. Open Google Chrome.
  2. On the address bar, go to zoom.us
  3. Enter the meeting ID as provided by the meeting organizer.
  4. Click Join.join-zoom-meeting

Note: If this is your first time to join a meeting via Google Chrome, you will be asked to open the Zoom meeting client. Click Open Zoom Meetings.

Join a Meeting Using Mozilla Firefox

  1. Open Firefox.
  2. On the address bar, go to zoom.us
  3. Enter the meeting ID as provided by the meeting organizer.
  4. Click Join.

join-zoom-first-time
Note: If this is your first time joining via the Firefox web browser, you may be asked to open Zoom or the Zoom installer package. Click Open Link.

Join a Meeting Using Microsoft Edge or Internet Explorer

  1. Open Microsoft Edge or Internet Explorer.
  2. On the address bar, go to zoom.us
  3. Enter the meeting ID as provided by the meeting organizer.
  4. Click Join.

Join a Meeting Using the Meeting Invitation Link You Received via Email

  1. Open your default email client (e.g., Mail, Outlook, etc.)
  2. Locate and select the Zoom meeting invitation you received.
  3. Click the Join Zoom Meeting link you received.join-zoom-meeting-from-email-link

Note: Depending on your default web browser, you may be asked to open Zoom to join the meeting. Click Allow if you want to proceed with joining the meeting.

Turn Off Video When Joining a Zoom Meeting

  1. Sign into your Zoom desktop app.
  2. Click your profile picture, and then click Settings.
  3. On the left pane, click Video.
  4. On the right pane, under Meetings, click Turn off my video when joining a meeting.

Share Only a Portion of Your Active Screen During Zoom Meetings

  1. On the Zoom call control panel, click the Share Screen.share-zoom-screen
  2. Click Advanced.
  3. Click Portion of screen and then click Share.

Note: A ‘share window frame’ will appear. Use your mouse to drag this frame to only the portion of the screen you want to share.zoom-screen-frame

  1. Click Stop Share (at the top of your screen) when you no longer want to share your screen.

Set Up Your Zoom Status to ‘Do Not Disturb’

  1. Sign into your Zoom desktop app.
  2. Click your Profile
  3. Click Do not disturb, and then click for how long this status should last.zoom-dnd

Always Get a Reminder Before a Zoom Meeting Starts

  1. Sign into your Zoom desktop app.
  2. Click the Settings gear icon on the top right .
  3. In the General section, click the Remind me drop-down arrow and then select to be reminded 5, 10 or 15 minutes before a meeting starts.meeting-reminder

Share Your Screen During a Zoom Call

  1. On the Zoom call control panel, click the Share screen.share-zoom-screen
  2. Select the screen window or application that you want to share with others and then click Share.
  3. Click Stop Share (at the top of your screen) when you no longer want to share your screen.stop-screen-sharing

I hope you enjoyed this article!
If you have any other Zoom questions, just comment below and I’ll personally respond to them.😉

[FREE]: How to Backup and Restore Drivers

It’s never a bad idea to backup installed drivers for the numerous hardware devices on your system.

And there’s no need to look far…

Just use the free version of DriverFinder to quickly and easily back up (and restore) your device drivers whenever you want.

⇨ Click here to download DriverFinder.

How to Set Up a VPN Connection in Windows 10

Curious about how to set up a VPN connection? That’s not surprising. With privacy and security so important these days, it is a good idea to use a VPN connection in Windows 10.

VPN is short for Virtual Private Network. It helps protect your personal data and shields your location whenever you’re online. But how do you go about this in Windows 10? This article will help you set up a VPN and connect it to Windows 10.

Set Up a VPN Connection in Windows 10

Before you can use a VPN connection in Windows 10, you must first create the VPN connection itself.

To create a VPN connection:

  1. Click on the notification area in the Windows 10 Taskbar (1).
    create VPN connection
  2. Next, click on the VPN block in the popup window (2).
  3. This will bring up VPN Settings. In this window, click Add a VPN connection.
    add VPN connection
  4. Now you will need to enter the details for the VPN connection.Configure VPN
  5. For the VPN provider, select Windows (built-in). For the Connection name, you can enter any convenient name for the connection (e.g. Personal Connection, or Work Connection).
  6. For the server name or address, enter the name or address of the VPN server.
  7. Then select the type of sign-in info, or leave the default User name and password.
  8. Enter the details for the sign-in authorization (User name and password, or other means of authorization).
    Note: For work type of connections, simply request the necessary configuration details from the IT administrator. For Paid VPN services, the VPN provider will give you the configuration details.
  9. Click Save to finalize the creation of the VPN connection.

Connect to a VPN in Windows 10

Once you have created a VPN connection in Windows 10, you need to connect to it to make sure your privacy is shielded when you go online.

To connect to an existing VPN connection:

  1. Click on the notification area in the Windows 10 Taskbar.
  2. Click the VPN block in the popup window.
  3. In the VPN Settings window, click the VPN connection you want to use.
  4. Click Connect.
    connect to VPN
  5. Optionally, enter the authorization details for the VPN connection to complete the sign-in.

Once you are connected to the VPN, you should be able to see this from the Taskbar. Click the WiFi or Network icon. The VPN connection should show Connected below it.

VPN connected

Use a Browser-Based VPN Connection

Apart from the above described method of using a VPN connection in Windows 10, it is also possible to use a VPN connection through your browser.

Both Chrome and Firefox have extensions or add-ons that offer VPN connections.


I hope you enjoyed reading this article!
Having other problems with your network connection? Easily check if you have the latest drivers for your wireless or network card by downloading DriverFinder.

How to Add a Printer in Windows 10

Need to add a printer in Windows 10? In this article, I’ll show you the steps on how you can add or link a printer to your computer, whether that printer is brand spanking new, or an old one that you’ve had for years.

Add a Printer Automatically in Windows 10

Firstly, make sure your printer is turned on and connected to your computer. Next, follow the steps below to install the printer in Windows 10.

  1. Simultaneously press the Win + R key to open the Run dialog box.
    Open Printers and devices
  2. In the Run dialog box, type the following command: control printers, and then click the OK button
  3. Next, click the Add a printer button.
    Add a printer
  4. Windows will scan for your plugged printers. Select your printer and then click Next.
  5. Windows will install a printer driver for the device. Once done, click the Finish button.
    Tip: Click the Print a test page button to test your printer before clicking Finish.
  6. Check if your new printer is added in the list of Devices and Printers.

Use an Older Printer with Windows 10

So, what if you end up getting a new computer, or you upgraded an existing computer to Windows 10, and you still want to use your old printer?

Manufacturers often don’t make new Windows 10 drivers for older printer models. To use an older printer in Windows 10, you start by following the Steps 1-3 above.

  1. When no printer is found, click the link The printer that I want isn’t listed link.
    The printer that I want isn't listed
  2. Next, select the option My printer is a little older. Help me find it. And then click Next.
    My printer is a little older
  3. Windows 10 will search for available printers and compatible drivers. Once found, select the compatible printer model, and click Next.
  4. Now type a name for the printer, and click Next.
  5. Skip the Printer Sharing option by clicking Next again.
  6. Use the Print a test page button to check if the printer is working, and then click Finish.

Add a Printer Manually in Windows 10

If both previous options did not enable you to install or connect your printer to Windows 10, you can try to install the printer manually.
Here are the steps to follow:

  1. Follow the previous instructions to click the link The printer that I want isn’t listed.
  2. Now select the option Add a local printer or network printer with manual settings, and click Next.
  3. The next step is to choose a printer port. Select the option Use an existing port (this is for a printer connected locally to your computer). In the drop-down list next to it, select the port. For a printer connected through a USB cable, select the USB option. For a printer connected with a parallel cable, select the LPT1 option. Then click Next.
  4. Next, click the Windows Update button. This will make sure Windows 10 checks the online repository for compatible drivers (Microsoft Update Catalog).
    Use Windows Update for Driver
  5. Wait for Windows to finish scanning the devices and driver catalog. In the next windows, select the printer manufacturer and then the printer model.
    Printer Brand and Model
    Note: If the exact model for your printer is not listed, try selecting a model similar to your printer model. Or, if you have a driver disk for the printer, click the Have Disk option and select the INF file location for the printer driver.
  6. Click Next.
  7. The final steps are the same as before. Type a name for the printer, skip the printer sharing option and print a test page.
  8. Click Finish.
Note: Is finding the right printer driver getting a bit too technical for you? No sweat. Download DriverFinder to find the EXACT printer driver your PC needs with just one click.

Install an Old Printer Driver in Windows 10, Using Compatibility Mode

If you have a driver installer for an older version of Windows for your printer, you can still try to use it with Windows 10. Just like some earlier Windows versions, Windows 10 has the ability to run programs in compatibility mode.

  1. Open a File Explorer window and browse to the driver installer file.
  2. Right-click the file and in the popup menu, select the option Troubleshoot compatibility.
    Troubleshoot Compatibility
  3. Wait for the Program Compatibility Troubleshooter to analyze the file. Once complete, click Test the program to see if the installer will run under Windows 10.
  4. If the printer driver was installed by the program, you can select Next, and then click Yes, save the settings for this program.
  5. If the program failed, and the printer driver was not installed, click Next.
  6. Now click No, report the problem to Microsoft and check online for a solution.
    Report Printer Problem
  7. If an online solution is available, you can try the option presented.

In many cases the online troubleshooter will not give you a viable solution for older printers. But  if you know which version of Windows the installer is compatible with, you can manually set the Compatibility mode instead of letting Windows 10 analyze it.

  1. Simply right-click the driver installer program, and click Properties in the popup menu.
  2. In the properties dialog box, select the checkbox named Run this program in compatibility mode for:
  3. In the drop-down list below it, select the Windows version that you know the installer is compatible with.
    Windows 10 Compatibility Mode
  4. Click OK.
  5. Now double-click the installer in the Explorer window to run it. The program will now be executed with compatibility settings for the selected Windows version.
    Note: Some installers need to be executed with Administrator rights. So if, running the installer fails. Right-click the file, and in the the popup menu select Run as administrator.
  6. Follow the instructions in the printer driver installer program to finish the printer installation.
windows10-printer-drivers

The Printer is too old for Windows

It may turn out to be impossible to get your printer working on Windows 10 or Windows 11 because it is too old. In that case, there are only two real options.

The first option is to use a Virtual Machine solution (VMware or VirtualBox), install an older version of Windows, and install the printer software in that.

Using the virtual machine sharing options you can then access and use the printer in Windows 10 or Windows 11.

The second option is to use OpenPrinting with Linux. This is a lot more technical to implement, but it is a good option for older printers. For example, if the old Windows software for the printer is no longer available. Linux has better support for older hardware than the new Windows versions. This method uses the Windows Subsystem for Linux (WSL) to install a Linux distribution in Windows first.

Copyright 2009 and Beyond - DriverFinderPro.com - All Rights Reserved