Backup and restore drivers in Windows 10. Manual and automated ways are discussed so you can keep a copy of your driver files and restore them when needed.
There are a couple of reasons why knowing how to backup and restore drivers in Windows 10 can come in really handy. For instance, you may want to re-install Windows or upgrade your hard drive to an SSD. It’s also just plain good practice to backup drivers once in a while.
Manually Back Up Drivers Using ‘DriverStore’
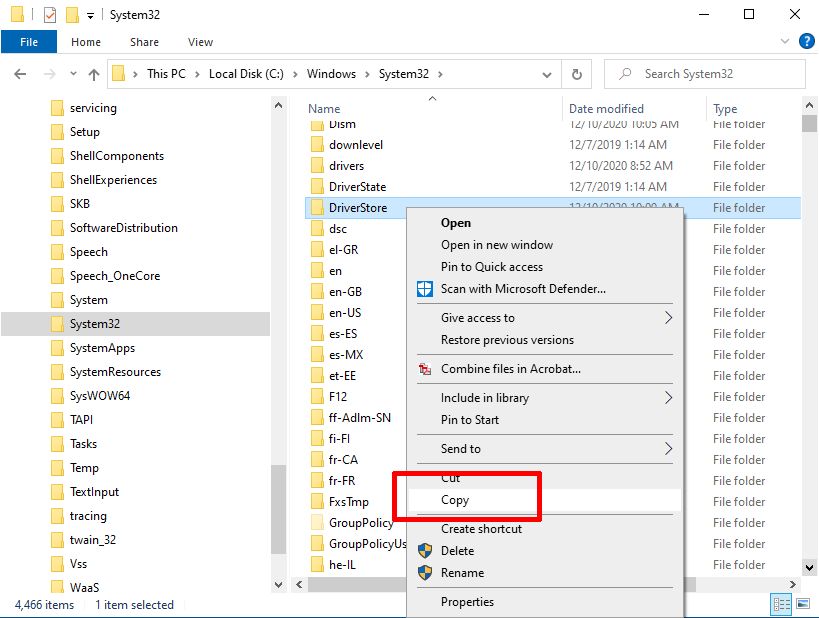
To manually backup driver files in Window 10 is to simply copy the DriverStore folder. This folder is located in C:WindowsSystem32 (assuming the C: drive is your system drive).
Use File Explorer and navigate to C:WindowsSystem32 folder, locate the DriverStore folder, and then right-click it to Copy it.
After that, navigate to a backup location (a USB stick or external drive is a good idea), and then right-click the storage location and select Paste.
Keep in mind that the DriverStore folder can be large (several GB), so it is a good idea to right-click it first and select Properties to see the size. That way you can make sure there is enough space available in the backup location.
Manually Back Up Drivers Using the Deployment Image Servicing and Management Tool (DISM)
Another method to manually backup drivers in Windows 10 is to use the DISM tool. This will make a backup of all third-party drivers. Windows will install any directly supported devices automatically from the installation location, or from the Windows Update service. So getting a copy of only the installed third party drivers can make sense.
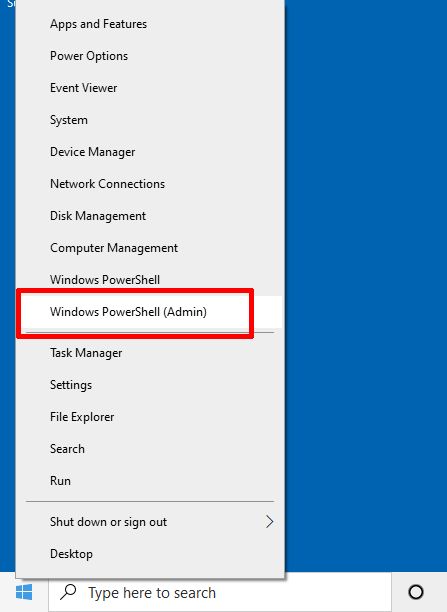
For this driver backup method, you will need to start the Windows PowerShell with administrator rights.
Right-click the Windows Start button, and in the Start menu, click Windows PowerShell (Admin).
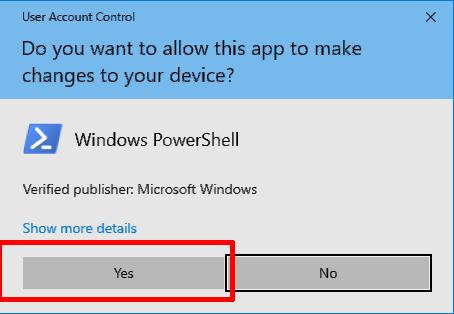
This will open a new PowerShell window (similar to a command window). You will first be prompted by the User Account Control to confirm starting the PowerShell with admin rights. Click the Yes button to confirm.
In this PowerShell windows, type the command -> DISM / Online /Export-Driver /Destination:C:\DriverBackup
C:\DriverBackup in this example is the destination location for the driver backup files. You can change this to the backup location for your drivers. Make sure it is an existing, valid path, or the command will not work.
Press Enter after typing the command, and then wait for the operation to complete. This can take a bit, depending on the number of drivers and the speed of your destination location.
Once the command completes it will show a message stating “The operation completed successfully.”
After that, you can type Exit and press Enter to close the PowerShell.
How to Install Drivers from a Backup in Windows 10
To install drivers from a back up to a Windows 10 installation, you need to load all the driver packages back into the driver repository. Once there, they can be used to install devices that match those drivers.
As expected there is an option to add drivers using the DISM tool that was described earlier to create a back up. The limitation of that however, is that you can only add drivers to a Windows Image file using this method. Not to a live Windows installation.
So the tool to use to install drivers from a driver backup location into Windows 10 is called PnPutil. This is a command line tool to perform actions on driver packages, and it is included in all Windows versions, starting with Windows Vista.
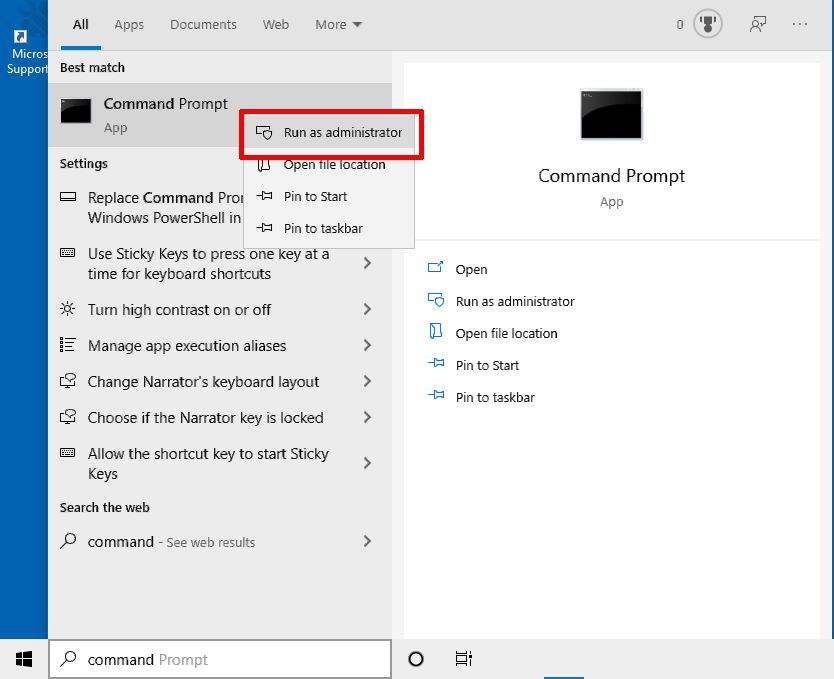
Open a Command prompt with administrator rights (right click the command prompt icon and in the popup menu, select Run as administrator). Confirm the UAC message by clicking Yes.
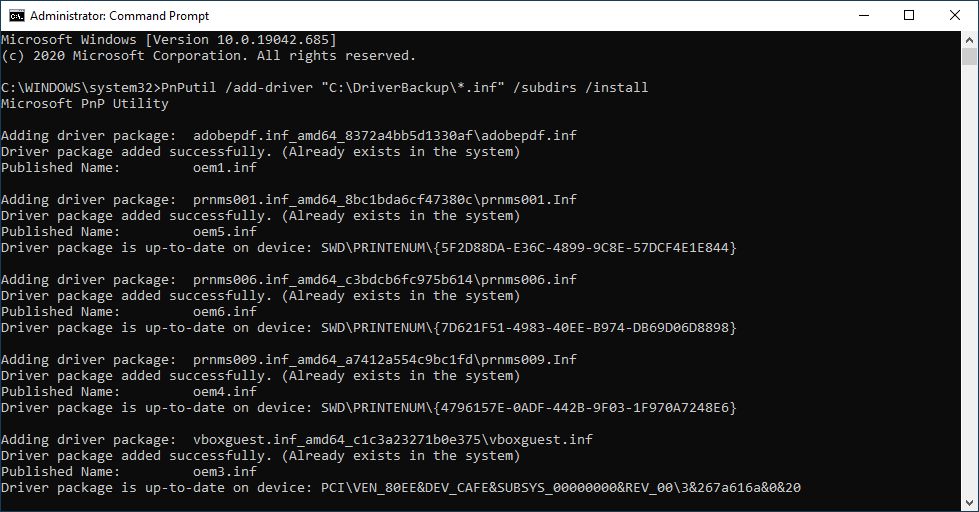
Now type the following command -> PnPutil /add-driver “C:\DriverBackup*.inf” /subdirs /install /reboot
Again, change the C:DriverBackup path to where your driver backup is located. The /reboot is not required, but recommended since driver installation often requires a reboot to complete. You can also manually reboot the computer afterwards of course.
The /subdirs parameter will ensure that all subfolders are also included for available driver INF files, while the /install parameter ensures that any devices that are compatible with the added drivers get installed in the process.
After pressing Enter, the command will start adding the driver packages from the specified backup location back into the driver store.
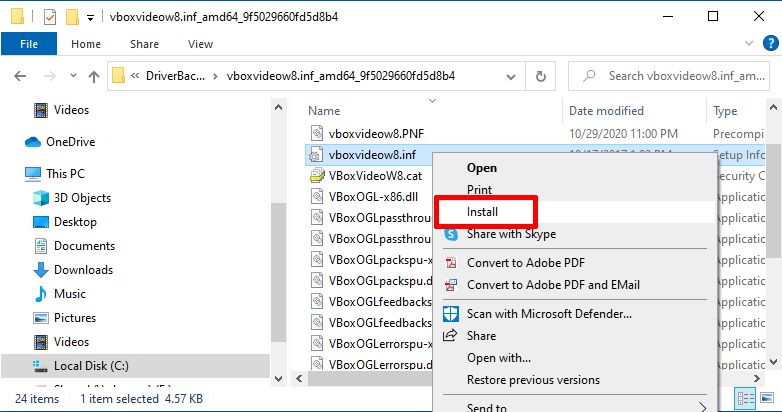
Although in most cases installing drivers from a backup into Windows 10 using this method will work, be aware that you have no control over the sequence of the driver installation. In many cases it is recommended to install the chipset drivers before any of the other drivers.
If that is a cause for things to fail, you might want to install some drivers manually first. Simply right-click the INF file and in the popup menu, select Install.
You will again be prompted by the User Account Control to confirm. Simply click Yes to continue.
Sometimes, you may not get any message whether a driver installation is successful or not. Just reboot your computer and check the Device Manager to see if the newly installed driver is active for the device it is intended.
How to Automatically Backup and Restore Drivers
Are the above steps getting a bit too technical for you? No problem because you can simply use DriverFinder (free version!) to backup and restore drivers in less than 60 seconds!
Click here to download and install DriverFinder on your Windows 10 computer.
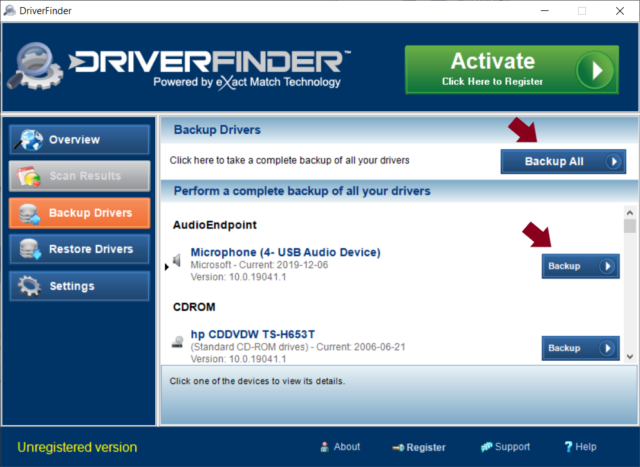
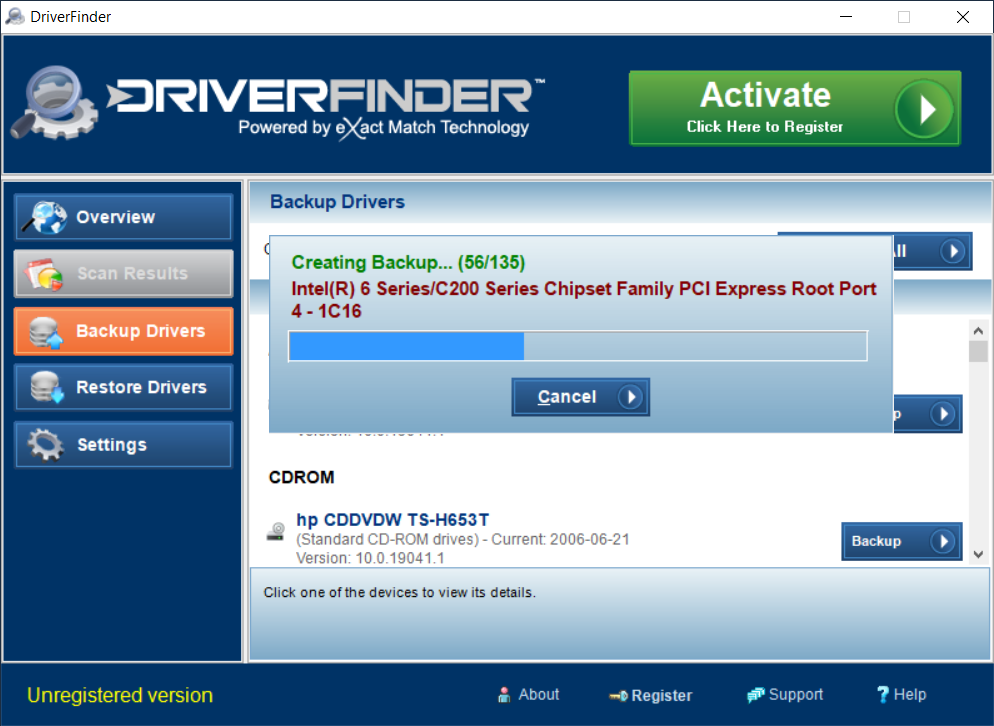
On the left side, click Backup Drivers.
If you want to back up a single driver, scroll to find that driver and click the Backup button beside it. To back up ALL your windows 10 drivers, click Backup All.
The driver backup process just takes a few seconds. Wait till DriverFinder confirms that the backup completed successfully.
That’s it! In the process above, backing up the 135 drivers in my Windows 10 system took just 56 seconds!
So now that you’ve backed up your drivers using DriverFinder… where are the backups?!? Glad you asked :)
On the left-side of DriverFinder, click Settings. Here you’ll find where the driver backups are located.
You can keep your driver backups here or you can copy or move them to another storage device (e.g., CD, DVD, USB, etc.)
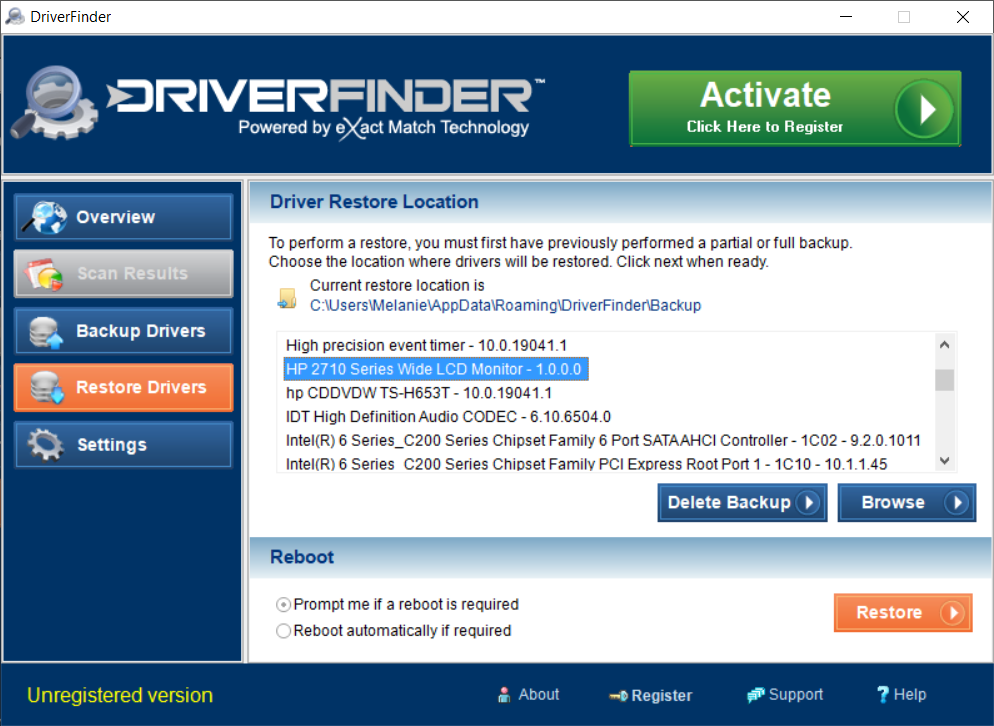
Now, if you ever need to restore a driver, simply click Restore Drivers on the left side of DriverFinder.
Select the driver you want to restore and then click Restore. Simple.
You can backup and restore Windows 10 drivers using the free version of DriverFinder any time.

The Registered/Pro version enables you to run a driver scan so you can update all your drivers before you back them up.
Manually installing monitor drivers in Windows 10 can help you solve screen display limitations. Follow these easy steps to install a monitor driver for your PC.
Monitor drivers tell your Windows PC what display monitor you are using and what the capabilities of the monitor are. The monitor driver ensures that your display can be optimized for color usage, refresh rates, and screen resolutions.
In Windows 10 a lot of hardware is recognized and supported directly, so in many cases monitor drivers are installed automatically.
But if your monitor is not recognized or detected properly, your screen resolution and other display settings will be limited. In that case it might be required to manually install monitor drivers in Windows 10. That will then allow you to use the maximum capabilities of the monitor.
Monitor Driver Installation Steps for Windows 10
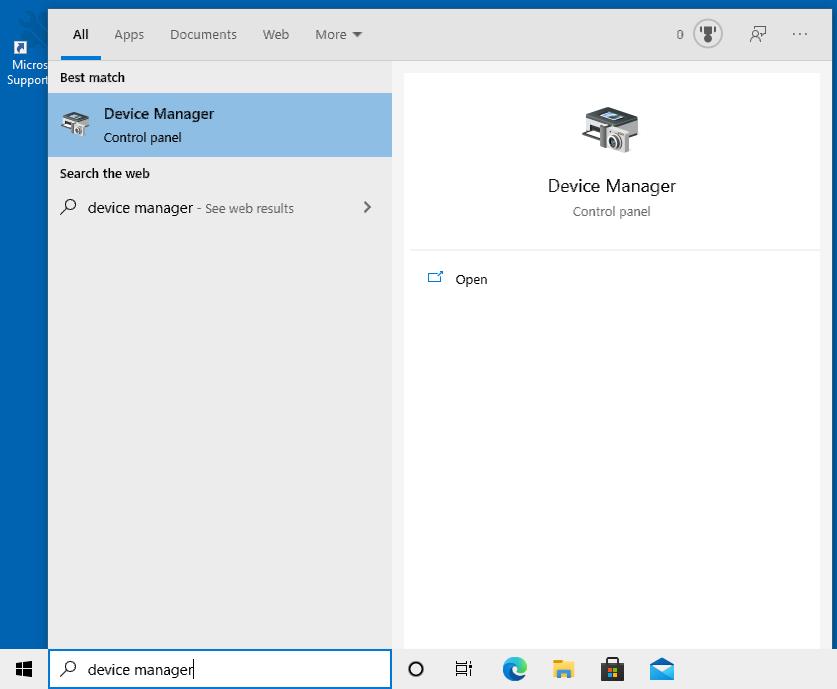
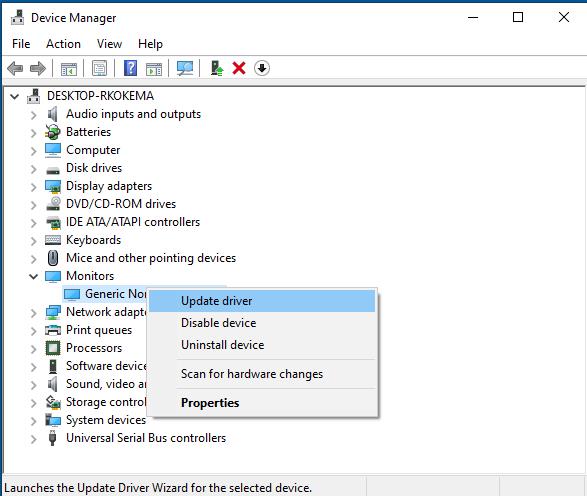
Step 1– To start with the manual installation of the monitor driver, you need to open the Device Manager in Windows.
Right-click the Start button, and in the Start menu, select Device Manager.
Alternatively, simply type “device manager” in the search box, and then click the Device Manager in the search results.
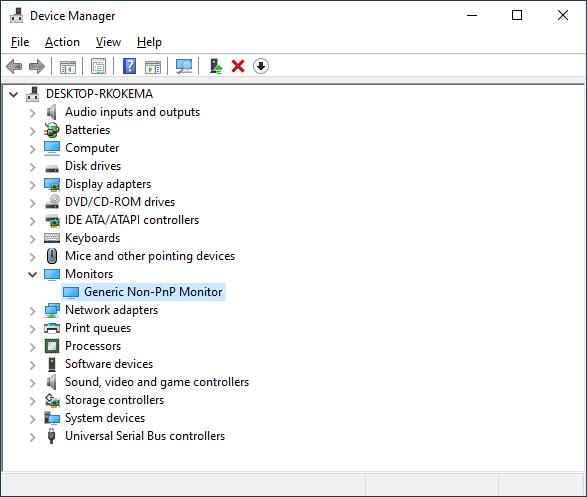
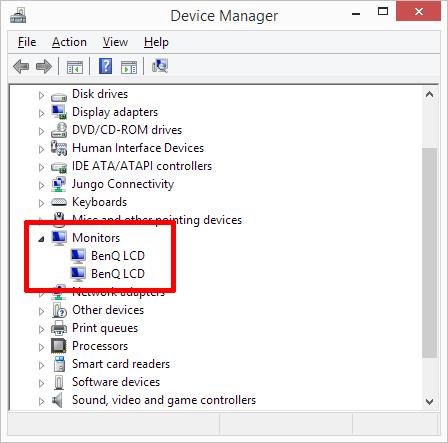
Step 2 – In the Device Manager window, open the Monitors group, and select the monitor for which you manually want to install the driver.
Step 3 –Right-click the monitor item, and in the the popup menu, select Update driver.
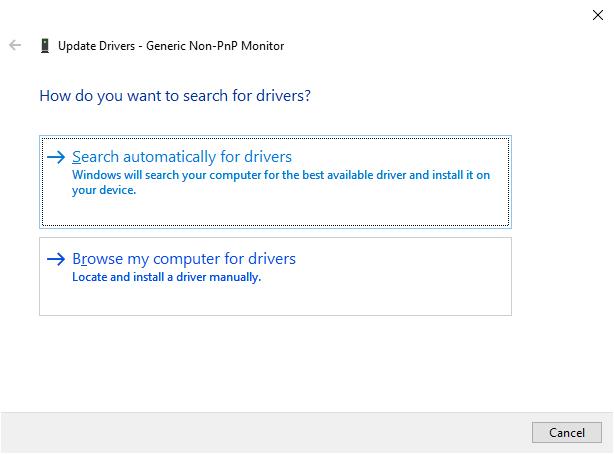
Step 4 – In the Update Drivers window, select the option Browse my computer for drivers
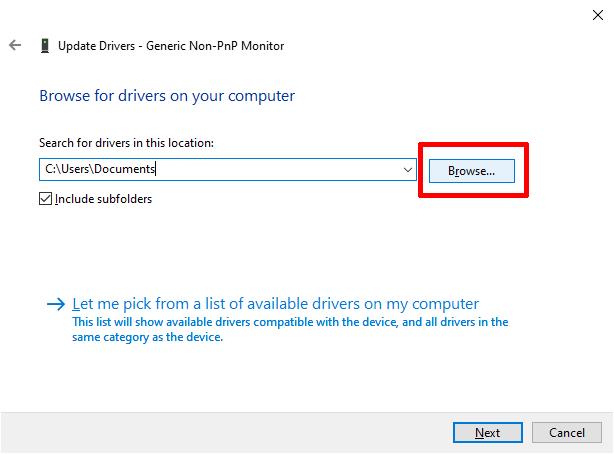
Step 5 – Next, click the Browse button and navigate to the location of the monitor driver files.
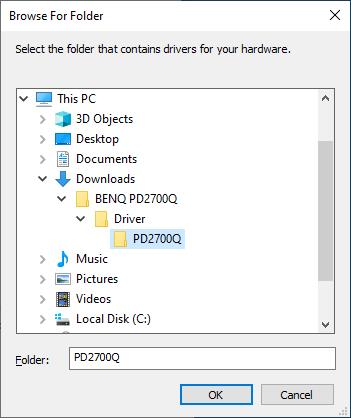
Monitor driver files typically exist of at least 3 files, a file with file extension .INF, a file with file extension .CAT, and a file with file extension .ICM.
The INF file is used by Windows for the driver installation and contains driver installation information. The CAT file is a catalog file that contains, as Microsoft calls it, thumbprints for all files in the driver collection. The ICM file contains the color profile for the monitor that allows Windows to match colors with the display characteristics of the monitor to show realistic colors.
Step 6 – Click the OK button to confirm the location of the monitor driver files.
Step 7 – Click the Next button to confirm the monitor driver file location.
Windows 10 will now install the monitor drivers for your monitor and show a message that it has successfully updated your drivers.
Step 8 – Click the Close button to finish.
The Device Manager should now list the monitor(s) with the correct brand/model indication.
Problems Related to Monitor Drivers in Windows 10
The most common problem you will face if Windows 10 does not recognize the monitor is that the screen resolution is limited to a low resolution (640×480, 800×600, or 1024×768). Especially with modern (4K) screens, resolutions can be a lot higher.
For non-LCD screens, the refresh rates can also be limited, which might result in a flickering screen.
Dual (multi) display setups can also have restrictions as result of the monitors not being recognized.
I already mentioned the color profile for monitors. A ICM file is used to specify the International Color Consortium compatibility for a monitor. To make sure the intended colors are properly displayed by the monitor they are calibrated and the values are defined in the color profile. This prevents the problem with the monitor displaying incorrect colors.
One thing to keep in mind though is that it is not only the monitor driver that affects display issues. The graphics card and the driver for the graphic card are just as important. Memory limitations on the graphics card can limit possible screen resolutions, and so can DisplayPort-to-HDMI dongles. So make sure you check and update the graphics card drivers as well.
Where Do I Find Monitor Drivers for Windows 10?
If you have your original monitor installation package, you could find a CD-ROM (or DVD) with it that contains the original drivers. Even though they may not be the latest drivers for your monitor, it is a good place to start if you still have them. But most manufacturers of display monitors will have a support section on their website where you can download monitor driver files for their models.
Unlike many other device drivers, monitor drivers are less limited to Windows versions, so even if there is no direct support for Windows 10, you can often use a monitor driver for an older version of Windows in Windows 10. In general, there is also no distinction between 32-bit and 64-bit versions for monitor drivers.
If you cannot manually find a monitor driver for you monitor, try downloading DriverFinder and let it find a monitor driver for you automatically.
Additional Monitor Software
Apart from getting the right driver for your monitor device, installing the software from the original manufacturer can also help install addional software. For the example used in this article, we used a BenQ display. That comes with something called Display Pilot.
This type of software can help control settings for your monitor(s). Instead of using physical controls, you can change the contrast and brightness from the program. ViewSonic has the vDisplay Manager, which is something similar.
Some other features, like different color profiles, virtual desktops, and similar options can have an overlap with standard features in Windows itself. So the added value of this type of software needs to be assessed, so you do not install unneeded software. Typically these programs are run at startup (or logon), so they can increase the Windows start time.
Disk Management in Windows 10 is used to manage your disk drives and volumes. Learn how to open Disk Management in Windows 10 in different ways and pick the one you like best. Clear instructions with illustrative images.
In Windows 10, there’s a built-in mechanism that can help you easily manage your disk drives. It’s called Disk Management. But first, how to open it?
The easiest way to open Disk Management in Windows 10 is by using the Quick Access menu.
Right-click the Windows Start button on the bottom-left corner of your screen. This will show the Quick Access menu. From here, click Disk Management.
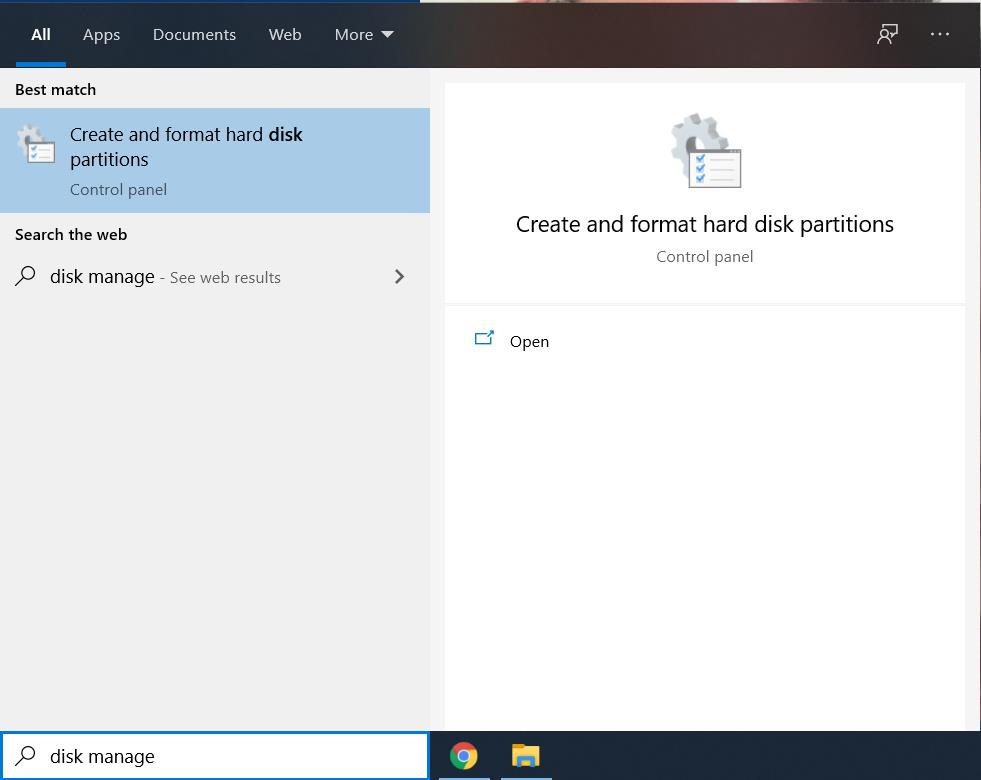
If you prefer using the keyboard, you can also use the Search box in the taskbar. Type disk management in the search box and when shown, select Create and format hard disk partitions in the search results.
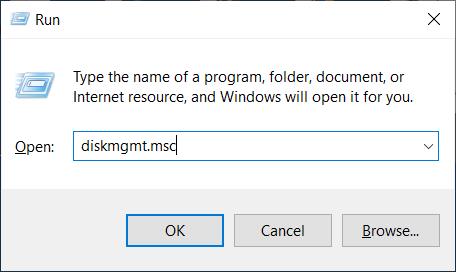
Another keyboard method to open Disk Management in Windows 10 is to press the keyboard combination Windows + R, which will open the Run window. Next, type diskmgmt.msc and then click OK.
If you can remember the exact command this is a good alternate to the search option.
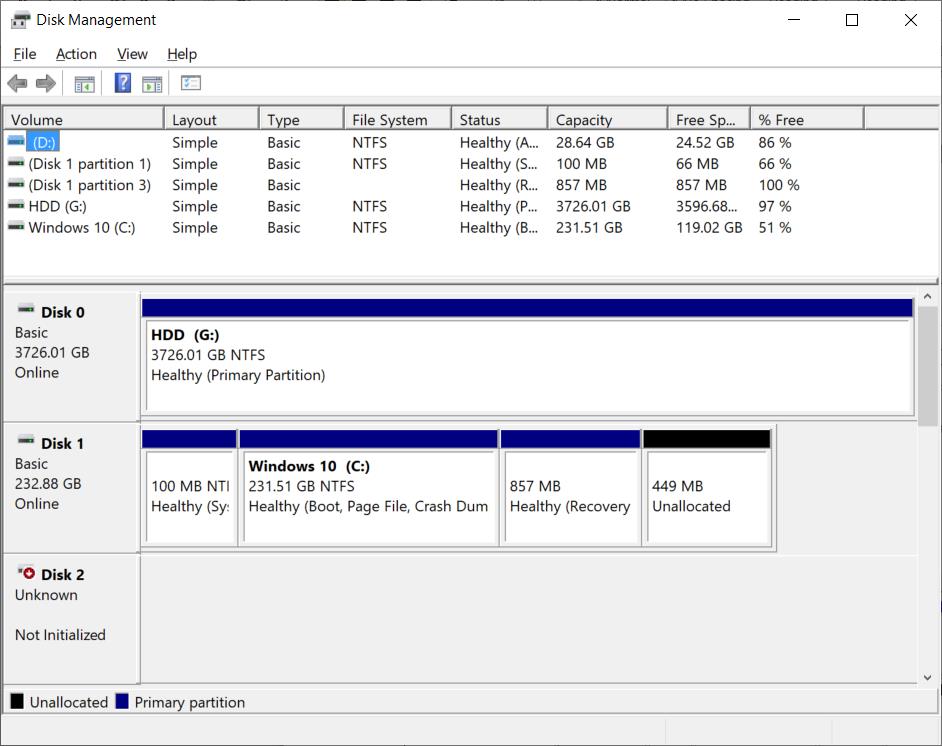
The Disk Management Window
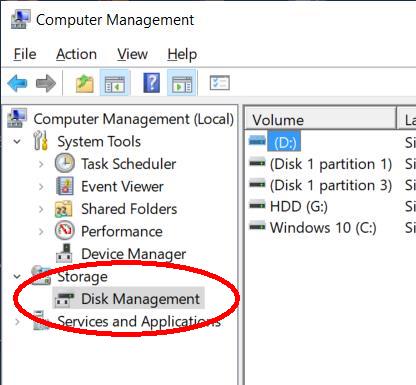
Another way to open Disk Management in Windows 10 is to use the Computer Management option. You can access Computer Management from the Quick Access Menu as well.
Once the Computer Management window is open, navigate to Storage-> Disk Management on the left-hand panel and select it. Please note that depending on the computer configuration, it can take a moment for disk management details to show.
Once the Disk Management window shows, you will see all the disks and volumes (or partitions) in your computer.
The top table shows the volumes with the file system and available disk space.
In the bottom section, you will see the disk drives in the computer, and how the storage space on the disks is allocated to the different volumes (partitions).
Why Use Disk Management in Windows 10?
Normally you would only use disk management when you install a new version of Windows, or when you add or replace a disk drive to your computer.
But there are also scenarios where Disk Management in Windows 10 can be useful during normal computer usage.
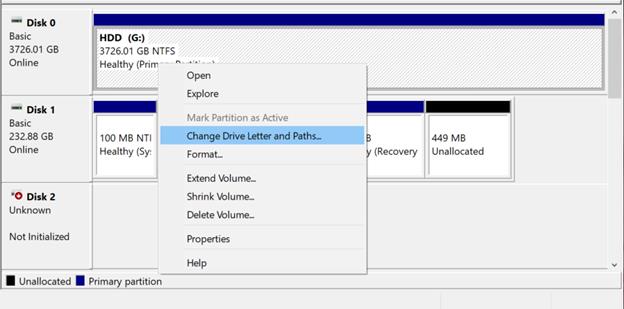
Changing a drive letter for a volume can be helpful to prevent external drives not being recognized due to drive letter conflicts. If a USB stick or external USB drive is plugged but does not show up in Windows Explorer, check the drive letter assignment first!
Simply changing the name of a volume to a more useful indication of what is stored on the drive is another example.
And, maybe less frequent, you might need to change the size of a drive.
In all these cases, simply right-click the volume in the disk management window and select the option in the popup menu.
Note: Use the Properties option to change the name of a volume.
I hope this article has helped you guys when trying to find the Disk Management tool in Windows 10. If you have any questions, feel free to let me know in the comment section below, and I’ll do my best to answer them!
Fix #1 – Check That Your Mic is Correctly Plugged to Your PC
This fix assumes that you have an external device you’re using as your microphone for your Zoom meetings. If that’s not the case, feel free to move on to the next recommended fix.
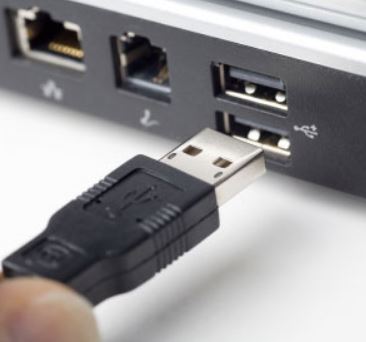
Unplug your microphone and plug it back in to ensure that it’s not just loosely connected.
If you’re using a USB audio device, then try plugging it into a different usb port. Note: If you’re using a USB hub or USB extension cable, try plugging the device directly into your computer’s USB port.
For Bluetooth headsets, or microphones, make sure to PAIR the device with your Windows computer.
Fix #2 – Check that your Microphone Device is Not Muted
On the Windows Taskbar, right-click the speaker icon and then click Open Sound Settings.
Under Input, click the Choose your input device down arrow and select the microphone device you want to use.
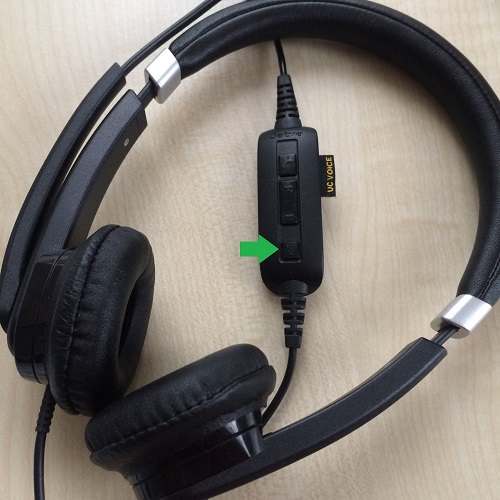
If you’re using an audio headset, check that its Mute switch – if it has one – is not turned on.
This is my Jabra headset and where the Mute button is on my device.
Fix #3 – Check that Zoom is Allowed to Use Your Microphone
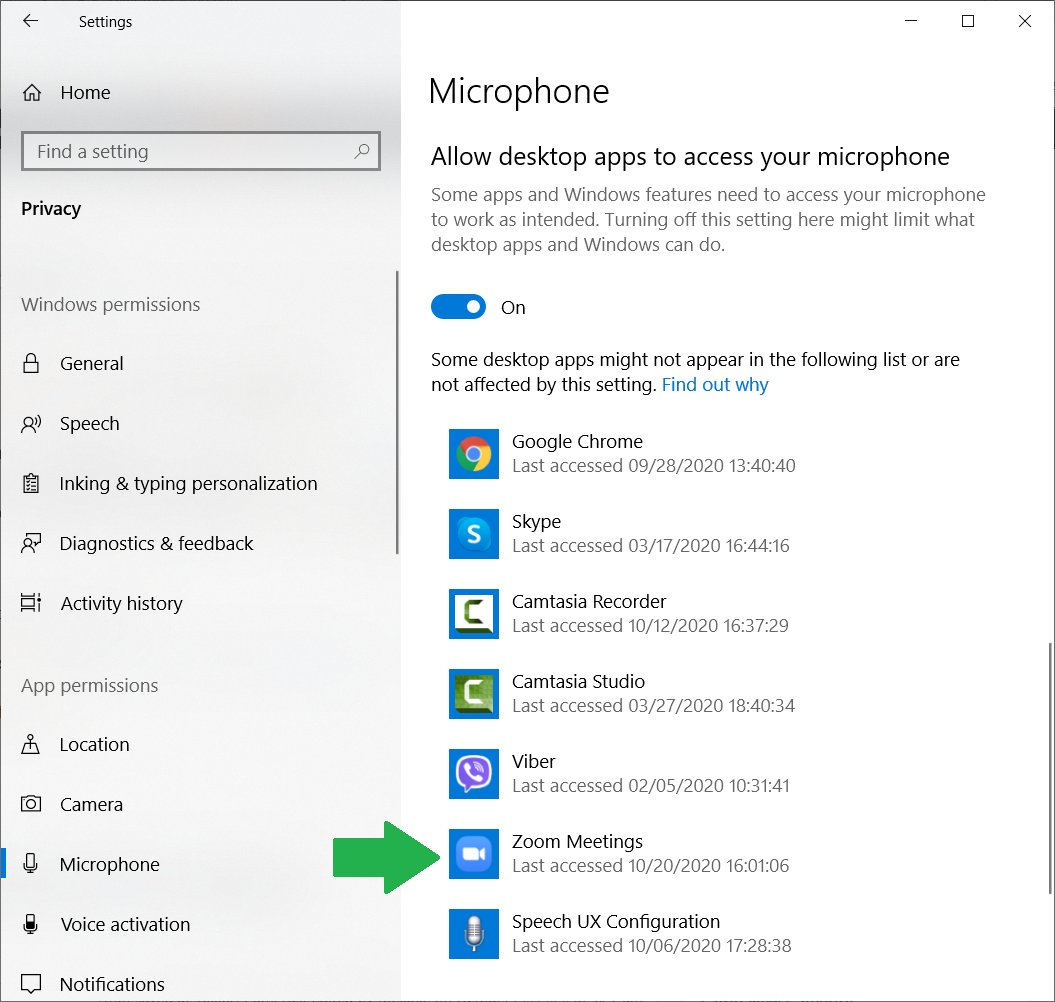
Use the Windows search box, type microphone privacy settings and select this option when it appears.
Under Microphone, switch the Allow apps to access your microphone toggle to On.
Scroll down further till you find Allow desktop apps to access your microphone, and then toggle that to On too.
Note: Ensure that Zoom Meetings is one of the desktop apps listed as allowed to use the microphone.
Tip: Is the Zoom app not listed under Microphone Privacy Settings?
Uninstall Zoom.
Restart your PC.
Re-install Zoom.
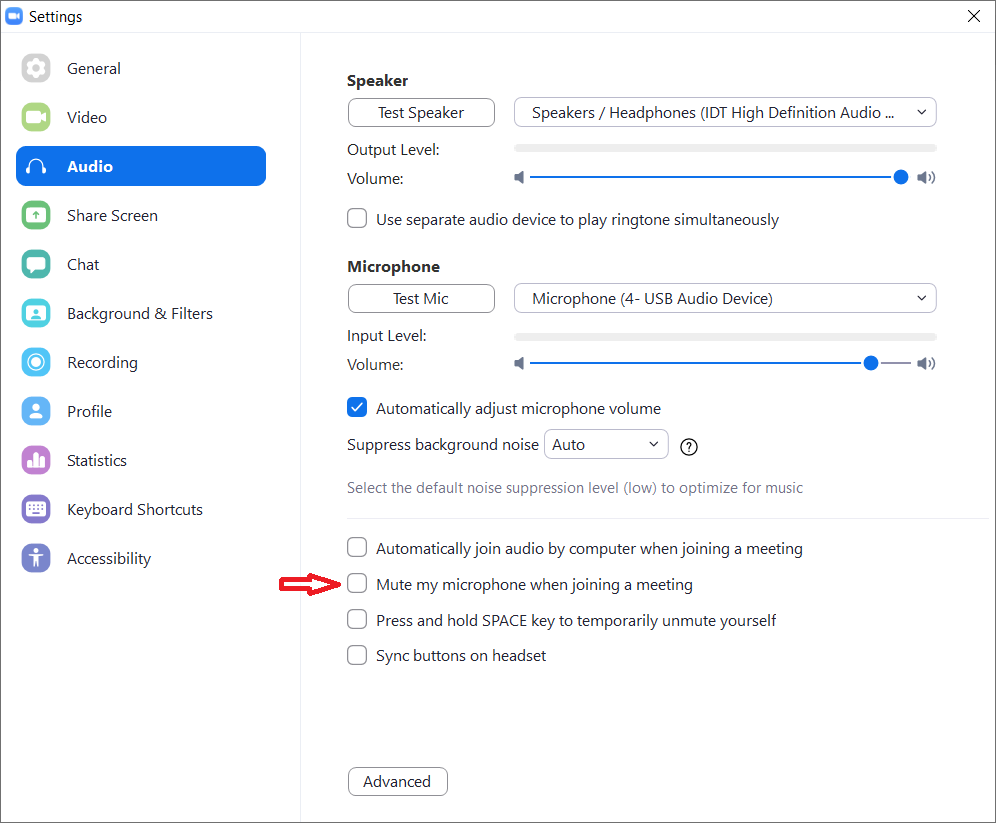
Fix #4 – Ensure that Zoom is Using the Default Microphone
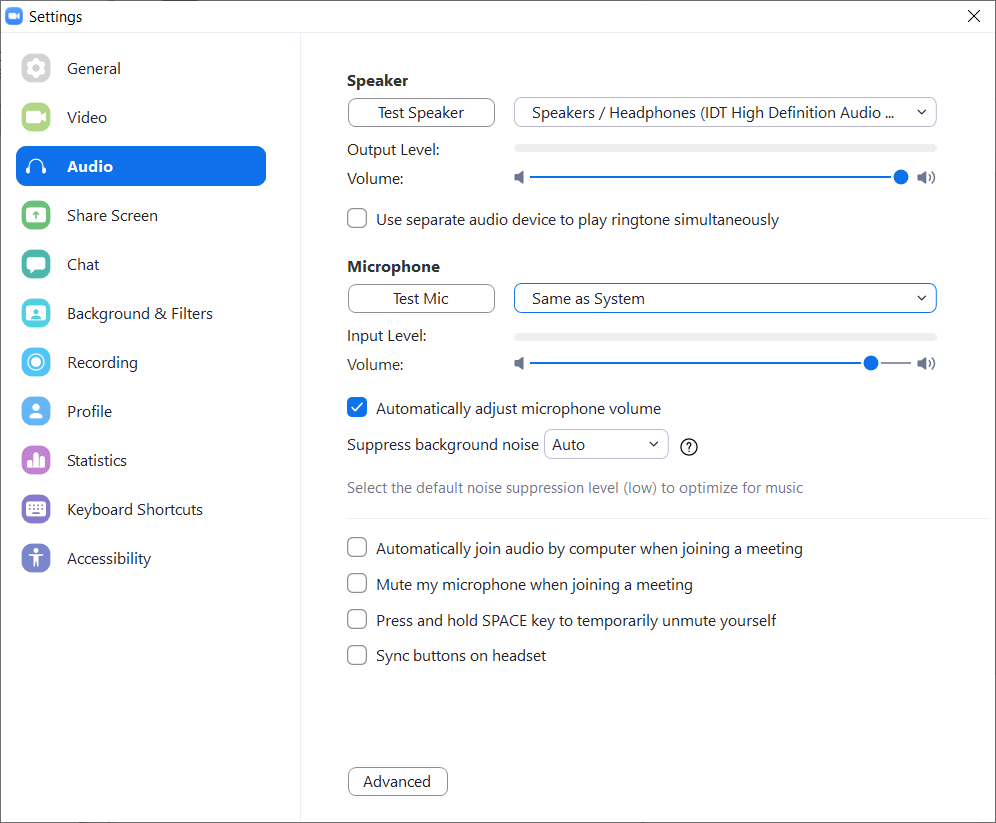
Log into your Zoom desktop app.
On the right side of the Zoom pane, under your profile icon, click the Settings icon .
On the left pane, click Audio.
Under Microphone, ensure that audio device selected is the same device you chose under Fix #2 above. If not, click the down arrow and then select Same as System.
While you’re in there, perform a mic test.
Under Microphone, click Test Mic.
Say something into your microphone.
Whatever you say should be played back to you.
While you’re in there, check that the microphone is not automatically set to mute when you join a meeting.
Ensure that the setting Mute my microphone when joining meeting is off.
Note: By the way, the Meeting Host can mute meeting participants so be sure this is not the case.
Fix #5 – Update Your Audio Drivers
If you’re microphone is still not working with Zoom even after going through the Windows and Zoom solutions above, then you may need to update your device drivers.
Audio drivers ensure that Windows can recognize and operate your audio devices, including your microphone. In the same way, USB ports and Bluetooth also need device drivers to function.
Hardware manufactures release new device drivers all the time. This is their way of releasing new product features or new functionality for their devices, as well as fixing any bugs that may have been detected by consumers over use.
How to Update Drivers Manually
Normally, for sound problems you should go your PC manufacturer’s website and install the latest Windows 10 sound drivers available for your laptop or desktop PC. However, if you have a custom PC, or if you built your PC yourself (impressive!), you should probably head to your motherboard manufacturer’s website and download audio drivers from them.
If, like me, you’re using a USB microphone, try to download and install the recent release of USB controller drivers from the manufacturer’s website.
How to Update Drivers Automatically
If you don’t have time or the know-how to properly select, download and install the drivers you need, you can do this process automatically with DriverFinder. (Shameless plug!)
DriverFinder does exactly what its name suggests… instantly find the RIGHT device drivers you need. Once you install DriverFinder, it will automatically recognize your system info and details, as well as all the devices installed or connected to your PC.
It will then compare the drivers installed on your system against our DAILY UPDATED and ever-growing driver database. From here, just download and install the latest audio driver found for your device.
Click Activate to register your copy of DriverFinder.
Click Start Scan to check for new drivers.
Download and install the latest device drivers recommended for your audio/microphone device.
Fix # 6 – Quit Other Chat & Teleconferencing Software
You may not realize this but perhaps other apps are on/open and are ‘locking’ the use of your microphone. So if you have Skype,GoToMeeting, Microsoft Teams, Google Meet, etc. installed on your PC, ensure that all of them are completely closed.
Click the up arrow ^ on the Taskbar notification of Windows to see hidden icons.
If you see any chat or teleconferencing app there, right-click it and then click Quit or Sign Out.
Tip: If you want, you can also uninstall all other chat and teleconferencing apps you have installed on your PC to be sure, apart from Zoom of course. Reboot your PC and then perform a mic test again in Zoom.
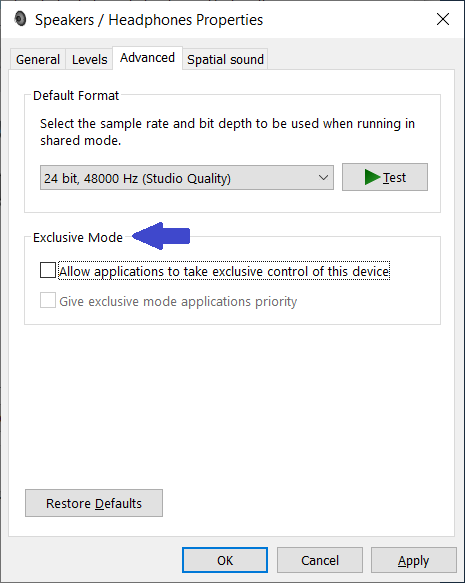
Fix # 7 – Disable ‘Audio Enhancement’ Settings
Disable ‘Audio Enhancement’ settings for your output.
On the Windows Taskbar, right-click the speaker icon and then click Open Sound Settings.
Under Output, click Device Properties.
In the DeviceProperties window, click Additional device properties.
Click the Advanced tab.
Uncheck Allow hardware acceleration of audio with this device and Enable audio enhancements.
Click OK.
Note: If you don’t see the above settings, look at the options under Exclusive Mode and uncheck those options.
Disable ‘Audio Enhancement’ settings for your input.
On the Windows Taskbar, right-click the speaker icon and then click Open Sound Settings.
Under Input, click Device Properties.
In the DeviceProperties window, click Additional device properties.
Click the Advanced tab.
Uncheck Enable audio enhancements.
Click OK.
Note: If you don’t see the above settings, look at the options under Exclusive Mode and uncheck those options.
Fix # 8 – Use Your Phone as Your Microphone
If you’re already in a meeting, we understand you’re in a pinch and just want to use any mic ASAP. In this case, you may want to use your phone as your microphone.
Download the Zoom app on your Android or iPhone.
On your phone, login into your Zoom account.
Go back to the Zoom desktop app.
Click on the arrow next to Mute, and then click Switch to Phone audio.
You will be given a meeting ID and password. Use it to join the meeting on your phone.
Fix # 9 – Run the Windows 10 Audio Troubleshooter
Windows 10 has a built-in troubleshooters that can help fix common issues. Especially for non-tech-savvy users the Windows troubleshooters are a good choice. Since there is a troubleshooter for Recording Audio, this can used used to troubleshoot and fix microphone problems.
To run the Windows 10 audio troubleshooter follow these steps:
In the Taskbar search box, type “troubleshoot setting”.
Click the Troubleshoot Settings icon in the search result.
In the Troubleshoot Settings window, click the Additional troubleshooters option.
Next, scroll down to locate the Recording Audio option and click it.
Finally, click the Run the troubleshooter button that appears.
The troubleshooter will execute and identify any problems with the microphone and related settings. In most cases any available fixes will be applied automatically. Just follow the on-screen instructions in case manual actions are required (like selecting the audio input device to troubleshoot).
Zoom Microphone not working on iOS devices
When using Zoom on an Apple iPhone or iPad, the microphone can also be muted.
The very first step is to allow Zoom to access your microphone. So when you see the message “Zoom” Would Like to Access the Microphone, make sure you click the OK option.
In addition the microphone access, the microphone can be muted within the Zoom app itself.
Follow these steps to make sure the microphone is not muted within the Zoom app on iOS.
Open the Zoom App.
Click the Settings icon in the lower-right corner.
Next, click the Meetings
In the Meeting Settings, make sure the option Mute My Microphone is disabled.
Start your meeting, or join your meeting with the Join with Audio option to make sure the audio (and microphone is enabled).
If you are still facing problems, try closing any other apps that might use the microphone. A last option is to restart the phone or iPad.
I hope this article has helped you with your ‘Zoom mic not working in Windows 10‘ issue. Do let me know below which fix worked for you! If you have any questions, or more suggested fixes please feel free to comment below as well.
By default the latest Windows versions automatically install new updates, including driver updates. Updating your PC software in general is a good idea to ensure maximum security and performance. But there are cases where driver updates are not desirable, and you need to disable automatic driver updates.
Some hardware only operates with a specific driver version. Other hardware devices need a specific driver version to ensure all functionality is available. You wouldn’t want a driver update to suddenly remove features, or introduce device problems.
Steps to disable driver updates
If you find yourself in a situation where you want to decide which driver updates to install and which ones not, you can disable automatic driver updates in Windows.
To do this, open the Control Panel and go to System and Security.
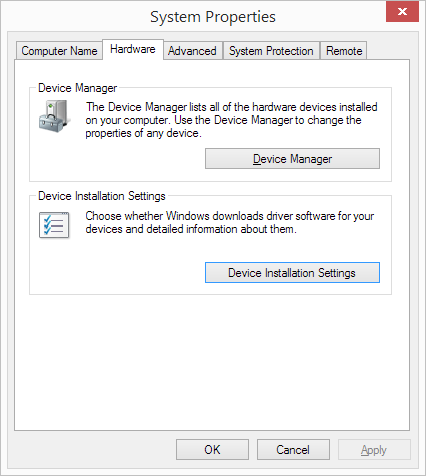
Next, select the System option, and click Advanced system settings. Tip: type “sysdm.cpl” in the Run or Search field in Windows, followed by the Enter key to open the System Properties directly.
In the System Properties windows, you need to select the Hardware tab.
Now click the Device Installation Settings button.
This will bring up the Device Installations Settings window. Here you will need to change the option from Yes, do this automatically to No, let me choose what to do. And then select the option Never install driver Software from Windows Update. Next, click the Save Changes button.
After this Windows will still install regular software updates through Windows Update. But the drivers on you system are no longer automatically updated.
Disable automatic driver updates in Windows 10
For Windows 10 the steps are almost identical.
Start the control panel by typing “control panel” in the Seach box.
Click the Control Panel app in the search result.
In the Control Panel window, click the System icon.
In the Settings window, scroll down to the Related settings, and click Advanced system settings.
From here on the steps are the same as step 3 above. The only difference is the Device installation settings window looks a little different.
Disable automatic driver updates in Windows 11
The instructions for Windows 11 are almost identical to the instructions for Windows 10. Here are the quickest steps to disable the automatic driver updates.
In the Search box on the taskbar type “change device installation settings“.
In the search results, click Change device installation settings to bring up the Control panel dialog for Device installation settings identical to step 5 in the previous section.
Select the No (your device might not work as expected) option and click the Save Changes button.
Hide specific driver updates in Windows 11
Perhaps disabling all automatic driver updates in Windows 11 is not what you want. If only one specific driver update is causing a problem on your system, you would rather just not install that.
This can also be achieved. Ignoring a driver update (or any update for that matter) is possible in Windows 11 by hiding the update.
After the download completes, execute the file by double-clicking it in the File Explorer.
In the Show or hide updates window, click the Next button.
Next, select the option Hide updates.
Once the Hide updates option shows with the list of updates, select the update to hide and click Next again. (In the example screenshot we have selected the Intel wireless driver update.)
Once complete, the window wil show Troubleshooting completed and show the update as Fixed. The update will now be ignored in the Windows Update process.
Click the Close button to finish and close the window.
Note: If you want to enable the update again, simply run the wushowhide.diagcab file again. This time, select the Show hidden updates option to re-enable the hidden update.
Keep in mind that if a newer update for the driver becomes available, that will not automatically be ignored as well. These steps pertain to the specific update selected only.
Of course we recommend checking and updating your drivers with our DriverFinder software. That way you can decide which updates to install and which not!


![[Easy Fixes] Zoom Mic Not Working in Windows 10 – Updated 2022 Guide](https://driverfinderpro.com/driver-guide/wp-content/webp-express/webp-images/uploads/zoom-no-mic.jpg.webp)