The DXGKRNL fatal error in Windows is a Blue Screen of Death error (or STOP error) that will halt the operating system. A critical error in the DirectX software system causes this error.
When this error occurs, you will see the BSOD with the error message. Depending on the Windows version, the system will halt, or Windows will try to recover by scanning for problems.
Cause of the DXGKRNL Fatal Error
As mentioned, the problem is related to the DirectX graphics system that is installed in Windows. DirectX is a library that enables software to interact with the PC’s video and audio hardware. It is mainly used by gaming software. DirectX has been part of Windows since XP (version 9.0) until Windows 11 (version 12).
DirectX allows software to use the multimedia accelerator features of your video and audio hardware for great performance. But to do this, DirectX operates at a high security level in the operating system. So, if something goes wrong, problems are serious for the operating system.
What can go wrong? Well, mainly device drivers and DirectX itself. DirectX uses objects and drivers that execute at kernel level, and it also interacts with devices through device drivers for the video and audio hardware. Any problem with the DirectX file or configuration, or a problem with the device drivers can cause the DXGKRNL fatal error.
Solving the DXGKRNL Fatal Error
There are two main solutions to fixing the error. The first is updating or reinstalling DirectX, and the second is updating or reinstalling the device drivers for video and audio hardware.
If you can still boot into Windows, you can execute the steps to solve the error. If Windows won’t start anymore, try using the Safe Mode boot. In that startup mode, Windows only uses a standard video driver with minimal features. For Windows 7 and Windows 8, the steps are different. Press F8 during boot to get into the Advanced Boot Options screen and select Safe Mode.
DirectX in Windows
With most software, you would simply say: uninstall it, reboot, and then reinstall it. That was possible for older versions of DirectX as well, but not in the latest Windows versions. DirectX is an integral part of Windows in the latest Windows versions.
For Windows 7 there was still a separate update that can be downloaded to install DirectX 11.1.
For later Windows versions, you simply need to make sure you run Windows Update.
In Windows 10, open Settings, select Update & Security and click Check for updates.
In Windows 11, open Settings, select Windows Update and click Check for updates.
DirectX Diagnosis
To check the version, and any potential problems, you can use the DirectX Diagnostic Tool. This tool is part of the DirectX installation and can be started by typing “dxdiag” in the Start menu search box.
After starting the dxdiag app, you will see the details of the DirectX installation.
With the System tab active, the DirectX Version can be seen at the bottom of the list with System Information.
Use the Next Page button to jump through the pages, or simply use the tab selectors to switch directly to the Display, Sound, or Input options.
In the Display tab, you can see which features are enabled. The Notes section will show any problems with the DirectX functionality. The Notes section is present for all tabs.
If a DirectX feature is Disabled, it might either disabled in the settings, not be supported by your PC hardware, or not supported due to driver limitations.
Update the Display Driver
If the DXGKRNL fatal error is caused by a device driver, the first step is to update the driver to the latest version. Updated drivers can have bug fixes, performance improvements, and feature enhancements.
To update the display driver in Windows, use the Device Manager.
Open the Device Manager using the search box in the Start menu, or press the Windows key + R and type devmgmt.msc in the Run box followed by the Enter key.
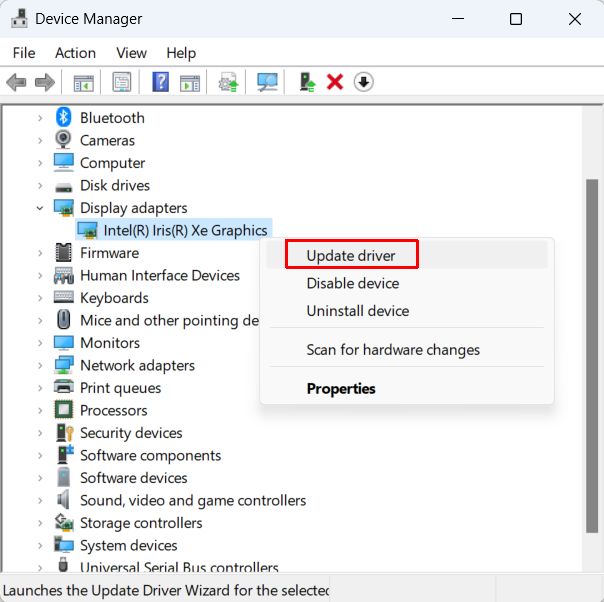
In the Device Manager, expand the Display adapters category by double-clicking it.
Next, right-click the listed graphics adapter, and in the popup menu, select Update driver.
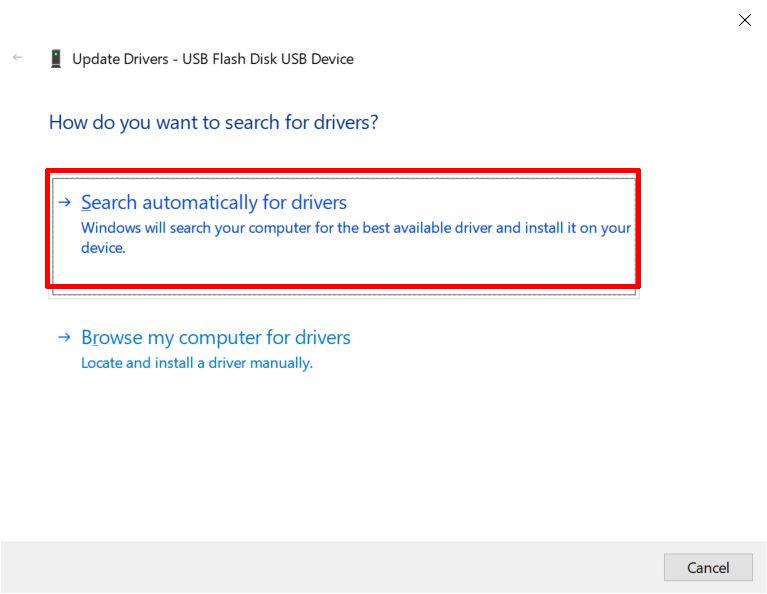
Use the option Search automatically for drivers to let Windows check for graphics driver updates automatically. If you have downloaded the latest graphics driver for your computer manually, use the option Browse my computer for drivers and select the location.
Once the updated driver is installed, click Close and close the Device Manager.
Next, restart the computer and see if the problem is resolved.
Uninstall the Display Device to fix the DXGKRNL error
There may be no driver update available for the graphics card. Or an update is available, but the update did not fix the problem. In that case, the driver configuration may be a problem. Uninstalling the display device can then help solve the error.
Uninstalling a device and then restarting the PC will force Windows to reinstall the graphics device. If the driver was also deleted during uninstall, the driver will also be downloaded and installed again.
Use the instructions from the previous section to open the Device Manager and expand the Display adapters
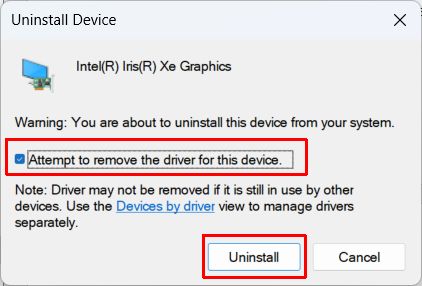
Right-click the graphics adapter, and in the popup menu select Uninstall device.
In the Uninstall Device window that shows next, make sure to select the option Attempt to remove the driver for this device. Note: for previous Windows versions this option is worded a little differently.
Click the Uninstall button to continue.
Once the device is uninstalled, restart Windows. The display device will be reinstalled during the restart with the latest driver. Note: in case the display device is not automatically reinstalled, use the Scan for hardware changes in the Action menu of the Device Manager to force the device installation.
System Restore
None of the solutions so far working? If your Windows configuration is using System Protection, you can try the System Restore option to revert to an earlier, working configuration.
With every change, Windows can create a restore point that will help bring back a previous configuration. Here are the instructions for Windows 11.
Open Settings from the Start
Select System, and then About.
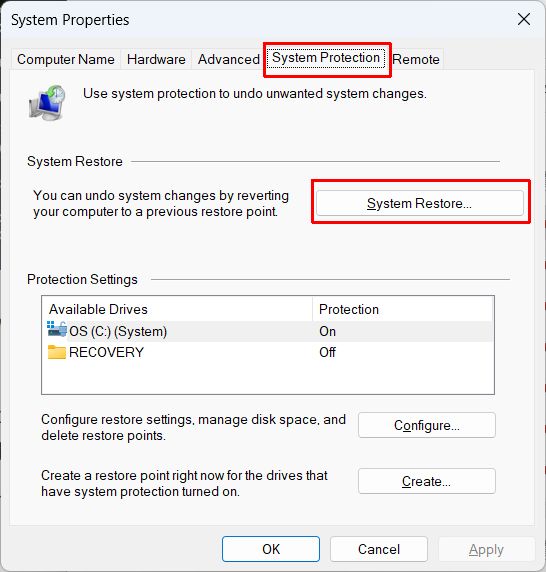
Scroll down to the Related links section, and then click Advanced system settings. This will bring up the System Properties.
In the System Properties window, select the System Protection
Next, click the System Restore button.
Click Next to show the list of restore points on your computer.
Select which restore point to use, and then click Next.
Click the Finish button to confirm the restore operation.
Click Yes in the confirmation window.
Windows will now create a restore point. Your PC may restart during the process. Just be patient and let the system restore complete.
After the final restart, see if the problem is solved.
Although this specific error is related to the display aspect, DirectX also uses sound and other media and input drivers. It is recommended to keep all device drivers up to date using DriverFinder.
When you are finally ready to upgrade from Windows 10 to Windows 11 and your system is meeting the system requirements, you can still run into issues that prevent the upgrade. The cFosSpeed Driver can prevent the upgrade to Windows 11, as the Windows Update process will report it as something that needs your attention. Essentially it states that “a service isn’t ready for this version of Windows 10”.
What is the cFosSpeed driver?
The cFosSpeed driver is an Internet accelerator software solution. It optimizes Internet traffic on a Windows PC by installing a driver. The traffic shaping software has some advanced network analysis and optimization integrated, but it also allows for the prioritization of streams or protocols. Great for video streaming and gaming.
How did cFosSpeed get on my system?
The solution is integrated with quite a few OEM vendors. Parties like MSI, Asus, ASRock, and Gigabyte include it in their driver bundles for their motherboards. In the case of Asus, you might know it as Turbo LAN, which is a rebranded version of the cFosSpeed software. With MSI it is part of the Dragon Center.
Fix cFosSpeed from blocking the Windows 11 Update
Considering the problem, there are two solutions to the issue with the cFosSpeed driver. The first is to update it to a version that does not block the Windows 11 update. The second option is to uninstall the cFosSpeed driver from your Windows installation.
Update the cFosSpeed driver
The first option to update the driver is to check the OEM support site for an updated version of the software that includes the cFosSpeed driver.
For Asus, check their support site and look up your model to see if a new version is available. If so, download it and install it and then try the Windows 11 upgrade again.
For MSI, download and install the latest version of the MSI Dragon Center and after completing the installation, try the Windows 11 upgrade again.
For Gigabyte you will need to download the cFosSpeed Internet Accelerator Software from their site.
For ASRock, the cFosSpeed driver is part of the XFast Lan solution. It can be downloaded from here.
The last option is to download the latest cFosSpeed software from the vendor’s site and install it. Take note that this is a shareware version, which is valid for 30 days. But it should update your cFosSpeed driver so that you can upgrade to Windows 11. Update: the software is now owned by Atlas Tech Solutions and their latest version is 13.
If you have the original cFosSpeed software installed and running, you can click the cFosSpeed icon in the Taskbar, and then in the popup menu select Get latest version.
Uninstall the cFosSpeed driver
If the driver update did not solve your issue, and you can still not upgrade to Windows 11, the best option is to uninstall the cFosSpeed driver altogether.
Steps to uninstall cFosSpeed in Windows 10:
Open Settings from the Start
In the Settings window, select Apps.
By default, Apps & features should be selected. If not, select that option in the left-hand panel.
Now scroll down in the apps list until you see the cFosSpeed entry (it will include a version number in the name).
Click it, and then click the Uninstall
When prompted “This app and its related info will be uninstalled.”, click the Uninstall button.
When the UAC (User Account Control) windows pops up, click the Yes option to allow the uninstaller to run.
Follow the instructions in the cFosSpeed Uninstall Wizard to uninstall the app. If for some reason this does not work, it is also possible to uninstall the cFosSpeed from the Network Properties.
Open the network properties for an active adapter, select the cFosSpeed for faster Internet Connections (NDIS 6) entry, and then click the Uninstall button.
You will again be prompted for a confirmation. Click the Yes option to uninstall the cFosSpeed driver.
After completion, the entry will no longer show in the Network Properties list.
There is no need to repeat this for any other active network adapters. Once uninstalled, it will be removed from all network devices.
Note: Uninstalling the cFosSpeed software using the network option will only remove the Lan Manager component, which is the network driver. The cFosSpeed main application, if installed, will still remain. So, if possible, use the App uninstall option to uninstall cFosSpeed.
After uninstalling the software, try the Windows 11 upgrade again.
If the upgrade still fails, you may need to consider doing a fresh install of Windows 11 rather than an upgrade from Windows 10.
Make sure to also check the article about TMP drivers and how they can affect the Windows 11 upgrade.
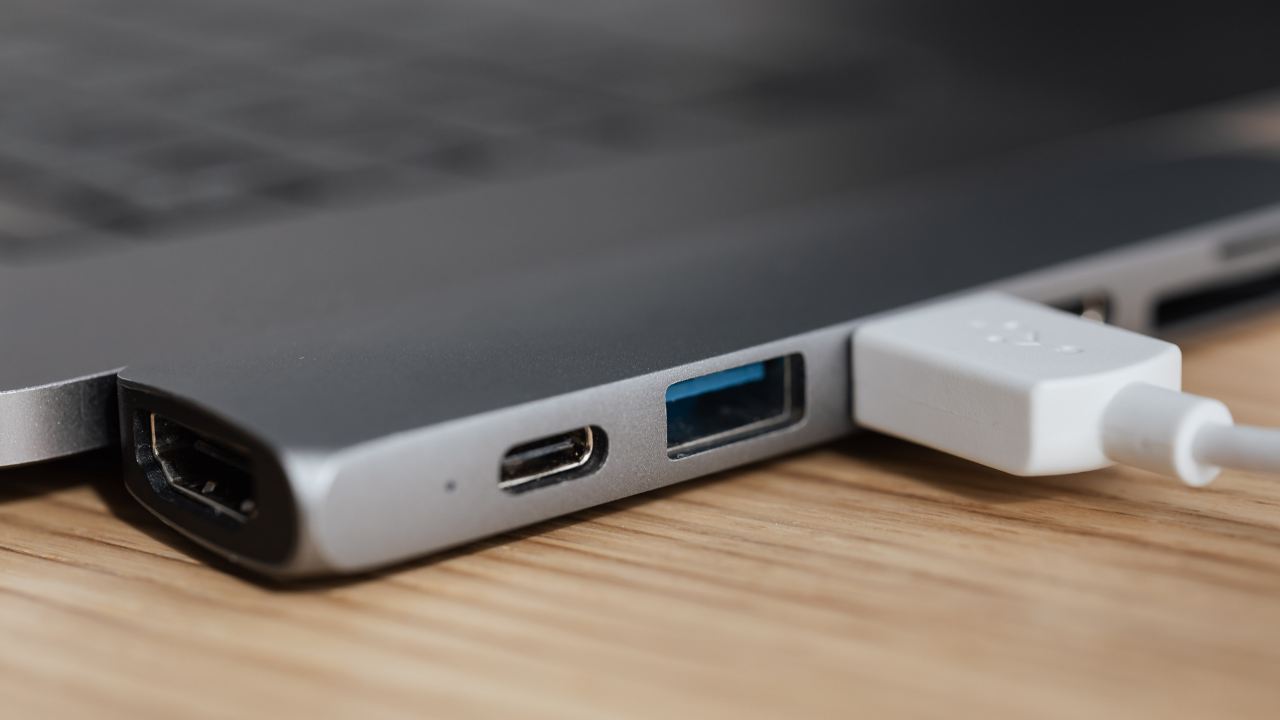
To get the benefits of a USB device with a type-C connector, the USB-C driver for all USB-C devices should be installed on your Windows PC. Download and install the USB-C drivers for the controller and the connected USB-C device to get things to work.
What is USB-C?
USB-C is a huge improvement over older USB standards both in terms of practical use as well as in performance.
USB-C refers to the type-C connector, where older USB versions use the type-A and type-B connectors. The biggest advantage of the type-C connector is that you cannot plug it wrong, it is a reversible connector.
USB-C is downward compatible with USB 2.0, but for full support, USB version 3.2 is needed. USB 4.0 takes things a step further with increased data transfer speeds and Thunderbolt 3 compatibility.
Other USB-C benefits:
Transfer speeds for USB-C devices can vary from 5 Gbit/s to 20 Gbit/s depending on the USB version.
100 Watts of power (20V, 5A) with two-way charging.
DisplayPort over USB for ports supporting the USB-C Alt Mode. Allows for connecting video sources and display devices.
The USB-C connector type was created by the USB Implementers Forum (USB-IF). USB-IF is a group of companies creating computer hardware and software (including Apple, HP, Intel, Lenovo, Microsoft, and many others). The USB-IF group is also responsible for issuing USB vendor IDs that are used to uniquely identify hardware devices.
For USB-C ports and devices to work, a USB controller is required to be functional. It is often referred to as a Host Controller Interface (HCI), or these days an eXtensible Host Controller Interface (xHCI). Modern Intel and AMD chipsets have onboard USB controllers. But there are also other vendors of USB controllers (Texas Instruments, Analog Devices, Cypress Semiconductors, and others).
It is important to be aware that not all USB-C type ports support all possible USB-C type features. DisplayPort and Thunderbolt for example are not implemented by all USB controllers. And if they are, installing the right driver for your USB-C type controller is critical for things to work properly.
Where do I find USB-C?
Most modern computers and devices are using a USB-C type port. You can recognize it by the connector type as outlined above. Be aware that Thunderbolt ports look the same and might not implement the USB-C functionality.
If your computer does not support USB-C devices, it can be added using a docking station, or internal extension card (desktop computers). There are many manufacturers that offer solutions for this.
Popular external devices that are connected to a computer using a USB-C type connection are game controllers, portable storage (SSD, flash drive), smartphones, and tablets. But even keyboards, mice, and printers can be connected through a USB-C connection.
Update USB-C Drivers in Windows
There are a few different ways in which USB-C drivers can be updated on Windows. In the latest Windows versions, the USB-C drivers should be installed automatically.
But if things are not working the USB-C type drivers might need to be manually updated, or use a program to update the USB-C drivers.
Make sure to update the USB controller drivers as well as any USB device-specific drivers.
Manually update a USB-C driver using the Device Manager
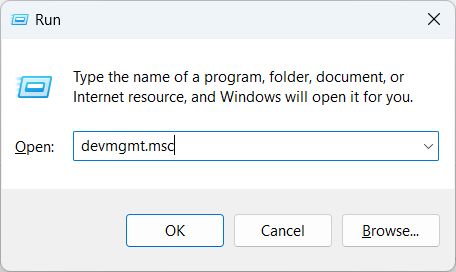
Open the Run box by pressing and holding the Windows logo key and then pressing the R key at the same time.
In the Open box, type devmgmt.msc, and then click the OK button or press the Enter key.
In the Device Manager window, click Universal Serial Bus controllers to show all USB devices.
Right-click the eXtensible Host Controller device, and in the popup menu, click Update driver.Note: The example shows the Intel® controller, but it can display other manufacturers like AMD, NVidia, or ASMedia as well.
The next step is to select where to search for drivers. Select Search automatically for updated driver software to use the Microsoft Windows Update server to search for USB-C driver updates.
If you have a downloaded copy of the USB-C driver for your computer or controller, select the second option: Browse my computer for driver software.
After selecting an option, follow the on-screen instructions to search for an updated driver.
Click Close when done.
If necessary, also update the drivers for the USB devices that are not recognized by Windows. Apart from the USB controllers themselves, some USB-C devices require additional drivers to function.
Automatically searching for a USB-C driver
If the solution from the previous step did not work, you can try using a program like DriverFinder instead.
DriverFinder will scan all your computer hardware and identify the devices. After that, the program will automatically find the right drivers for your PC hardware and Windows version.
Simply download and install the program, activate it, and run a scan to download all required drivers.
The benefit of DriverFinder is that it will detect all hardware, so you do not need to manually search for third-party drivers if Windows has no native support for devices.
If you have been working with Windows for some time, you will probably have faced this scenario: Windows Update Failed. For some reason, the updates failed partially, or did not get installed altogether.
And although Microsoft has been trying to improve things, failed updates happen will all versions of Windows, up to Windows 10.
Windows Update Failed – Common Error Codes
The reasons why Windows Update Failed are various. And as a result, there are many error codes associated with this problem. Some are generic, while others pertain to a specific update or specific problem.
Here are some examples of error codes that are linked to failed Windows updates:
0x800705b4 – related to Windows Defender 0x800F0906, 0x800F081F, 0x800F0907 – .NET framework related 0x800F0922 – Windows 10 upgrade related 0x80240034 – downloading of update(s) failed 0x80242006 – update contains invalid metadata 0x80244018 – Internet connection related 0x80070070 – disk space related 0x80070103 – driver related
Some other examples are: 0x8007000E, 0x80D02002, 0x8007000D, 0x80246008, 0x80096004.
This list is definitely not complete. Sometimes there is a useful error description, but often it is not quite clear what caused the Windows Update process to fail.
Windows Update Failed – Common Causes
The obvious question to ask is: what caused the Windows Update to fail?
As in many cases with complex software, there can be quite a few causes. It is important to realize that the update process is basically a sequence of downloading and installing software. So availability of the source, a reliable connection for the download, and storage space for the download are the first essentials. But after that, the execution of the update installation can still cause problems.
To sum it up, the common causes for Windows Update to fail are:
Insufficient disk space – space is needed for storing the downloaded updates, as well as for the execution of the update installation.
Dependencies– An update can depend on something like a specific version of the .NET framework being installed, or a specific service having been started.
Failed previous updates – If a previous update has failed, it might have left (partial) installation files behind, or installed only partially causing problems with the next update.
Install sequence – If you have a lot of updates pending, all are downloaded in one go and installed once downloaded. If a specific sequence is required for some updates, this might fail.
Hardware incompatibility – In general, Windows prevents installing updates on incompatible systems. But there is a reason why Windows 10 is not supported on older systems. Hardware conflicts and limitations can definitely cause problems with software being installed.
Driver incompatibility – Windows 10, by default, includes device driver updates in the install process. If a new driver version is incompatible with the hardware version present, the update may fail. Trying to install a driver that is a lesser match than the installed driver can cause error 0x80070103.
Corrupt update files – This can be the result of download issues, where the update files did not completely download correctly.
Given the possible causes above, this also means that there are some relatively simple steps that can help solve Windows Update Failed situations.
Windows Update Failed – SIMPLE FIXES to Try Immediately
Try these steps – preferably in this sequence – to see if they are the cause of your Windows Update problem.
Check your disk space and free up space if needed. Although Windows Update reserves space for update files, it is still possible that a disk space limitation is the cause of the problem. Just check the available disk space on the system drive (check the Properties for the C: drive in most cases). And run a disk cleanup to free up some more space.
Restart your PC and try again – If the installation sequence is important for the updates being installed, simply reboot your computer and restart Windows Update to fix the issue.
Select which updates to install – If you are running other Microsoft software (like Office), it can help to limit Windows Update to the core only.
Using the Advanced options in Windows Update, you can tell Windows to not Receive updates for other Microsoft products when you update Windows.
Unplug external devices – In most cases, this will pertain to USB devices. Examples are printers, scanners, webcams, end external drives. Make sure not to unplug the mouse and keyboard if they are connected through a USB port, because then you can’t reboot the PC anymore.
Unplugging external devices can also help in case the Windows Update failed as a result of driver updates, or hardware incompatibility. It is also possible to disable automatic driver updates in Windows. That will prevent new driver updates from being downloaded automatically. Simply update the drivers after the Windows Update problems are resolved.
We recommend downloading DriverFinder for this. DriverFinder is a separate driver update program that will find the right – and latest – drivers for all your hardware.
After unplugging the devices, restart your PC and try Windows Update again.
Windows Update Failed – DEEP DIVE Fixes
Reset the Windows Update Cache
As with many computer actions, the Windows Update process uses temporary storage. One such element is called the Windows Update Cache. It is also referred to as the SoftwareDistribution directory.
Clearing the Windows Update cache is really nothing more than deleting the SoftwareDistribution directory (or its content). But since this file location is used by the Windows Update service, you can’t delete it when this service is running.
To delete the SoftwareDistribution directory:
In the Search box on the taskbar, type ‘command’.
In the Search results, right-click the Command Prompt.
In the popup menu, click Run as administrator.
When the User Account Control window shows, click the Yes button.
Once the Command Prompt window shows, type the following commands (press Enter after each command). net stop wuauserv net stop bits rd /s /q %windir%SoftwareDistribution net start wuauserv net start bits Note: If you are not comfortable deleting the SoftwareDistribution directory, you can rename it rather than deleting it (ren %windir%SoftwareDistribution SoftwareDistribution.bak).
Close the Command Prompt window, and then retry Windows Update.
If for some reason these steps fail or seem too complicated for you, there is another way.
To ensure the SoftwareDistribution directory can be deleted, you can start your PC in Safe Mode.
Click the Start menu icon, and in the Start menu click Settings.
In the Settings window, click the Update & Security option (last entry, so depending on the size of the window, you might need to scroll down).
Next, select the Recovery option.
And finally, click the Restart now button in the Recovery window.
Once your PC restarts, you will see the Choose an option screen. Select Troubleshoot.
In the Troubleshoot screen (next step), select Advanced options.
In the Advanced options screen, select Startup Settings.
The last step here is to click the Restart button in the Startup Settings screen.
Again the PC will reboot, after which you will see a list of options. Press the 4 or F4 key on your keyboard to start the PC in Safe Mode.
Once Windows starts, you can open a File Explorer window, navigate to the Windows folder (typically C:Windows) and delete the SoftwareDistribution folder. Tip: Press and hold Shift and then Delete to permanently delete the folder rather than moving it to the recycle bin.
After this, reboot your PC again (it will start in normal boot mode), and retry the Windows Update.
Run the System File Checker
The System File Checker, or SFC, does exactly what the name says: it will check and repair system files. This tool has been part of Windows since Windows XP and is still present in Windows 10.
The exact function of the tools is described as “Scans the integrity of all protected system files and replaces incorrect versions with Microsoft versions”. This is a useful tool to use for many Windows problems, not just if Windows Updates failed.
How to run the System File Checker.
Open a Command Prompt window with Administrator access.
For Windows 8 and later it is recommended to run the DSIM tool before running the SFC tool. DSIM (or full: Deployment Image Servicing and Management) can be executed using the command: DISM /online /cleanup-image /restorehealth Note: Like the SFC command, the DSIM command can take a bit of time to complete.
In the Command Prompt window type the command: SFC /SCANNOW and press the Enter key.
Now, wait for the command to complete. This can take some time.
Once the command completes, close the Command Prompt window and restart the computer.
Run the Windows Update again after this to check if the issue is resolved.
Download and Install Updates Manually
Although it is best to have the automatic update process install Windows updates, it is possible to download and install them manually.
Microsoft has a download page for Windows 10. This page can be used to download the Windows 10 upgrade tool and Windows 10 installation media. Useful if you need a copy of Windows 10 installation files to recover corrupted system files, or if you need to reinstall Windows 10.
Apart from that, major updates can also be downloaded from there.
For individual Windows Updates, you need to visit the Windows Update Catalog. There you can search for individual updates (KB numbers).
To know which updates to search for, simply go to the View update history (in the Windows Update settings).
Look for the entries that show “Failed” instead of “Successfully” and take note of the KBxxxxxxx number.
Now visit the Windows Update Catalog in a browser. Type the KB number in the search field, and click Search.
Use the Download button to download the update manually. If more than one result shows, you typically want to download the top one (newest date).
After you click the Download button, a new window will show with a link to the .CAB file. Click the link to download the file.
Once the file completes downloading, you can open the file. In this example, which uses an Edge browser update, simply click the Open file link. This will open a Windows Explorer window with the default download folder selected.
The file should be an .MSI file (Microsoft Installer), which can be executed by double-clicking it. You can also select it and press Enter on the keyboard.
Follow the installation instructions presented to complete the installation of the Windows Update.
Disable Your Anti-Virus Software
This solution should really only be used if all others fail since you will put your PC at risk for a short while. But in some cases, the download of Windows Update files does not complete due to Windows Defender or another AV program.
IMPORTANT: Make sure you re-enable the your anti-virus software immediately after completing the Windows Update!
How to disable Windows Defender in Windows 10.
In the Search box on the taskbar, type ‘windows defender’.
In the Search results, click the Windows Defender Firewall icon.
This will bring up the Windows Defender Firewall windows. Click the link named Turn Windows Defender Firewall on or off.
In the Customize Settings window, select the radio button labeled Turn off Windows Defender Firewall (not recommended) in the Private network settings section.
Click the OK button to confirm.
Close the Windows Defender Firewall window.
With Windows Defender disabled, run Windows Update again to see if the problem is resolved.
For other Anti Virus software, please check the vendor’s instructions on how to temporarily disable their software. Many solutions have a taskbar icon which shows a popup menu when clicked (or right-clicked). The menu often has an option to disable the AV software for a limited time.
Check Your PC’s Download Settings
Disable LAN-Proxy Settings
If you’re using a proxy, try disabling it to see if it will fix the update failure issue.
In the Search box on the taskbar, type ‘internet options’.
In the Search results, click the Internet Options icon.
This will open the Internet Properties dialog box. Select the Connection tab (1).
Now click the LAN settings button (2).
This will bring up the Local Area Network (LAN) Settings window. Make sure you have the checkbox named Automatically detect settings selected.
In the same window, also make sure you have the checkbox named Use a proxy server for your LAN (…) unchecked.
Click the OK button to confirm.
Click the OK button in the Internet Properties dialog box.
After this, try Windows Update again.
Background Intelligent Transfer Service
BITS is short for Background Intelligent Transfer Service. Windows update uses this service to download updates in the background, while you can still actively use your Internet connection.
So just make sure the BITS service is running properly on your system using these steps:
In the Search box on the taskbar, type ‘services’
In the Search results, click the Services App icon.
This will bring up the Services window. Scroll down in the list until you see the Background Intelligent Transfer Service. Tip: You can widen the Name column by clicking and dragging the header separator (1).
Right-click the Background Intelligent Transfer Service line, and in the popup menu, select Properties (2).
This will bring up the BITS Properties window, with the General tab selected. Change the Startup type to Automatic (Delayed Start). Note: This change will ensure the BITS service is started automatically when the computer starts. The Delayed Start option will result in the service being started after all other services, which can reduce startup times.
Click the OK button to confirm.
Finally, close the Services window.
After this, restart your system and try Windows Update.
Hardware Devices and Drivers
As mentioned earlier, hardware device and driver compatibility issues can Windows Updates to fail.
Drivers are a critical part of the Windows operating system as they ensure all devices function properly. But that also results in driver problems often being the cause for failed Windows Updates.
Unplugging external, non-essential devices is a first step in trying to fix Windows Update failed errors (if caused by devices or drivers).
Disabling automatic driver updates in Windowsis another step to exclude drivers from being updated by Windows. This will help if the hardware device that is causing problems cannot be disconnected/removed.
After either of these two steps, run Windows Update again to see if the problem is fixed.
If none of the above works, try the Windows Update Driver Cleanup feature.
If driver updates are a reason for a Windows Update to fail, you can try to clean up existing or old driver installation files. It can be done with a single command.
Simply open a command prompt with administrator-level access (see earlier instructions in this article).
In the Command Prompt window type the command: rundll32.exe pnpclean.dll,RunDLL_PnpClean /DEVICES /DRIVERS /FILES /MAXCLEAN And then press the Enter key. Note: The command will complete without showing any output in the Command Prompt window. The result of this command is actually added to a log file C:WindowsINFsetupapi.dev.log. So if you are interested in the details, open that file and scroll down to the bottom of the file for the latest changes.
Close the Command Prompt window.
After that, run the Windows Update process again to see if your problem is solved.
Specific Tips for Windows 10
NOTE: ALL of the above troubleshooting tips can also be tried if you’re using Windows 10. The following though are specific to this particular Windows version.
In Windows 10, Microsoft has incorporated a special Update Troubleshooter. It analyzes the system for common causes and problems related to failed Windows Updates. If it finds a problem, it will try to fix it automatically.
Run the Windows Update Troubleshooter
Click the Start menu button, and in the Start menu, click Settings.
In the Settings window, select Update & Security.
Next, select Troubleshoot, and then click the link called Additional troubleshooters.
Now, click the Windows Update option under Get up and running, and then click the Run the troubleshooter button.
The Windows Update troubleshooter will start analyzing the system. Wait for it to complete. Any problems that were found (and fixed) are shown in the window.
After completion, click the option to Close the troubleshooter.
Although this might seem like a strange suggestion, pausing the updates will clear the downloaded updates. So un-pausing the updates after this might fix your problems with Windows Update.
In Windows 10 follow these instructions:
Click the Windows Start button, and then click Settings.
In the Settings window, click Update & Recovery.
Next, select Windows Update.
In the Window Update window, select Advanced options.
In the Advanced options screen, scroll down until you see the Pause updates option.
Click the Select date control and simply select a date in the future. Since we are just pausing the updates briefly, the duration of the pause period does not matter.
No need to save anything. Once you changed the date, close the Settings window and restart your PC.
After the PC restarts, go to the Settings again, select Update & Recovery, and then Windows Update.
It will show Updates paused. Click the Resume updates button to un-pause the Windows Update process.
Windows will immediately start checking for updates again and hopefully complete downloading and installing updates after this.
Windows Update Failed – Still Not Solved?!?
If Windows Update still keeps failing, try skipping an update.
Of course, this needs to be assessed on an individual scenario basis. Critical security updates should not be skipped, while optional, non-essential updates can be.
If nothing works, and critical updates fail, or too many updates fail, the only real solution might be to do a fresh install of Windows on your system.
Is your USB drive not showing in Windows 10? Here’s a quick step-by-step fix… with pics!
External storage devices like USB Flash drives and external hard disk (HDD) or SSD drives are quite handy and popular. They’re commonly used for backups, or as simple storage devices. Normally, when you plug a USB device, its corresponding drive simply shows up in File Manager. So what do you do if the USB drive is not showing up on your Windows 10 computer?
#1 – Check the USB Device.
The first thing to do is to check if the USB device itself is okay.
You can do this by connecting the USB drive to a different computer. If it is correctly recognized there, then you know the USB drive itself is fine and that the problem is with your Windows 10 system.
If the device is an external hard disk (or SSD), or ZIP drive, also check if the cable is defective by exchanging it with a different cable if possible. This is a less frequent cause, but not something to be ignored.
Also make sure to connect the USB device directly to a USB port on the Windows 10 PC, not through an extension cable or USB hub. Long cables, extra connections, or insufficient power can also be a cause for problems with USB drives (this is especially true for the older USB 1.1 and USB 2.0 ports and devices).
#2 – Check Your PC.
Unless you made changes, there is normally no reason to assume anything is wrong with your computer. However, for older PC’s it can be helpful to turn the PC off, remove the USB devices, and completely unplug the PC.
While troubleshooting the issue with the USB drive, leave other USB devices disconnected (unless you really need them, like a mouse or keyboard).
If you did make changes to your computer, like putting additional hardware, upgrading its firmware, or changing its BIOS settings, then try reverting these changes and testing the USB drive again to ensure that these changes have not caused the issue.
#3 – Check Windows 10 Settings.
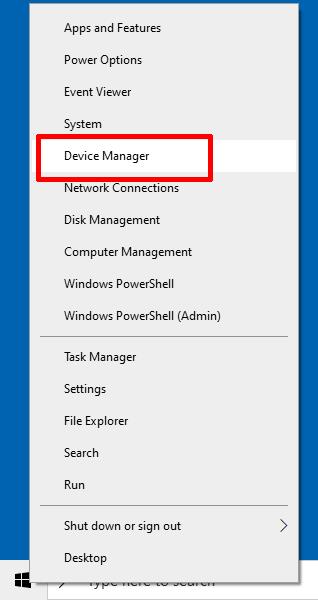
If your USB driver is still not showing in Windows 10, then it’s time to to get into the Device Manager.
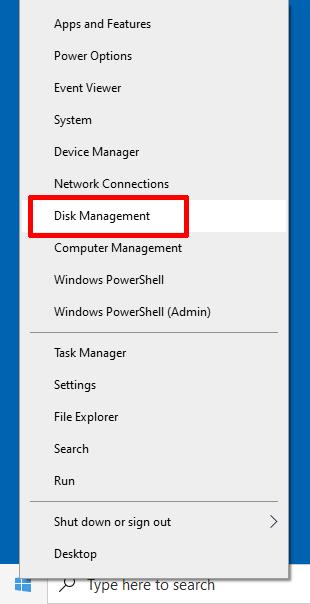
Right-click the Windows Start button, and in the popup menu, select Device Manager.
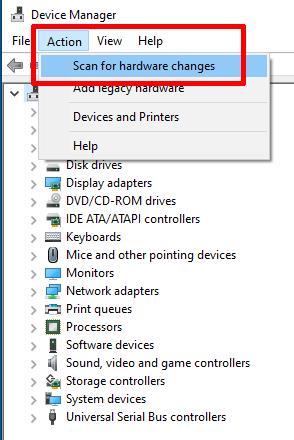
In Device Manager, click the Action menu, and then click Scan for hardware changes.
Once complete, check if the USB drive is showing up in Windows Explorer. If not, try the next step.
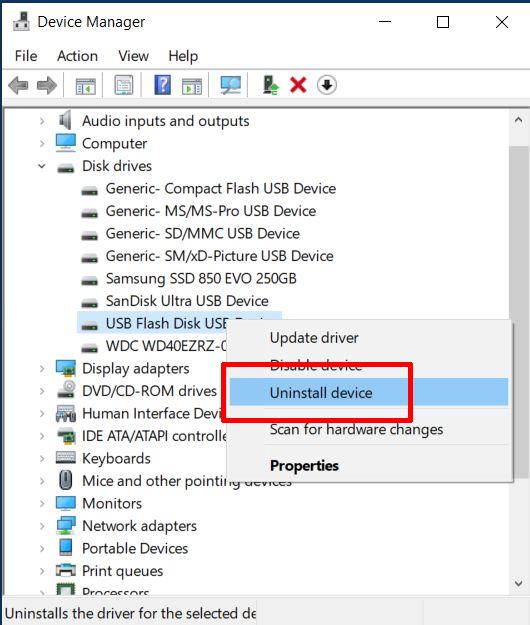
In Device Manager, open up the Disk drives list, right-click the USB drive, and then click Uninstall device.
Next, restart your PC. When Windows 10 restarts, it will automatically re-detect the USB device and install the available driver for it. This step can solve configuration issues with the USB drive, so it will show up again.
If your USB drive is still now showing up, try updating the driver for the USB device.
This can be done from the Device Manager. Simply right-click the USB drive in the list of Disk drives, and in the popup menu, click Update Driver.
Next, click the option Search automatically for drivers, and wait for the driver update to complete.
Be aware that this step only checks for updated USB device drivers. In most cases the correct operation of USB devices depends on the USB controller, which is a system device. So it is best to check for updated chipset drivers as well.
If the USB device is working properly, but the drive is now showing up in Windows Explorer, it is possible that the drive has no drive letter assignment.
Right-click the Windows Start menu, and then click Disk Management.
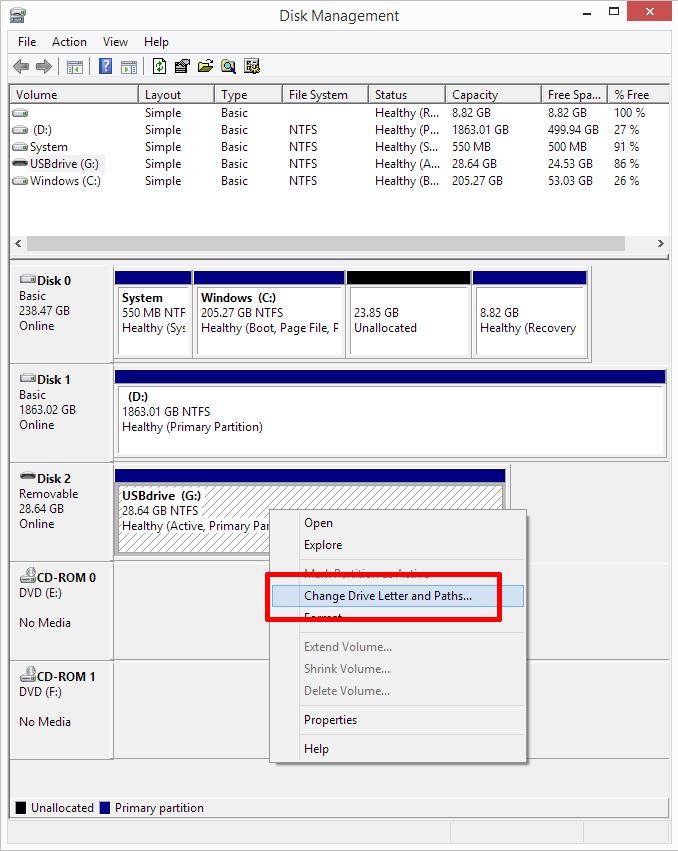
Once the Disk Management window opens, you will see all disks present in the PC.
Find the disk that represents the USB drive and check that it has a drive letter assigned to it. In the screenshot above, Disk 2 is the USB device and it has the drive letter G assigned to it.
To find your USB drive, check for a disk that is listed as “Removable” (although it can also be listed as “Basic“), and compare the size to that of your USB drive. If you are not sure, compare the Disk Management screen with the USB drive that’s not connected.
If there is no drive letter assignment, simply right-click the partition (the block next to the disk with the blue bar at the top), and in the popup menu, click Change Drive Letter and Paths.
Next, click the Add button.
Next, change the drive letter (or leave it as is to get a default assignment), and then click OK .
Even if there is already a drive letter assigned to the USB drive, it is still useful to try and change it. The reason for this is that it is possible that there are drives using the same drive letter assignment. Even if another USB device with the same drive letter assignment is not present at the moment, the configuration could still cause conflicts.
To change the drive letter to a higher character, click the Change button rather than the Add button. After that, the steps are the same; i.e., change the drive letter and click the OK button.
Note: If the partition for the USB disk shows as a black bar, rather than a dark blue bar and is listed as Unallocated, that means the drive formatting is not recognized. This means that the disk needs to be formatted before it can be used. If there should be data on the USB drive, a data recovery tool needs to be used for retrieval of the files.
If the USB disk is still not showing up in Windows Explorer, a final step is to try the Windows 10Hardware and Devices Troubleshooter. Just type “troubleshoot” in the Search box in the Windows Task Bar to start the Troubleshooter.


![[Easy Fixes] Windows Update Failed](https://driverfinderpro.com/driver-guide/wp-content/webp-express/webp-images/uploads/windows-update-failed.jpg.webp)