PC Errors | DriverFinder - We Make Drivers Work for You - Part 3

How to Fix USB Drive Not Showing Up in Windows 10

Is your USB drive not showing in Windows 10? Here’s a quick step-by-step fix… with pics!

usb-drive-not-shownExternal storage devices like USB Flash drives and external hard disk (HDD) or SSD drives are quite handy and popular. They’re  commonly used for backups, or as simple storage devices. Normally, when you plug a USB device, its corresponding drive simply shows up in File Manager. So what do you do if the USB drive is not showing up on your Windows 10 computer?

#1 – Check the USB Device.

The first thing to do is to check if the USB device itself is okay.

You can do this by connecting the USB drive to a different computer. If it is correctly recognized there, then you know the USB drive itself is fine and that the problem is with your Windows 10 system.

If the device is an external hard disk (or SSD), or ZIP drive, also check if the cable is defective by exchanging it with a different cable if possible. This is a less frequent cause, but not something to be ignored.

Also make sure to connect the USB device directly to a USB port on the Windows 10 PC, not through an extension cable or USB hub. Long cables, extra connections, or insufficient power can also be a cause for problems with USB drives (this is especially true for the older USB 1.1 and USB 2.0 ports and devices).

#2 – Check Your PC.

Unless you made changes, there is normally no reason to assume anything is wrong with your computer. However, for older PC’s it can be helpful to turn the PC off, remove the USB devices, and completely unplug the PC.

While troubleshooting the issue with the USB drive, leave other USB devices disconnected (unless you really need them, like a mouse or keyboard).

If you did make changes to your computer, like putting additional hardware, upgrading its firmware, or changing its BIOS settings, then try reverting these changes and testing the USB drive again to ensure that these changes have not caused the issue.

#3 – Check Windows 10 Settings.

If your USB driver is still not showing in Windows 10, then it’s time to to get into the Device Manager.

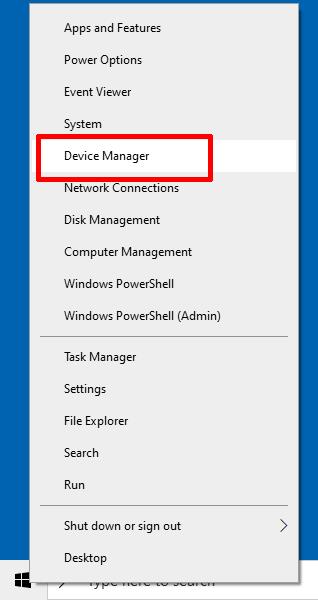
Right-click the Windows Start button, and in the popup menu, select Device Manager.

Start Device Manager

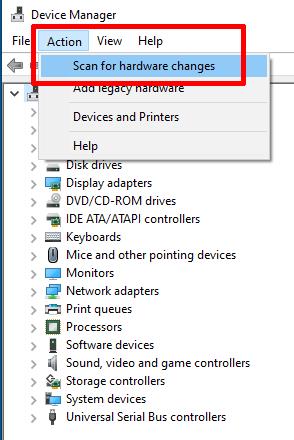
In Device Manager, click the Action menu, and then click Scan for hardware changes.

Scan for Hardware Changes

Once complete, check if the USB drive is showing up in Windows Explorer. If not, try the next step.

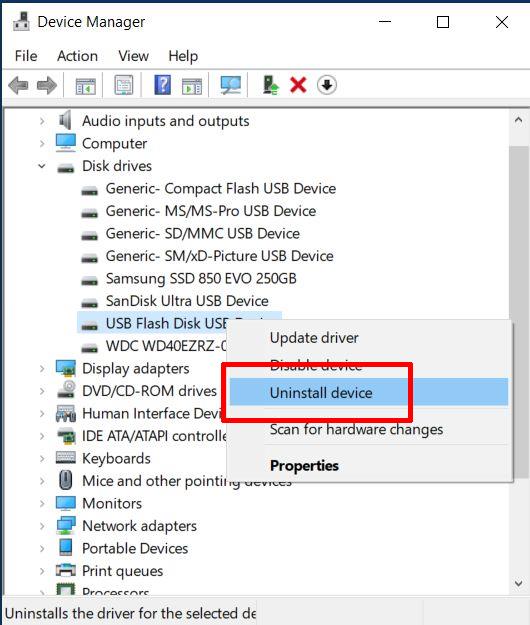
In Device Manager, open up the Disk drives list, right-click the USB drive, and then click Uninstall device.

Uninstall Device

Next, restart your PC. When Windows 10 restarts, it will automatically re-detect the USB device and install the available driver for it. This step can solve configuration issues with the USB drive, so it will show up again.

If your USB drive is still now showing up, try updating the driver for the USB device.

download-usb-drivers

This  can be done from the Device Manager. Simply right-click the USB drive in the list of Disk drives, and in the popup menu, click Update Driver.

Next, click the option Search automatically for drivers, and wait for the driver update to complete.

Update Driver

Be aware that this step only checks for updated USB device drivers. In most cases the correct operation of USB devices depends on the USB controller, which is a system device. So it is best to check for updated chipset drivers as well.

A simple way to do that is to download a driver tool like DriverFinder and scan your PC for all hardware devices and find the latest drivers.

#4 – Check Windows 10 Disks and Drives.

If the USB device is working properly, but the drive is now showing up in Windows Explorer, it is possible that the drive has no drive letter assignment.

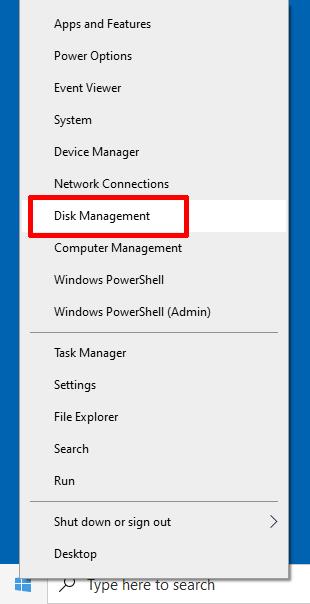
Right-click the Windows Start menu, and then click Disk Management.

Start Disk Management

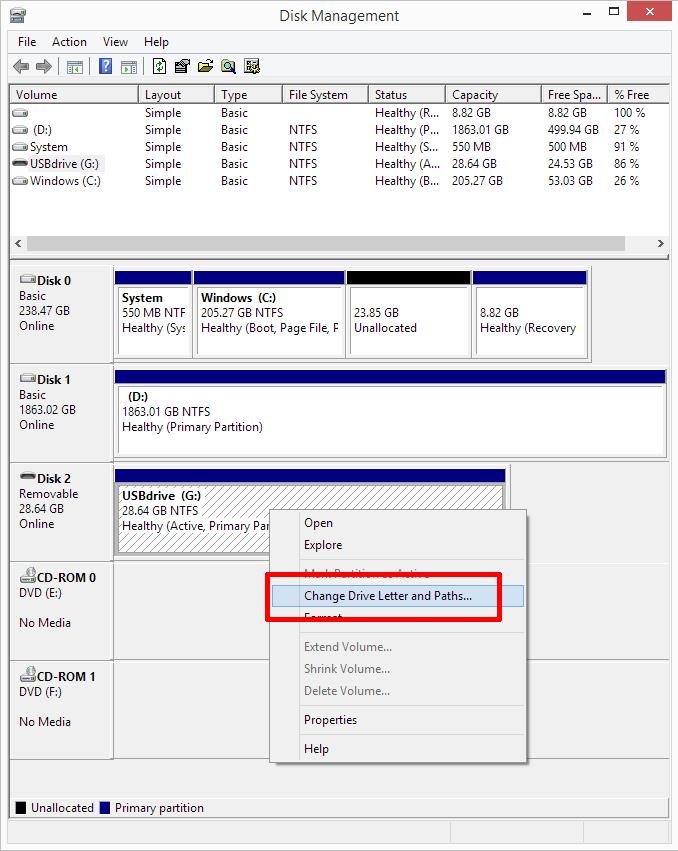
Once the Disk Management window opens, you will see all disks present in the PC.

Windows 10 Disk Management

Find the disk that represents the USB drive and check that it has a drive letter assigned to it. In the screenshot above, Disk 2 is the USB device and it has the drive letter G assigned to it.

To find your USB drive, check for a disk that is listed as “Removable” (although it can also be listed as “Basic“), and compare the size to that of your USB drive. If you are not sure, compare the Disk Management screen with the USB drive that’s not connected.

If there is no drive letter assignment, simply right-click the partition (the block next to the disk with the blue bar at the top), and in the popup menu, click Change Drive Letter and Paths.

Next, click the Add button.

Next, change the drive letter (or leave it as is to get a default assignment), and then click OK .

Even if there is already a drive letter assigned to the USB drive, it is still useful to try and change it. The reason for this is that it is possible that there are drives using the same drive letter assignment. Even if another USB device with the same drive letter assignment is not present at the moment, the configuration could still cause conflicts.

To change the drive letter to a higher character, click the Change button rather than the Add button. After that, the steps are the same; i.e., change the drive letter and click the OK button.

Note: If the partition for the USB disk shows as a black bar, rather than a dark blue bar and is listed as Unallocated, that means the drive formatting is not recognized. This means that the disk needs to be formatted before it can be used. If there should be data on the USB drive, a data recovery tool needs to be used for retrieval of the files.

If the USB disk is still not showing up in Windows Explorer, a final step is to try the Windows 10 Hardware and Devices Troubleshooter. Just type “troubleshoot” in the Search box in the Windows Task Bar to start the Troubleshooter.

[Easy Fixes] Zoom Mic Not Working in Windows 10 – Updated 2022 Guide

Everything is set. It’s time. You click the link to join a Zoom meeting. You hear everyone. But no one can hear you. That sucks!

Let’s get right to it then. Following are some easy, step-by-step fixes you can do to get that mic working for Zoom in Windows 10.

Note: Why focus on Zoom for this article? Zoom downloads increased from just less than five million to 26.9 million in March 2020, so chances are this is your video chat app of choice for your online meetings.

Fix #1 – Check That Your Mic is Correctly Plugged to Your PC

This fix assumes that you have an external device you’re using as your microphone for your Zoom meetings. If that’s not the case, feel free to move on to the next recommended fix.

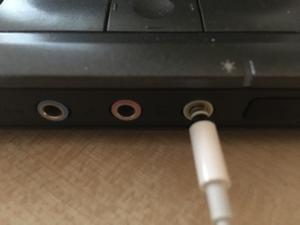
  1. Unplug your microphone and plug it back in to ensure that it’s not just loosely connected.
    Plug Zoom microphone
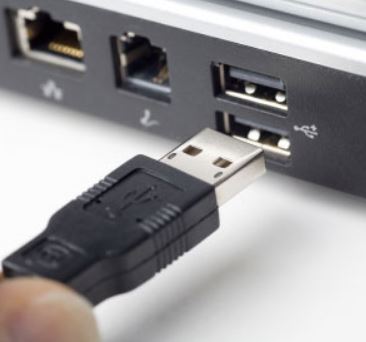
  2. If you’re using a USB audio device, then try plugging it into a different usb port.
    usb-port
    Note: If you’re using a USB hub or USB extension cable, try plugging the device directly into your computer’s USB port.
  3. For Bluetooth headsets, or microphones, make sure to PAIR the device with your Windows computer.

Fix #2 – Check that your Microphone Device is Not Muted

  1. On the Windows Taskbar, right-click the speaker icon and then click Open Sound Settings.
  2. Under Input, click the Choose your input device down arrow and select the microphone device you want to use.
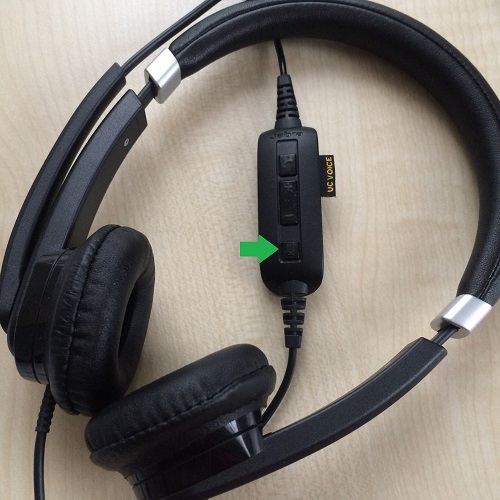
  3. If you’re using an audio headset, check that its Mute switch – if it has one – is not turned on.

headset-mute-button This is my Jabra headset and where the Mute button is on my device.

Fix #3 – Check that Zoom is Allowed to Use Your Microphone

  1. Use the Windows search box, type microphone privacy settings and select this option when it appears.
  2. Under Microphone, switch the Allow apps to access your microphone toggle to On.
  3. Scroll down further till you find Allow desktop apps to access your microphone, and then toggle that to On too.

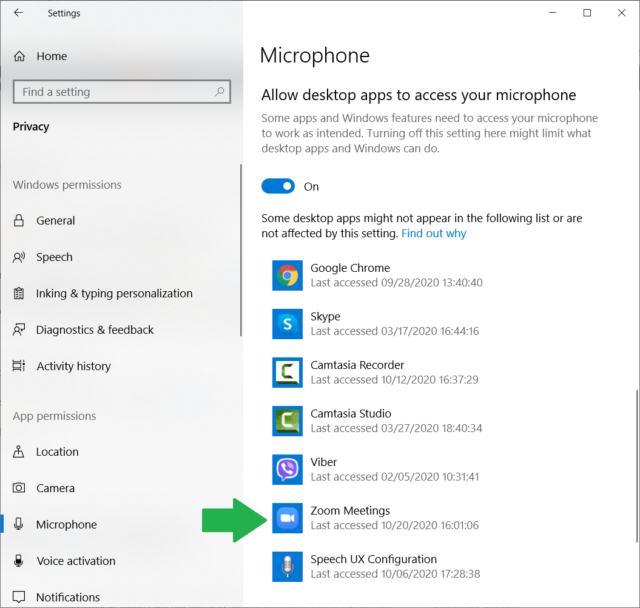
Note: Ensure that Zoom Meetings is one of the desktop apps listed as allowed to use the microphone.

microphone-access-for-zoom

Tip: Is the Zoom app not listed under Microphone Privacy Settings?

  • Uninstall Zoom.
  • Restart your PC.
  • Re-install Zoom.

Fix #4 – Ensure that Zoom is Using the Default Microphone

  1. Log into your Zoom desktop app.
  2. On the right side of the Zoom pane, under your profile icon, click the Settings icon settings-icon.
  3. On the left pane, click Audio.
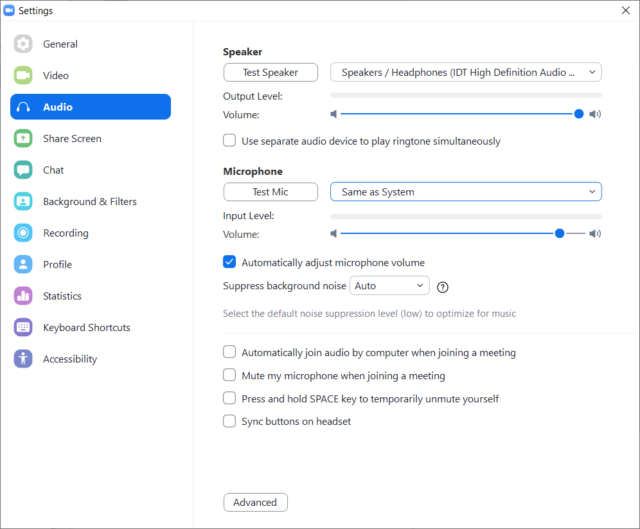
  4. Under Microphone, ensure that audio device selected is the same device you chose under Fix #2 above. If not, click the down arrow and then select Same as System.
    zoom-mic-same-as-system
  5. While you’re in there, perform a mic test.
    • Under Microphone, click Test Mic.
    • Say something into your microphone.
    • Whatever you say should be played back to you.
  6. While you’re in there, check that the microphone is not automatically set to mute when you join a meeting.
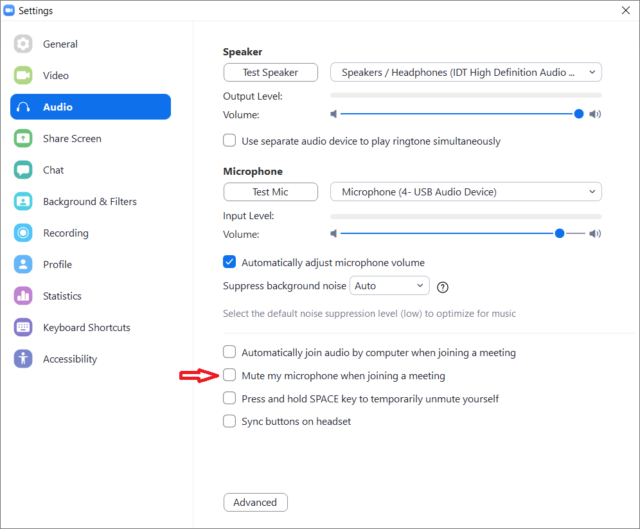
    Ensure that the setting Mute my microphone when joining meeting is off.

zoom-mute-setting

Note: By the way, the Meeting Host can mute meeting participants so be sure this is not the case.

Fix #5 – Update Your Audio Drivers

If you’re microphone is still not working with Zoom even after going through the Windows and Zoom solutions above, then you may need to update your device drivers.

Audio drivers ensure that Windows can recognize and operate your audio devices, including your microphone. In the same way, USB ports and Bluetooth also need device drivers to function.

Hardware manufactures release new device drivers all the time. This is their way of releasing new product features or new functionality for their devices, as well as fixing any bugs that may have been detected by consumers over use.

How to Update Drivers Manually

Normally, for sound problems you should go your PC manufacturer’s website and install the latest Windows 10 sound drivers available for your laptop or desktop PC. However, if you have a custom PC, or if you built your PC yourself (impressive!), you should probably head to your motherboard manufacturer’s website and download audio drivers from them.

If, like me, you’re using a USB microphone, try to download and install the recent release of USB controller drivers from the manufacturer’s website.

How to Update Drivers Automatically

If you don’t have time or the know-how to properly select, download and install the drivers you need, you can do this process automatically with DriverFinder. (Shameless plug!)

DriverFinder does exactly what its name suggests… instantly find the RIGHT device drivers you need. Once you install DriverFinder, it will automatically recognize your system info and details, as well as all the devices installed or connected to your PC.

It will then compare the drivers installed on your system against our DAILY UPDATED and ever-growing driver database. From here, just download and install the latest audio driver found for your device.

  1. Click here to download and install DriverFinder.
  2. Click Activate to register your copy of DriverFinder.
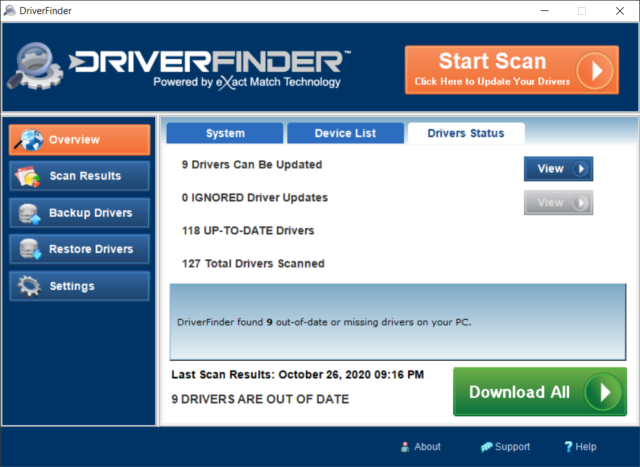
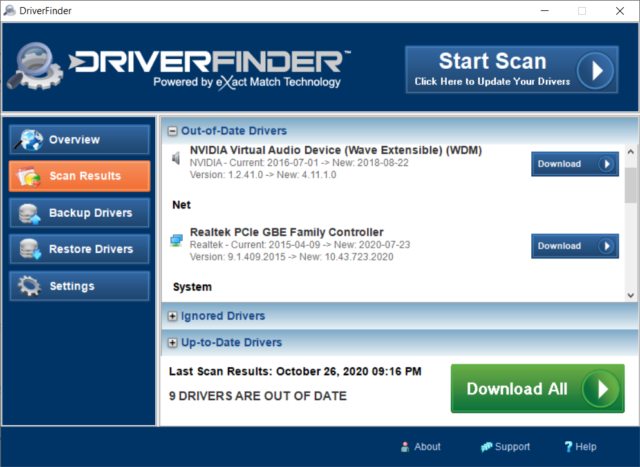
  3. Click Start Scan to check for new drivers.
    df-driver-scan
  4. Download and install the latest device drivers recommended for your audio/microphone device.
    download-audio-drivers

Fix # 6 – Quit Other Chat & Teleconferencing Software

You may not realize this but perhaps other apps are on/open and are ‘locking’ the use of your microphone. So if you have Skype, GoToMeeting, Microsoft Teams, Google Meet, etc. installed on your PC, ensure that all of them are completely closed.

  1. Click the up arrow ^ on the Taskbar notification of Windows to see hidden icons.
  2. If you see any chat or teleconferencing app there, right-click it and then click Quit or Sign Out.

Tip: If you want, you can also uninstall all other chat and teleconferencing apps you have installed on your PC to be sure, apart from Zoom of course. Reboot your PC and then perform a mic test again in Zoom.

Fix # 7 – Disable ‘Audio Enhancement’ Settings

Disable ‘Audio Enhancement’ settings for your output.

  1. On the Windows Taskbar, right-click the speaker icon and then click Open Sound Settings.
  2. Under Output, click Device Properties.
  3. In the Device Properties window, click Additional device properties.
  4. Click the Advanced tab.
  5. Uncheck Allow hardware acceleration of audio with this device and Enable audio enhancements.
  6. Click OK.

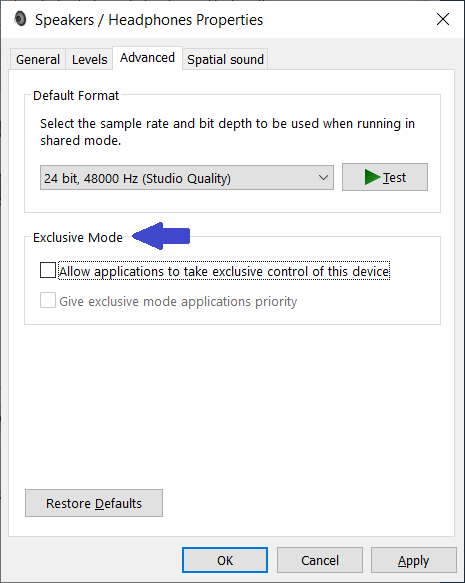
Note: If you don’t see the above settings, look at the options under Exclusive Mode and uncheck those options.

enhanced-sound-settings

Disable ‘Audio Enhancement’ settings for your input.

  1. On the Windows Taskbar, right-click the speaker icon and then click Open Sound Settings.
  2. Under Input, click Device Properties.
  3. In the Device Properties window, click Additional device properties.
  4. Click the Advanced tab.
  5. Uncheck Enable audio enhancements.
  6. Click OK.

Note: If you don’t see the above settings, look at the options under Exclusive Mode and uncheck those options.

Fix # 8 – Use Your Phone as Your Microphone

If you’re already in a meeting, we understand you’re in a pinch and just want to use any mic ASAP.  In this case, you may want to use your phone as your microphone.

  1. Download the Zoom app on your Android or iPhone.
  2. On your phone, login into your Zoom account.
  3. Go back to the Zoom desktop app.
  4. Click on the arrow next to Mute, and then click Switch to Phone audio.
  5. You will be given a meeting ID and password. Use it to join the meeting on your phone.

Fix # 9 – Run the Windows 10 Audio Troubleshooter

Windows 10 has a built-in troubleshooters that can help fix common issues. Especially for non-tech-savvy users the Windows troubleshooters are a good choice. Since there is a troubleshooter for Recording Audio, this can used used to troubleshoot and fix microphone problems.

To run the Windows 10 audio troubleshooter follow these steps:

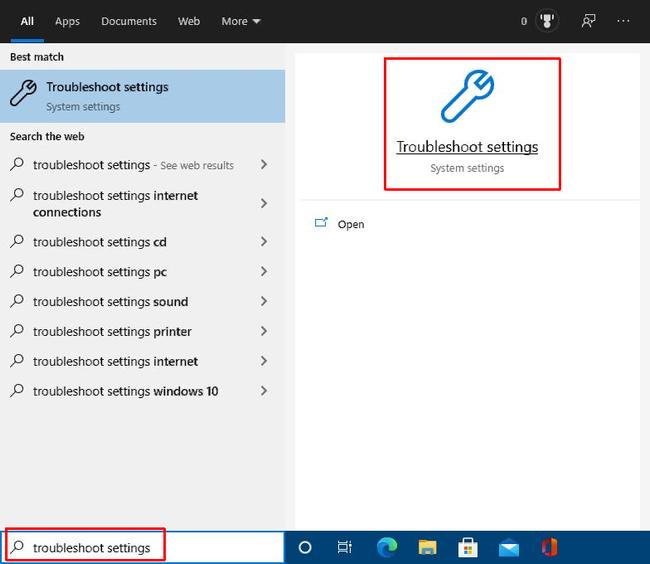
  1. In the Taskbar search box, type “troubleshoot setting”.
    Start Windows 10 Troubleshooter
  2. Click the Troubleshoot Settings icon in the search result.
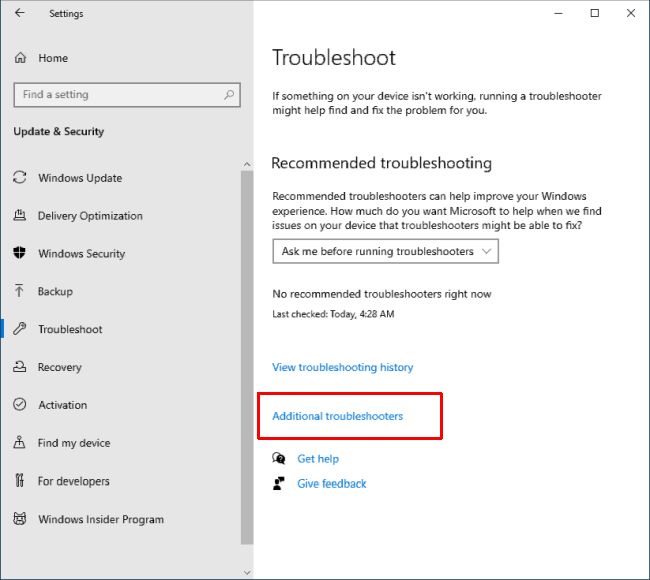
  3. In the Troubleshoot Settings window, click the Additional troubleshooters option.
    Additional Troubleshooters
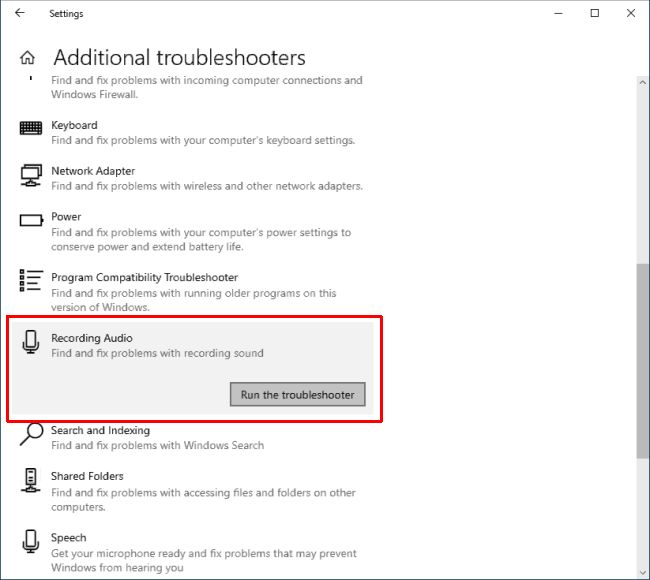
  4. Next, scroll down to locate the Recording Audio option and click it.
    Recording Audio Troubleshooter
  5. Finally, click the Run the troubleshooter button that appears.

The troubleshooter will execute and identify any problems with the microphone and related settings. In most cases any available fixes will be applied automatically. Just follow the on-screen instructions in case manual actions are required (like selecting the audio input device to troubleshoot).

Zoom Microphone not working on iOS devices

When using Zoom on an Apple iPhone or iPad, the microphone can also be muted.

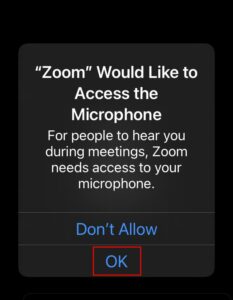
The very first step is to allow Zoom to access your microphone. So when you see the message “Zoom” Would Like to Access the Microphone, make sure you click the OK option.

Zoom Microphone Access iOS

In addition the microphone access, the microphone can be muted within the Zoom app itself.

Follow these steps to make sure the microphone is not muted within the Zoom app on iOS.

  1. Open the Zoom App.
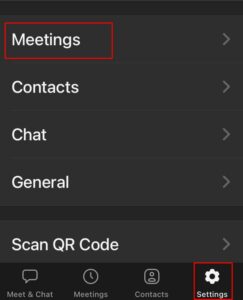
  2. Click the Settings icon in the lower-right corner.
    Zoom Settings
  3. Next, click the Meetings
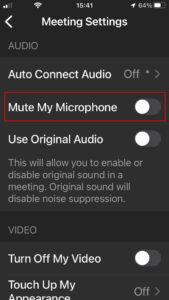
  4. In the Meeting Settings, make sure the option Mute My Microphone is disabled.
    Zoom Meeting Settings

Start your meeting, or join your meeting with the Join with Audio option to make sure the audio (and microphone is enabled).

If you are still facing problems, try closing any other apps that might use the microphone. A last option is to restart the phone or iPad.


I hope this article has helped you with your ‘Zoom mic not working in Windows 10‘ issue. Do let me know below which fix worked for you! If you have any questions, or more suggested fixes please feel free to comment below as well.

Fix ‘HP Printer Install Failed in Windows’

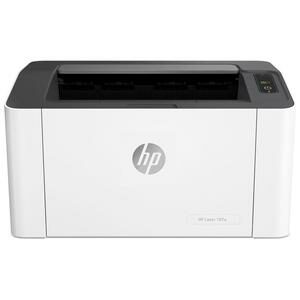
HP Printer Install FailedLike any computer device, printers need additional software to function in Windows. For hardware devices, this software is generally called a driver. By default, Windows supports a lot of devices since many drivers are already included in Windows, but many devices still need a separate driver or additional software to operate; for Hewlett-Packard printers, this is also true.

HP printer driver packages include a lot of additional software, and not only the actual driver. This enables printer troubleshooting and offers additional printing functionality that is beyond the default Windows functions. As a result, the installation of HP printer driver software is a little more extensive and complex than other average drivers. Some HP printer driver installation packages are in the hundreds of megabytes!

The problem we are addressing here is when the installation of an HP printer driver fails, resulting in error messages like “driver fatal install”, or “fatal error during installation”. Further error details can contain file names, error codes, or version mismatches.

You can also see the following errors:
The drivers for this device are not installed (Code 28). To reinstall drivers, click Reinstall Driver.”
Fatal Error 2753 — MSI.dot4wrp

How to Solve HP Printer Install Failed Errors

In most cases, driver installation errors can be solved by simply reinstalling the software again, sometimes a reboot is required before attempting the installation again.

But in the case of more complex software like HP printer software, a failed installation can cause all subsequent installation attempts to fail. The reason is that a failed installation can leave behind locked files, or registry information, which causes the next installation to fail.

Uninstall HP printer

In these cases, the next step is to first uninstall the previous installation, so that a clean system can be used to reinstall the HP driver software. The simplest way to do that is to uninstall the HP printer software from the Control Panel -> Uninstall (or Add/Remove programs) option. The Uninstall a program is found in the Control Panel under Programs -> Programs and Features in Window 7 and later.

In addition you can remove the HP printer in the Devices and Printers section of the Control Panel.

If, however, the HP printer software installation failed in an early stage, the software might not show up in the Control Panel uninstall list. That means the removal of the failed software will not be possible that way. The next thing to try in that case is to use a cleanup utility to fix the corrupted registry. Microsoft used to have the Windows Installer Cleanup Utility for this purpose, but due to conflicts with Office 2007, it was replaced by the Microsoft Fix It solution.

The Fix It solution will clear bad registry keys that can prevent programs from being installed. Keep in mind that it does not actually remove any files from the failed HP driver installation. Those will simply be overwritten by the next installation. Instead of the Microsoft solution, you can also try using a program to scan and fix the complete Windows registry, which does not limit itself to installer issues only. You can use such a program to clean all HP entries from your system before attempting the reinstall. We recommend using PC Cleaner for this purpose.
Note: by Choosing to install PC Cleaner (5.72MB), you consent to it’s End User License Agreement and Privacy Policy of the site.

If you are running XP or Vista, it is also possible that the Windows Installer itself is corrupted. In that case you can simply try to download the Windows installer and reinstall that.

If reinstalling the Windows Installer is not possible, try to re-register it:

– Open a command prompt with administrator rights.
– Type: msiexec /unregister and press Enter.
– After the command completes type: msiexec /register and press Enter again.

For HP Officejet printers, HP used to offer a driver removal utility that could help you remove the HP printer driver for specific models. Unfortunately, this utility is no longer available from them.

Other steps that can help:

– Run a disk cleanup to clear out the temp folders, which are used for temporary installation files.
– Stop the HP services using the Manage Computer option to prevent DLL files being locked.

Reinstalling the HP Printer Software

After the install cleanup is finished and the Windows installer is fixed, you need to reinstall the HP Printer driver software. Unplug the HP Printer and reboot before you do this so that Windows does not install any default drivers for the HP device. During installation, you can reconnect the printer when the installation process indicates it. Please consider that even for wireless printers you sometimes need to make a physical connection with the PC during the initial installation. Please check the printer manual for details.

If installation still fails, and you are using a USB connection, try using a different USB port, and make sure not to use an external USB hub between the PC and the HP printer.

Windows 10 HP Printer Compatibility

Windows 10 Compatibility Mode

Although a lot of HP Printers are supported even under Windows 10, not all HP printers will work. Especially older printer models have no direct support under Windows 10, more so when it is the 64-bit version.
There are a few things you can try to get an HP printer to install in Windows 10 anyway.
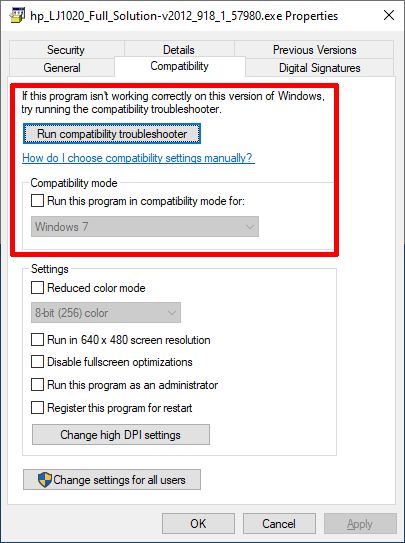
The first is to try and run the printer installer in Compatibility Mode. Simply right-click the driver installer file and in the popup, select Properties.

You can now select Run compatibility troubleshooter. Windows will try to determine which Windows version the file is compatible with. Or you can manually choose the Windows version by using the Run this program in compatibility mode for option. After this, click OK, and execute the installer.

In some cases this method works, even though not all printer functions might be supported due to compatibility issues (often the case with printer/scanner combinations).

Use a Virtual Machine to circumvent the HP Printer Install Failed error

If the printer is not supported at all, even with the compatibility mode, you can choose to use a Virtual Machine (VM). In the Virtual Machine, you then run a version of Windows that still has support for your HP printer. The advantage is that you can still use the printer, the disadvantages are that you need to first still have a version of Windows that supports your printer, and you need to run the VM for all print functions, which means transferring all documents to be printed between the host (Windows 10), and the VM. Apart from being a complex solution, this is not a very convenient solution, so it is only interesting in a few scenarios.

To use a virtual Machine in Windows, you can use the Oracle VirtualBox software or the VMware Workstation Player. Both are free.

Lastly, always make sure to use the latest HP driver software, to guarantee that you are not suffering from old versions with possible bugs or limited functionality. To scan your PC for all drivers and find HP updates, use DriverFinder!

Unscrambling USB Device Error Messages

usb-driverA USB drive is lightweight and portable which is why more people prefer it over other means of moving and storing info. Lots of devices these days are equipped with a USB connection for easy communication with other gadgets and computers. Most cameras and mobile phones along with printers today provide support for USBs.

However, these USB compatible gadgets, while handy, can occasionally prove problematic owing to device drivers that are flawed. Such issues are for the most part easy to repair but it is more complicated if the USB port or devices are involved. Usually the problem here is coming from within the USB drivers.

Communication between computers and other devices like USBs is possible using drivers. Corrupt or improperly installed device drivers can cause computers to not detect the presence of the device and even misread its commands which leads to errors. Expect to see a message of unknown device error if your computer fails to recognize a device. Either you get the error as USB device not recognized or as Unknown Device. The problem can be tied to improper driver installation or an obsolete or ruined driver.

Issues With Installing Drivers

After initial hook up a device to a computer a message will pop up at the bottom corner of the screen. You will be brought to the installation wizard upon clicking on the popup window. There are times when installation is not so smooth and errors appear which causes files to be added incorrectly. It can be encountered even long after devices were put in owing to original drivers being damaged.

Trojans and viruses are just two of many malicious software that can destroy or zap away device drivers. Viruses work by changing the registry keys of a computer which in turn leads to driver files that are damaged. While registry scans are a reliable solution you are still better off updating the drivers regularly.

An Antiquated Device Driver

Consider uninstalling all the drivers related to your USB gadget if loading the latest device driver programs still does not let you use the USB you have. In Windows go to Add and Remove Programs and then click on whichever icon is representative of your particular device. Insert the accompanying disc of your device to reinstall all the drivers you just uninstalled.

Once the disc is inserted you will see the installation wizard and it will help you install the drivers. If you lost the disc then you can go to a third party or manufacturer website to search for the drivers you require. Have the model number and the code handy when searching for drivers over the Net.

The solutions mentioned here are all manual and usually not called for. PC drivers update utilities are really all that that are needed to ensure up to date drivers and take care of device driver issues.

Three Canon Printer Error Problems & Solutions

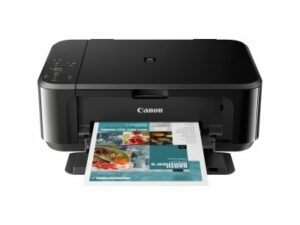
Canon is one of the most widely used printer brands in the world. From the super-fast inkjet models to the cost efficient all-in-one solutions, their products make sure that you can print out important documents easily and conveniently. Unfortunately, Canon printers are susceptible to problems, as evident when Canon printer error messages began to make their presence known. Many of these codes are specific to the type of Canon printer you own, and here are three of the most common annoyances you are likely to encounter.

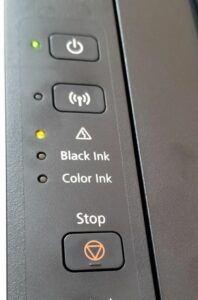
1) Power LED Lit Solid Orange
Canon Printer Error

Printer error messages do not always come in the form of numeric code. In fact, the LED on your device can tell you a lot about the problem. According to the manufacturer, the power LED on a Canon printer may be lit orange instead of green when the device needs to be set or requires maintenance. The recommended solution is to first turn off the machine, and then unplug its power cord from the power outlet. Next, wait a moment, and then plug the device in again and turn it back on. In many cases, this will solve the printer error message and if so, the power LED will glow green. However, if the LED remains orange, this particular error may indicate that your Canon printer needs to be repaired. In this case, your best bet would be to contact Canon’s technical support team for further assistance.

2) E27

The E27 printer error message is common on Canon Pixma all-in-one printers. This particular error occurs when the waste ink absorber is full. Your first inclination may be to clean the holder and cartridge itself to remove all excessive ink, dirt and spills. Unfortunately, most people do not have luck with these methods. The best resolution to the problem is to reset the waste ink counter. While this requires several steps and a lot of patience, it usually works on most Pixma models. To clear up this printer error message, follow the steps below:

– Simultaneously press the ON/OFF button and STOP/RESET button on your Canon printer.

– Press the ON/OFF button once and then the “STOP/RESET” button twice to enter the maintenance mode. (You should notice a value of “0″ on your LED indicator).

– Press the “STOP/RESET” button 4 times in order to reset the waste ink counter.

– Turn off your Canon printer.

– Turn the printer back on.

3) Ink is Missing

The “Ink is Missing” printer error message is among the oldest error codes for Canon printers. Oddly enough, this one can show up shortly after installing a fresh ink cartridge. The most common cause is using a generic brand of ink with your printer. You could try removing and then reseating the ink cartridge back in place but most of the time, this only serves as a temporary resolution. Your best bet would be to only install ink cartridges that are manufactured and supported by Canon. This way, you can dramatically reduce the threat of compatibility issues, get better technical support and receive a free replacement if problems should ever occur.

Copyright 2009 and Beyond - DriverFinderPro.com - All Rights Reserved