In modern computing, encryption and decryption play a crucial role in protecting sensitive information from unauthorized access. These processes ensure that data remains secure when stored or transmitted. One of the key hardware components responsible for handling encryption and decryption tasks in a computer is the PCI encryption/decryption controller. To function correctly, this controller requires specific drivers, which allow Windows 10 to communicate with the hardware.
This article provides information about PCI encryption/decryption controllers, their role in a PC, the drivers required for their operation, where to obtain these drivers, and how to install them.
What is Encryption and Decryption?
Encryption is the process of converting readable data (plaintext) into an unreadable format (ciphertext) to prevent unauthorized access. Decryption is the reverse process, where the ciphertext is converted back into plaintext so it can be read and used by authorized users.
Encryption ensures security in various scenarios, including:
- Protecting sensitive files stored on a computer.
- Securing internet communications such as emails, website traffic, and VPN connections.
- Encrypting data stored on external drives and USB devices.
The decryption process is essential to retrieve and use encrypted data, ensuring that only authorized individuals or systems can access the original information.
BitLocker is an example of Windows software that uses encryption and decryption.
Devices in a PC That Handle Encryption and Decryption
A typical PC or laptop includes several hardware components that perform encryption and decryption tasks:
- TPM (Trusted Platform Module): A dedicated chip that handles cryptographic operations, ensuring the security of encryption keys and passwords. See TPM drivers.
- CPU (Central Processing Unit): Modern processors include built-in encryption instructions, such as Intel AES-NI and AMD Secure Processor, which speed up encryption tasks.
- GPU (Graphics Processing Unit): Some graphics cards support encryption acceleration for video streaming and secure processing.
- SSD (Solid State Drive) with Hardware Encryption: Some SSDs come with built-in encryption capabilities to secure stored data.
- PCI Encryption/Decryption Controller: A specialized hardware component on the motherboard responsible for handling encryption and decryption operations at the system level.
What are PCI Encryption/Decryption Controller Drivers?
A PCI encryption/decryption controller driver is a software component that allows the Windows operating system to communicate with the encryption hardware in a computer. Without the proper drivers, the system may not recognize or use the encryption features effectively, leading to security vulnerabilities or performance issues.
These drivers are required for:
- Ensuring secure data transmission and storage.
- Supporting encryption features in Windows 10, such as BitLocker.
- Enabling hardware-level encryption acceleration.
- Fixing error messages related to missing drivers in Device Manager.
Where to Get PCI Encryption/Decryption Controller Drivers
If your system displays a missing driver warning for the PCI encryption/decryption controller in Windows Device Manager, you need to install or update the necessary driver. Here are the best sources for obtaining the correct drivers:
1. Manufacturer’s Website
Most computer and motherboard manufacturers provide official driver downloads for their hardware. To get the latest driver:
- Identify your PC model (e.g., HP, Dell, Lenovo, ASUS, Acer).
- Visit the official support website of the manufacturer.
- Look for “Chipset” or “Security” drivers.
- Download the PCI encryption/decryption controller driver suitable for Windows 10.
2. Windows Update
Windows 10 can automatically detect and install missing drivers through Windows Update. To check for available updates:
- Open Settings (Win + I).

- Go to Update & Security > Windows Update.
- Click Check for updates.
- If a relevant driver is available, it will be downloaded and installed automatically.

3. Device Manager
Another way to find and install drivers is through Device Manager:
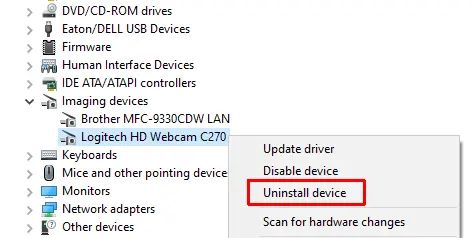
- Right-click the Start button and select Device Manager.
- Locate PCI Encryption/Decryption Controller (it may appear under “Other devices” posssible with a yellow warning sign).

- Right-click on it and select Update driver.
- Choose Search automatically for drivers.
- If Windows finds an appropriate driver, it will install it.
4. Intel, AMD, or Other Chipset Providers
If your computer’s motherboard is powered by an Intel or AMD chipset, you can download drivers directly from their official websites:
These sites automatically detect your hardware and recommend the latest drivers.
5. DriverFinder
DriverFinder is a software program that allows you to automatically find and install device drivers for your PC. The program scans all hardware devices, including encryption/decryption controllers, and finds the latest device drivers for them. Drivers can be automatically downloaded and installed using the program. You can download the DriverFinder installer to try it out.
How to Install PCI Encryption/Decryption Controller Drivers
Once you have downloaded the appropriate driver, follow these steps to install it:
Method 1: Using an Installer File
If the driver download includes an executable installer (e.g., setup.exe):
- Double-click the installer file.
- Follow the on-screen instructions.
- Restart your computer after installation.
Method 2: Manual Installation via Device Manager
If the driver is in .INF format (without an installer):
- Open Device Manager.
- Right-click the PCI Encryption/Decryption Controller.
- Select Update driver.
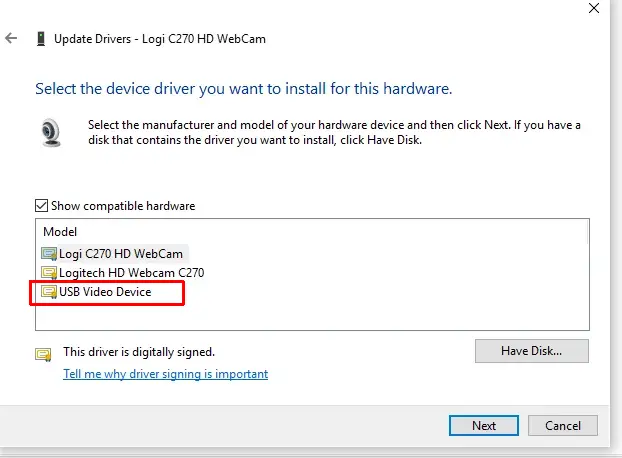
- Choose Browse My Computer for drivers.
- Click Browse and navigate to the folder where the driver is located.
- Click Next to install the driver.
- Restart your computer after installation.
Troubleshooting Driver Installation Issues
If you encounter issues while installing the PCI encryption/decryption controller driver, try the following solutions:
- Ensure You Downloaded the Correct Driver
- Check your system’s model number and chipset details before downloading a driver.
- Avoid using generic or incompatible drivers.
- Run Windows Troubleshooter
- Go to Settings > Update & Security > Troubleshoot.
- Click Additional troubleshooters > Hardware and Devices.
- Follow the instructions to fix driver issues.
- Use System Restore
- If a new driver causes problems, roll back to a previous state by using System Restore.
- Open Control Panel > Recovery > Open System Restore.
- Update BIOS/Firmware
- Some encryption features depend on motherboard firmware. Updating BIOS from the manufacturer’s website may resolve driver conflicts.
The PCI encryption/decryption controller is an essential component for securing data on modern computers. To ensure optimal performance and security, it is crucial to install the correct drivers. By keeping your PCI encryption/decryption controller driver updated, you enhance system security, enable encryption features, and maintain overall system stability.