One of the new protection features in Windows 11 is called Core isolation. This feature helps protect against vulnerabilities that may harm the system. It is also referred to as virtualization-based security (or VBS). An important aspect of this protection is the setting memory integrity. Enabling this setting will allow Windows to shield the memory from bad code or invalid access.
A limitation of memory integrity protection is the fact that it can be impossible to enable it due to incompatible drivers. Device drivers are an important piece of any operating system, including Windows 11. Since device drivers enable communication with hardware devices, they are operating at a high-security level in Windows with access to critical system resources.
Even with systems that had no problems in the past, Windows updates can result in the core isolation option being disabled with no obvious cause.
In this article, we show how to enable memory integrity and how to deal with incompatible drivers that may block the enabling of the core isolation protection.
How to enable memory integrity
- Open the Settings by pressing the Windows + I keys, or use the Start menu.
- In the Settings window, click Privacy & security (1) in the left-hand pane.
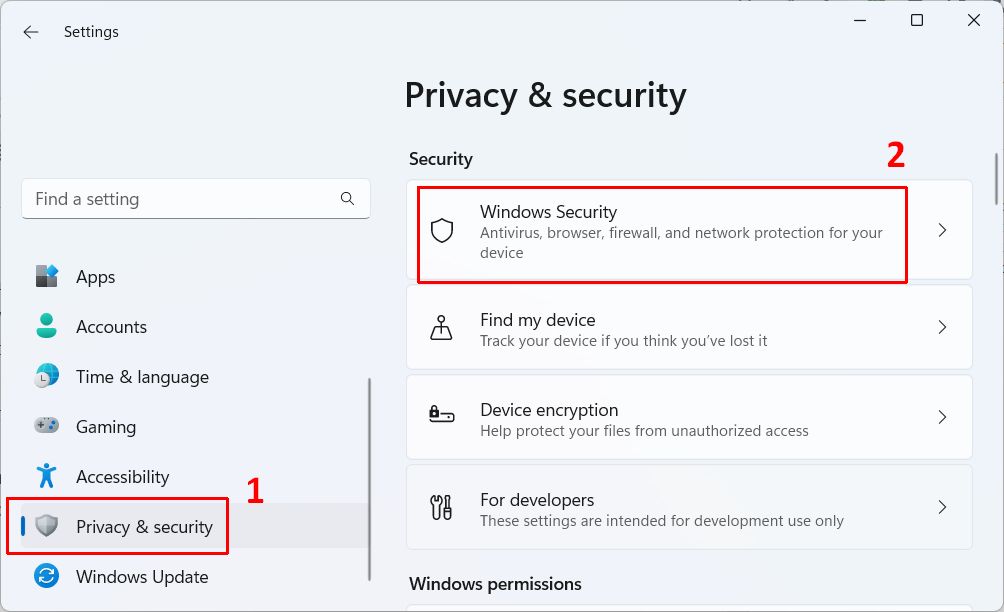
- Next, click Windows Security (2) in the right-hand pane.
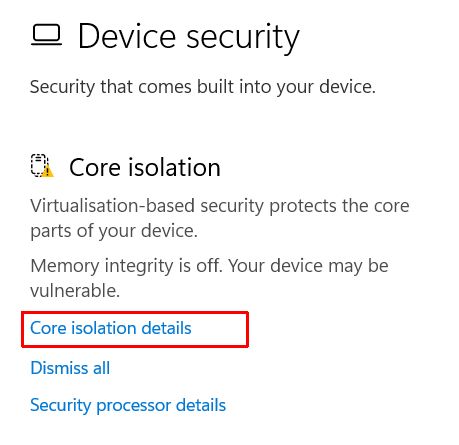
- Then, click Device security in the right-hand pane. This will open a new window called Windows Security.
- Under Core isolation, click the Core isolation details link.
- Now toggle the switch for Memory integrity from Off to On.
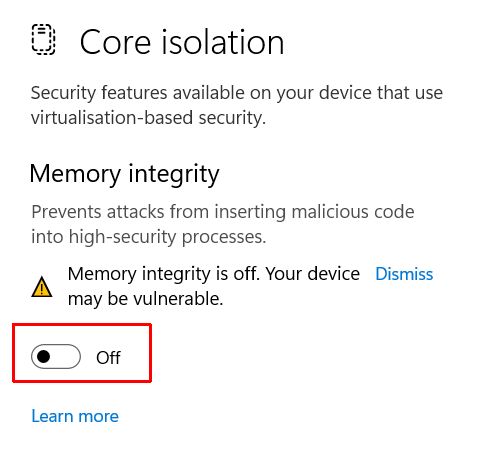
Windows will start checking for driver compatibility before enabling the memory integrity option. - Close the Windows Security window and the Settings windows.


After this, the core isolation in Windows 11 is enabled, helping protect the memory from invalid access. This will add an extra layer of protection against malware on your PC.
Incompatible drivers
So what happens with incompatible drivers are installed in the system? In that case, enabling the Memory integrity feature will fail and the Core isolation will not be working.

To find out which drivers are incompatible, click the Review incompatible drivers link.
You will now see one or more entries of drivers (.sys file names) that are incompatible with the Windows 11 driver system. That means, the device for which the driver is intended may work fine, but the driver is not fully compatible with the Windows 11 security system. This may happen if older drivers are installed (e.g. Windows 7 or Windows 10 drivers).
Clicking the downward pointing arrow to the right of the driver’s name will reveal details about the driver. This information, date, version, and INF name can be used in the process to solve the driver incompatibility.

It is also possible that no imcompatibvle drivers are shown. In that case, try the manual enabling option.
Solve driver incompatibility issues
The simplest choice is to simply leave the Core isolation feature in Windows 11 disabled. That way, the incompatible driver can still be used and the device will function. Considering the possible vulnerability to the system this is not the preferred option. Only when no compatible driver for the device can be found and the device is really needed would you use this option.
The better solution to enabling the memory integrity option in Windows 11 is to replace any incompatible drivers with a newer, compatible version of the device driver.
Our example shows the stm_tpm.sys driver, which is an STMicroelectronics Trusted Platform Module. Other frequently occurring examples are the ene.sys driver and the wdcsam.sys (or wdcsam64_prewin8.sys), which are MSI and Western Digital drivers respectively.
#1 Update the driver from the Device Manager
Replacing an incompatible driver with a newer version is the best way to guarantee the driver will be compatible with Windows 11. Use the Device Manager to check for updates for the device.

In this process, Windows 11 will check the Microsoft Update Catalog for a newer version of the driver for the specific device. Take note that the device does not show any error in this example. The device and driver are functioning without device errors in Windows 11.
Note: If you do not see the problematic driver, use the option Show hidden devices in the View menu to show additional devices with their drivers.

In case any device is listed with an exclamation mark, it indicates a problem. Updating the driver for the device may fix the problem, otherwise check the error code for the device to solve the issue.
#2 Uninstall the driver to enable memory integrity
If the incompatible driver is not loaded and used by Windows, the memory integrity option can be turned on. Use the device manager to Uninstall the device, and then use the command prompt (or PowerShell) to delete the driver using the pnputil /delete-driver command.
pnputil /delete-driver oem97.inf /uninstall /force
Note: It is important to uninstall the device first, otherwise the command above will fail because the driver package is still in use.
The INF file name used in the command can be found in the details of the incompatible drivers in the Windows Security window. See the Published name detail. The /uninstall parameter ensures the driver package is removed from any devices that use the driver. The /force parameter allows the driver to be deleted even when it is in use.
Once the device is uninstalled and the driver is deleted, enable the memory integrity option as described earlier. If it still fails, try the other solutions listed here.
#3 Manually replace the incompatible driver
If the device is needed, option #2 is not possible, since the device will not work without a driver. But if the automatic update of the incompatible driver also does not work, a manual solution is required.

Use the Device Manager to uninstall the device. If Windows shows the option to Attempt to remove the driver for this device during the device uninstall, select that option. This option will not show for all devices and will only work if the driver is not in use by another device.
After this, find a new driver for the device on the manufacturer’s website. In the case of the wdcsam.sys error, the latest Western Digital drivers will solve the issue. Our ene.sys article has the details for a solution with that driver. For other manufacturers, their support site should provide the latest drivers if available.
Enable Memory Integrity using the Windows Registry
If the above steps do not resolve the issue, it is possible to force the activation of the memory integrity in Windows 10 and Windows 11 using the Windows Registry. Although it is possible to use the Registry Editor for this to manually add the required keys and entries, it is easier to execute the commands to insert the registry keys from the console. Below are the steps.
Open a command prompt window with administrator privileges.

Now execute the following commands one by one:
reg add "HKLM\SYSTEM\CurrentControlSet\Control\DeviceGuard" /v "EnableVirtualizationBasedSecurity" /t REG_DWORD /d 1 /f

reg add "HKLM\SYSTEM\CurrentControlSet\Control\DeviceGuard" /v "RequirePlatformSecurityFeatures" /t REG_DWORD /d 1 /f

reg add "HKLM\SYSTEM\CurrentControlSet\Control\DeviceGuard" /v "Locked" /t REG_DWORD /d 0 /f

reg add "HKLM\SYSTEM\CurrentControlSet\Control\DeviceGuard\Scenarios\HypervisorEnforcedCodeIntegrity" /v "Enabled" /t REG_DWORD /d 1 /f

reg add "HKLM\SYSTEM\CurrentControlSet\Control\DeviceGuard\Scenarios\HypervisorEnforcedCodeIntegrity" /v "Locked" /t REG_DWORD /d 0 /f
Each command should show that the operation completed successfully.

After that, close the command prompt window (type “exit” followed by pressing the Enter key), and restart Windows.
Now check that the memory integrity option in Windows Security is enabled.
Note: The commands above are for Windows 10 version 1607 and later (including Windows 11). For earlier Windows 10 versions (1511 and below), use these commands.
reg add "HKLM\SYSTEM\CurrentControlSet\Control\DeviceGuard" /v "EnableVirtualizationBasedSecurity" /t REG_DWORD /d 1 /f

reg add "HKLM\SYSTEM\CurrentControlSet\Control\DeviceGuard" /v "RequirePlatformSecurityFeatures" /t REG_DWORD /d 1 /f

reg add "HKLM\SYSTEM\CurrentControlSet\Control\DeviceGuard" /v "HypervisorEnforcedCodeIntegrity" /t REG_DWORD /d 1 /f

reg add "HKLM\SYSTEM\CurrentControlSet\Control\DeviceGuard" /v "Unlocked" /t REG_DWORD /d 1 /f
Note: Using the registry edit option can result in Windows showing the Memory Integrity option as “This setting is managed by your administrator“. If that is the case, revert the registry settings to undo the change.
I grew up with PCs and Windows, and have been a full-time programmer in the past. This has made writing about anything 'tech' a natural by-product :)
- How to Fix Unknown USB Device – Device Descriptor Request Failed - May 8, 2024
- How to Fix Problems with a Logitech Webcam in Windows - May 2, 2024
- Fix the Thread Stuck in Device Driver error in Windows - April 22, 2024

simply deleting the driver for the wdcsam64_prewin8.sys solved my issue with my WD My Book and WD Passport external drives. used the pnputil /delete-driver oem101.inf /uninstall to get rid of it.
Now my system give me the message “This setting is managed by your administrator“ All goot but how i revert now the registry settings or undo this? You didn’t give us a warning before of this issue before the instructions. Now my memory integrity will be off forever. I can’t access that anymore!
Hey Anthony, why did you deleted my comment?
What part did you not liked?
@Virosso Man – Your comment was not deleted, just held for moderation to prevent spam.
Regarding the issue of the setting being managed by your administrator, that is not a common problem specific to these instructions. Hence no warning.
From what I know of the issue, it is often caused by a AV software ‘conflict’. E.g. two security systems affecting each other.
Try temporarily disabling the other (non-Defender) AV software to see if that solves it.
Another possible solution is to reset the Windows Security from the settings (it’s under App settings or Advanced options depending on W10 or W11).