Driver updates normally come as one, often big, single file. If the driver file has the extension “.exe”, that means the driver file is a self-installing driver file or a self-extracting driver file. Simply double-click the driver file to execute the driver installation process. Follow the instructions of the installation program to complete the hardware driver installation. A reboot might be required on the end of the driver installation.
In the case of a self-extracting driver file, executing the “.exe” file will result in the extraction of the compressed driver files. You often need to specify a destination for the driver file extraction. Once the files are extracted, you will see the driver files that are required to install the driver update.
However, if the driver update file has a “.zip” or “.rar” extension, you need to manually uncompress the driver files. Windows supports the “.zip” extension, but if required get a program like 7-Zip to uncompress the driver files.
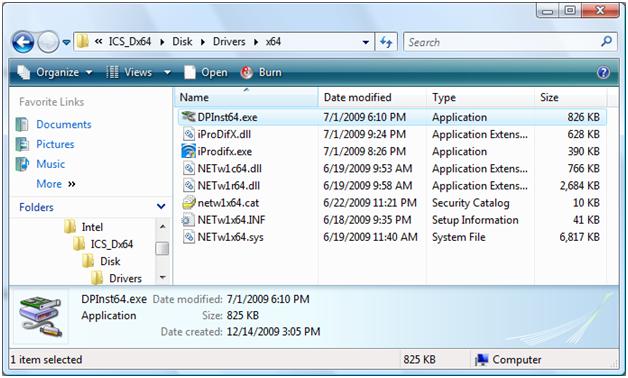
Within the folder with the driver files, you would typically find a driver installation program. In most cases it will be called “setup.exe” or “install.exe”, but other program files with the “.exe” extension are also possible. Again, simply double-click these installer programs to install the hardware driver update. An installation wizard will guide you through the driver install process.
In the example below the “.exe” file is called “DPInst64.exe”.
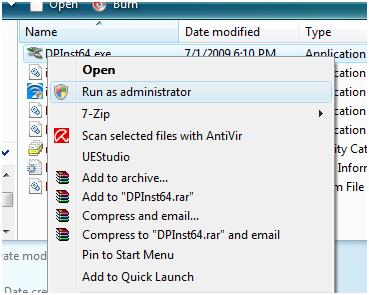
Note: Make sure that you are logged in with Administrative rights when you want to install a driver in Windows Vista or Windows 7. Another option is to right-click the “.exe” file and in the popup menu, select Run as Administrator.
If there is no file with the “.exe” extension in the folder with driver files, you will need to manually install the driver update.
Installing Drivers in Vista and Windows 7
Open the Control Panel from the Windows Start menu. In the Control Panel, select Hardware and Sound. Next, select Device Manager. If the UAC message comes up, click the Continue button.
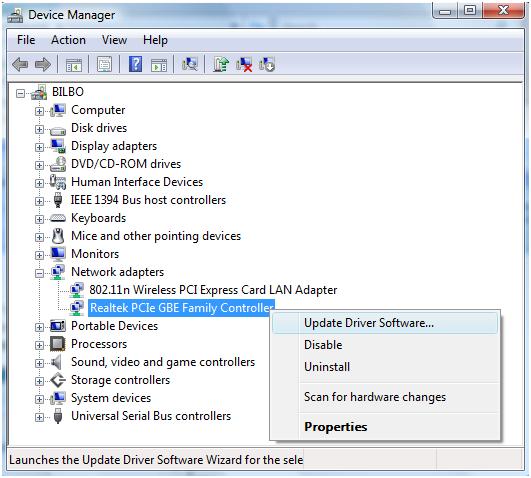
In the Device Manager, select the device for which you want to update the drivers. Right-click the device, and in the popup menu select Update Driver Software.
In the next screen, select Browse my computer for driver software. Click the Browse button, and select the location where you extracted the driver files.
After you selected the driver file location, click the Next button to update the drivers.
Installing Drivers in Windows XP
In Windows XP the steps to install a hardware driver update manually are almost the same, but the screens and selections differ a bit.
In the Start menu, select the Control Panel. Next, select Printers and Other Hardware. Next, select System in the left-hand panel (If you use the classic view, you can click System immediately).
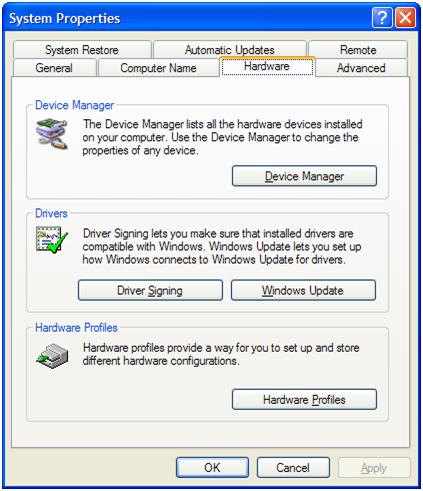
In the System Properties window, select the Hardware tab. Next, click the Device Manager button.
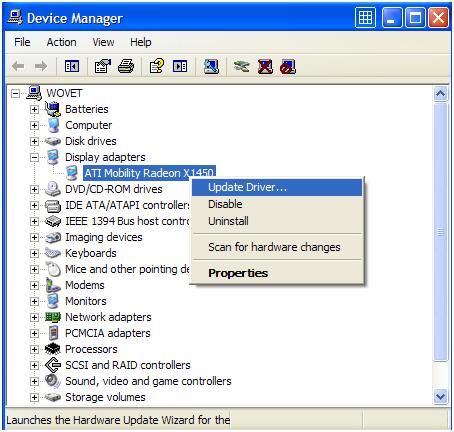
In the Device Manager, select the device for which you want to update the drivers. Right-click the device, and in the popup menu select Update Driver.
In the Hardware Update Wizard, select the option “No, not this time”, and click Next.
In the next screen, select “Install from a list or specific location (Advanced)”, and then click Next again.
Then select “Don’t search, I will choose the driver to install”, and click Next again. Now you need to select the hardware category to which your device belongs, and click Next. If you do not know the category, simply select the default Show All Devices.
In the next screen, select the Have Disk button.
The Hardware Update Wizard will now show an Install From Disk window, where you need to click the Browse button.
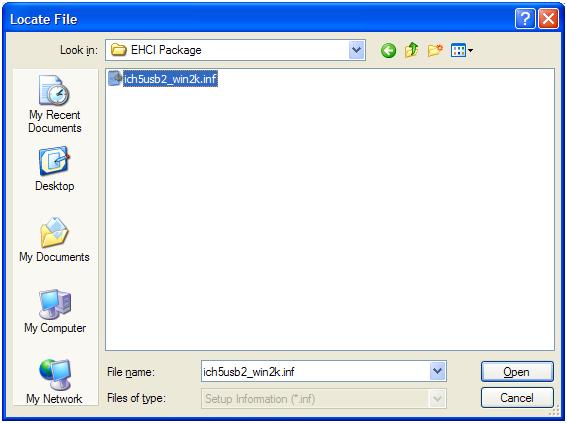
Using the file browser, you will now navigate to the location where you extracted the driver update files. The file browser will look for a file with the “.inf” extension.
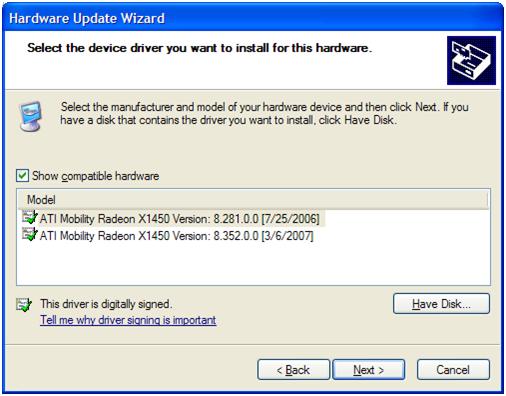
Once you have selected the file with the “.inf” extension, you click the Open button and the click the OK button. Windows will then show you the list of devices supported by the driver update, from which you need to select your device. Then click Next to proceed with the driver installation. When the driver installation is finished, click the Finish button.
- Top 25 Zoom Questions Answered (Beginner Level) - May 25, 2021
- [FREE]: How to Backup and Restore Drivers - May 19, 2021
- Client Highlight: Kieran Holloway - November 5, 2020



Hi
I’m not sure i down loaded all 27 drivers
I clicked on the 1st one which i think was a
965 chip set which had install button next to
it, some of the other 27 had install buttons some
had open buttons, however i didn’t get to depress these
others at all, because i was prompted to restart the
computer and when it restarted…all of your pages
were gone? after rebooting…what can i do to determine
if i have all the new drivers…Paul