driver | DriverFinder - We Make Drivers Work for You - Part 2

How to solve a DRIVER POWER STATE FAILURE Error

Blue screen errors in Windows are notorious. There are different causes, but in general, they are serious errors. When you see a DRIVER POWER STATE FAILURE error on the blue screen, the error is caused by a device driver.

DRIVER_POWER_STATE_FAILURE

Depending on the Windows version, you could also see the stop error code  0x0000009F.

What is a Blue Screen Error?

Blue Screen Of Death (or BSOD in short) errors are caused by stop errors. These are the types of errors that cause the operating system (Windows) to crash. Stop errors causing blue screens have been part of Windows since Windows XP and can happen even on the latest versions.

Since these errors are critical, the blue screen is shown with an indication of the stop error details. A stop error code, which can be a code or description is shown to inform the user. Further processing is halted to prevent damage or data loss if things were to continue processing.

Causes for the DRIVER POWER STATE FAILURE error

The error driver power state failure on Windows 10 indicates that the PC has an inconsistent power state. Typically this happens when the PC changes its power mode. It could be going from sleep (or hibernation) to an active state or the other way around.

When a power transition happens, the hardware in the PC is directly affected. To communicate the power state change, Windows tells the hardware to change accordingly. This is where device drivers come into play. Communication from Windows to the hardware happens through these device drivers.

So, essentially the error is caused by non-expected behavior from a device driver. This can either mean that the hardware itself is causing it, or there is a problem with the driver.

What to do to fix it?

Although it might seem strange, in many cases the problem is not consistent and can be a one-time occurrence. Simply letting the PC reboot might result in Windows restarting without problems.

Considering the severity of the error, however, it is best to find out the cause and try to solve the issue. Device drivers operate at a high-security level in the operating system. This is why Windows will not keep running, but stops and shows the error.

Troubleshooting the Driver Power State Failure error

To see which driver, and as a result, which hardware device, has caused the error we need to find more details.

The most automated, hands-off approach is to use the Windows Troubleshooter. It is available in the latest Windows versions, and can be started from the Settings. Microsoft is also recommenind the GetHelp app to automatically find solutions to Windows problems.

To find more information on the cause of the driver power state failure manually, you can use the Event viewer and something called a minidump.

When a stop error occurs, Windows creates a log file called a minidump. These files are stored in a folder called Minidump in the system root (typically C:\Windows\Minidump). The minidump filename will contain the date and have a file extension .dmp. If no such file is created, check the configuration for creating minidumps.

These mindump (or crash dump) files when generated as a result of the DRIVER POWER STATE FAILURE error will often contain the filename causing the error, which in turn can help pinpoint the driver.

Reading and analyzing a minidump file is a rather technical process. Luckily, tools are available that can read minidump files and show the result in a more user-friendly way. Try BlueScreenView or WhoCrashed.

WhoCrashed minidump analysis

Fixing the DRIVER POWER STATE FAILURE error

Once you know which driver caused the error, you can take action. To identify the driver in a minidump file, look for the .SYS file extension. A few examples:

BTHUSB.SYSBluetooth device
NVRAID.SYSNVIDIA nForce RAID Device
RTWLANE.SYSRealtek Wireless LAN 802.11 PCI-E Adapter
IntcSST.SYSIntel® Smart Sound Technology
HIDIR.SYSInfrared HID Device

In most cases the .SYS file name will be a good indication of the device name to look for in the Device Manager. If it is not clear, simply do an online search for the file name to identify the device.

The first step is to roll back the driver for that device using the Device Manager. This will undo the most recent update of the driver and bring back the previous (hopefully stable) version.

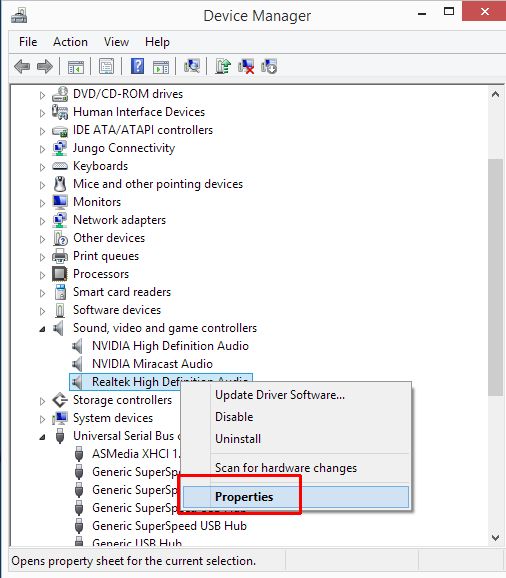
  1. Open the Device Manager.
  2. Locate the device that caused the stop error.
  3. Right-click the device, and in the popup menu click Properties.
    Device Driver Properties
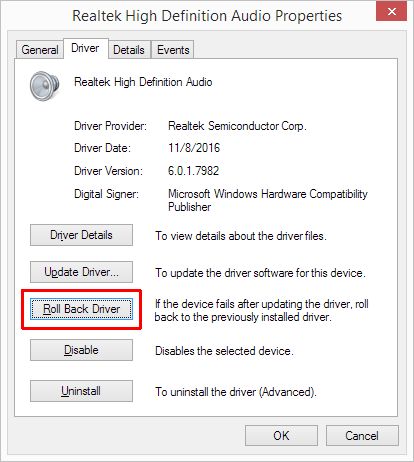
  4. In the device properties window, select the Driver tab.
  5. Click the Roll Back Driver button.
    Roll Back Driver
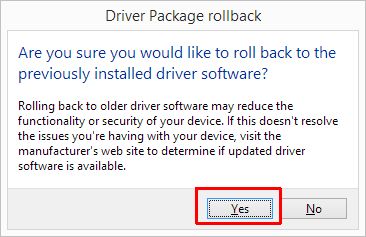
  6. Click the Yes button to confirm the driver rollback.
    Roll Back Driver Confirm

If there is no option to roll back the driver, that means the original driver is installed. The option in that case, is to update the driver for the device to a newer version. Driver updates are released to fix know issues and make sure the driver is compatible with the latest Windows version. So, installing an updated version of the driver can also help solve the DRIVER POWER STATE FAILURE error.

Driver not known

If the minidump did not provide the name of the driver or device that caused the stop error, you need a different approach to solving the issue.

The first step is to roll back drivers for any new devices, or updated driver versions.

For updating drivers, in addition to Windows Update, you can use DriverFinder. The program will automatically find the latest versions of device drivers for all hardware devices present in your system.

If rolling back and updating does not fix the problem, here are two more suggestions to fix stop errors in general.

  • Run a Windows check for missing or corrupt Windows components using Deployment Image Servicing (DSIM).
    Open a Command Prompt window with administrative privileges, and then type: DSIM /online /cleanup-image /restorehealth and press Enter.
  • Run a system scan to fix any Windows system file issues.
    For this, again you need to open a Command Prompt window with administrative privileges, and type: SFC /scannow at the prompt. Wait for the command to finish after pressing Enter.
    sfc scannow

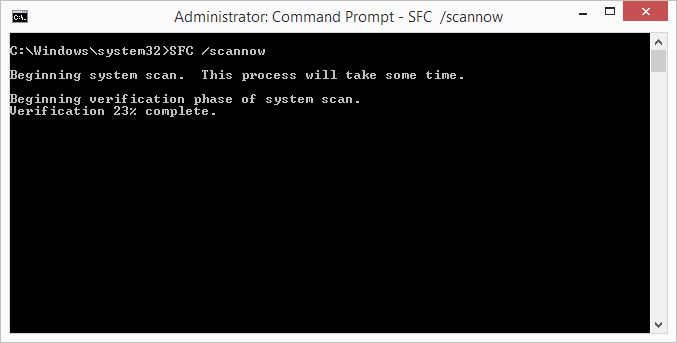
It is suggested to run these commands in this sequence since the DSIM service is a more recent option with better results for the latest Windows versions. Please note that you will need an active Internet connection for the first command. For Windows versions older than Windows 10, you will first need to install the Windows Assessment and Deployment Kit.

Note: Both commands can take some time to complete.

Disable power saving altogether

In general, disabling the power saving is not the desired option, but it can actually be used to solve the DRIVER POWER STATE FAILURE error. By disabling all power-saving options, no power changes take place, and as a result, devices do not cause this error.

You can use the Control Panel in Windows to change the power settings.

  1. Open the Control Panel by pressing the Windows + R keys and typing “control panel” in the Run box. Press Enter to confirm.
  2. In the Control Panel click the option Power Options.
    Note: You may need to change the View by option from Category to Large icons or Small icons.
    Control Panel Power Options
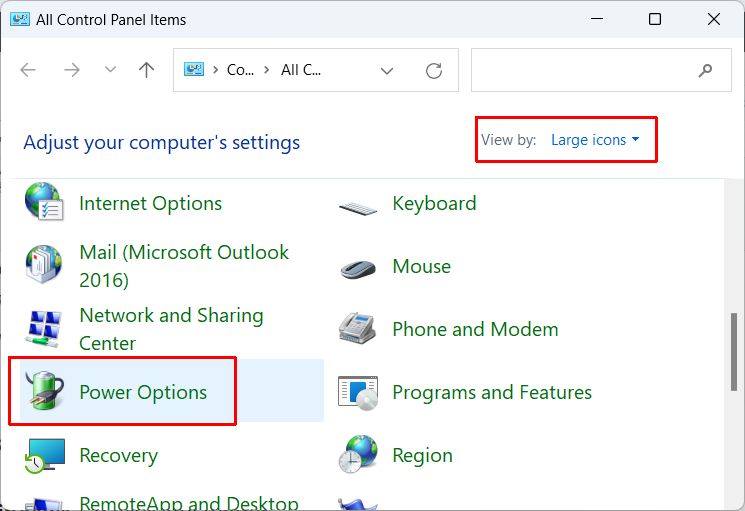
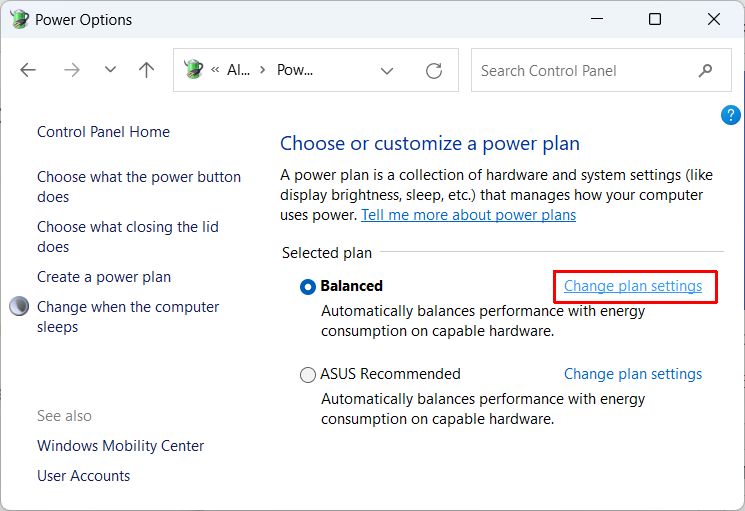
  3. In the power plan selection pick either Balanced or High performance.
  4. Next, click the Change plan settings link for the selected option.
    Change power plan settings
  5. In the Edit Plan Settings window, change the time for the options Turn off the display and Put the computer to sleep to Never.
    Keep display on and no sleep mode
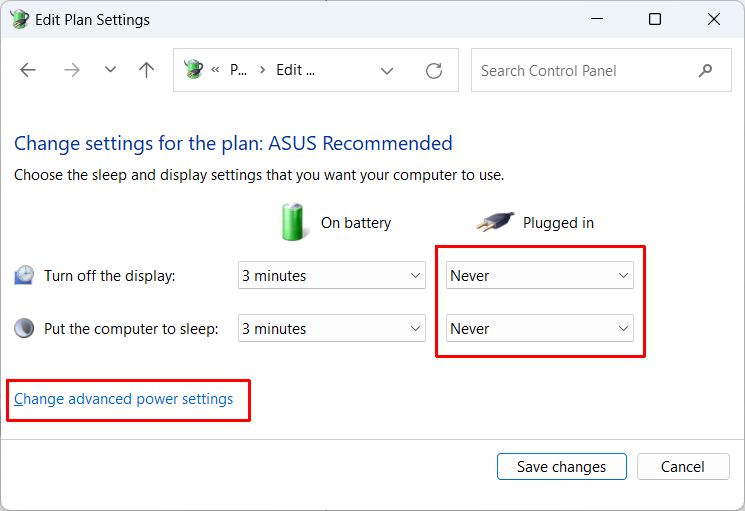
    Note: The On battery options will only show for laptops and portable devices.
  6. Next, click the link Change advanced power settings.
  7. In the Power Options window, open up the PCI Express category, click the Link State Power Management and select the option Off to disable it.
    disable link state power management
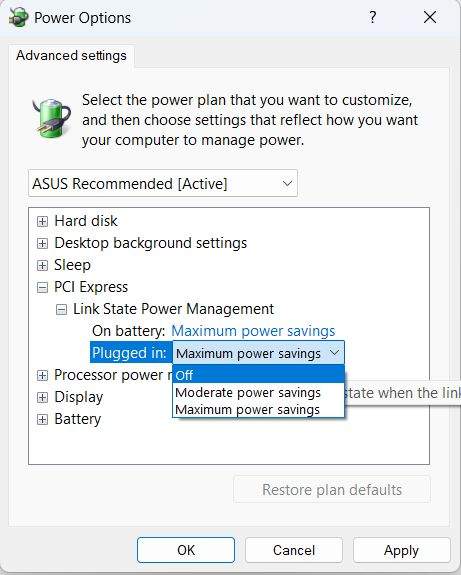
  8. If there is a USB or Wireless category, also disable power management in those, or set it to maximum performance.
  9. Click OK to close the Power Options window.
  10. Click Save changes to close the Edit Plan Settings window and update the changed settings.

Keep in mind that this is more of a workaround than an actual solution. Even if you can prevent the error from happening, the core cause of the error is still unaddressed. It is best to still pinpoint the device or driver causing the issue and fix that, so the power management can be enabled again.

Windows will not start

If the DRIVER POWER STATE FAILURE error is happening consistently, Windows might not start, or run long enough for you to take action. In that case, there are a few things to try:

  • Unplug external devices. The error is often caused by USB devices, so disconnecting external storage devices is essential in this case.
    After this, you can try starting Windows normally, and if that still does not work, try the next step.
  • Start Windows in Safe Mode.
    Safe Mode is a Windows state where not all device drivers are loaded. This way you will be able to make changes that are not otherwise possible.
  • Use a System Restore point to bring Windows back to a previous state.
    If System Restore is active, driver updates are generally proceeded by Windows creating a system restore point. So, reverting to a previous system restore point is similar to a driver rollback.
  • Reinstall Windows. Not something anybody wants, but as a last resort, this has to be mentioned. Reinstalling Windows will ensure that all drivers are original versions and device configuration is reset. Make sure to make a backup of your data first!

Once you have Windows running again, you can roll back any new drivers as mentioned earlier, or update drivers depending on their version.

How to Install a Synaptics Touchpad Driver

Most touchpads on laptops and notebooks are using a Synaptics device. For the touchpad to work, Windows will need a Synaptics touchpad driver to be installed. The driver ensures the touchpad is recognized as a pointing device, replacing the need for an external mouse.

But even if you prefer an external mouse, it is good to have the touchpad working so that you have a working pointing device in case you forget the mouse. And don’t forget about all the extra features modern touchpads offer (e.g. multi-finger gestures, area taps, etc.).

Install a Driver Using the Device Manager

Depending on the Windows version you’re using, support for many devices is included. As such, it’s possible to use the Windows Device Manager to install the Synaptics touchpad driver.

It is not guaranteed that the driver will be the latest version from the manufacturer, nor may it offer all features. However, in many cases, a working pointing device can be achieved using the Windows Device Manager.

For Windows 10:

  1. Right-click the Start button.
  2. In the popup menu that appears, click Device Manager.
    Windows 10 Start Menu
  3. In Device Manager, locate the entry called “Mice and other pointing devices”, and then click to expand that category.
  4. The Synaptics pointing device should be listed here as something called “Synaptics SMBus Touchpad”.
    Note: If the Synaptics SMBus Touchpad is not listed in this category, check if a category called Other devices exists, and then open that (1). The device will be listed there with a different name, most likely as Unknown device. Just click that and then follow the next steps.
  5. Right-click the device and then click Update driver (2).
    Synaptics Touchpad Driver
  6. Next, select the option to Search automatically for drivers.
    Search for drivers automatically
  7. Wait for Windows to search for the driver and install it.
    Note: If the driver fails to install, you may need to download the driver from the PC manufacturer’s support site.

Enabling the Synaptics Touchpad Driver

If no device is shown in the Device Manager at all, make sure you haven’t disabled the touchpad on your laptop.

Some laptop manufacturers have incorporated special function keys to disable and enable the touchpad (Asus laptops use Fn + F9 or Fn + F6, Dell uses Fn + F3, Lenovo uses F6, etc. – see your laptop manual for details).

Check if the touchpad is enabled in Windows 10, by using the Windows search bar and then typing “touchpad settings”. Click Touchpad settings under the best match results, and make sure that Touchpad (1) is set to On.

Windows 10 Touchpad Settings

In addition, check whether the setting for ‘Leave touchpad on when a mouse is connected‘ (2) is enabled or disabled. If it is disabled, and an external mouse is connected, the touchpad will also be disabled.

You may also use the Settings -> Bluetooth & devices (1)-> Touchpad (2) option directly to access the touchpad settings. This will also allow you to directly enable or disable the Touchpad (3).

How to Manually Install a Synaptics Touchpad Driver from the Manufacturer

To manually install a Synaptics touchpad driver, you first need to download the driver installer from the laptop manufacturer. Using the specific touchpad driver from the manufacturer will guarantee that all functionality is available. Manufacturers often offer features beyond the standard Synaptics touchpad driver, even though it is not always the latest version of the Synaptics driver. This may include support for tap functions or the multi-finger gestures options.

  1. Locate the support website for your laptop brand.
  2. Look up the laptop model.
  3. Download the touchpad driver.
  4. After downloading, run the driver installer and follow the on-screen instructions.

Here are some of the more common support sites for laptop manufacturers:

Lenovo  (For the Synaptics UltraNav Driver for Windows)
Hewlett Packard (HP)
Asus
Toshiba
Samsung

How to Automatically Install a Synaptics Touchpad Driver

If you’re not sure about the exact brand and model of your laptop, or you find manually installing a touchpad driver tedious, you can use DriverFinder to automatically locate the driver for you.

The DriverFinder program scans your laptop for all hardware devices that are present. Using its own device driver database, it locates the appropriate driver for the devices. This includes Synaptics touchpad drivers.

Note: Drivers in the DriverFinder database are sourced DIRECTLY from hardware manufactures so rest assured that the right driver update is recommended.

  1. Download the DriverFinder program.
  2. Get a license and Activate the program.
  3. Run a Scan using the program.
  4. Click the Update button next to the device in the scan results.
    Synaptics Touchpad driver Windows 10
  5. Wait for the driver to be installed, or follow the on-screen instructions to install the driver.

Another benefit of using DriverFinder is that you can update ALL the drivers for your laptop (including sound drivers, video drivers, etc.), and not just the Synaptics touchpad driver.


Windows PCI Simple Communications Controller Driver

Microsoft Windows uses device drivers to communicate with hardware devices in the computer. One of the important devices in a computer is the PCI simple communications controller. If the PCI simple communications controller driver is not installed, the device will show an error. In addition, it can result in other devices depending on this device failing or not being recognized by Windows.

What is a PCI Simple Communications Controller?

PCI is short for Peripheral Component Interconnect and it is a hardware bus that is used to connect hardware devices to a computer. The bus is inside the computer, on the motherboard, so you will not see it, like a printer or mouse. But it is a critical component to enable communication between the CPU and hardware devices. The PCI simple communications controller is a controller chip that is part of the motherboard chipset. The device manufacturer is Intel.

PCI Simple Communications Controller Driver Errors

If the right driver for the PCI simple communications controller is not installed, this will be visible in the Device Manager in Windows. The device will show an error or warning.

PCI Simple Communications Controller Error

The device will be shown in the Other devices category instead of the System devices category. When you right-click the device and check the Properties, the error will often show “The drivers for this device are not installed. (Code 28)”.

Apart from this, other devices might not be recognized and show up as Unknown devices in the Other devices category as well.

Device Manager unknown devices

Once the right driver for the PCI simple communications controller is installed, the other devices can be recognized by Windows as well and drivers for them can also be installed.

Download PCI Simple Communications Controller Driver

Solving the problem with the PCI simple communications controller is a matter of installing the right driver. The driver needed is the Intel Management Engine driver, which is a chipset driver.

  1. To download the driver from the Intel support website, make sure you have a working Internet connection and visit the Intel download page.
  2. In the search box, type “management engine driver” and then click the appropriate entry for your Windows version in the result list.
    Intel management  engine driver
  3. In the next page, select the driver that is right for your Windows version and click the link.
  4. This will bring up the download page. Click the Download button to download the ZIP file to your computer. After agreeing to the Intel Software License Agreement, the download will start.
  5. Unzip the downloaded file to extract the driver files.
    Navigate into the extracted folder (ME_SW_2216.16.0.2805 in this example) and then into the subfolder named ME_SE_DCH.
    Install Intel MEI
drivers
  6. Install the drivers by executing the SetupME.exe file.

Once installed, restart your computer for the changes to take effect. Any devices depending on the PCI Simple Communications Controller should now also be recognized and their drivers installed.

Update the Driver from the Device Manager

Instead of manually downloading and installing the drivers for devices like the PCS Simple Communications Controller, you can also use the Device Manager to update the driver. Especially in later Windows versions, many drivers are automatically installed.

  1. Open the Device Manager from the Start menu, or type devmgmt.msc in the Run box after pressing the Windows + R keys.
  2. In the Device Manager, open the Other devices category.
  3. Right-click the PCI Simple Communications Controller, and in the popup menu click Update driver (or Update Driver Software depending on your Windows version).
    Update PCI driver from device manager
  4. Choose the option to let Windows Search automatically for drivers (or Search automatically for updated driver software, again, depending on the Windows version).
  5. Wait for the driver to be installed and then click Close to finish the driver update.

After this, reboot your PC to have the changes take effect and let Windows find any other hardware devices that may now be detected.

If the automatic update fails, make sure you have an active Internet connection. If that is the case, the other option is to choose the option Browse my computer for drivers in step 4 and select the path where you manually downloaded the latest driver for the device.

For finding the right drivers for your computer system, we recommend you use the DriverFinder utility. It scans your hardware devices and allows you to download the latest drivers for all devices.

Install a Driver in Windows Compatibility Mode

When drivers are being installed, it’s important that they MATCH the Windows operating system (OS) that is installed on the PC. However, when Microsoft releases a new OS (e.g., Windows 11), it’s impossible for ALL hardware manufacturers to simply comply and have new drivers immediately for the new OS.

To solve this issue – and to prevent your devices from simply stopping functioning when you upgrade to a new Windows OS – Microsoft has the Windows Compatibility Mode feature. It can be used to execute programs, including driver installation programs, in a mode that is compatible with an older version of Windows.

Here is how to use the Windows Compatibility Mode to run a driver installer:

  1. Right-click the driver installer file for the driver you want to install and then select Properties in the popup menu.
  2. Select the Compatibility tab.
  3. Under Compatibility Mode, select the checkbox named Run this program in compatibility mode for:
  4. Click the down arrow and select the Windows version of the driver.

    Tip: If needed, you can also select the option to Run this program as an administrator. Many driver installers require this option if the user account does not have administrative privileges.
  5. Click OK.
  6. Install the driver by double-clicking the driver installation file to execute it.

If you are not sure which version of Windows the driver is compatible with, you can also use the option to let Windows check it. In that case, click the Run compatibility troubleshooter button in the properties window.

Windows Compatibility Troubleshooter

After this, Windows will analyze the driver installer file and try to determine the best compatibility mode.

You can then click Try the recommended settings or click Troubleshoot program. The first option will run the driver installer with the suggested settings. In the second option, a wizard will ask you for details about the program execution to try and solve the issues.

Windows compatibility-troubleshooter wizard

Answer the questions as best as you can, and click Next.

In the end, click the Test program button to execute the driver installer with the new settings to see if it works.

If it does, great! If not, you can choose different settings, or report the problem to Microsoft.

Windows compatibility troubleshooter result
Copyright 2009 and Beyond - DriverFinderPro.com - All Rights Reserved