error | DriverFinder - We Make Drivers Work for You

A driver cannot load on this device ene.sys

When you are updating Windows 11 to the latest version, you might see an error pertaining to the file called ENE.SYS. The error indicates that the device driver cannot load. This problem is a result of the security settings in Windows 11 in combination with an older version of the ene.sys file.

A driver cannot load on this device ene.sys

What is ene.sys?

The ene.sys file is a driver file. Like other .sys files on Windows systems, it is a device driver that enables the communication between Windows and a hardware device. The ene.sys file is part of a system called MSI Mystic Light, which controls lights in a PC. This is typically used in gaming systems and is used by MSI for their gaming systems.

Mystic Light is installed as part of the MSI Dragon Center or MSI Center.

There are a few methods to solve the error related to the ene.sys file not loading. Below you will find the details on these options with instructions on how to execute them.

Option 1 – disable the memory integrity check

To enhance security Windows 11 has an option called core isolation. You can read all about it on the Microsoft website, but in short, it is a memory security feature that helps prevent critical components from being affected by malware or crashing the system.

Disabling this feature can solve the loading problem with the ene.sys file since the driver will be allowed to load afterwards.

To disable the core isolation (memory access protection) in Windows 11, follow these steps:

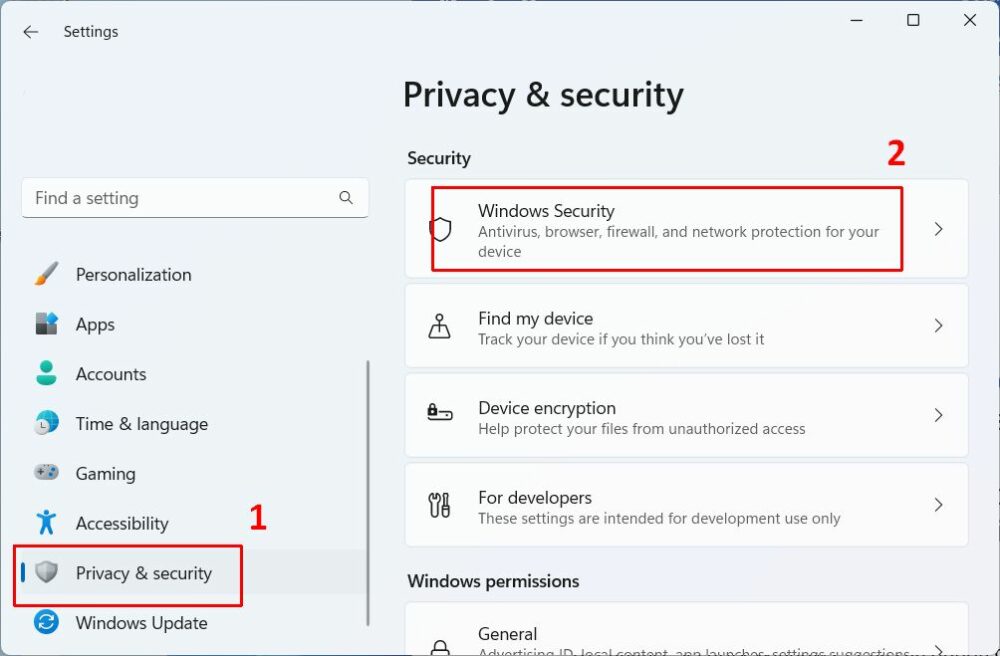
  1. Open the Windows 11 Settings from the Start menu.
  2. In the Settings window, click Privacy & security option in the left-hand pane (1).
  3. Next, click Windows Security in the right-hand pane (2).
    Windows 11 Security Settings
  4. Scroll down in the list of Protection areas until you see Device security and click it. The Windows Security window will open with Device security active.
  5. Now click the Core isolation details link.
  6. Toggle the option Memory integrity to Off.
    Disable Memory Integrity in Windows 11

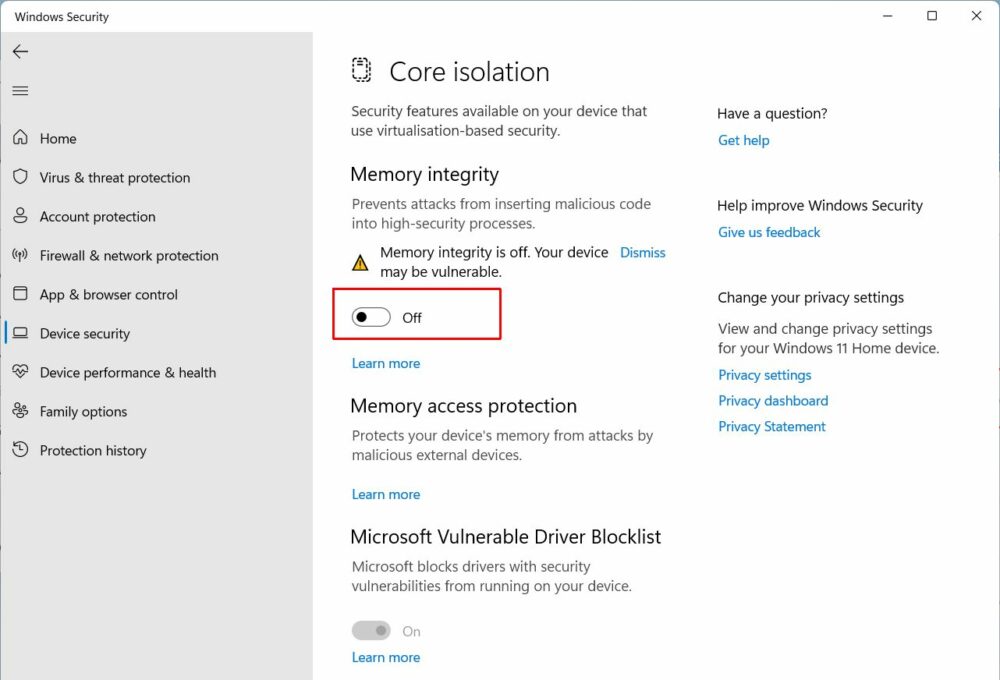
Changing the Memory integrity option to Off will allow incompatible drivers to be loaded. That includes the version of the ene.sys that was shown in the initial error message.

As you will realize, this change will reduce the level of security on your Windows 11 PC. So, it is not the most desired option, but if no newer driver is available, it is the only option to load the driver.

Option 2 – Updating the ene.sys driver file

The better option to deal with the incompatible driver is to install an updated version of the device driver. Installing a later version of the ene.sys file can fix the problem. This will allow the Memory integrity check to be enabled and load the ene.sys driver at the same time.

To update the Mystic Light version for MSI, you use the MSI Gaming Center software. Or for Windows 11, the new MSI Center software. The MSI Center can be downloaded from the MSI website.

After downloading and installing the MSI Center, run it to find the Mystic Light option and click the Update button. If the Mystic Light is not in the Installed list, find it under the Installable items and install it to get the latest version.

Mystic Light in MSI Center

Once the installation of the new Mystic Light version is complete, enable the Memory integrity option in Windows 11 again.

Windows 11 will check the drivers installed on the system for compatibility.

Enable Memory integrity in Windows 11

If all drivers are compatible, the option will be enabled and the Core isolation will function properly.

In case a driver is found not to be compatible, Windows 11 will show a message in the notification area.

Incompatible drivers for core isolation

Click the Review incompatible drivers link in Windows Security to find out which drivers are incompatible.

Non-MSI vendors

What if you never used an MSI hardware product? There are other light control products used by different vendors that use the ENE solution as well. Have a look at Trident Z Lighting Control by G.SKILL, ASUS Aura, Gigabyte RGB Fusion, and NZXT CAM. SignalRGB is a non-vendor solution for RGB sync.

It is important to only install one of these solutions though, as they can use similar software components that interfere with each other’s operation.

In general, we recommend keeping device drivers up to date. Using the latest versions ensures the most recent digital certificates on the driver files and the best compatibility with Windows 11. Use our DriverFinder program if you have trouble finding an updated driver.

Manually remove ene.sys and related files

In case you cannot fix the problem by installing, updating, or uninstalling software related to light sync, you might need to do a manual cleanup of anything related to ENE.SYS.

That means checking the Program Files folders on your system for any ENE subfolders and deleting them. Then search for ENE.SYS and ENE.DLL on the system disk and remove those files as well.

It can even be enough to simply rename the ene.sys file in the Windows driver folder. Just do a file search in the C:\Windows\System32\Drivers or C:\Windows\System32\DriverStore\FileRepository folder for the ene.sys file and rename it to ene.sys.old or something similar. You will need administrator access level for this.

The last step is to search for ENE in the Windows Registry and remove any entries related to the driver. Make sure to make a backup of the Registry first by using the Export option in the Registry Editor! Adter creating a backup, use the Edit -> Find menu option to search for any ene.sys entries and remove them.

Search ene.sys in Windows registry

Note: Make sure to repeat the search after every occurance found and deleted using the Edit-> Find Next option (F3).

Windows 11 – Direct RGB Support

The best solution to the problem would of course be that there is no need for the ene.sys driver. At the moment there is no direct support for RGB lighting control for gaming in Windows 11. Microsoft seems to be working on this though. In Windows 11 build 25295, lightning controls have been found in the settings that seem to indicate Microsoft is implementing things directly into Windows 11! Original Microsoft specifications for this are from 2018.

How to run a Windows Troubleshooter

The latest Windows versions have the ability to analyze and fix common problems. Microsoft has named this feature the Windows Troubleshooter. In earlier versions of Windows, Microsoft Fix It was available, which is a similar feature. But the Troubleshooter functions in Windows 10 and Windows 11 are more elaborate than this earlier solution.

In many cases, Windows will suggest running a Troubleshooter if a problem is encountered. The Troubleshooter can then be invoked automatically, or by clicking a link or button to confirm executing the problem analysis. The Troubleshooters in Windows can be executed for different categories, either device (hardware) or software related.

But it is good to know that you can also manually execute a Troubleshooter in case it is needed. Be prepared that not all problems can be fixed using a Windows Troubleshooter. Only common problems, known errors, and configuration problems can sometimes be solved. Typical steps executed by the troubleshooters are resetting configuration data and restarting services.

Windows 10

  1. Open the Settings window from the Start menu.
    Open Settings in Windows 10
  2. In the Settings window, click the option Update & Security.
  3. In the left-hand panel, click Troubleshoot (1).
    Windows 10 additional troubleshooters
  4. In the right-hand panel, scroll down until you see the option Additional troubleshooters (2) and click the link.
  5. In the list of Additional troubleshooters, find the type of problem you are trying to fix and click it.
  6. Next, click the Run the troubleshooter button that appears.
    Windows 10 Run troublshooter
  7. A new window will appear that will show Windows is detecting problems. Follow any instructions that appear and click Next each time.
    Note: The instructions and steps will vary for each type of problem and troubleshooter.
  8. When done, click the Close button.
  9. Close the Settings window.

Windows 11

  1. Open the Settings window by pressing the Windows + I keys or from the Start menu.
  2. In the left-hand panel, select System.
  3. In the right-hand panel, scroll down until you see Troubleshoot and click it.
    Windows 11 Settings troublshoot
  4. Next click Other troubleshooters in the right-hand panel.
  5. Scroll down to the Other section and then locate the Troubleshooter you want to execute.
  6. Click the Run button in the selected Troubleshooter.
    Windows 11 other troubleshooters
  7. A new window will show with Windows showing “Detecting problems”.
    Follow the instructions in the window to complete the Troubleshooter. Click the Next button after each required step and click the Close button when done.
    Windows 11 troubleshoot steps
    Exmple of running the trooubleshooter for Playing Audio.
  8. Close the Settings window.

In addition to the incorporated troubleshooters in Windows, a separate troubleshooter can be downloaded for problems related to program installation (and removal). This download is compatible with Windows 7, Windows 8, Windows 8.1, and Windows 10. So, if your problem relates to the installation or removal of a program, try downloading and running this tool.

Tip to Fix Audio Issues

There are some problems the audio troubleshooter may not fix. A common audio problem is dealing with crackling sound, audio stutter, or popping sounds. Often unexplainable, and it can sound like there is a bad connection.

A solution that help solve such issues in Windows is the disabling of the hibernation feature. Of course this is not recommended by Microsoft as it can lead to data loss when a power problem occurs. But if you are not concerned with that and just want the best quality audio, give it a try.

Three Canon Printer Error Problems & Solutions

Canon is one of the most widely used printer brands in the world. From the super-fast inkjet models to the cost efficient all-in-one solutions, their products make sure that you can print out important documents easily and conveniently. Unfortunately, Canon printers are susceptible to problems, as evident when Canon printer error messages began to make their presence known. Many of these codes are specific to the type of Canon printer you own, and here are three of the most common annoyances you are likely to encounter.

1) Power LED Lit Solid Orange
Canon Printer Error

Printer error messages do not always come in the form of numeric code. In fact, the LED on your device can tell you a lot about the problem. According to the manufacturer, the power LED on a Canon printer may be lit orange instead of green when the device needs to be set or requires maintenance. The recommended solution is to first turn off the machine, and then unplug its power cord from the power outlet. Next, wait a moment, and then plug the device in again and turn it back on. In many cases, this will solve the printer error message and if so, the power LED will glow green. However, if the LED remains orange, this particular error may indicate that your Canon printer needs to be repaired. In this case, your best bet would be to contact Canon’s technical support team for further assistance.

2) E27

The E27 printer error message is common on Canon Pixma all-in-one printers. This particular error occurs when the waste ink absorber is full. Your first inclination may be to clean the holder and cartridge itself to remove all excessive ink, dirt and spills. Unfortunately, most people do not have luck with these methods. The best resolution to the problem is to reset the waste ink counter. While this requires several steps and a lot of patience, it usually works on most Pixma models. To clear up this printer error message, follow the steps below:

– Simultaneously press the ON/OFF button and STOP/RESET button on your Canon printer.

– Press the ON/OFF button once and then the “STOP/RESET” button twice to enter the maintenance mode. (You should notice a value of “0″ on your LED indicator).

– Press the “STOP/RESET” button 4 times in order to reset the waste ink counter.

– Turn off your Canon printer.

– Turn the printer back on.

3) Ink is Missing

The “Ink is Missing” printer error message is among the oldest error codes for Canon printers. Oddly enough, this one can show up shortly after installing a fresh ink cartridge. The most common cause is using a generic brand of ink with your printer. You could try removing and then reseating the ink cartridge back in place but most of the time, this only serves as a temporary resolution. Your best bet would be to only install ink cartridges that are manufactured and supported by Canon. This way, you can dramatically reduce the threat of compatibility issues, get better technical support and receive a free replacement if problems should ever occur.

Copyright 2009 and Beyond - DriverFinderPro.com - All Rights Reserved