how to | DriverFinder - We Make Drivers Work for You

How to Fix Problems with a Logitech Webcam in Windows

Logitech webcams have been a popular choice for external webcam solutions on Windows PCs. Not only are the newer models popular, but even the older Logitech c270 webcam and Logitech C920 webcam models are still in use. Particularly with older models, there can be issues with newer Windows versions. Logitech webcam drivers for older models and newer Windows versions are not available.
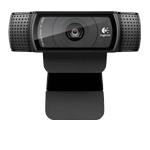
So how do we still get the webcam working? We’ll have a look at the possible solutions to get the Logitech webcam working in Windows.

Hardware

If you are certain your webcam is still in good working order, it is still worth having a look at the setup. Most webcams are connected to a PC using a USB connection. And for the older Logitech webcam models, like the c270 and c920, this is a USB 2.0 connection.

To have the best chance of a working webcam on a Windows PC, make sure to connect the webcam to a USB 2.0 port. Although USB 3.0 and USB 3.1 ports should be compatible, the best guarantee to a working webcam is to use the USB 2.0 port for older webcams.

For modern laptops, this may be a challenge, since they would only have a USB 3 port available, but chances are you would have a built-in webcam anyway.

A second thing to avoid is using a USB hub to connect the webcam to your PC. Although it may work in some cases, if you are having problems, plug the webcam into a USB port that is directly connected to your PC (motherboard). If you do need to use a USB hub, use a USB hub with external power to increase the chance of success.

Similarly, avoid using USB cable extensions. If the webcam cable is too short for your requirement, it is easy to get a USB extension cable to get the required length. This might have worked in the past, but with all electronics using low-power components, the cable length may pose a problem for an error-free connection.

Software

When we are talking about software for webcams there are really only three things: the driver, the recording/viewing software, and the Windows setting. Both can play a role in solving problems with webcams.

Logitech Webcam drivers

Depending on the Windows version, separate drivers for a Logitech webcam may not be required. The latest Windows versions, like Windows 10 and Windows 11, have compatible drivers installed. Most webcams will be plug-and-play.

Download and install Logitech Webcam drivers

For older webcam models or older Windows versions, this will be different. Simply visit the Logitech webcam support website, and choose your model to download and install the required driver.

Logitech Webcam Support site

If you do not see your model, type it in the search box to find the webcam.

In the Logitech webcam details page, select the Download option on the left (1), and then pick the Windows version in the drop-down list (2). Next, you will see the available downloads for your webcam.
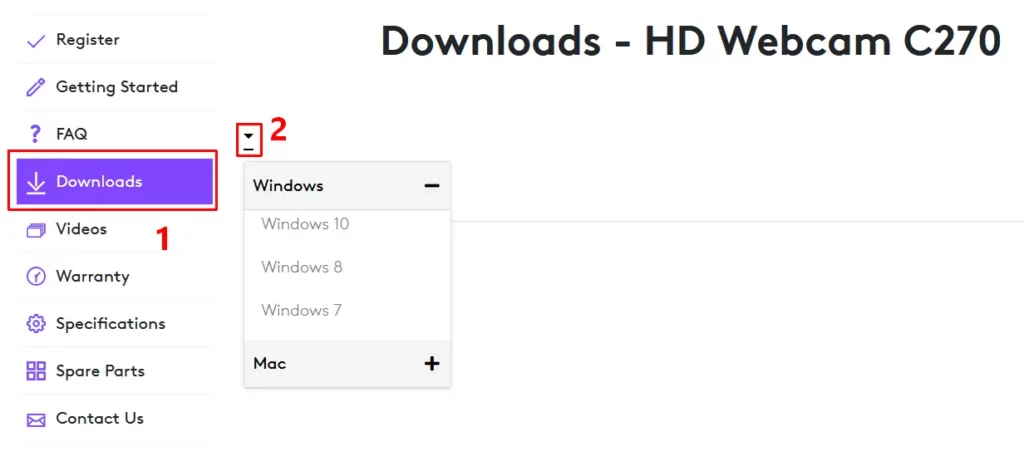
Download Logiech webcam driver

Reinstalling the Webcam device

If the driver is present on your system, and the webcam is still not working, it can help to reinstall the device. For this, we uninstall the device from the Device Manager and then use the Scan for hardware changes in the Action menu to reinstall it. A restart of the PC will also let Windows reinstall the device and the driver.
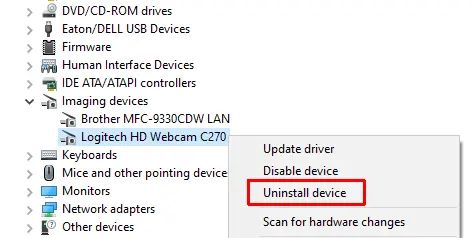
Uninstall Logitech webcam device

Please note that depending on the Windows version, the Logitech webcam will be listed under either the Cameras or Imaging devices category.

Uninstall the driver for the webcam

Most newer Logitech webcams use the standard USB Video Class (UVC) driver. During installation of the device, a copy of the standard driver is made for the webcam to function. To solve problems with the webcam, it can help to uninstall the device and the UVC webcam driver and have Windows reinstall it.

This is similar to the previous step, but in this case, make sure to select the option to uninstall the driver for the device to ensure a fresh copy gets installed and configured when the Webcam is detected again.
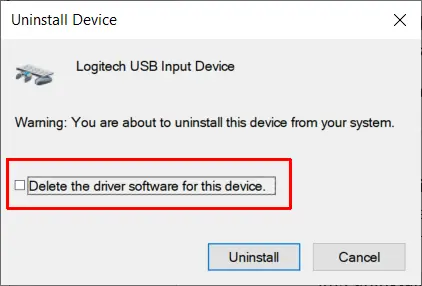
Uninstall Logitech webcam driver

Manually switch to the UVC driver

If the webcam uses a driver that is not working with your Windows version, and the webcam is compatible with the standard USB Video Class, it is possible to manually switch to the UVC driver for the webcam. This can help solve the webcam issue.

  1. In the Device Manager, right-click the webcam device.
  2. Next, click the Update driver option in the popup menu.
  3. Select the Browse my computer for drivers option.
  4. Now click the Let me pick from a list of available drivers on my computer.
  5. In the Model list, select the USB Video Device option and click Next.
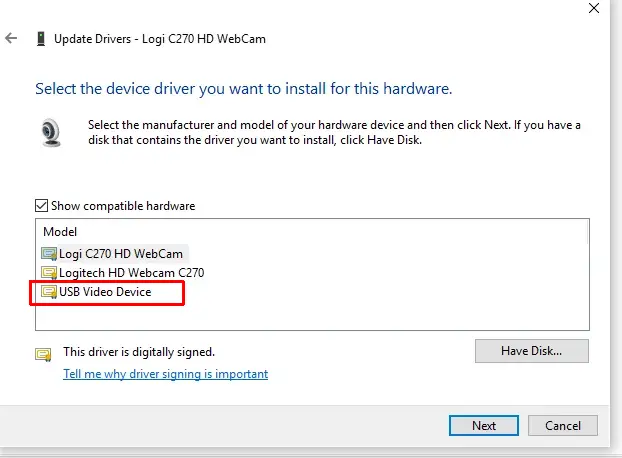
Logitech C270 HD webcam driver

After this, open the camera app or recording software and check if the webcam is working.

Logitech Webcam software

To check the proper functioning of the webcam in Windows, try different software programs. In general, it is best to use programs that are installed with Windows itself to ensure maximum compatibility. In the latest Windows versions, the Microsoft Camera app is the best place to start.

But it is also possible to test with other camera software. For Logitech webcams, the Logitech Capture software is recommended. It is compatible with Windows 7 up to Windows 11 and supports the C92x, BRIO, and StreamCam models. ManyCam and YouCam are other popular programs.

But, of course, you can also use your favorite video chat app to test your webcam. Skype, Teams, and Google Meet, all directly support your webcam if it is working.

Specifically for Logitech webcams though, it is sometimes useful to install additional specific Logitech software to configure and test the webcam. Logitech Camera Settings is a little older program that can be used to configure the specific settings of your Logitech webcam. Logi Tune is the more recent version of the Logitech software to use for Logitech webcams. Both these programs can quickly tell you if the webcam is working and allow control over various webcam display and recording settings.

If nothing works, the last option is to install the older Logitech Webcam Software (LWS). The latest version is 2.8 and can still be downloaded from the Logitech support site. Especially for older Logitech webcam models, this software can provide a solution on the latest Windows versions if nothing else works. You may need to run it in compatibility mode to get it working on Windows 11.
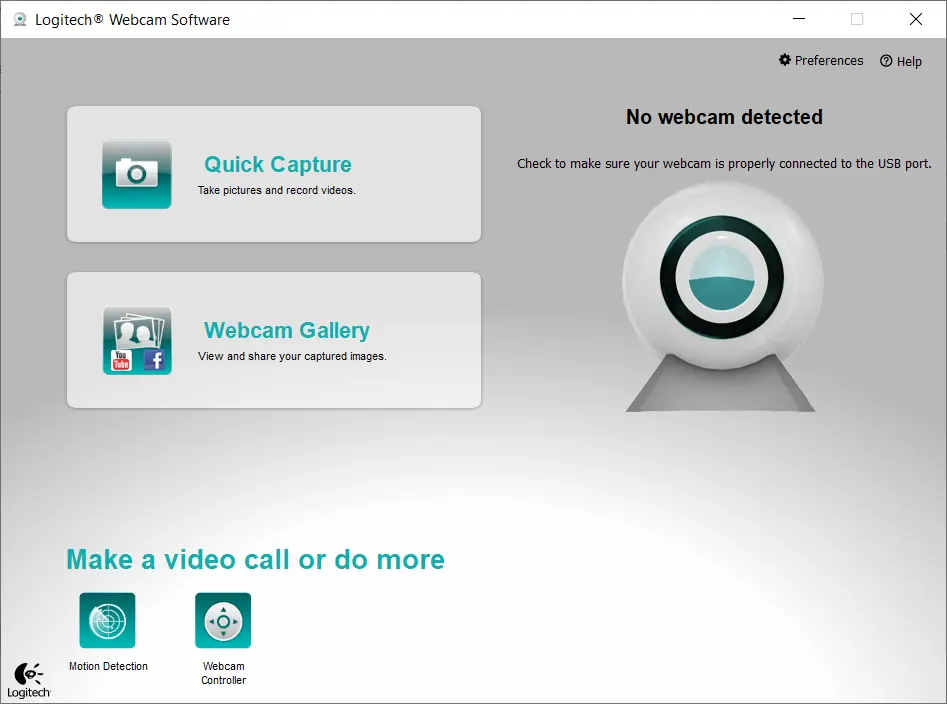
Logitech Webcam Software 2.8

Windows settings

Something that can easily be overlooked when troubleshooting Logitech webcam problems is a setting in Windows. The latest Windows versions have more settings for privacy than earlier versions. That means you need to allow applications to access the camera device.

  • In Windows 10, open the Settings window and go to Privacy.
  • Under Privacy, click Camera.
  • Now make sure the Allow apps to access your camera is enabled.
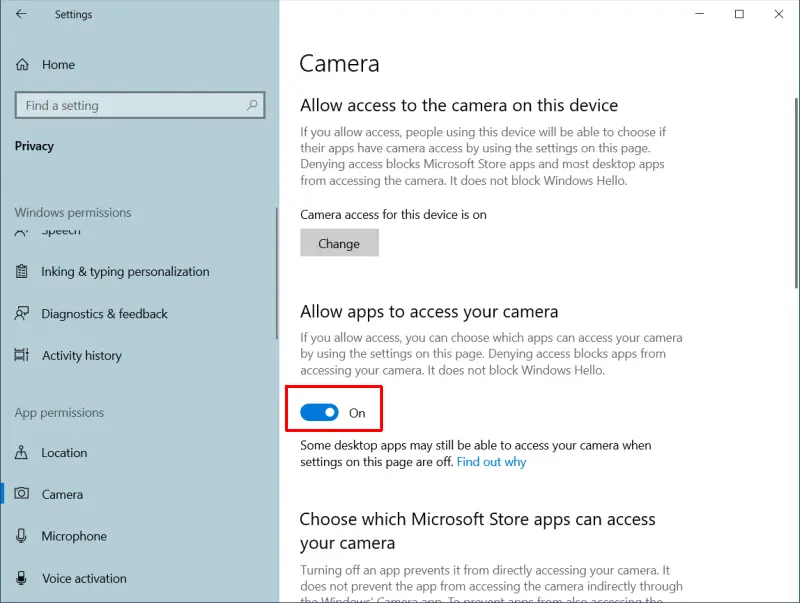
Allow camera access in Windows 10

If you scroll down further, you can even pick which apps on your system can access the camera.
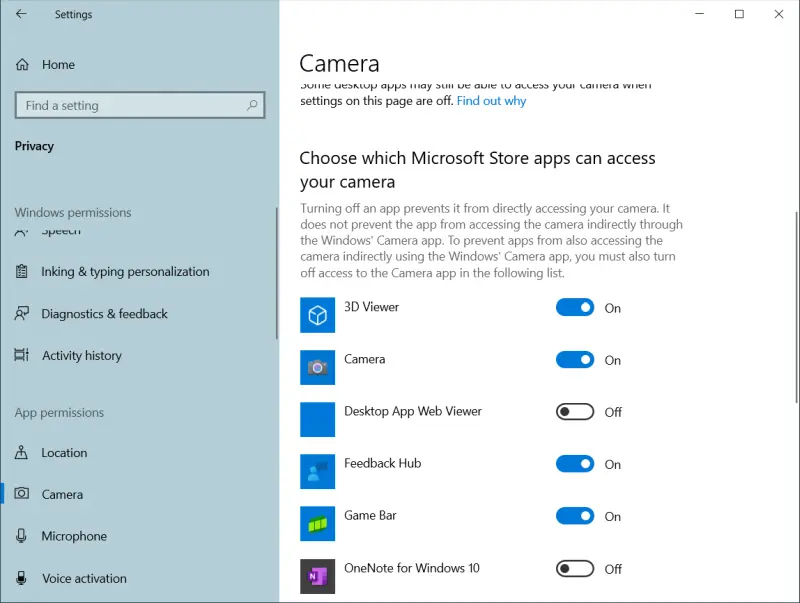
Select apps for camera access in Windows 10

For more tips on fixing webcam issues, check out this article on how to fix webcam problems.

As always, make sure you check for regular driver updates using our DriverFinder application to make sure you have the latest device drivers installed for all your devices!

Windows 7 Drivers

Windows 7 drivers are needed for the hardware in a computer to function. Drivers, or device drivers, enable the operating system to communicate with all devices.

Although many users have upgraded to Windows 10, there are also still a lot of computers that are running Windows 7. According to Statcounter information, over 10% of systems running Windows worldwide is still running Windows 7. Reasons might be personal preference, software compatibility, or hardware restrictions.

Windows 7 included drivers

With the evolution of Windows versions, Microsoft has added support for more hardware with each version of Windows. As a result, Windows 7 supports a lot of hardware directly.

Even if devices are not immediately recognized in Windows 7, it is often possible to get Windows 7 drivers by running Windows Update.

But even after running Windows Update, there still may be unsupported devices in Windows 7. Some devices do not have Microsoft-certified drivers and as a result, are not included in the Microsoft update catalog. Microsoft refers to tested and signed drivers as WHQL drivers. This means Windows Hardware Quality Labs, a set of tests and certification for hardware drivers.

Important to keep in mind with Windows 7 drivers is that Microsoft has stopped adding Windows 7 drivers. So support for newer hardware might be limited if available.

Where to find Windows 7 Drivers

So what if you are left with devices that are not recognized or not working in Windows 7? Where do you find the required drivers?

The first place to look is the support site for the computer brand. Check PC your brand and model at the back or bottom of your PC. In general, there is a label with detailed information.

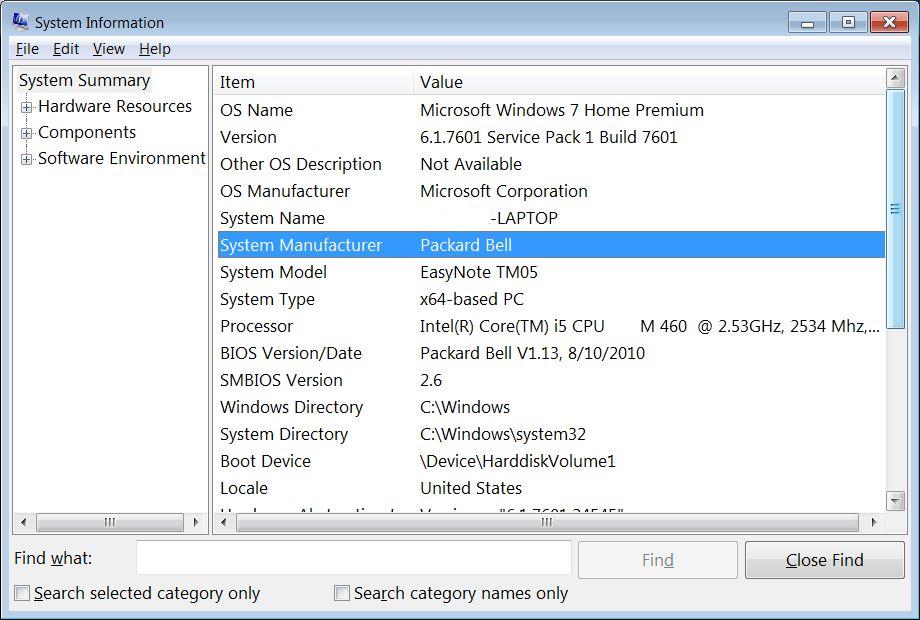
You can also type “msinfo32” at the Run option in the Start menu to get the system details.

Windows 7 System Information

The System Information tool will show the system manufacturer, system model, and architecture (32-bit or 64-bit).

Using this information it is possible to check for Windows 7 drivers on the manufacturer’s website.

If Windows 7 drivers are not available, you can also try Windows Vista drivers, as they are often compatible.

The benefit of this method is that manufacturers offer full installers for the Windows 7 drivers, including any required, or recommended extra software. Although the extra software is not always required, it can offer options to tweak, or enable, device features.

If the PC manufacturer does not offer Windows 7 drivers for your computer, the next step is to check the device manufacturer’s website (e.g. Intel, Realtek, Nvidia). If you know the details for the hardware component, you can check for Windows 7 drivers there.

Cannot find the Windows 7 driver

Still cannot find a driver for Windows 7 for your device? As mentioned before, check if Vista (or even Windows 8) drivers are available. It is possible these work on Windows 7 as well.

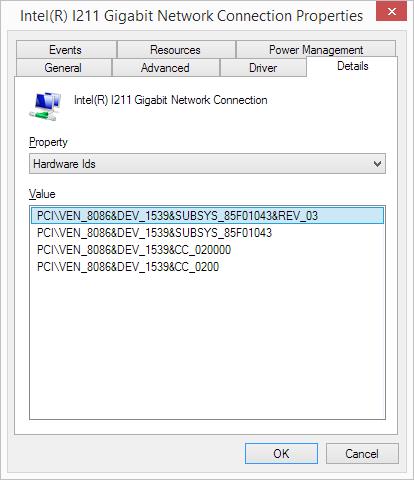
If no drivers are available, the next step is to search for Windows 7 drivers based on the hardware ID (or compatible hardware ID) of the devices. These are unique identifiers for each device.

Use the Device Manager to check the Properties of a device using the Details tab.

Windows 7 Drivers - hardware ID

With this information, you can try and find a driver online. In this case, you are looking for a Windows 7 driver that is not necessarily from the same computer manufacturer. For example, Dell might offer Windows 7 support for a device that is not supported by Lenovo.

Always be careful to only download drivers from reputable sources. There are many sites that include extra software or links in driver downloads.

Use DriverFinder to find Windows 7 drivers

If manual searching for a Windows 7 driver is not giving any results, you can try DriverFinder. DriverFinder is a program that does the searching for you. Using the computer, device, and Windows version information, the program locates drivers for your devices.

The benefit of using DriverFinder is that it uses a proprietary repository of drivers. Driver and device information from Microsoft and most PC and hardware manufacturers is included to find the right driver for your Windows 7 PC.

And unlike many other solutions, DriverFinder provides full installers when available (not stripped down driver with essential files only – INF, SYS, and CAT files).

To try it, download DriverFinder and install the program.

How to Stop Windows 10 Waking Up from Sleep On Its Own

Is Windows 10 waking up from sleep randomly even though you’ve put it in Sleep Mode? I hear you. Like many other people, I often leave my PC on for longer periods of time. When I’m done working, I simply put it in ‘sleep mode’ so I can easily continue where I left off the next day.

Lately, I’ve noticed that my PC ‘comes to life’ on its own even though I put it to sleep. (I know… creepy!) This brought out the geek detective in me so if you’re experiencing this, read on to find out how to stop that from happening.

Windows 10 Waking Up from Sleep Mode — Possible Reasons

There are multiple possible causes why your PC can suddenly wake up from sleep. Although they might seem random, they are actually not.

One of the most common causes is Windows itself.

Windows 10 normally checks for updates or performs scheduled maintenance tasks. To make matters worse, if the task fails, it can keep on trying the task until it succeeds. So your PC will go to sleep and come out of it multiple times!

Another possible cause is you have software installed that is scheduled to perform a task. An example of this is your anti-virus software performing a scan at a specific time.

Another reason is that a hardware device is triggering the PC to wake up. The most common device is the network device, but USB devices can also trigger power mode changes.

So Which One is Causing these Random ‘Wake Ups’

The first thing to do is…  ask Windows itself! The way to do this is to use a command prompt and use the powercfg command.

Here are the steps in detail:

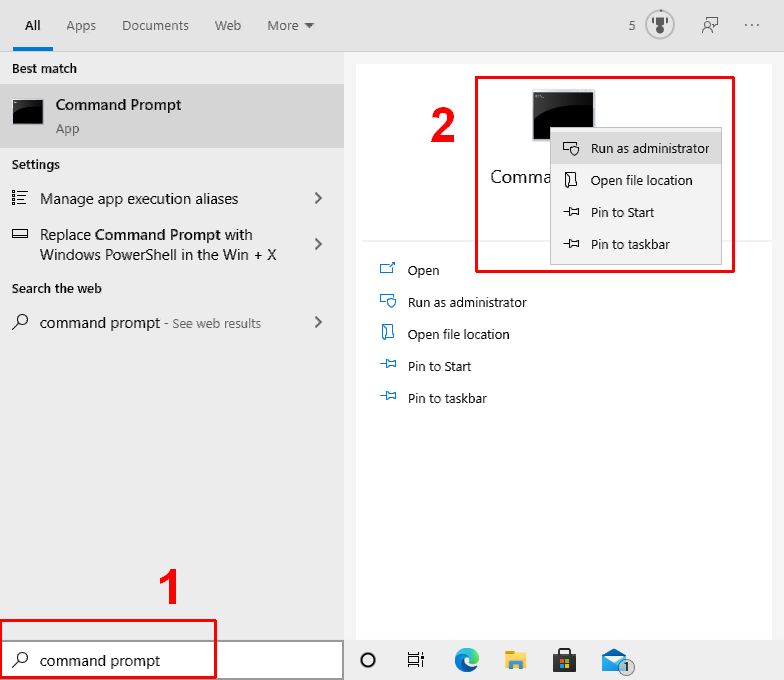
  1. On the Windows search bar, type “command prompt” (without quotes).
  2. In the results that show, right-click Command Prompt.
  3. In the popup menu that appears, click Run as administrator.
    Afministrator Command Prompt
  4. Click the Yes button in the User Account Control dialog box when it shows.
  5. In the Administrator: Command Prompt window, type:
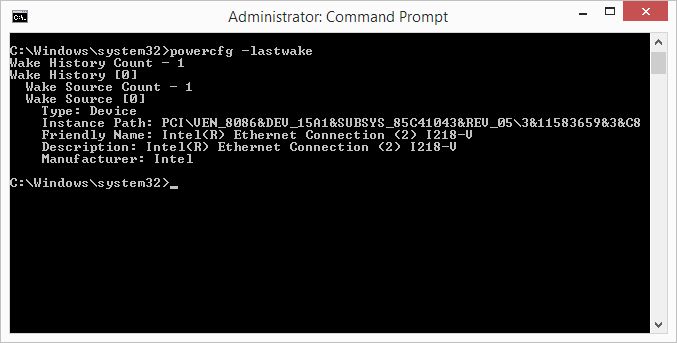
    powercfg –lastwake
    Powercfg -lastwake
  6. In this specific example, you can see that a hardware device woke up the computer. The Intel(R) Ethernet Connection caused the PC to wake up from sleep.

Please note that it’s not always the fault of a hardware device :)  Results of your particular powercfg –lastwake command run may show a specific software or application instead.

To give an example, I had left my email client – MS Outlook – running a few times. Not a problem in itself, but since I had scheduled it to fetch email from a specific email account at regular intervals, it woke up my PC… constantly!

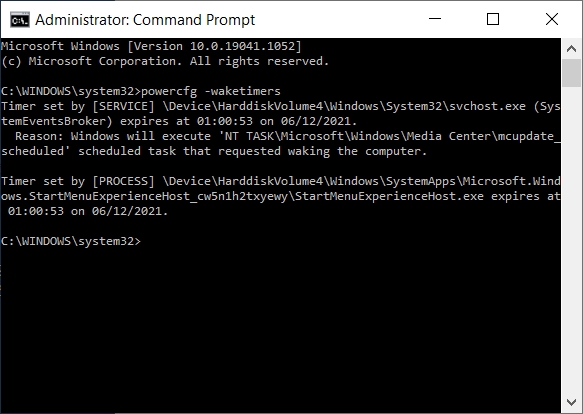
Apart from the –lastwake parameter, you can also use the –waketimers parameter.

Powercfg -waketimers

The powercfg –waketimers command will show all active wake timers. (Below in this article you can find out how to disable the Allow Wake Timers option in Windows 10.) The results of the command will show the current timers that are set on the PC. Details include the type, name, and exxpiration.

Another option to find out the reason for the wake-from-sleep issue is to check the Windows Event Viewer. The Event Viewer is a Windows app that uses a graphical user interface rather than a text based interface (command prompt).

Here are the steps:

  1. On the Windows search box, type “event viewer” (without quotes).
  2. In the search results, click the Event Viewer App.
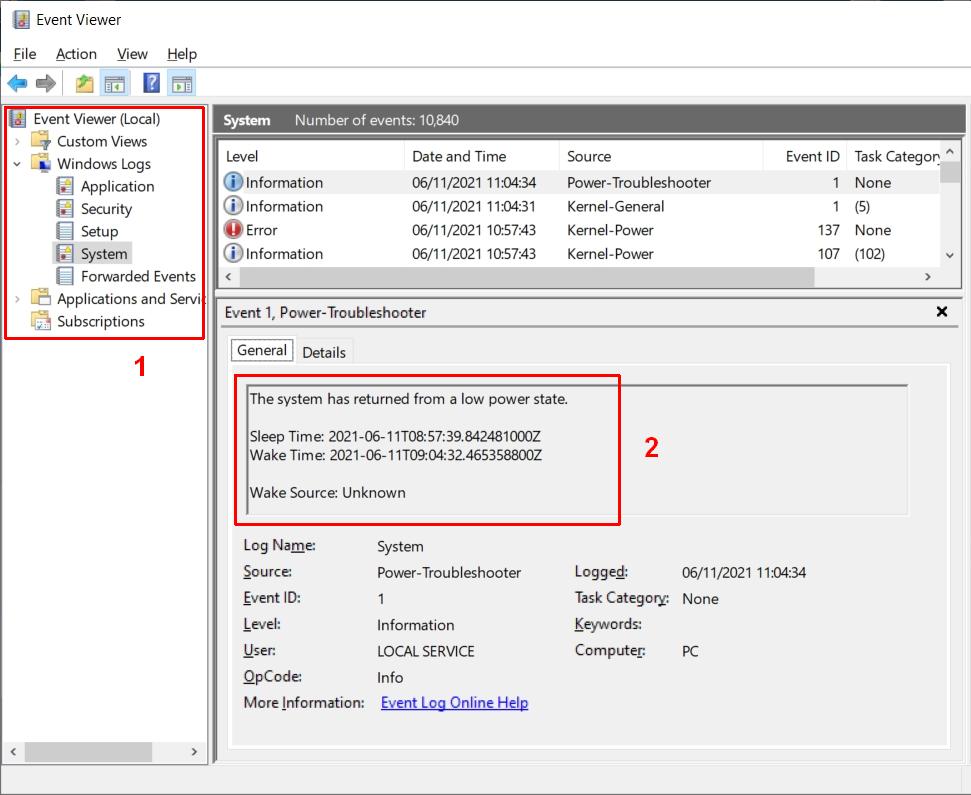
  3. In the Event Viewer window, open Windows Logs, and then click System (1).
    Windows 10 Event Viewer
  4. Under System (right-side of the window), scroll through the event list and look for a Source that includes “Power”.
  5. For the selected event, you can see the explanation in the panel below the event list (2).

In the example screenshot above, the Wake Source is listed as Unknown. Not very helpful, but there will be list entries that do tell you the reason. You can click the Details tab for more information on the event.

How to Stop Windows 10 Waking Up from Sleep On Its Own

Once you know what causes your PC from waking up from sleep, you can take action to prevent it from happening again.

Windows Update

Let’s start with Windows Update since it’s a common cause of the wake-from-sleep behavior. Also, updates do not only wake up your PC from sleep, they can also result in (multiple) reboots.

If you leave your browser, files, and documents open to continue where you left off, you do not want your PC to reboot in the middle of the night (even if you HAVE saved your open work).

Here are the steps to change Windows Update settings:

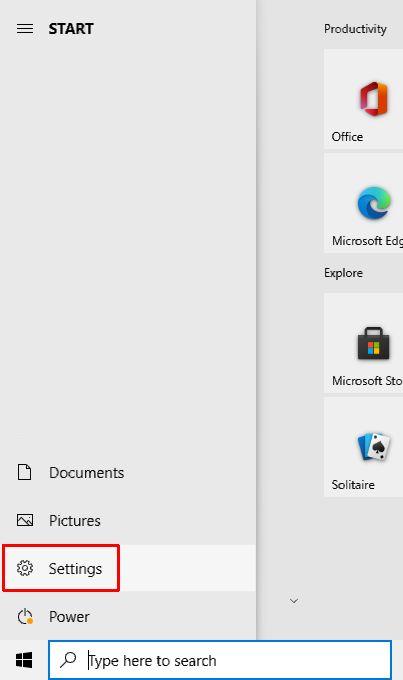
  1. Click the Start menu button, then click Settings.
    Windows 10 Settings
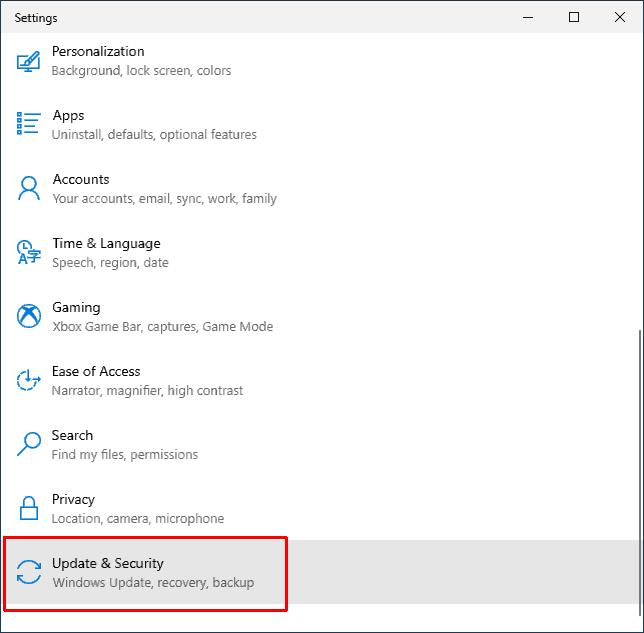
  2. In the Settings window, scroll down and select Update & Security.
    Windows 10 Update & Security
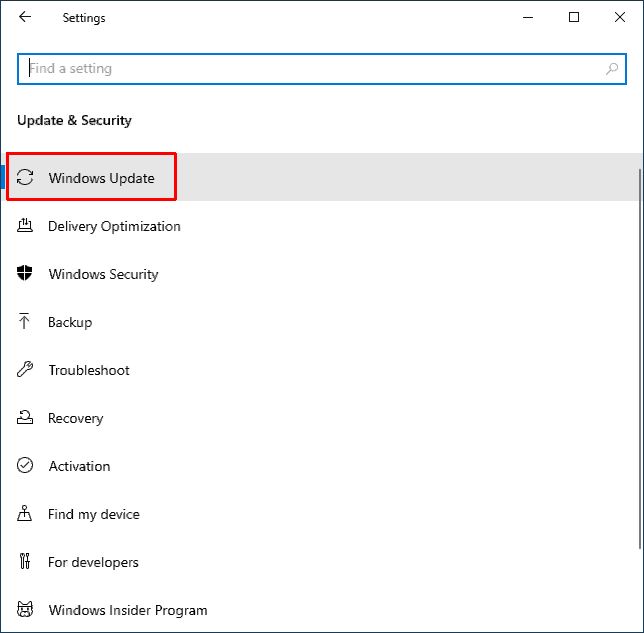
  3. Now click the Windows Update option.
    Windows Update - PC waking up from sleep
  4. Wait for the Windows Update check to complete and for the Windows Update results to show.

There are two things you can do here.

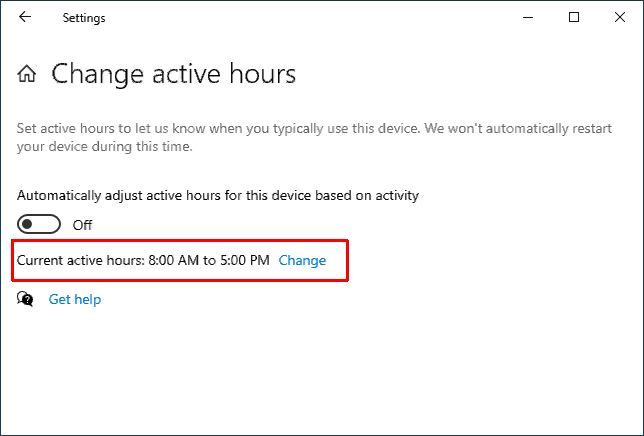
#1. Change your PC ‘active hours’ to suit your situation. This controls when updates and reboots will not take place. So what if we define active hours as all hours of the day? Although that looks like a great way to prevent Windows Update from running, you can only define a maximum period of 18 hours as active hours :(

Windows 10 Active Hours

After all, you can’t be working 24 hours, right?!? Still, an 18-hour limitation gives you a lot of control when updates should not be installed.

#2. Completely pause Windows Updates from happening.

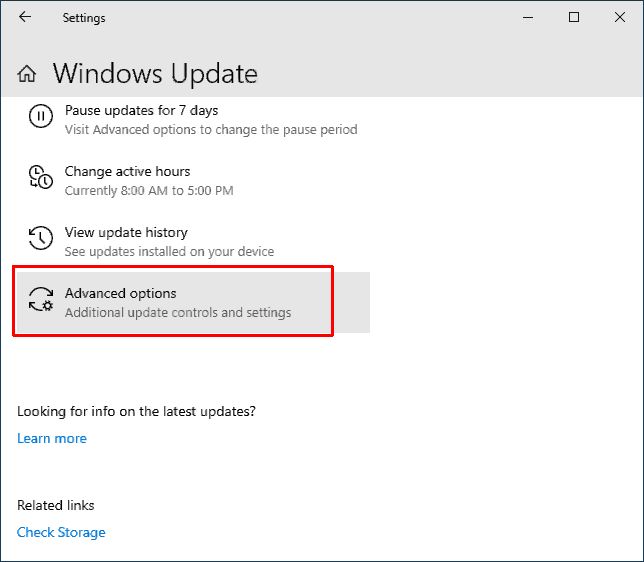
Windows Update Advanced Options

Click the Advanced options in the Windows Update window.


Now you can select a date until which the updates should be paused.

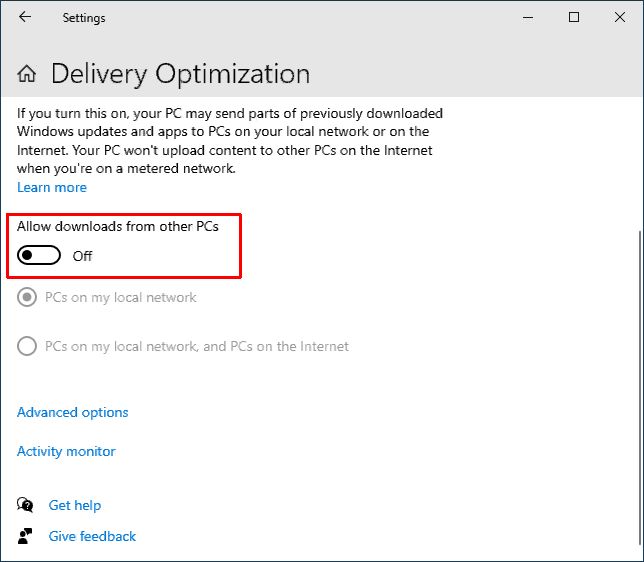
Tip: Since you are already there, you should click the Delivery Optimization option too, and disable the option to Allow downloads from other PCs.

Windows Update Delivery Optimization

Do this for all PCs on your local network, so they won’t wake each other up distributing Windows Updates files to each other.

Disable Scheduled Maintenance

Windows 10 has a few automatic maintenance functions at a scheduled interval. Security, diagnostics, updates, all things that help keep your PC in good shape.

Apart from the ability to schedule when this maintenance is allowed to run, it is also possible to tell it not to wake up the PC.

Here are the steps to prevent scheduled maintenance to wake your PC:

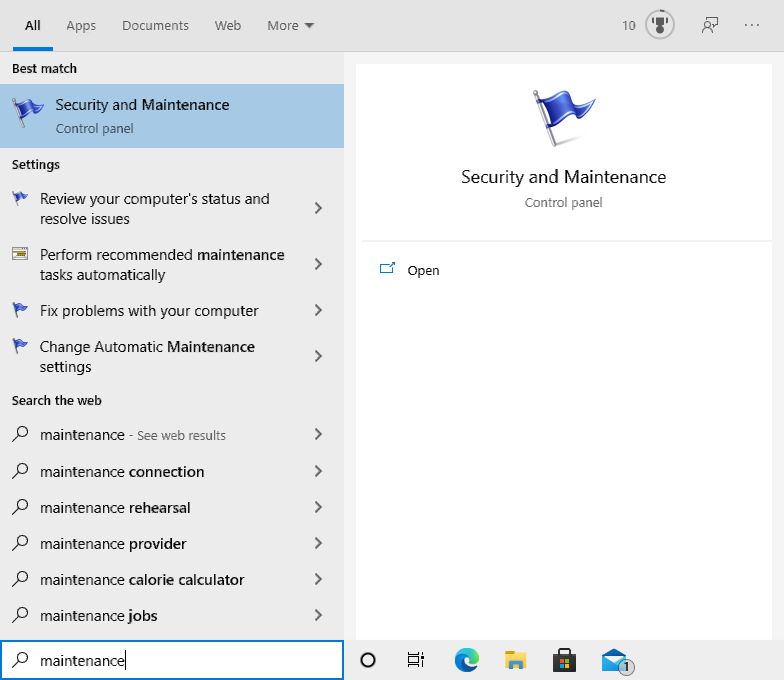
  1. In the Windows search box, type “maintenance” (without quotes).
  2. In the search results, click Security and Maintenance.
    Windows 10 Security and Maintenance
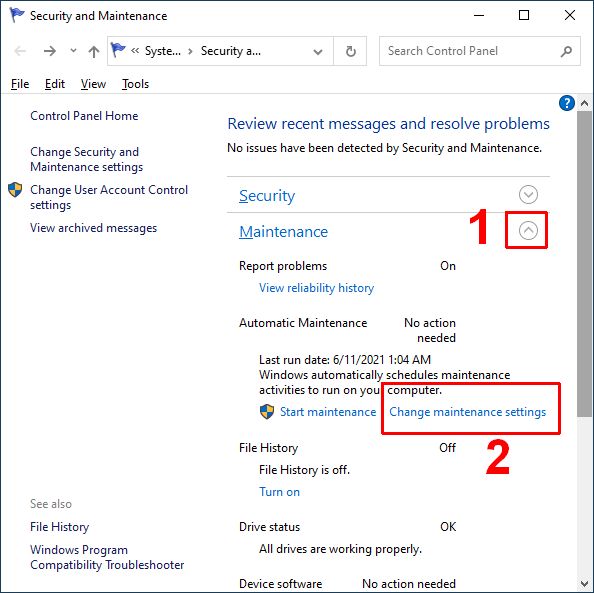
  3. In the Security and Maintenance window that appears, open the Maintenance group (1).
  4. Now click the option Change maintenance settings (2).
    Windows 10 Change Maintenance Settings
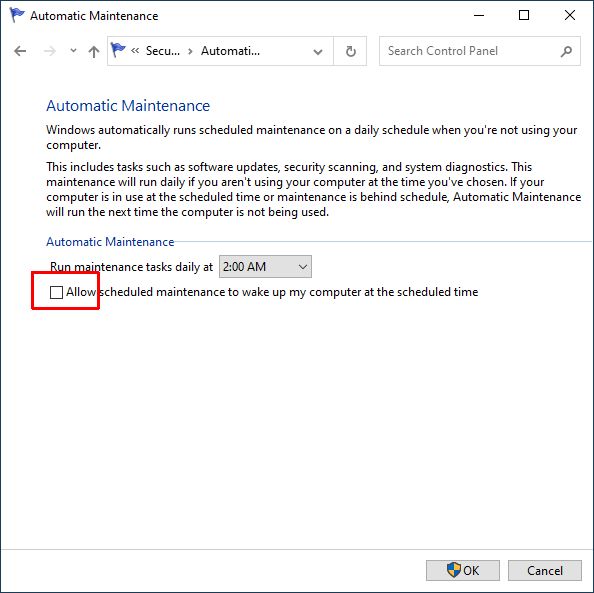
  5. Clear the checkbox for Allow scheduled maintenance to wake up my computer at the scheduled time.
    Disable Automatic Maintenance Wake Up
  6. Click OK.

After this, scheduled maintenance tasks will no longer be able to wake up your Windows 10 computer from sleep mode. (You can always run the maintenance manually by selecting the Start maintenance option.)

Network Controller (Wake-on-LAN)

As we saw in the earlier screenshot for the powercfg example, network connectors (or adapters) can trigger the PC to wake up from sleep.

Although there are valid scenarios for this option, it might not be what you want if it results in your computer waking up from sleep.

The steps to disable the Wake-on-LAN function are:

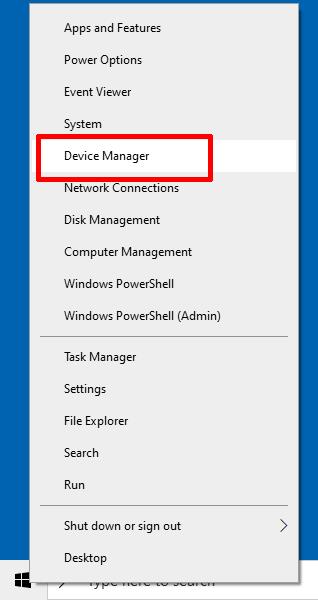
  1. Right-click the Start menu button.
  2. In the popup menu, click Device Manager.
    Start Device Manager
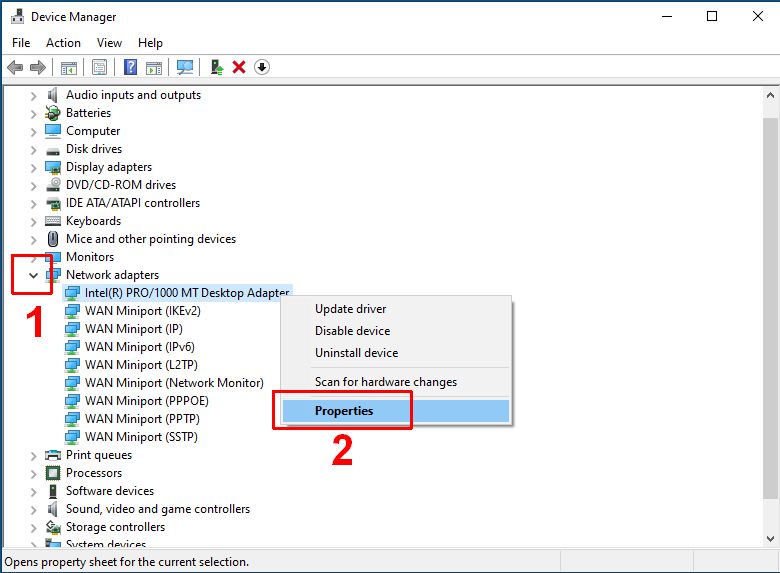
  3. In Device Manager, open the group called Network adapters by clicking the arrow in front of it (1).
  4. Right-click the network adapter in the list, and in the popup menu select Properties (2).
    Windows 10 Network Adapter Properties
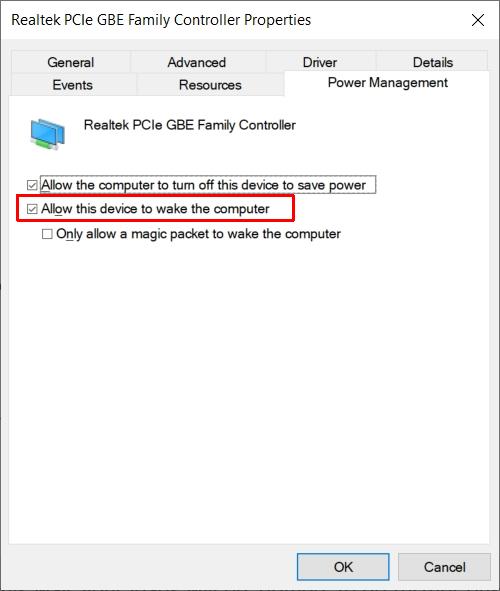
  5. In the Properties window for the network adapter, select the Power Management tab.
  6. Uncheck or clear the checkbox named Allow this device to wake the computer.
    Disable Wake-on-LAN
  7. Click OK.

One thing to keep in mind here is that the Wake-on-LAN feature is available for each network adapter. So if your PC has multiple Ethernet connections, or maybe even a wireless connection, these steps need to be repeated for each network adapter.

Disallow Wake Timers

In the start of this article, you read that Windows 10 has the possibility to use wake timers. Wake timers are scheduled events that can wake the PC from sleep (or hibernation).

The Windows Task Scheduler has a checkbox option to Wake the computer to run this task for scheduled tasks. That will result in a wake timer to be used.

To prevent wake timers from waking up Windows 10 from sleep, you can disable this option.

  1. In the Windows search box, type “power option” (without quotes).
  2. In the search result, click Power & sleep settings.
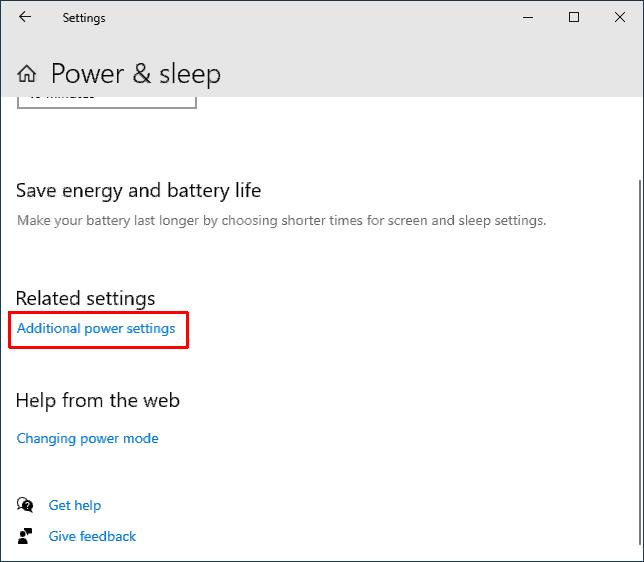
  3. Click Additional power settings.
    Windows 10 Additional Power Settings
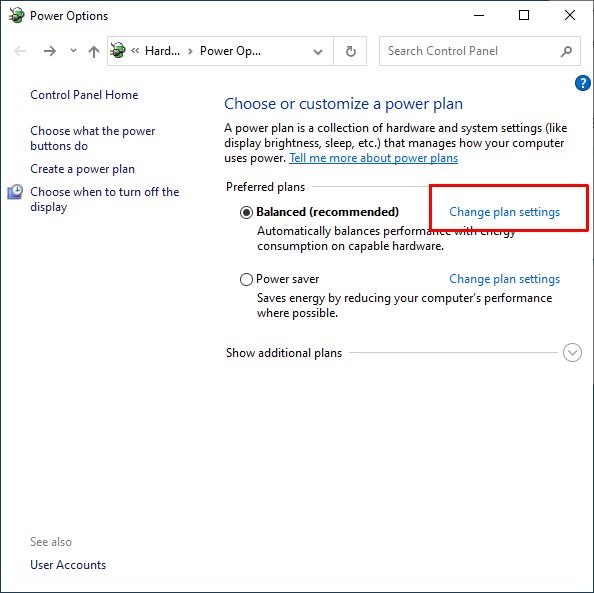
  4. Select Change plan settings for the selected power plan.
    Windows 10 Change Power Plan Settings
  5. In the Edit Plan Settings window, click Change advanced power settings
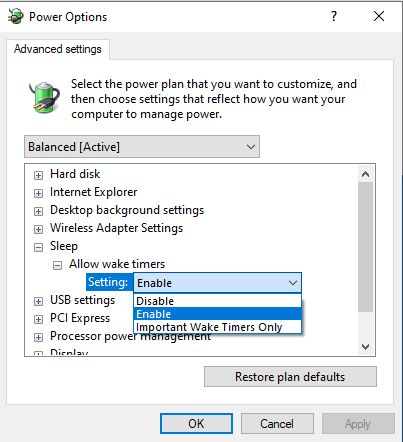
  6. This will bring up the Power Options dialog box. Open the Sleep option.
  7. Click Allow wake timers and then change the Setting. You can either completely Disable the Allow wake timers, or allow Important Wake Timers Only.
    Disable Allow Wake timers
  8. Click the OK button to confirm the change.

Do realize that this setting affects all wake timers. If you have identified a specific task that causes your PC to wake up from sleep, it might be better to open the Task Manager and disable the option to Wake the computer to run this task.

USB Devices

This is probably the most uncommon reason why your Windows 10 PC is waking up on its own. But since it is possible for USB devices to wake your PC from sleep, it needs to be mentioned.

In normal circumstances, when a Windows PC goes to sleep, you want to be able to wake it up using the mouse or keyboard (or even a mousepad on laptops).

This is one of the reasons why it’s possible for hardware devices to wake up the PC. In most cases these input devices are USB-based. (Even a web camera with motion detection can be connected on a USB port and trigger wake-up events.)

Configuring the power options for USB devices is very similar to the configuration for network adapters.

  1. Right-click the Start menu button.
  2. In the popup menu, click Device Manager.
  3. In the Device Manager locate the USB device, right-click it and select Properties in the popup menu.
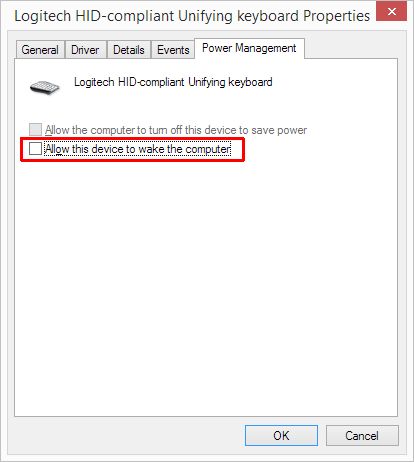
  4. Click the Power Management tab.
  5. Clear the checkbox named Allow this device to wake the computer.
    Disable USB Device Wake Up PC
  6. Click the OK button to confirm, and OK again to close the USB device Properties dialog box.

These steps need to be repeated for all USB devices. (Unless you know which particular USB device is triggering the wake-up event.)

If you are not sure which USB device is the culprit, you can try removing them one-by-one and see if the PC still wakes up. This is only possible for external USB devices, so be aware that some integrated devices (like webcams) often also use a USB connection.

Device Drivers

Considering the potential of hardware devices to contribute to the wake-up-from-sleep issue, this story would not be complete without mentioning the importance of up-to-date device drivers.

Device drivers enable Windows 10 to interact with PC hardware such as network adapters and USB devices. As such, the most updated device drivers will ensure Windows 10 can accurately control the devices and their power behavior. You can download DriverFinder here and run a driver scan to check if you have the latest drivers for your Windows 10 PC.

How to Open the Control Panel in Windows 10

Many Windows 10 settings are configured through the Control Panel. The Device Manager for example, which is used for driver settings, is accessed through this panel. As such, it’s important to know how to open the Control Panel in Windows 10.

In Windows 7 and 8.1, opening the Control Panel was easy. All you had to do was click or right-click the Windows Start button. However, in Windows 10, this is no longer the case.

Open the Control Panel Using the Search Box

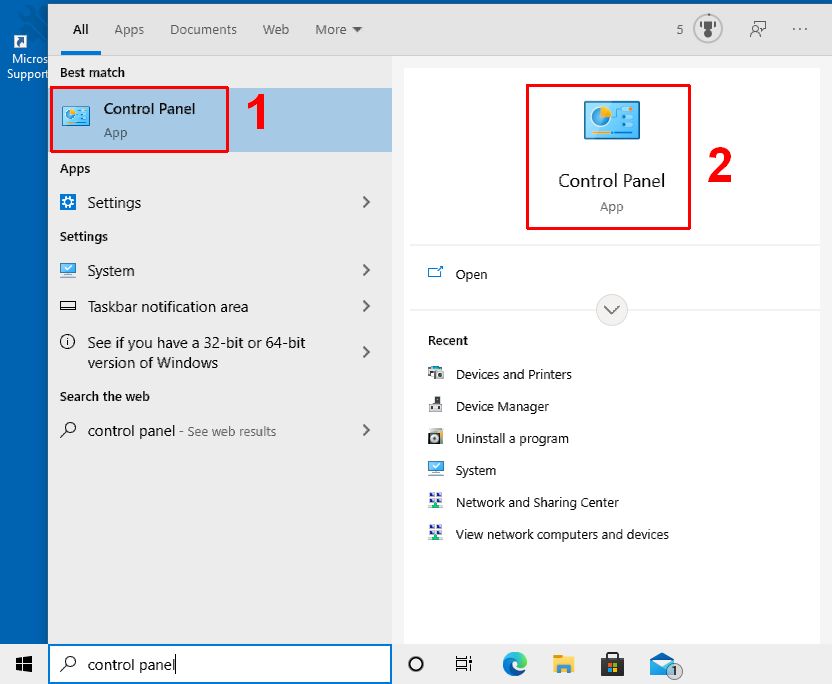
This is generally the preferred, and easiest way to open the Control Panel. Simply type “control panel” in the search box on the Taskbar.

In the Search results screen, you can click the Control Panel App under best match (1), or click the Control Panel icon in the right-hand window (2).

Open the Control Panel

Open the Control Panel from the Taskbar

If you want even easier access to the Control Panel in Windows 10, you should ‘pin’ it it to the Taskbar, thereby creating a shortcut.

  1. Follow the steps above to open then Control Panel.
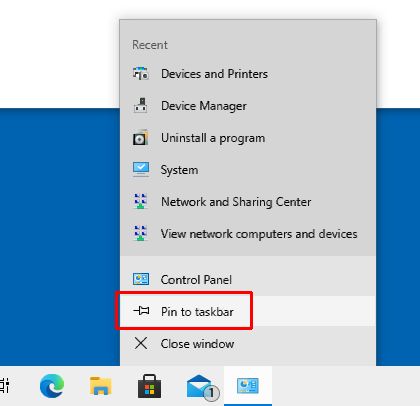
  2. On the Taskbar, right-click the Control Panel icon.
  3. In the popup windows that opens, click Pin to taskbar.

Pin control panel to taskbar

After this, the Control Panel icon will permanently show on the Taskbar. So even when you close the Control Panel, you can quickly open it again by clicking the icon on the Taskbar!

Why Use the Control Panel?

Since it seems that Microsoft has made it a bit more difficult to open the Control Panel, you would expect that it is not needed that much. Not true!

For example, for device driver related actions (e.g., driver updates, troubleshooting, driver roll-backs, etc.) the Device Manager is needed.

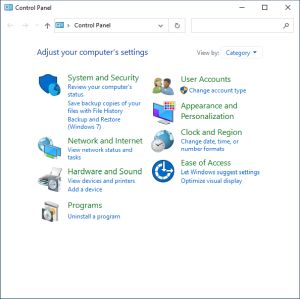
To get to the Device Manager, you need to open the Control Panel. From there, select the Hardware and Sound option, and then click the Device Manager option.

Another common task performed via the Control Panel is program uninstalls.

Many applications create a Program Group in the Start menu, where they normally put a link to an uninstall option. But if that is not available, then the easiest method to uninstall a program is the Uninstall a program feature in the Control Panel.


Fix ‘HP Printer Install Failed in Windows’

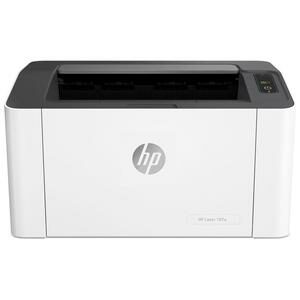
HP Printer Install FailedLike any computer device, printers need additional software to function in Windows. For hardware devices, this software is generally called a driver. By default, Windows supports a lot of devices since many drivers are already included in Windows, but many devices still need a separate driver or additional software to operate; for Hewlett-Packard printers, this is also true.

HP printer driver packages include a lot of additional software, and not only the actual driver. This enables printer troubleshooting and offers additional printing functionality that is beyond the default Windows functions. As a result, the installation of HP printer driver software is a little more extensive and complex than other average drivers. Some HP printer driver installation packages are in the hundreds of megabytes!

The problem we are addressing here is when the installation of an HP printer driver fails, resulting in error messages like “driver fatal install”, or “fatal error during installation”. Further error details can contain file names, error codes, or version mismatches.

You can also see the following errors:
The drivers for this device are not installed (Code 28). To reinstall drivers, click Reinstall Driver.”
Fatal Error 2753 — MSI.dot4wrp

How to Solve HP Printer Install Failed Errors

In most cases, driver installation errors can be solved by simply reinstalling the software again, sometimes a reboot is required before attempting the installation again.

But in the case of more complex software like HP printer software, a failed installation can cause all subsequent installation attempts to fail. The reason is that a failed installation can leave behind locked files, or registry information, which causes the next installation to fail.

Uninstall HP printer

In these cases, the next step is to first uninstall the previous installation, so that a clean system can be used to reinstall the HP driver software. The simplest way to do that is to uninstall the HP printer software from the Control Panel -> Uninstall (or Add/Remove programs) option. The Uninstall a program is found in the Control Panel under Programs -> Programs and Features in Window 7 and later.

In addition you can remove the HP printer in the Devices and Printers section of the Control Panel.

If, however, the HP printer software installation failed in an early stage, the software might not show up in the Control Panel uninstall list. That means the removal of the failed software will not be possible that way. The next thing to try in that case is to use a cleanup utility to fix the corrupted registry. Microsoft used to have the Windows Installer Cleanup Utility for this purpose, but due to conflicts with Office 2007, it was replaced by the Microsoft Fix It solution.

The Fix It solution will clear bad registry keys that can prevent programs from being installed. Keep in mind that it does not actually remove any files from the failed HP driver installation. Those will simply be overwritten by the next installation. Instead of the Microsoft solution, you can also try using a program to scan and fix the complete Windows registry, which does not limit itself to installer issues only. You can use such a program to clean all HP entries from your system before attempting the reinstall. We recommend using PC Cleaner for this purpose.
Note: by Choosing to install PC Cleaner (5.72MB), you consent to it’s End User License Agreement and Privacy Policy of the site.

If you are running XP or Vista, it is also possible that the Windows Installer itself is corrupted. In that case you can simply try to download the Windows installer and reinstall that.

If reinstalling the Windows Installer is not possible, try to re-register it:

– Open a command prompt with administrator rights.
– Type: msiexec /unregister and press Enter.
– After the command completes type: msiexec /register and press Enter again.

For HP Officejet printers, HP used to offer a driver removal utility that could help you remove the HP printer driver for specific models. Unfortunately, this utility is no longer available from them.

Other steps that can help:

– Run a disk cleanup to clear out the temp folders, which are used for temporary installation files.
– Stop the HP services using the Manage Computer option to prevent DLL files being locked.

Reinstalling the HP Printer Software

After the install cleanup is finished and the Windows installer is fixed, you need to reinstall the HP Printer driver software. Unplug the HP Printer and reboot before you do this so that Windows does not install any default drivers for the HP device. During installation, you can reconnect the printer when the installation process indicates it. Please consider that even for wireless printers you sometimes need to make a physical connection with the PC during the initial installation. Please check the printer manual for details.

If installation still fails, and you are using a USB connection, try using a different USB port, and make sure not to use an external USB hub between the PC and the HP printer.

Windows 10 HP Printer Compatibility

Windows 10 Compatibility Mode

Although a lot of HP Printers are supported even under Windows 10, not all HP printers will work. Especially older printer models have no direct support under Windows 10, more so when it is the 64-bit version.
There are a few things you can try to get an HP printer to install in Windows 10 anyway.
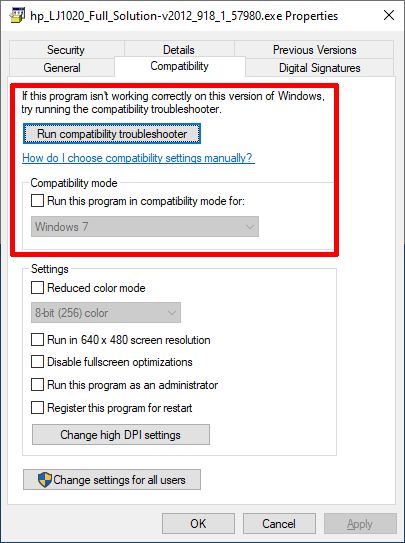
The first is to try and run the printer installer in Compatibility Mode. Simply right-click the driver installer file and in the popup, select Properties.

You can now select Run compatibility troubleshooter. Windows will try to determine which Windows version the file is compatible with. Or you can manually choose the Windows version by using the Run this program in compatibility mode for option. After this, click OK, and execute the installer.

In some cases this method works, even though not all printer functions might be supported due to compatibility issues (often the case with printer/scanner combinations).

Use a Virtual Machine to circumvent the HP Printer Install Failed error

If the printer is not supported at all, even with the compatibility mode, you can choose to use a Virtual Machine (VM). In the Virtual Machine, you then run a version of Windows that still has support for your HP printer. The advantage is that you can still use the printer, the disadvantages are that you need to first still have a version of Windows that supports your printer, and you need to run the VM for all print functions, which means transferring all documents to be printed between the host (Windows 10), and the VM. Apart from being a complex solution, this is not a very convenient solution, so it is only interesting in a few scenarios.

To use a virtual Machine in Windows, you can use the Oracle VirtualBox software or the VMware Workstation Player. Both are free.

Lastly, always make sure to use the latest HP driver software, to guarantee that you are not suffering from old versions with possible bugs or limited functionality. To scan your PC for all drivers and find HP updates, use DriverFinder!

Copyright 2009 and Beyond - DriverFinderPro.com - All Rights Reserved