Intel | DriverFinder - We Make Drivers Work for You

How to Update an Intel Bluetooth Driver – Windows 11

The Intel Bluetooth interface is part of the Intel wireless adapters in PCs with an Intel wireless chipset. The appropriate driver needs to be installed to ensure the Intel Bluetooth device functions on Windows 11. Windows 11 will normally install supported drivers automatically, but if you need to update an Intel Bluetooth driver on Windows 11, follow these instructions.

Manually Update the Bluetooth Driver

To update the Intel Bluetooth driver, we first need to download the latest version from the Intel website. In some cases, your PC manufacturer will also have a driver available for the Bluetooth interface in your PC. Make sure to check the available versions on both websites to see which version is required.

  1. Open a web browser and navigate to the Intel download center.
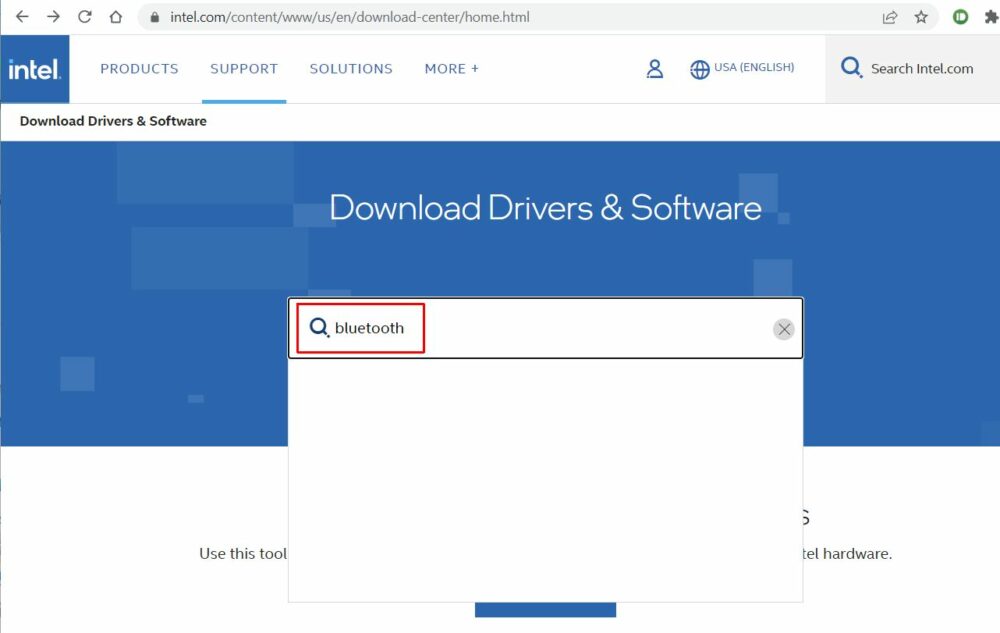
  2. On Intel the web page, use the Search option to locate the latest Bluetooth driver. Type “bluetooth” and press Enter.
    Search Bluetooth Intel support
  3. In the list with search results, locate the Intel® Wireless Bluetooth for Windows 10 and Windows 11 entry and click it.
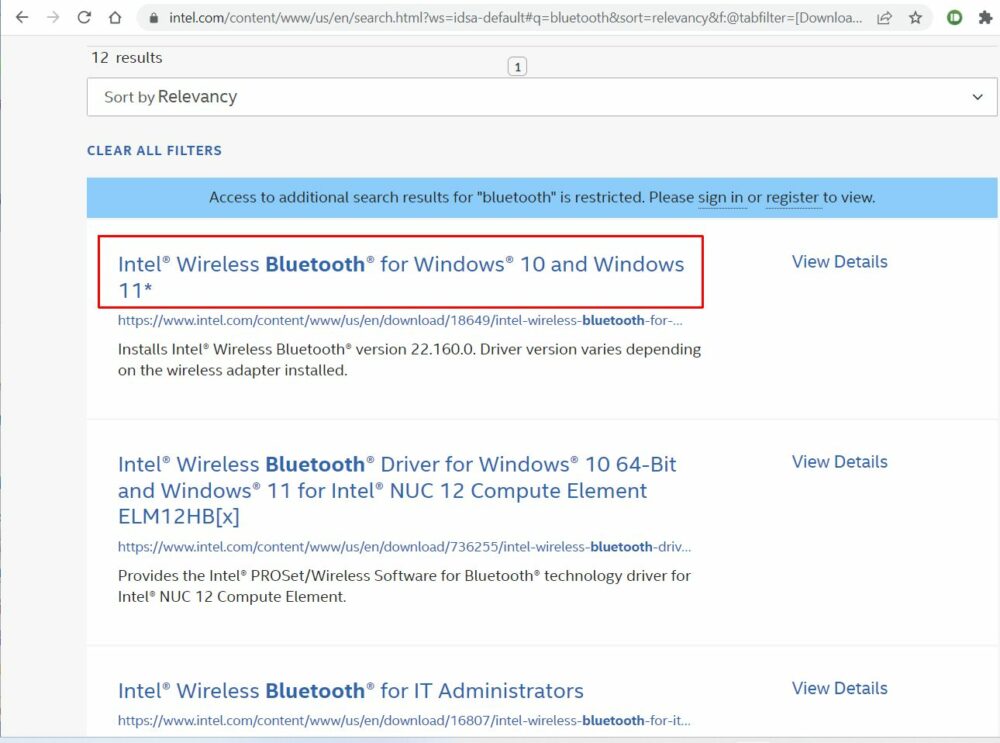
    Intel Bluetooth driver download link
  4. On the web page for the intel® Wireless Bluetooth® for Windows 10 and Windows 11, click the Download button for the installer.
    Note: The downloaded version will be the latest available. If you need an older version, use the Version drop-down field to select a previous version.
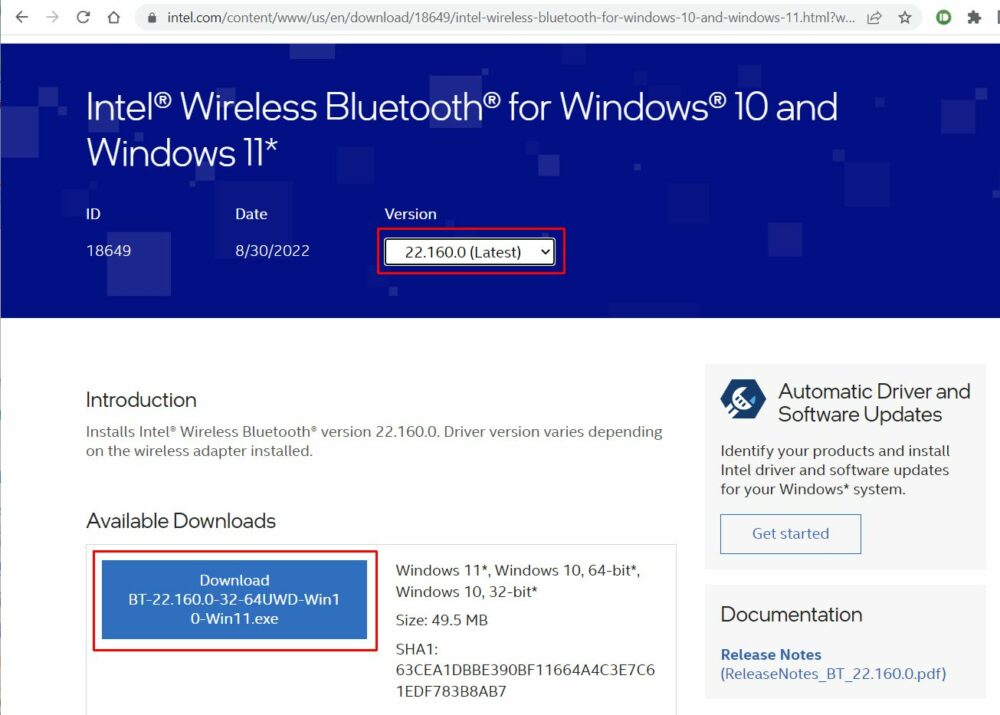
    Download Intel BT Driver
  5. Click the I accept the terms in the license agreement button in the windows that show next.
  6. The Intel Bluetooth installer file will start downloading.
    Note: Depending on the browser being used, you may need to select a destination on disk for the downloaded file.
  7. Once the download completes, open a File Explorer and browse to the downloaded file.
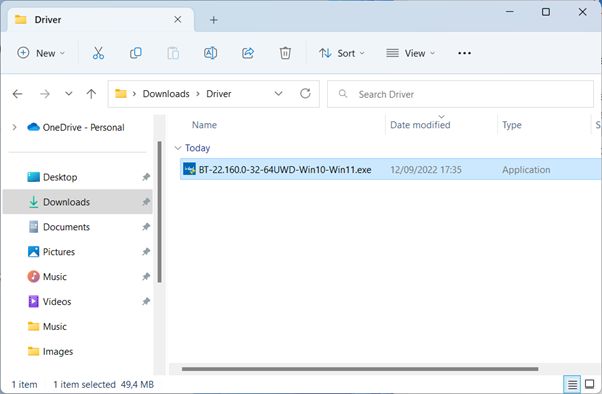
    Intel Bluetooth Installer File
  8. Double-click the downloaded file to execute the driver installation and follow the on-screen instructions. If the UAC screen shows, click the Yes option to continue.
  9. If a driver is already installed for the Intel Bluetooth device, a popup will show to confirm the upgrade from the existing version to the new version of the driver. Click Yes to confirm.
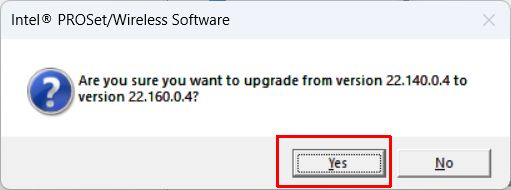
    Intel Bluetooth Driver Upgrade
  10. After this, follow the on-screen instructions in the Intel® Wireless Bluetooth® Setup window.
  11. Once the installation of the Intel Bluetooth driver completes, click the Finish button to close the setup window.
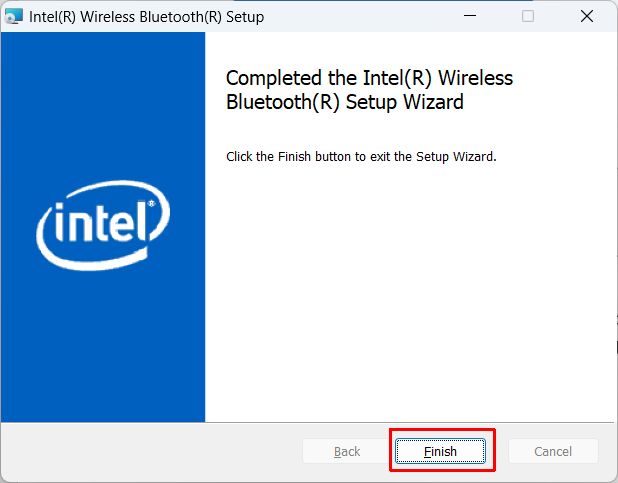
    Bluetooth Setup Complete

Note: Always make sure to check which wireless adapters are supported by the driver version. If your device is not listed, chances are that the driver will not work. For version 22.160.0.4, as shown in the instructions, the devices supported are:

Intel® Wi-Fi 6E AX4111, AX2111, AX2101
Intel® Intel® Wi-Fi 6 (Gig+) Desktop Kit1
Intel® Wi-Fi 6 AX2001, AX2011
Intel® Wireless-AC 95601,-AC 94621, 94611, 92601
Intel® Dual Band Wireless-AC 82651,-AC 82601, 3168
Intel® Wireless 7265 Family
Intel® Dual Band Wireless-AC 3165

Automatically Update an Intel Bluetooth Driver

To automatically update the Intel Bluetooth driver on Windows 11, run Windows Update. First, make sure automatic driver updates are not disabled.

  1. Open the Windows 11 Settings by pressing the Windows + I keys (or use the Start menu).
  2. Click Windows Update in the left-hand panel in the Settings window.
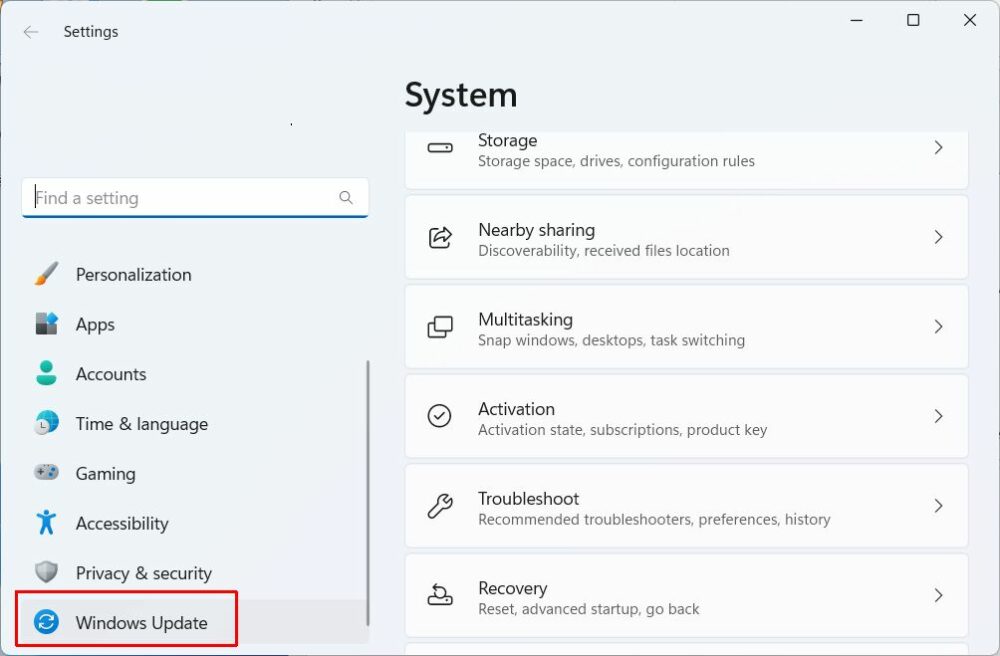
    Start Windows Update in Windows 11
  3. Next, click the Check for updates button in the right-hand panel.
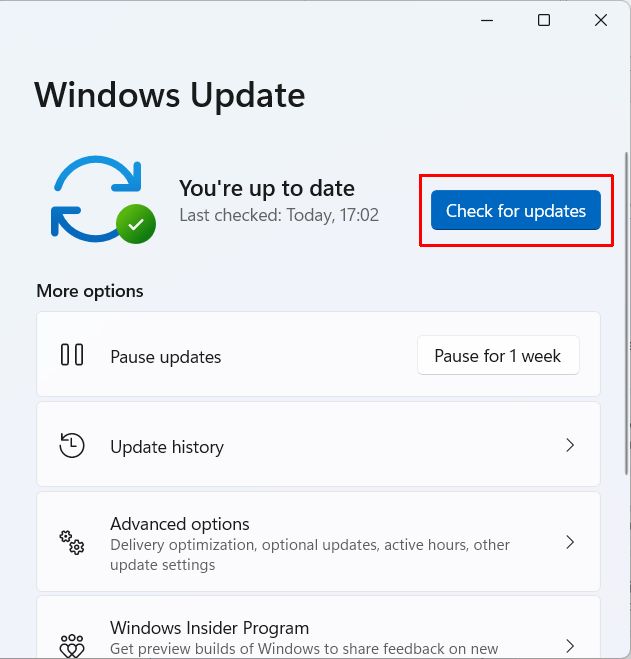
    Check for updates in Windows 11
  4. Wait for updates to be downloaded and installed.

A second option to automatically update the Intel Bluetooth drivers is to use a program like DriverFinder that will automatically find the latest version of the Bluetooth driver for your PC.

Update the Intel Bluetooth driver using the Device Manager

The last option to update the Intel Bluetooth driver is to use the Device Manager. The Device Manager has been part of Windows since the initial Windows versions. It allows you to see all devices that are present in the system. For each device, the drivers can be checked and updated.

  1. Open the Device Manager by right-clicking the Start menu button and selecting Device Manager in the menu.
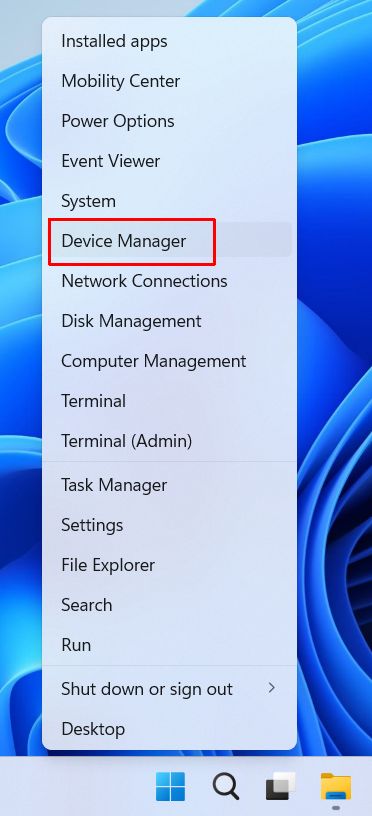
    Windows 11 Device Manager from Start menu
  2. In the Device Manager, expand the Bluetooth category.
  3. Right-click the Intel® Wireless Bluetooth® device, and in the context menu select Update driver.
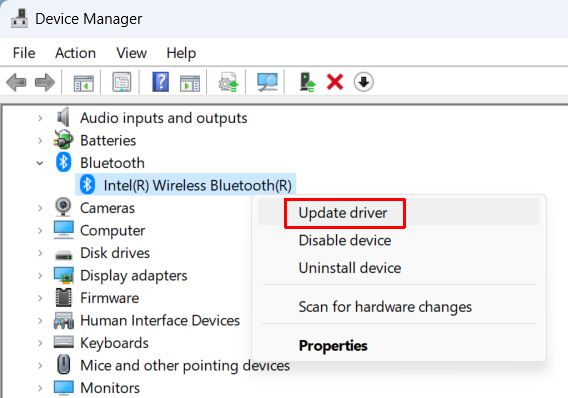
    Intel Bluetooth Update Driver
  4. Click the option Search automatically for drivers and wait for the driver to be updated.
  5. Click Close when done, and then close the Device Manager window.

Tip: Use the Uninstall device option to remove the device from the Windows configuration. Combined with the option to remove the driver software for the device, this can help solve problems by doing a fresh install of the driver.

With the above instructions, you can download and install the Intel Bluetooth driver for Windows. This should solve any issues you have with Intel Bluetooth not working in Windows.

How to Uninstall Intel Wireless Bluetooth Software

As mentioned in the previous section, sometimes it is necessary to remove the Intel Bluetooth driver before installing a new version. If you find that the Intel Bluetooth driver update cannot be installed, try removing the software first using these steps.
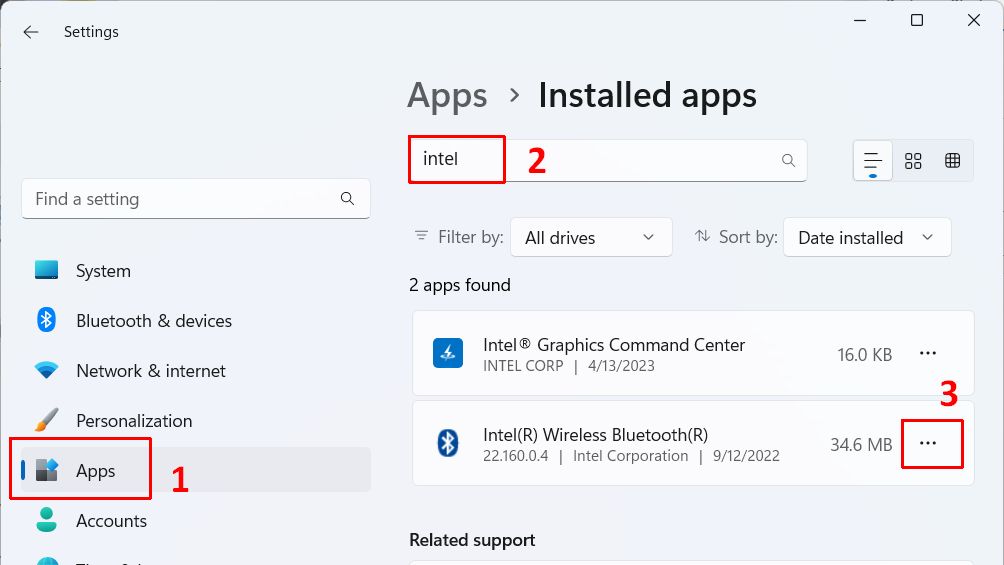
Uninstall Intel Wireless Bluetooth software
  1. Open the Settings window from the Start menu.
  2. Select Apps in the left-hand pane (1).
  3. Select Installed Apps in the right-hand pane.
  4. Type intel in the Search apps box (2).
  5. In the apps found, click the three dots icon next to Intel(R) Wireless Bluetooth(R) (3).
  6. Select Uninstall in the context menu.
  7. Click Uninstall again in the confirmation popup.

Wait for the software to be uninstalled. After that rebooting the device is recommended to make sure all components are removed. If any part of the software is in use, a reboot will make sure it gets removed when Windows restarts.

Intel UHD Graphics 620

The Intel UHD Graphics 620 is a graphics solution from Intel for mobile computers. It is integrated into the 8th generation Kaby Lake processors (or core U-series laptop processors). Since it is integrated into the processor chip, it does not come with its own memory but uses system RAM instead (up to 32 GB of shared memory can be used).

The main future of the Intel UHD graphics 620 processing unit is that it is a low-power solution (only uses 15W maximum). It supports DirectX 12, operates at 300 MHz frequency (can be boosted to up to 1000 MHz), and is an upgrade from the Intel HD 620 graphics solution. Full specs can be found at Intel.

Although usable for some gaming, the chip is not comparable to dedicated, external graphics solutions like the AMD and Nvidia graphics chips.

Intel UHD Graphics 620 Driver

To make sure the Intel UHD graphics 620 produces the best results, it is important to install the latest Intel drivers for it. Drivers are available for all Windows version from XP to Windows 11.

The right drivers will make sure the 4K resolution (at 60Hz) is supported and that DisplayPort 1. And HDMI 2.0 are properly working.

To get the latest driver for the Intel UHD 620 solution, download the latest version from the Intel support site. The file name will be something like gfx_win_xxx.xxxx_xxx.xxxx.exe, where each x represents a version number. The driver file for the Intel UHN graphics 620 solution supports all Intel 6th – 12th Generation core graphics processors.

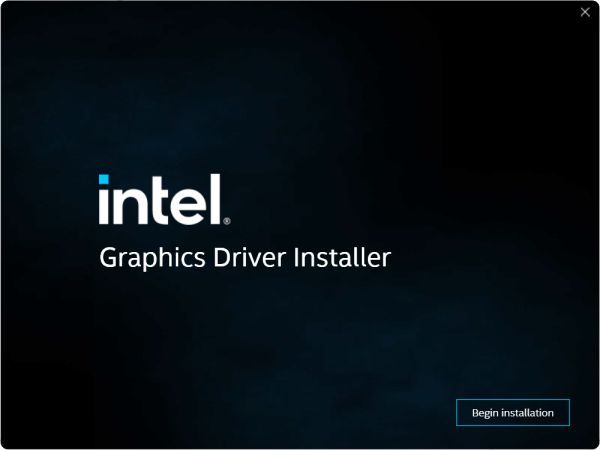
When downloading the driver file, be aware that the file can be over 1 GB in size, so the download will take a moment to complete. Once complete, execute the downloaded file to begin the driver installation. After confirming the UAC dialog, the installation screen will show.
Install Intel UHD Graphics 620 driver

Click the Begin installation button and follow the instructions in the installer to complete the driver installation.

Updating the Intel UHD Graphics 620 Driver from the Device Manager

Instead of downloading the complete processor driver installation file from the Intel support website, you can also update the Intel graphics driver from the Device Manager in Windows.

Here is how:

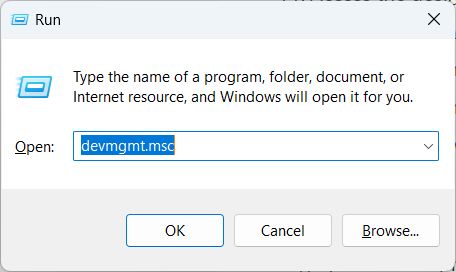
  1. Open the Device Manager by pressing the Windows key + R at the same time. Type devmgmt.msc in the Run dialog box, and press the OK button.
    Run Device Manager
  2. In the Device Manager, expand the Display adapters
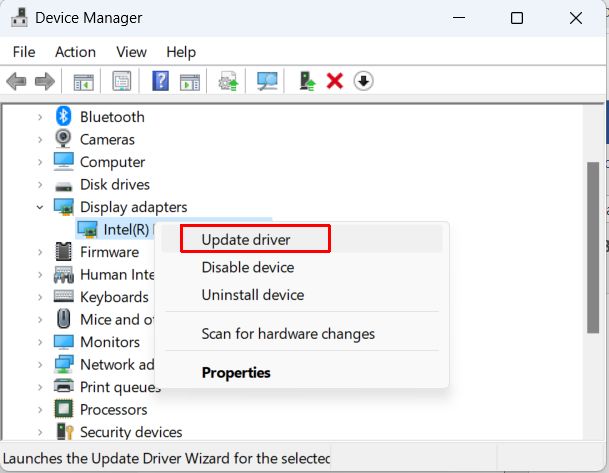
  3. Right-click the Intel UHD Graphics 620 device, and in the popup menu select Update driver.
    update intel uhd 620 driver
  4. Click the Search automatically for drivers option to let Windows find a newer driver for the graphics device.
  5. Wait for the driver to be updated, and then click Close to finish the driver update process.

If no new driver is found, you will see a message showing “The best drivers for your device are already installed”. If you believe the is a newer version available while it is not being offered by the Windows update process, you will need to manually download and execute the installer as described earlier. This can happen on older Windows versions with no update support for the device.

Solving problems with the Intel UHD Graphics device

With the right drivers, your Intel UHD graphics 620 device should operate without problems. But an incorrect or outdated driver or even device configuration problems can cause the graphics device to have issues. Possible scenarios are a blue screen, flickering screen, no support for a dual monitor, animation issues with Windows Desktop on Windows 10 and Windows 11, and more.

These problems, in most cases, are caused by driver issues. Apart from the above-described driver installation process, there are other steps that can be used to solve graphics problems with the Intel UHD 620.

Reinstalling the Intel UHD graphics 620 device

If the driver is correct, but the driver and/or device configuration is a problem, reinstalling the device can solve it.

  1. Open the Device Manager as described in the earlier steps.
  2. In the Device Manager, open the Display adapters
  3. Right-click the Intel UHD Graphics 620 device, and in the popup menu select Uninstall device.
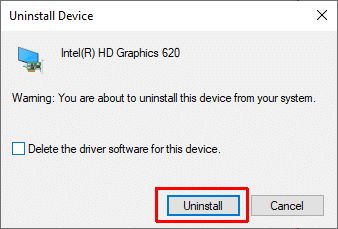
  4. In the Uninstall Device confirmation window, leave the Attempt to remove the driver for this device unchecked and click the Uninstall
    Note: depending on the Windows version, the checkbox might be labeled “Delete the driver software for this device”.
    Device Uninstall Warning
  5. After the device uninstall completes, reboot the computer to automatically reinstall the device with the existing driver.

If these steps do not fix your issue, repeat the steps to uninstall the device, but this time also uninstall the driver using the checkbox.

Rollback the driver to the previous version

In some cases, the graphics problems can be caused by a newer or incorrect version of the device driver. In this scenario, you want to revert back to the previous, working version of the Intel UHD graphics 620 driver. That can also be done using the device manager.

  1. Open the Device Manager as described in the earlier steps.
  2. In the Device Manager, open the Display adapters
  3. Right-click the Intel UHD Graphics 620 device, and in the popup menu select Properties.
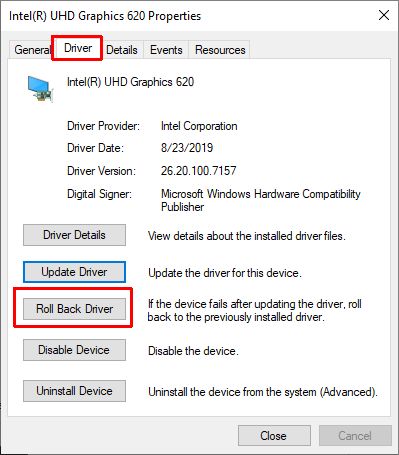
  4. In the Properties dialog box, click the Driver
  5. Next, click the Roll Back Driver button.
    intel uhd graphics 620 driver rollback
  6. Follow the on-screen instructions to confirm the driver rollback operation.

Note: If the Roll Back Driver button is grayed out, that means no previous version of the driver for the device is available.

Recommended: find and download the latest drivers for your PC devices automatically by using DriverFinder.

Windows PCI Simple Communications Controller Driver

Microsoft Windows uses device drivers to communicate with hardware devices in the computer. One of the important devices in a computer is the PCI simple communications controller. If the PCI simple communications controller driver is not installed, the device will show an error. In addition, it can result in other devices depending on this device failing or not being recognized by Windows.

What is a PCI Simple Communications Controller?

PCI is short for Peripheral Component Interconnect and it is a hardware bus that is used to connect hardware devices to a computer. The bus is inside the computer, on the motherboard, so you will not see it, like a printer or mouse. But it is a critical component to enable communication between the CPU and hardware devices. The PCI simple communications controller is a controller chip that is part of the motherboard chipset. The device manufacturer is Intel.

PCI Simple Communications Controller Driver Errors

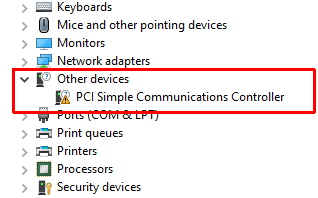
If the right driver for the PCI simple communications controller is not installed, this will be visible in the Device Manager in Windows. The device will show an error or warning.

PCI Simple Communications Controller Error

The device will be shown in the Other devices category instead of the System devices category. When you right-click the device and check the Properties, the error will often show “The drivers for this device are not installed. (Code 28)”.

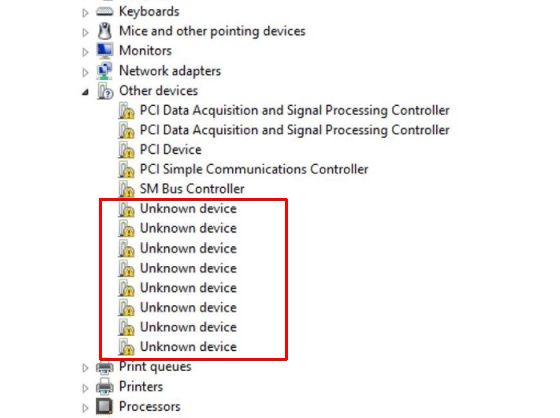
Apart from this, other devices might not be recognized and show up as Unknown devices in the Other devices category as well.

Device Manager unknown devices

Once the right driver for the PCI simple communications controller is installed, the other devices can be recognized by Windows as well and drivers for them can also be installed.

Download PCI Simple Communications Controller Driver

Solving the problem with the PCI simple communications controller is a matter of installing the right driver. The driver needed is the Intel Management Engine driver, which is a chipset driver.

  1. To download the driver from the Intel support website, make sure you have a working Internet connection and visit the Intel download page.
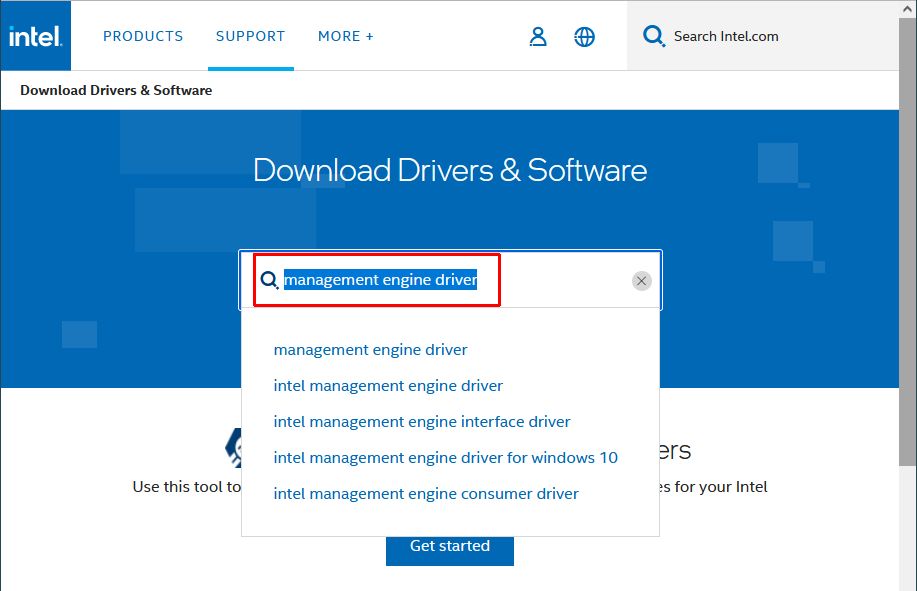
  2. In the search box, type “management engine driver” and then click the appropriate entry for your Windows version in the result list.
    Intel management  engine driver
  3. In the next page, select the driver that is right for your Windows version and click the link.
  4. This will bring up the download page. Click the Download button to download the ZIP file to your computer. After agreeing to the Intel Software License Agreement, the download will start.
  5. Unzip the downloaded file to extract the driver files.
    Navigate into the extracted folder (ME_SW_2216.16.0.2805 in this example) and then into the subfolder named ME_SE_DCH.
    Install Intel MEI
drivers
  6. Install the drivers by executing the SetupME.exe file.

Once installed, restart your computer for the changes to take effect. Any devices depending on the PCI Simple Communications Controller should now also be recognized and their drivers installed.

Update the Driver from the Device Manager

Instead of manually downloading and installing the drivers for devices like the PCS Simple Communications Controller, you can also use the Device Manager to update the driver. Especially in later Windows versions, many drivers are automatically installed.

  1. Open the Device Manager from the Start menu, or type devmgmt.msc in the Run box after pressing the Windows + R keys.
  2. In the Device Manager, open the Other devices category.
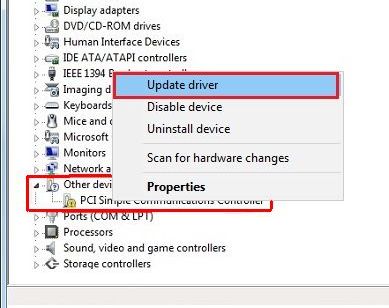
  3. Right-click the PCI Simple Communications Controller, and in the popup menu click Update driver (or Update Driver Software depending on your Windows version).
    Update PCI driver from device manager
  4. Choose the option to let Windows Search automatically for drivers (or Search automatically for updated driver software, again, depending on the Windows version).
  5. Wait for the driver to be installed and then click Close to finish the driver update.

After this, reboot your PC to have the changes take effect and let Windows find any other hardware devices that may now be detected.

If the automatic update fails, make sure you have an active Internet connection. If that is the case, the other option is to choose the option Browse my computer for drivers in step 4 and select the path where you manually downloaded the latest driver for the device.

For finding the right drivers for your computer system, we recommend you use the DriverFinder utility. It scans your hardware devices and allows you to download the latest drivers for all devices.

Copyright 2009 and Beyond - DriverFinderPro.com - All Rights Reserved