problem | DriverFinder - We Make Drivers Work for You

Fix MediaTek MT7921 Wi-Fi 6 Problem with Windows 11

The MediaTek MT7921 Wi-Fi card from Taiwanese manufacturer MediaTek was introduced in 2021. The wireless card was first used by Asus in their ROG and TUF gaming laptops. The new MediaTek chipset has improved wireless network connectivity, offering better performance and improved battery life.

All great of course, but with Windows 11, there are reports that the MediaTek MT7921 is not working after the June 2022 update of Windows 11. Problems vary from intermittent connectivity, no Wi-Fi device showing at all, and device errors (This device cannot start. (Code 10).

Install the MediaTek MT7921 Driver

The primary cause of such problems is the device driver. So the first thing to try is to uninstall the MediaTek MT7921 device in the Device Manager and reinstall the driver.

To uninstall and reinstall the MediaTek MT7921 driver:

  1. Open the Device Manager from the Start menu.
  2. In the Device Manager, click on Network adapters to expand the category and show the devices.
  3. Next, right-click the WIFI 6 MediaTek MT7921 device, and in the popup menu select Uninstall.

After this you have a few options:

  1. Restart the PC, in which case Windows will reinstall the device (but most likely using the same driver). You can also use the Action menu and select Scan for hardware changes to reinstall the device.
    – or –
  2. Use the MyASUS app (available in the Microsoft Store).
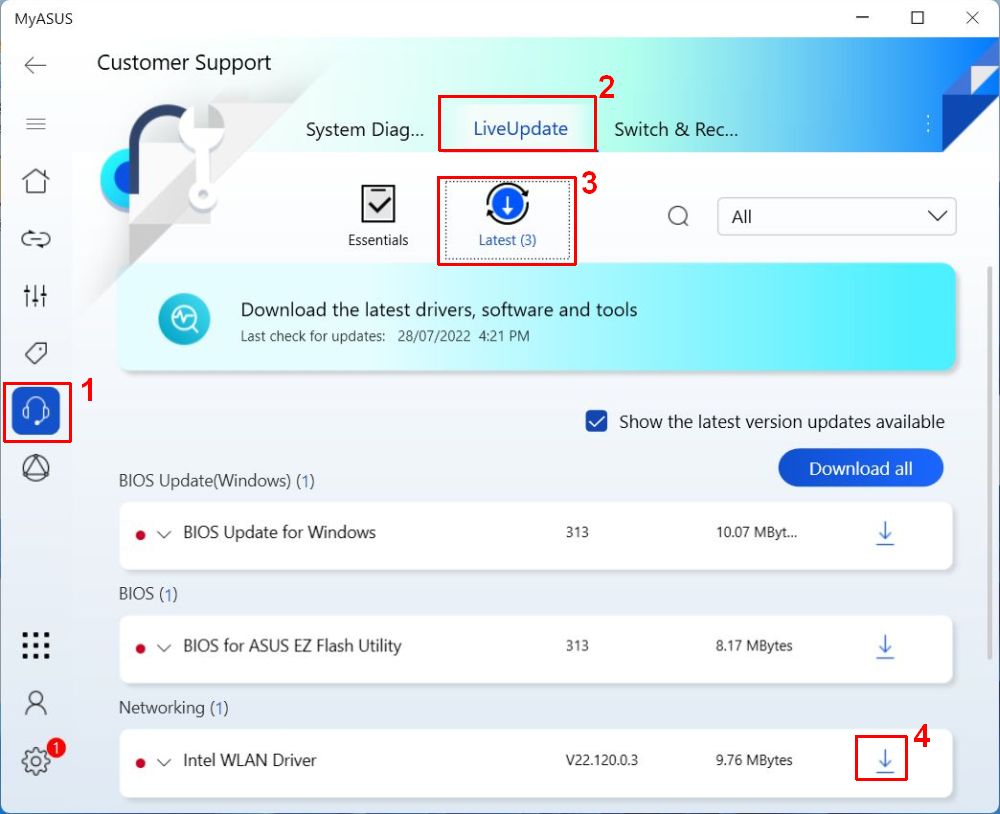
    MyASUS app
    Note: The screenshot is for illustration only, and shows the Intel WLAN Driver instead of the MediaTek MT7921 Driver.

    1. Go to the Customer Support section (1).
    2. Select LiveUpdate. (2)
    3. Select Latest. (3)
    4. Under Networking, locate the wireless driver and click the download icon. (4)
    5. Select a folder to download the driver to and click OK.
    6. Once the download completes, the download icon will change into a folder icon. Click it to open a File Explorer window with the downloaded file.
    7. Click the downloaded driver installer to install the driver.

If the device re-install or the driver update did not fix the problem, you might need to reset the BIOS. This was reported as having worked for a system with BIOS version 310. It is not certain this will work for other versions, but it is a possible solution.

To load the Asus default BIOS settings:

  1. With the system showing the Windows 11 desktop, press the power button and hold it for 20 seconds.
  2. Press and hold the F2 key, and then press the power button again to turn on the computer. This will get you into the BIOS.
  3. Click Default(F9) at the bottom of the screen, or press the F9 key on the keyboard.
  4. Next, click the OK button to confirm.
  5. Click Save & Exit(F10) at the bottom of the screen, or press the F10 key on the keyboard.
  6. And finally, click OK again to confirm saving the changes with the default settings loaded.
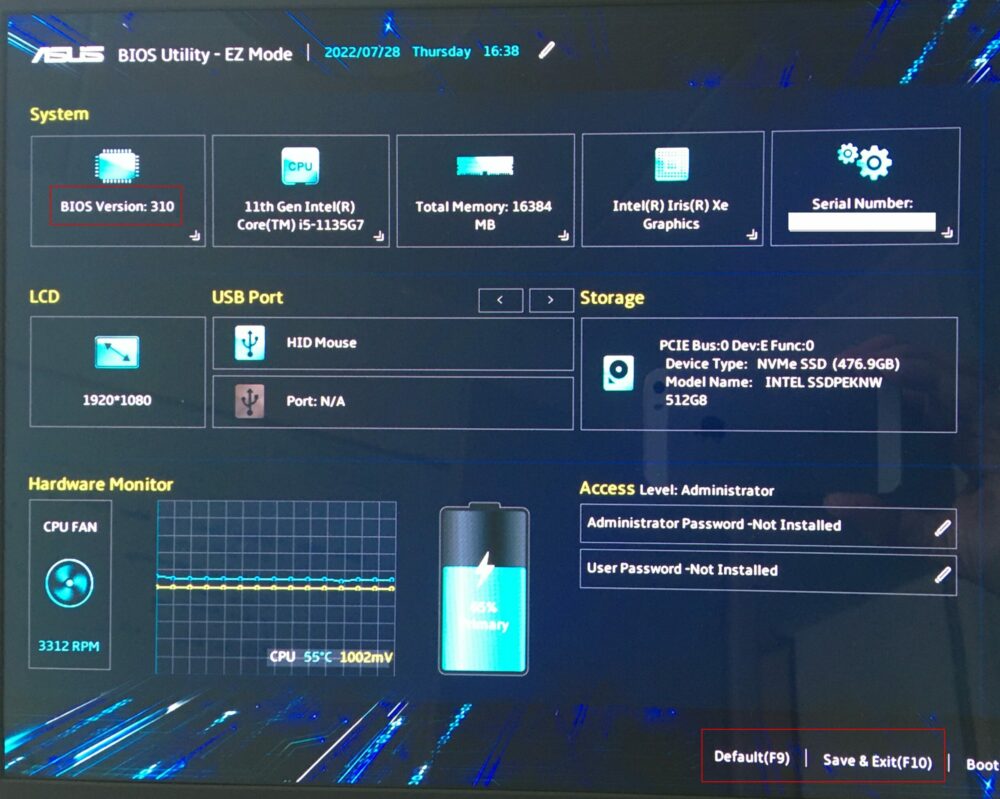
Load BIOS default to fix MediaTek MT7921 problem

The computer will reboot and start Windows 11.

Use a third-party driver

In general, is best to use a Microsoft driver or a driver from the computer or hardware manufacturer. But there is a difference in how fast different manufacturers release updated drivers for devices. And in the case of the MediaTek MT7921, the driver from ASUS might not be the latest driver.

If the Windows driver or the ASUS driver do not fix the problems with your MediaTek MT7921 Wi-Fi 6 card, try downloading and installing the Lenovo driver. This might sound weird, but the driver installer is the only real difference. The driver itself is for the exact same MediaTek device.

After the download completes, run the installer, and follow the on-screen instructions to extract and install the driver. If this does not help, you can uninstall it again after, or use a driver rollback to go back to the previous version.

How to run a Windows Troubleshooter

The latest Windows versions have the ability to analyze and fix common problems. Microsoft has named this feature the Windows Troubleshooter. In earlier versions of Windows, Microsoft Fix It was available, which is a similar feature. But the Troubleshooter functions in Windows 10 and Windows 11 are more elaborate than this earlier solution.

In many cases, Windows will suggest running a Troubleshooter if a problem is encountered. The Troubleshooter can then be invoked automatically, or by clicking a link or button to confirm executing the problem analysis. The Troubleshooters in Windows can be executed for different categories, either device (hardware) or software related.

But it is good to know that you can also manually execute a Troubleshooter in case it is needed. Be prepared that not all problems can be fixed using a Windows Troubleshooter. Only common problems, known errors, and configuration problems can sometimes be solved. Typical steps executed by the troubleshooters are resetting configuration data and restarting services.

Windows 10

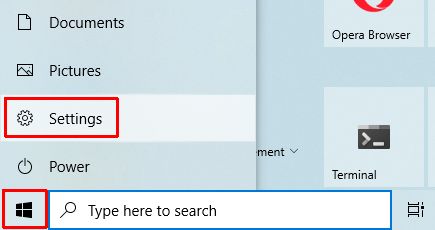
  1. Open the Settings window from the Start menu.
    Open Settings in Windows 10
  2. In the Settings window, click the option Update & Security.
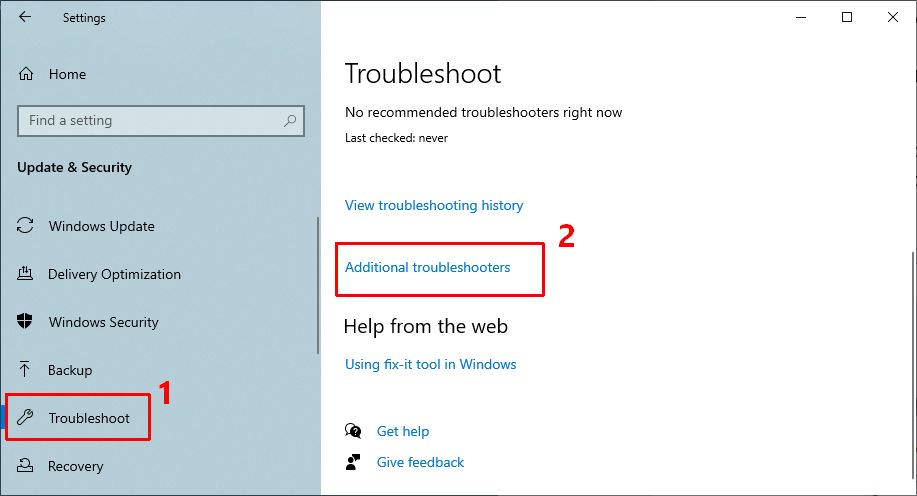
  3. In the left-hand panel, click Troubleshoot (1).
    Windows 10 additional troubleshooters
  4. In the right-hand panel, scroll down until you see the option Additional troubleshooters (2) and click the link.
  5. In the list of Additional troubleshooters, find the type of problem you are trying to fix and click it.
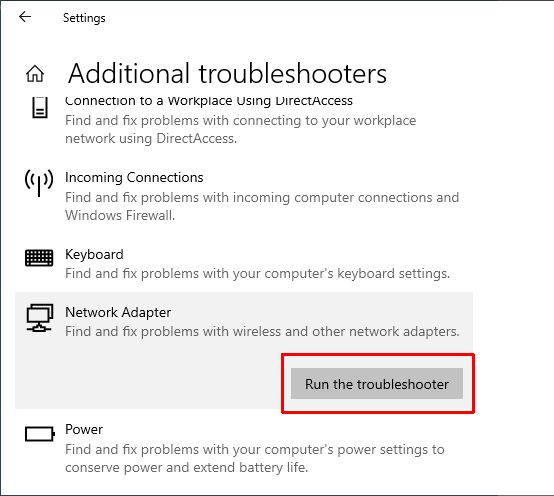
  6. Next, click the Run the troubleshooter button that appears.
    Windows 10 Run troublshooter
  7. A new window will appear that will show Windows is detecting problems. Follow any instructions that appear and click Next each time.
    Note: The instructions and steps will vary for each type of problem and troubleshooter.
  8. When done, click the Close button.
  9. Close the Settings window.

Windows 11

  1. Open the Settings window by pressing the Windows + I keys or from the Start menu.
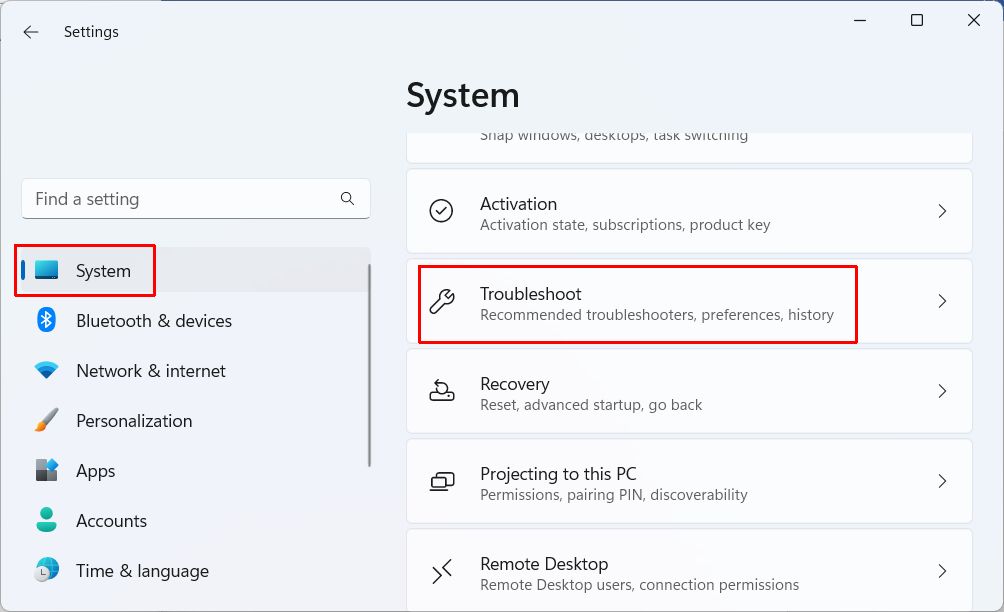
  2. In the left-hand panel, select System.
  3. In the right-hand panel, scroll down until you see Troubleshoot and click it.
    Windows 11 Settings troublshoot
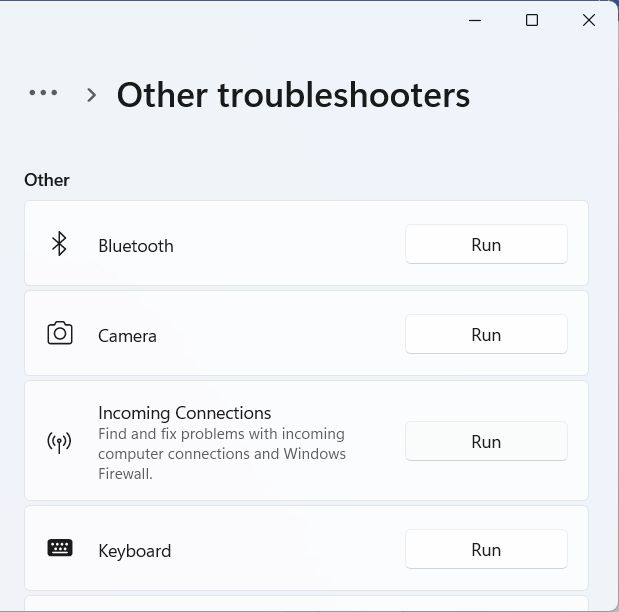
  4. Next click Other troubleshooters in the right-hand panel.
  5. Scroll down to the Other section and then locate the Troubleshooter you want to execute.
  6. Click the Run button in the selected Troubleshooter.
    Windows 11 other troubleshooters
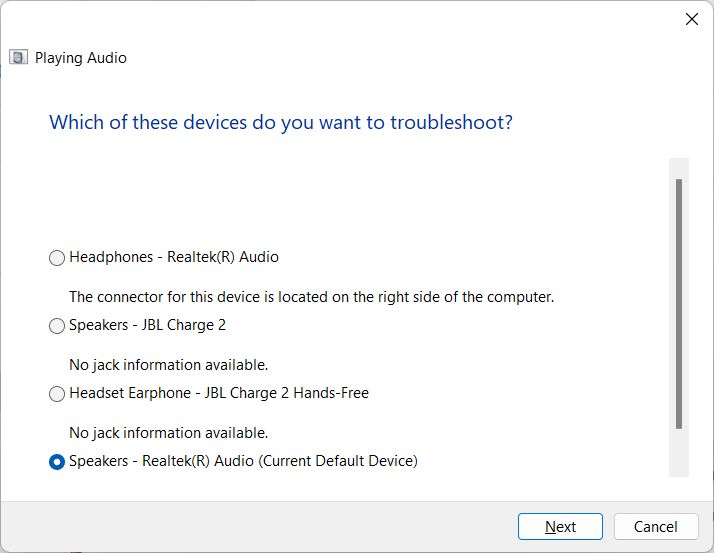
  7. A new window will show with Windows showing “Detecting problems”.
    Follow the instructions in the window to complete the Troubleshooter. Click the Next button after each required step and click the Close button when done.
    Windows 11 troubleshoot steps
    Exmple of running the trooubleshooter for Playing Audio.
  8. Close the Settings window.

In addition to the incorporated troubleshooters in Windows, a separate troubleshooter can be downloaded for problems related to program installation (and removal). This download is compatible with Windows 7, Windows 8, Windows 8.1, and Windows 10. So, if your problem relates to the installation or removal of a program, try downloading and running this tool.

Tip to Fix Audio Issues

There are some problems the audio troubleshooter may not fix. A common audio problem is dealing with crackling sound, audio stutter, or popping sounds. Often unexplainable, and it can sound like there is a bad connection.

A solution that help solve such issues in Windows is the disabling of the hibernation feature. Of course this is not recommended by Microsoft as it can lead to data loss when a power problem occurs. But if you are not concerned with that and just want the best quality audio, give it a try.

Fix ‘HP Printer Install Failed in Windows’

HP Printer Install FailedLike any computer device, printers need additional software to function in Windows. For hardware devices, this software is generally called a driver. By default, Windows supports a lot of devices since many drivers are already included in Windows, but many devices still need a separate driver or additional software to operate; for Hewlett-Packard printers, this is also true.

HP printer driver packages include a lot of additional software, and not only the actual driver. This enables printer troubleshooting and offers additional printing functionality that is beyond the default Windows functions. As a result, the installation of HP printer driver software is a little more extensive and complex than other average drivers. Some HP printer driver installation packages are in the hundreds of megabytes!

The problem we are addressing here is when the installation of an HP printer driver fails, resulting in error messages like “driver fatal install”, or “fatal error during installation”. Further error details can contain file names, error codes, or version mismatches.

You can also see the following errors:
The drivers for this device are not installed (Code 28). To reinstall drivers, click Reinstall Driver.”
Fatal Error 2753 — MSI.dot4wrp

How to Solve HP Printer Install Failed Errors

In most cases, driver installation errors can be solved by simply reinstalling the software again, sometimes a reboot is required before attempting the installation again.

But in the case of more complex software like HP printer software, a failed installation can cause all subsequent installation attempts to fail. The reason is that a failed installation can leave behind locked files, or registry information, which causes the next installation to fail.

Uninstall HP printer

In these cases, the next step is to first uninstall the previous installation, so that a clean system can be used to reinstall the HP driver software. The simplest way to do that is to uninstall the HP printer software from the Control Panel -> Uninstall (or Add/Remove programs) option. The Uninstall a program is found in the Control Panel under Programs -> Programs and Features in Window 7 and later.

In addition you can remove the HP printer in the Devices and Printers section of the Control Panel.

If, however, the HP printer software installation failed in an early stage, the software might not show up in the Control Panel uninstall list. That means the removal of the failed software will not be possible that way. The next thing to try in that case is to use a cleanup utility to fix the corrupted registry. Microsoft used to have the Windows Installer Cleanup Utility for this purpose, but due to conflicts with Office 2007, it was replaced by the Microsoft Fix It solution.

The Fix It solution will clear bad registry keys that can prevent programs from being installed. Keep in mind that it does not actually remove any files from the failed HP driver installation. Those will simply be overwritten by the next installation. Instead of the Microsoft solution, you can also try using a program to scan and fix the complete Windows registry, which does not limit itself to installer issues only. You can use such a program to clean all HP entries from your system before attempting the reinstall. We recommend using PC Cleaner for this purpose.
Note: by Choosing to install PC Cleaner (5.72MB), you consent to it’s End User License Agreement and Privacy Policy of the site.

If you are running XP or Vista, it is also possible that the Windows Installer itself is corrupted. In that case you can simply try to download the Windows installer and reinstall that.

If reinstalling the Windows Installer is not possible, try to re-register it:

– Open a command prompt with administrator rights.
– Type: msiexec /unregister and press Enter.
– After the command completes type: msiexec /register and press Enter again.

For HP Officejet printers, HP used to offer a driver removal utility that could help you remove the HP printer driver for specific models. Unfortunately, this utility is no longer available from them.

Other steps that can help:

– Run a disk cleanup to clear out the temp folders, which are used for temporary installation files.
– Stop the HP services using the Manage Computer option to prevent DLL files being locked.

Reinstalling the HP Printer Software

After the install cleanup is finished and the Windows installer is fixed, you need to reinstall the HP Printer driver software. Unplug the HP Printer and reboot before you do this so that Windows does not install any default drivers for the HP device. During installation, you can reconnect the printer when the installation process indicates it. Please consider that even for wireless printers you sometimes need to make a physical connection with the PC during the initial installation. Please check the printer manual for details.

If installation still fails, and you are using a USB connection, try using a different USB port, and make sure not to use an external USB hub between the PC and the HP printer.

Windows 10 HP Printer Compatibility

Windows 10 Compatibility Mode

Although a lot of HP Printers are supported even under Windows 10, not all HP printers will work. Especially older printer models have no direct support under Windows 10, more so when it is the 64-bit version.
There are a few things you can try to get an HP printer to install in Windows 10 anyway.
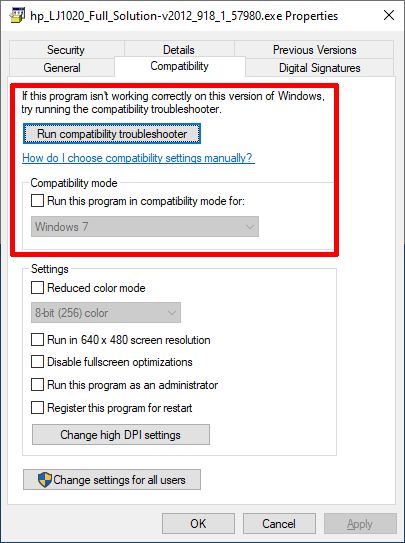
The first is to try and run the printer installer in Compatibility Mode. Simply right-click the driver installer file and in the popup, select Properties.

You can now select Run compatibility troubleshooter. Windows will try to determine which Windows version the file is compatible with. Or you can manually choose the Windows version by using the Run this program in compatibility mode for option. After this, click OK, and execute the installer.

In some cases this method works, even though not all printer functions might be supported due to compatibility issues (often the case with printer/scanner combinations).

Use a Virtual Machine to circumvent the HP Printer Install Failed error

If the printer is not supported at all, even with the compatibility mode, you can choose to use a Virtual Machine (VM). In the Virtual Machine, you then run a version of Windows that still has support for your HP printer. The advantage is that you can still use the printer, the disadvantages are that you need to first still have a version of Windows that supports your printer, and you need to run the VM for all print functions, which means transferring all documents to be printed between the host (Windows 10), and the VM. Apart from being a complex solution, this is not a very convenient solution, so it is only interesting in a few scenarios.

To use a virtual Machine in Windows, you can use the Oracle VirtualBox software or the VMware Workstation Player. Both are free.

Lastly, always make sure to use the latest HP driver software, to guarantee that you are not suffering from old versions with possible bugs or limited functionality. To scan your PC for all drivers and find HP updates, use DriverFinder!

Solved: CD/DVD Drive Not Recognized

Your PC is made up of many devices that interact with each other. Although in most cases updating your drivers is the solution to CD/DVD problems, there may be PC settings (or other applications) interfering with your CD/DVD device.

The following steps outline what you need to do to delete filters in your Windows registry, which may be preventing you from using your CD/DVD device. Steps may vary slightly depending on the Windows OS you use. ALWAYS back up your Windows Registry before making any changes.

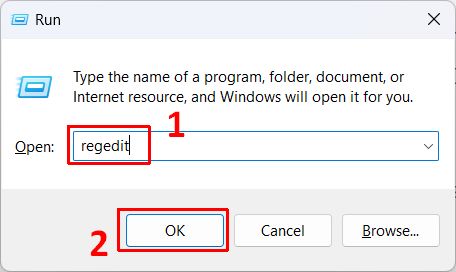
  1. From the Windows Start menu, click Run.
  2. Type regedit (1) in the space provided and then click OK (2).
    Windows run regedit
    Note: If the UAC window shows up, click Yes to continue.
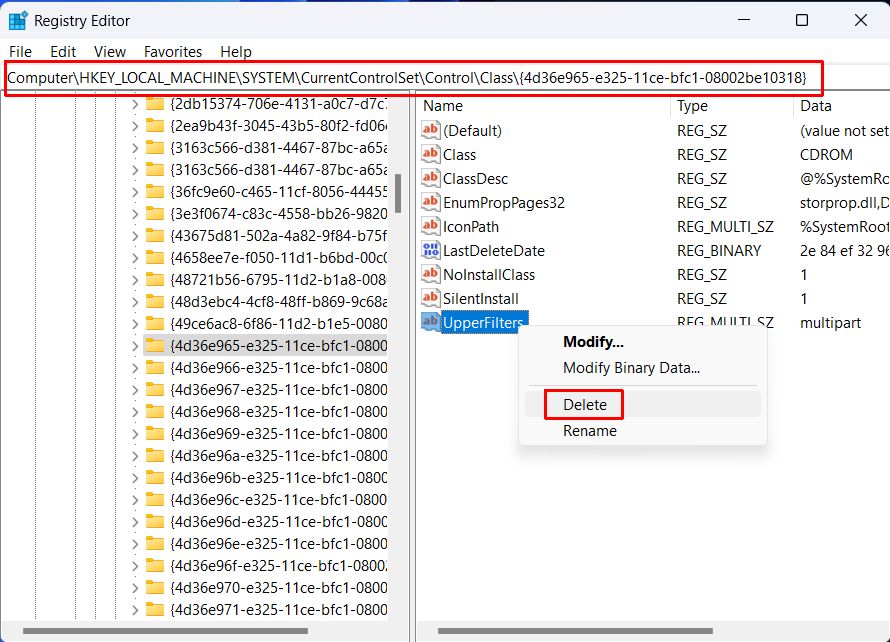
  3. Go to this folder: HKEY_LOCAL_MACHINE\SYSTEM\CurrentControlSet\Control\Class\{4D36E965-E325-11CE-BFC1-08002BE10318}
  4. On the right pane, right-click UpperFilters.
    Note: You may also see an UpperFilters.bak registry entry. You do not have to remove that entry. Remove UpperFilters only.
    If you do not see the UpperFilters registry entry, you still might have to remove the LowerFilters registry entry. To do this, go to Step 7 below.
    Delete UpperFilters in Registry to fix CD/DVD
  5. In the context menu, click Delete.
  6. If prompted to confirm the deletion, click Yes.
  7. On the right pane, right-click LowerFilters.
  8. In the context menu, click Delete.
  9. If asked to confirm the deletion, click Yes.
  10. Exit the Registry Editor.
  11. Restart your PC.

After the PC restarts, your CD/DVD drive should be recognized and a driver letter should be assign to the drive.

If you are using an external CD/DVD drive that is connected through a USB port, also check your USB ports and drivers. Connecting to a different USB port can sometimes be sufficient.

Recommended: Update Your CD/DVD Drivers with DriverFinder

Copyright 2009 and Beyond - DriverFinderPro.com - All Rights Reserved