
When working with any operating system, there will be moments when things go wrong and you wish you could go back in time. In Windows, System Restore offers a feature that is somewhat like that. Restore points can be created to make a snapshot of the configuration. Using the System Restore option, that configuration can then later be restored.
System Restore will only capture Windows configuration, not user files or settings. So it is a good feature to ensure the system can be restored in case of problematic apps, updates, drivers, and other system-critical changes.
Enable System Restore
Before restore points can be created, the System Restore function needs to be enabled. Enabling system restore will also allocate storage space on one or more drives for creating restore points.
To enable system restore on Windows:
- Open the Settings window using the Windows + I keys (or use the Start menu).
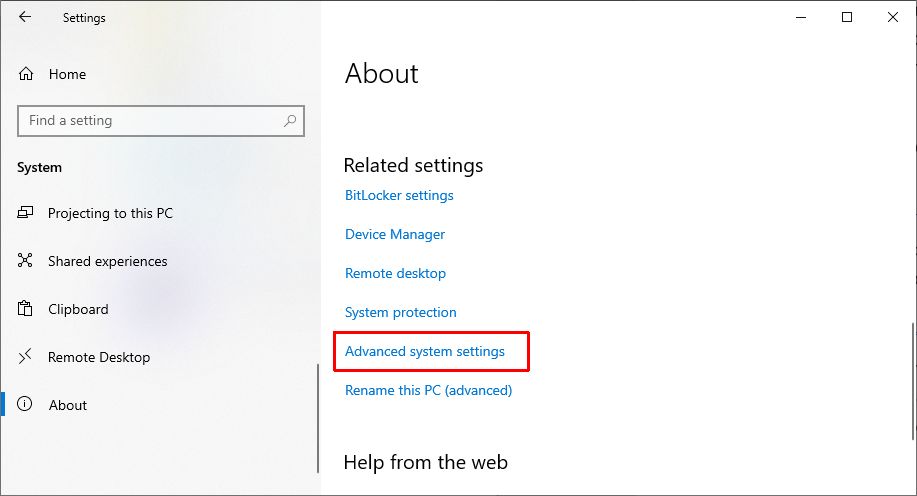
- In the Settings window, click System and then About.
- Scroll down to Related settings, and click the Advanced system settings link.
This will open a new dialog box named System Properties. - In the System Properties window, select the tab System Protection.
- Under Protection Settings, select the drive for which to enable the system protection.
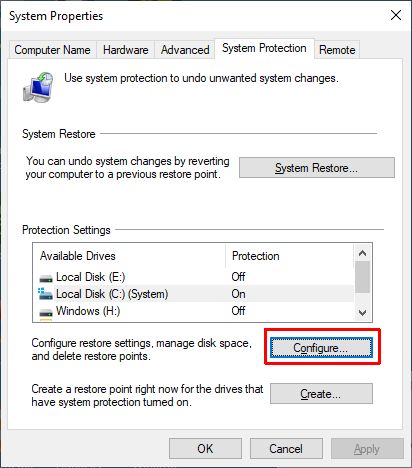
- Click the Configure button. A new dialog box will open showing the drive protection settings.
- Select the option Turn on system protection (1).
- Optionally, change the slider for Max Usage (2) to limit the amount of drive space that can be used for creating restore points.
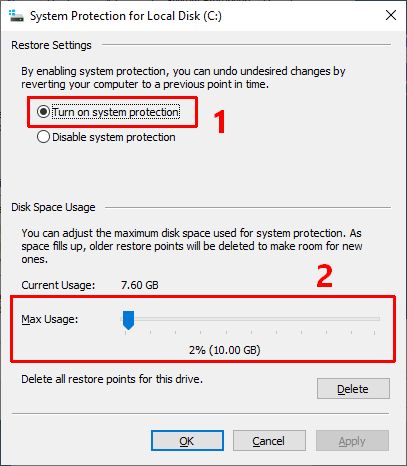
Note: By default, Windows will have system protection enabled for the system drive. - Click the OK button when done.
- Repeat steps 5 to 10 for any other drive for which you want to enable system protection. The main advantage of enabling system protection on other drives in your system is to limit the use of the system drive and allocate more space for restore points. The functionality of the System Restore feature does not change as a result.
- Click the OK button in the System Properties dialog box when done.


Once enabled, Windows will automatically create a system restore point when changes are made (driver install, Windows Update, etc.). But it is also possible to manually create a restore point. This can be convenient if you plan to manually make changes to your Windows system that you may need to reverse.
Using System Restore
When system protection is enabled and restore points are created, you can use these to restore the system to a previous state. Typically, this is done to solve problems with a device, an app, or Windows itself (after an update).
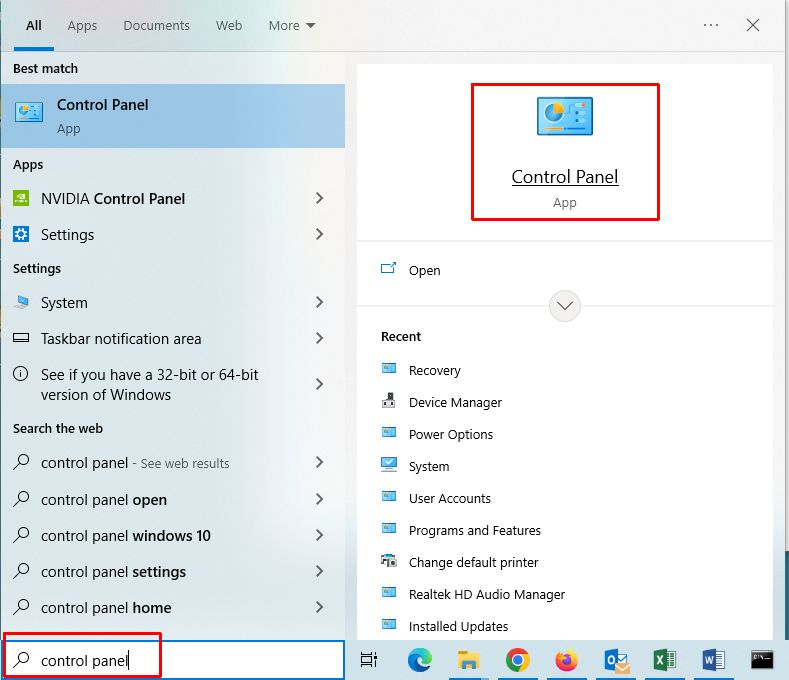
- Search for control panel in the Start menu search box.
- Click the Control Panel App in the search results.
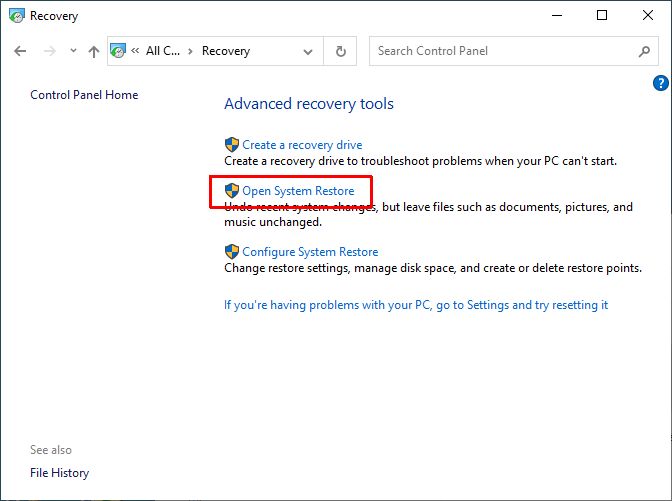
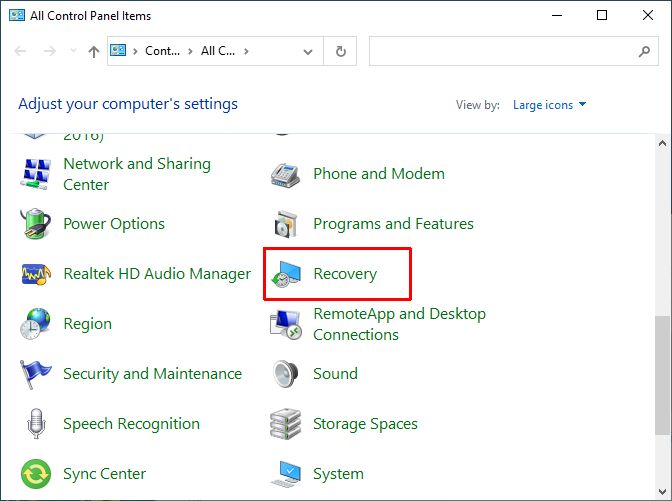
- In the Control Panel window, click the Recovery option.
- Next, click the option Open System Restore.
- To use the most recent restore point, leave the Recommended restore option selected and click Next.
- To manually select a restore point, select the option Choose a different restore point and click Next.
- In the manual restore point selection, select the checkbox Show more restore points (1) if you do not see the restore point you want to use. After that, select the restore point in the list (2) based on date, time, and description, and then click Next (3).
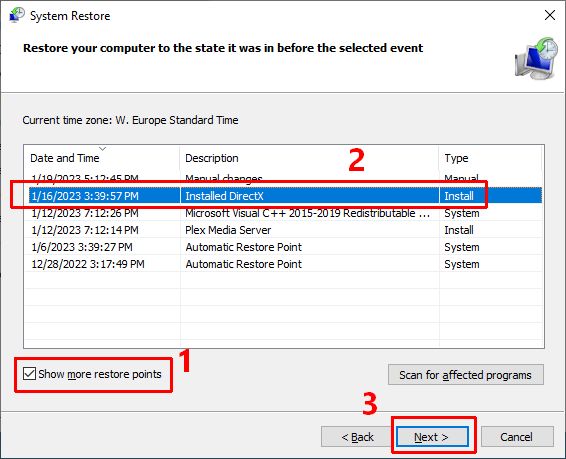
- Click the Finish button to confirm using the selected restore point for System Restore.
Note: If you are unsure of the impact of the System Restore using the selected restore point, click the Scan for affected programs This will show programs and drivers affected by the operation.


Manually Creating a Restore Point
Creating a restore point in Windows can be done at any time. To manually create a restore point in Windows use these steps.
- Type control panel in the search box on the Start menu and press Enter.
- In the search results, click the Control Panel App.
- In the Control Panel window, locate and click the Recovery option.
- Next, click the option Configure System Restore. The System Properties window will open with the System Protection tab selected.
- Click the Create button at the bottom of the dialog box.
- Type a description for the restore point and then click the Create button.
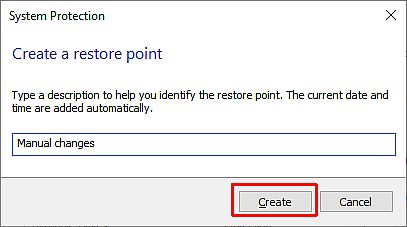
- Wait for the restore point to be created. Click the Close button when complete.
- Close the System Properties window and the Control Panel window.


Free up disk space used by restore points
Windows will only create restore points on the drivers for which system protection is enabled. The maximum configured size determines how many restore points can be created. Once the configured maximum space is used up, the next creation of a restore point will result in older restore points being removed.
It is also possible to manually delete restore points for a drive. The only valid reason for this is if you know that a restore point results in a problematic configuration. So, using the restore point is not desired and removal is the best option.
- Open the System Protection dialog box using the steps in the Enable System Restore
- Select the drive and click the Configure button.
- Next, click the Delete button.
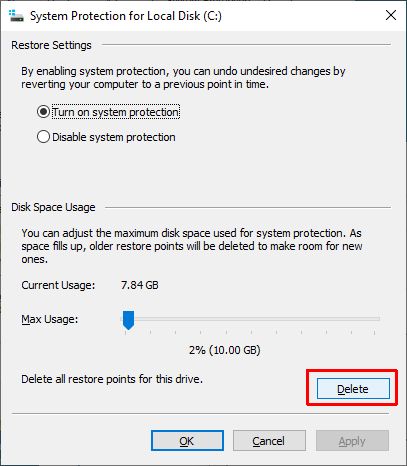
- Click the Continue button to confirm the removal of all system restore points on the drive.
- Click the Close button when done.
- Close the drive system protection window, and then close the System Properties window.

After this, all system restore points on the driver are deleted and the disk space is freed up.
It is important to realize that these steps will remove ALL restore points on the drive. It is not possible to select individual restore points for removal. The only other option available is to use Disk Cleanup and remove all restore points apart from the last one.
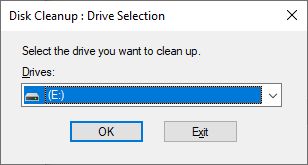
- Type disk cleanup in the search box on the Start menu and press Enter.
- In the search results, click the Disk Cleanup
- Select the drive for clean up and click OK.
- Select the More Options tab (1).
- Under System Restore and Shadow Copies, click the Clean up button (2).
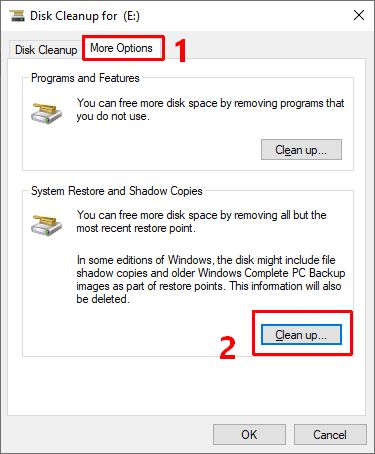
- Click the Delete button to confirm.

