update | DriverFinder - We Make Drivers Work for You

How to Update Realtek Bluetooth Driver – Windows 11

Realtek Bluetooth

The Bluetooth interface is used on Windows 11 (and Windows 10) systems to connect Bluetooth devices. Mobile phones, speakers, printers, or even another computer. Bluetooth wireless communication is ideal for short-range wireless communication. And like all hardware devices in Windows, the Bluetooth device needs a Bluetooth driver to function. The most common Bluetooth chips used in PCs are from Intel and Realtek.

If no driver is installed, Windows will not recognize the device, or Bluetooth will not function properly. So, if Bluetooth is not working in Windows 11, you might need to update the Bluetooth driver. In this article, we’ll show you how to update the Realtek Bluetooth driver. Of course, we also have instructions on updating the Intel Bluetooth driver.

Note: These instructions apply to both Windows 10 and Windows 11. It is important to update the Realtek Bluetooth driver on Windows 10 already, since the upgrade to a later Windows version can be blocked because of an old driver!
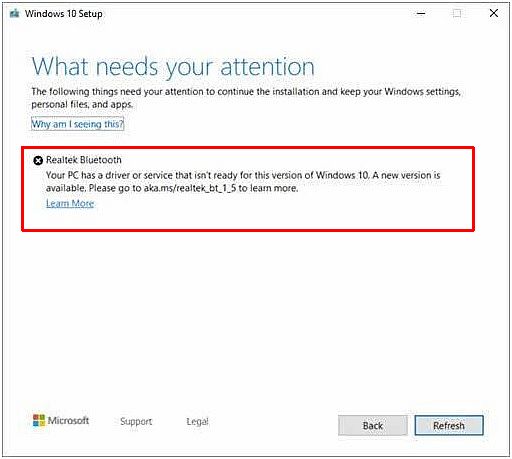
Windows 10 Update Problem Realtek Bluetooth

Updated Bluetooth drivers can solve this type of problem. Updated drivers will also make sure that any known bugs in previous versions are fixed, and performance and connectivity are maximized.

Automatically Update Drivers

Windows 10 and Windows 11 include support for a lot of devices by default. Drivers for the devices are either included in the Windows installation or retrieved during the Windows Update process.

If the Realtek Bluetooth driver needs to be updated, the first step is to run Windows Update. Also make sure that drivers updates are included in Windows Update, as automatic driver updates can be disabled in Windows!

Apart from Windows Update, a driver can also be updated from the Device Manager in Windows 11 directly.

  1. Press the Windows + R keys to bring up the run dialog box.
  2. Type devmgmt.msc in the Run field and press Enter or click the OK button.
  3. In the Device Manager window, locate the device for which to update the driver. Right-click the device, and in the context menu select Update driver.
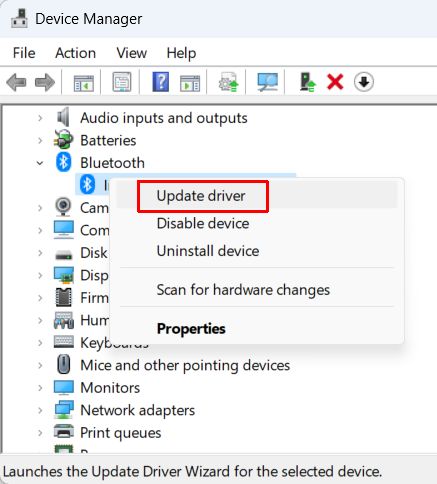
    Update Realtek Bluetooth driver
  4. Next select the option to let Windows Search automatically for drivers.
  5. Click the Close button when done.

For more details, also see installing driver updates using the Device Manager in Windows 11.

Another method to automatically update Windows drivers is to use the DriverFinder program. This software automatically scans all hardware devices in your PC and then recommends the appropriate device drivers for them. It will not just update the Realtek Bluetooth drivers, but allow you to update all your device drivers.

Manually Update the Realtek Bluetooth Driver

Manually updating drivers in Windows means downloading the driver installation files and running an installer or updating the driver from the Device Manager.

Driver files for Bluetooth devices can be available on the PC manufacturer’s website or the Realtek website. First, visit the support site of your PC manufacturer and check for updated drivers of your model. If they are not available, or still not the latest version, you can visit the Realtek website.

Realtek offers support for most of its devices online. This support includes the option to download Windows drivers for many of their devices.

Using the Realtek Support site

  1. Open a web browser and navigate to the Realtek software download page.
  2. On the Realtek web page, use the Product Line dropdown box to select Wireless Lan ICs.
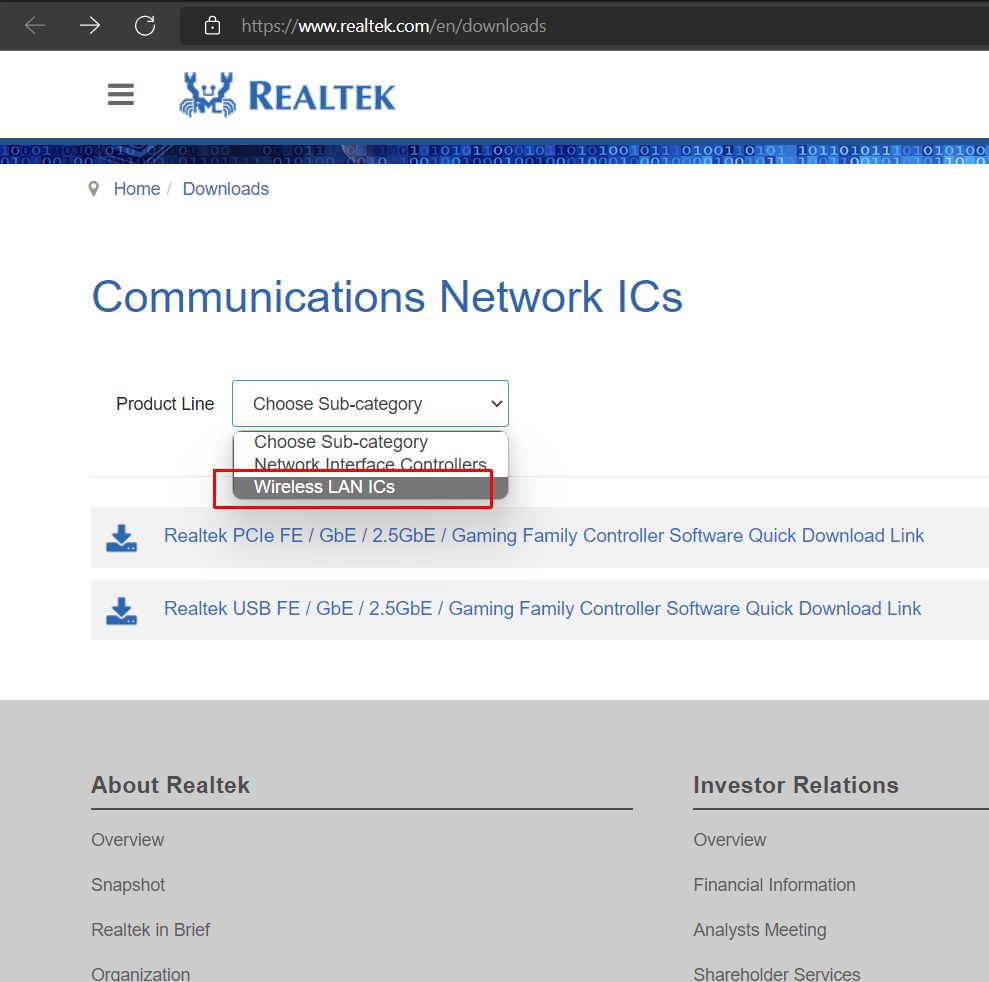
    Realtek Wireless device support
    Note: Bluetooth is a wireless technology, so support is combined with Wi-Fi devices.
  3. Now select the Realtek Wireless LAN IC from the list on the web page that matches the device in your PC. Click the Software link next to it.
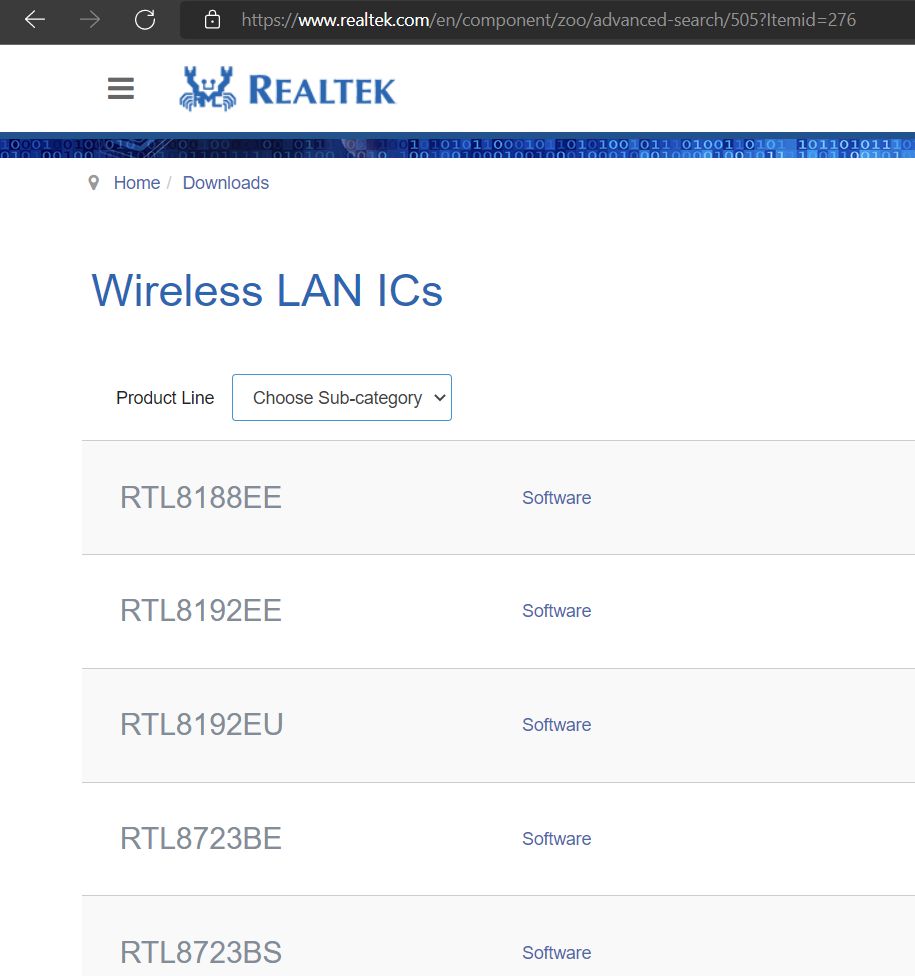
    Realtek Wireless LAN ICs
  4. On the specific Realtek LAN IC software page, locate the Bluetooth driver you need and click the download icon.
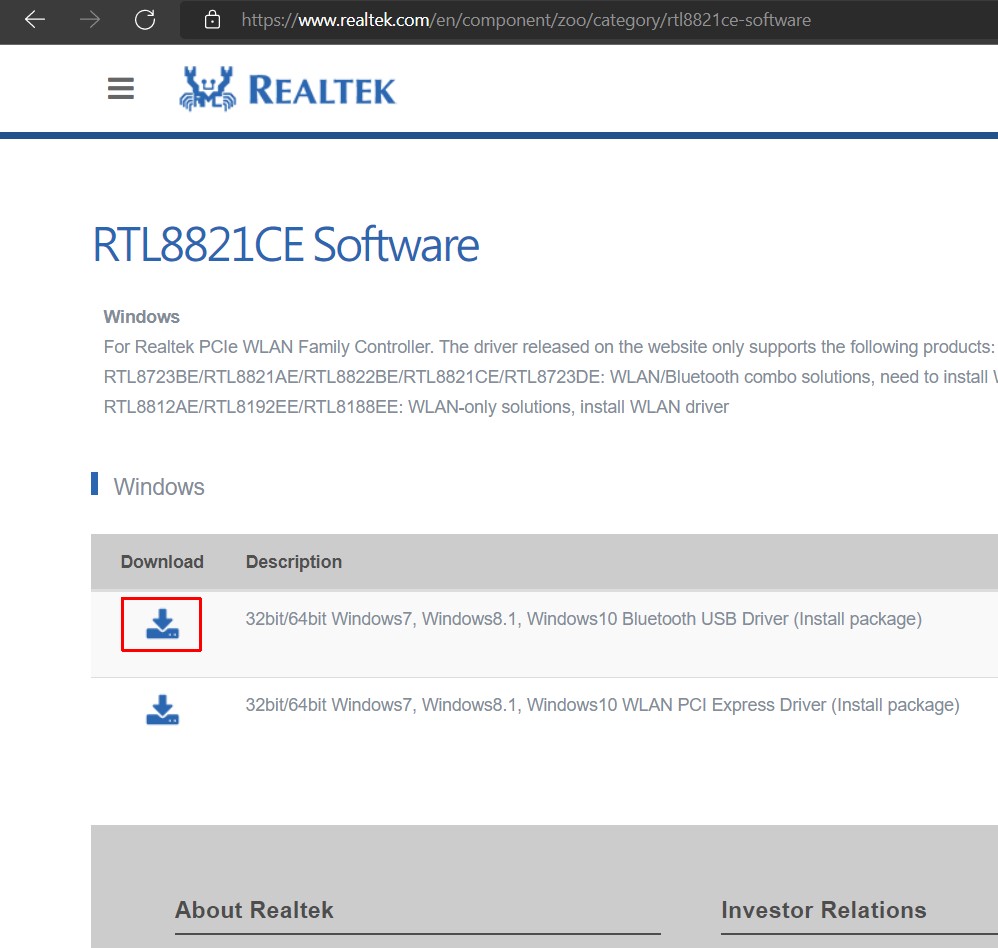
    Download Realtek Bluetooth driver
    Note: Most onboard Bluetooth solutions use a PCI Express implementation. External, pluggable solutions will use the USB option.
  5. On the Agree the Terms and Download page, select the checkbox I accept the above and then click the Download this file button.
  6. Finally, enter the Captcha and click the Go button.
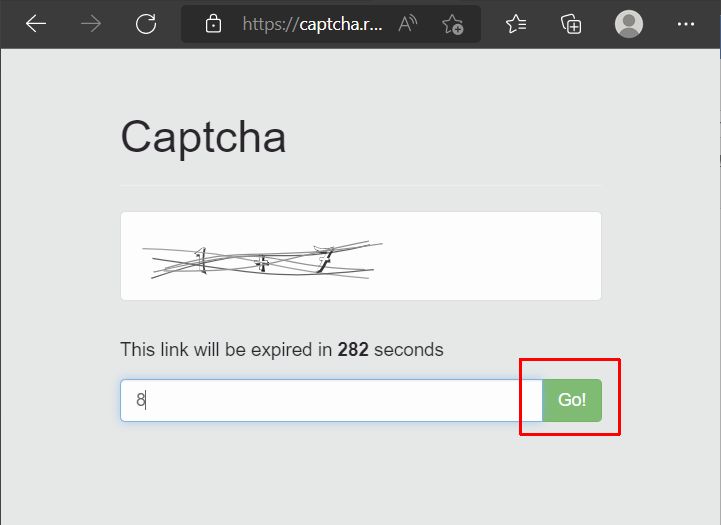
    Realtek download Captcha
  7. Wait for the file to be downloaded and if required, select the location on disk to save the file. (This will depend on the browser being used.)
  8. Open a File Explorer and browse to the downloaded file. If the downloaded file is executable (EXE file extension), simply double-click the file to execute the driver installation and follow the on-screen instructions.
  9. If the downloaded file is an archive (ZIP file extension), right-click the file and select Extract All in the context menu.
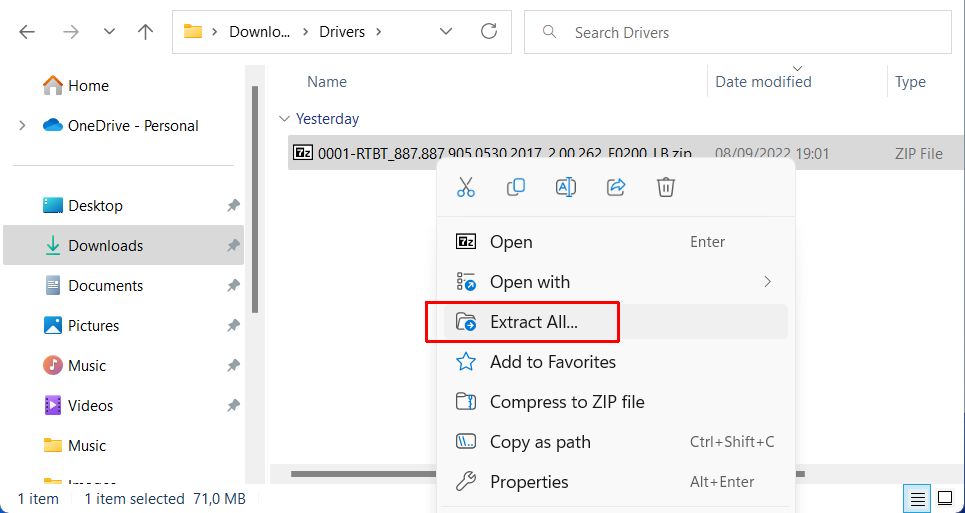
    Extract Realtek driver files
  10. Select the location where to extract the files, and then click the Extract button.
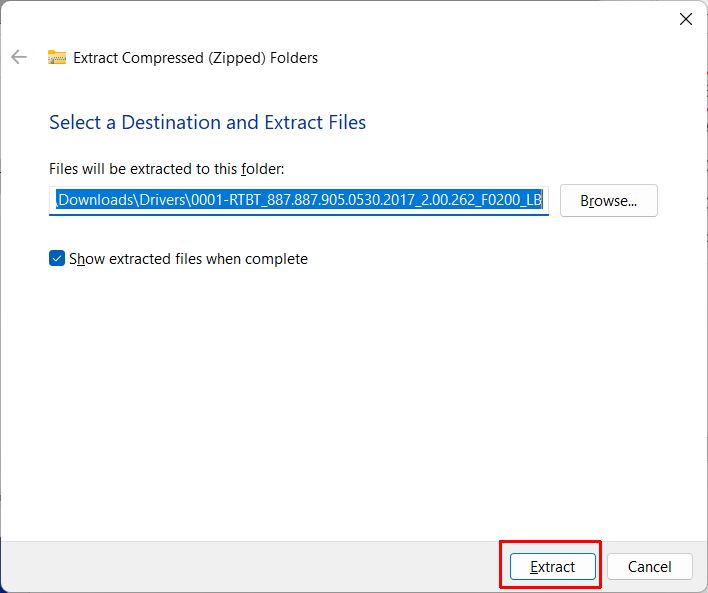
    Extract ZIP archive
    Note: The default suggestion is okay in general, as it is a subfolder of the file’s current location.
  11. Double-click the subfolder in the opened File Explorer
  12. Now locate the setup.exe file in the subfolder and double-click it to execute the driver installation process. Follow the instructions on screen.
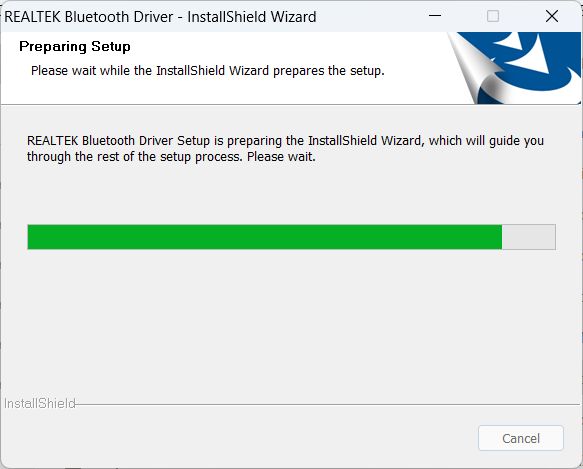
    Realtek Bluettoth Driver Installer

With the above instructions, you can download and install updated Realtek Bluetooth drivers for Windows. This should solve any issues you have with Realtek Bluetooth not working in Windows 11.

How to Update an Intel Bluetooth Driver – Windows 11

The Intel Bluetooth interface is part of the Intel wireless adapters in PCs with an Intel wireless chipset. The appropriate driver needs to be installed to ensure the Intel Bluetooth device functions on Windows 11. Windows 11 will normally install supported drivers automatically, but if you need to update an Intel Bluetooth driver on Windows 11, follow these instructions.

Manually Update the Bluetooth Driver

To update the Intel Bluetooth driver, we first need to download the latest version from the Intel website. In some cases, your PC manufacturer will also have a driver available for the Bluetooth interface in your PC. Make sure to check the available versions on both websites to see which version is required.

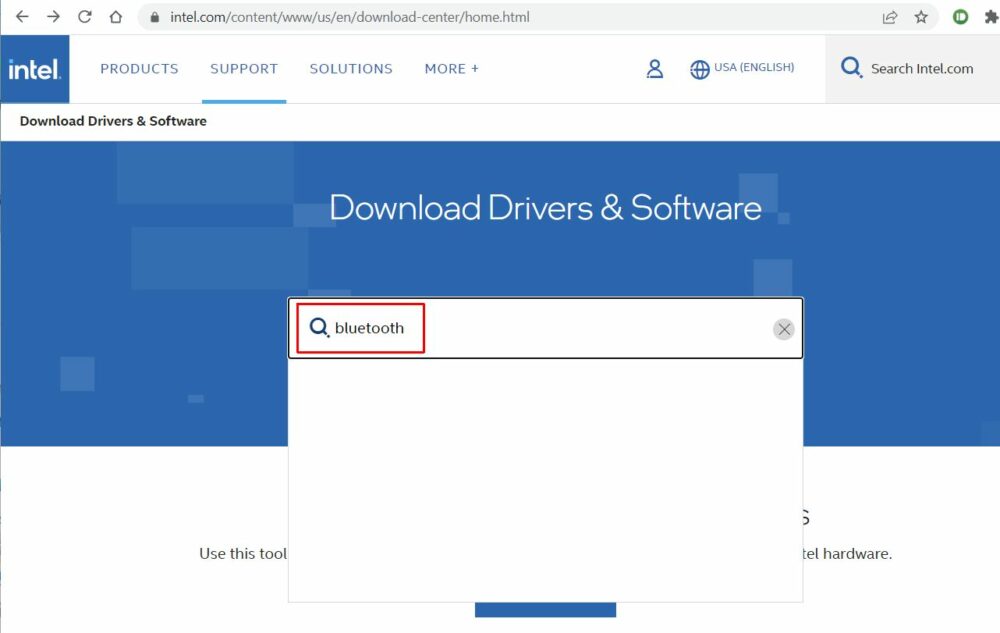
  1. Open a web browser and navigate to the Intel download center.
  2. On Intel the web page, use the Search option to locate the latest Bluetooth driver. Type “bluetooth” and press Enter.
    Search Bluetooth Intel support
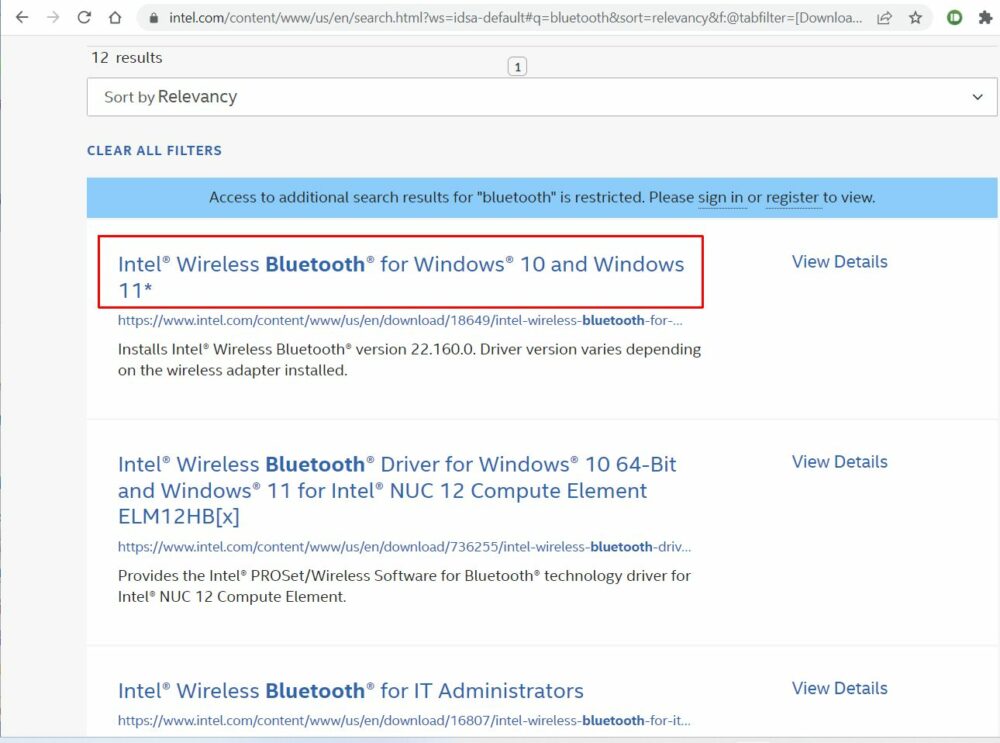
  3. In the list with search results, locate the Intel® Wireless Bluetooth for Windows 10 and Windows 11 entry and click it.
    Intel Bluetooth driver download link
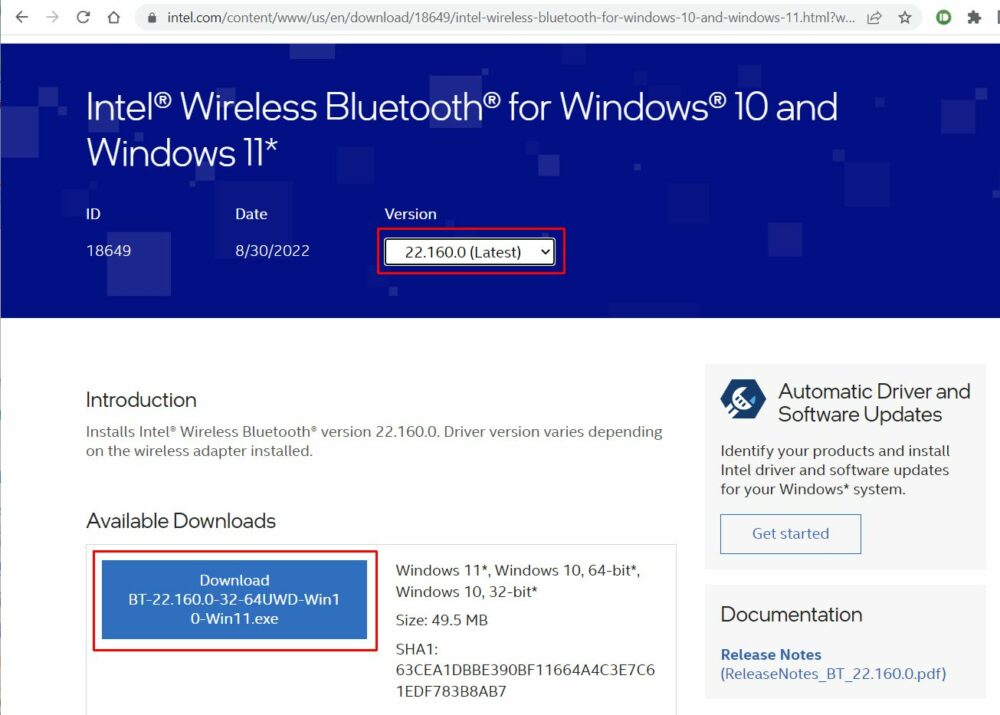
  4. On the web page for the intel® Wireless Bluetooth® for Windows 10 and Windows 11, click the Download button for the installer.
    Note: The downloaded version will be the latest available. If you need an older version, use the Version drop-down field to select a previous version.
    Download Intel BT Driver
  5. Click the I accept the terms in the license agreement button in the windows that show next.
  6. The Intel Bluetooth installer file will start downloading.
    Note: Depending on the browser being used, you may need to select a destination on disk for the downloaded file.
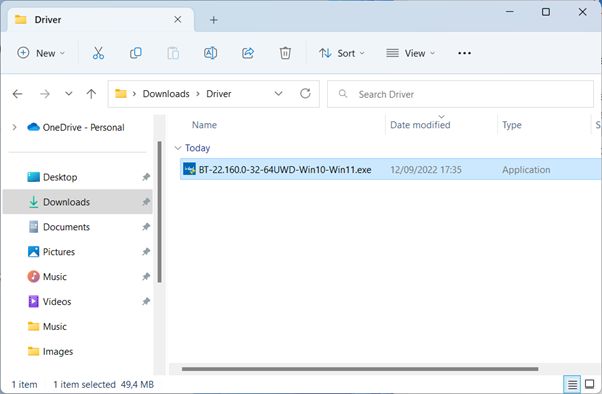
  7. Once the download completes, open a File Explorer and browse to the downloaded file.
    Intel Bluetooth Installer File
  8. Double-click the downloaded file to execute the driver installation and follow the on-screen instructions. If the UAC screen shows, click the Yes option to continue.
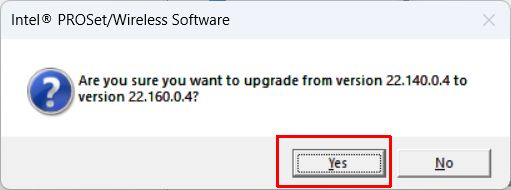
  9. If a driver is already installed for the Intel Bluetooth device, a popup will show to confirm the upgrade from the existing version to the new version of the driver. Click Yes to confirm.
    Intel Bluetooth Driver Upgrade
  10. After this, follow the on-screen instructions in the Intel® Wireless Bluetooth® Setup window.
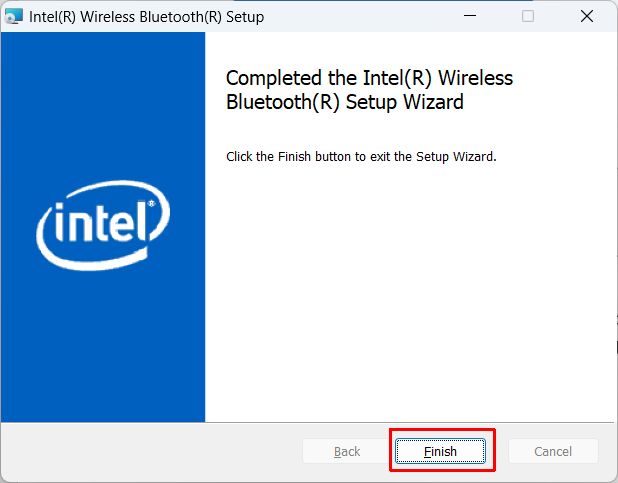
  11. Once the installation of the Intel Bluetooth driver completes, click the Finish button to close the setup window.
    Bluetooth Setup Complete

Note: Always make sure to check which wireless adapters are supported by the driver version. If your device is not listed, chances are that the driver will not work. For version 22.160.0.4, as shown in the instructions, the devices supported are:

Intel® Wi-Fi 6E AX4111, AX2111, AX2101
Intel® Intel® Wi-Fi 6 (Gig+) Desktop Kit1
Intel® Wi-Fi 6 AX2001, AX2011
Intel® Wireless-AC 95601,-AC 94621, 94611, 92601
Intel® Dual Band Wireless-AC 82651,-AC 82601, 3168
Intel® Wireless 7265 Family
Intel® Dual Band Wireless-AC 3165

Automatically Update an Intel Bluetooth Driver

To automatically update the Intel Bluetooth driver on Windows 11, run Windows Update. First, make sure automatic driver updates are not disabled.

  1. Open the Windows 11 Settings by pressing the Windows + I keys (or use the Start menu).
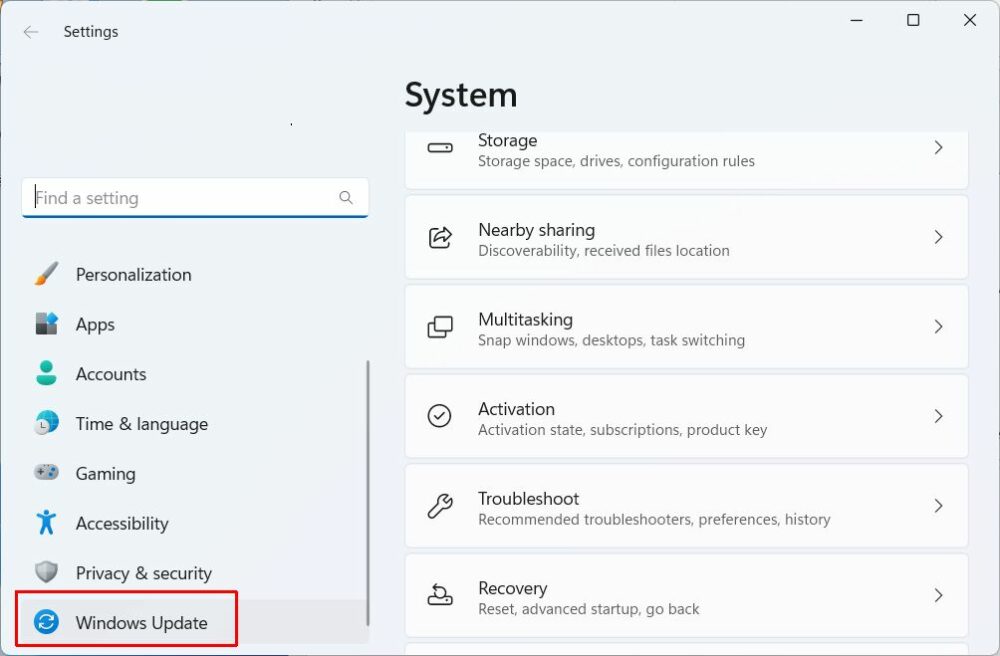
  2. Click Windows Update in the left-hand panel in the Settings window.
    Start Windows Update in Windows 11
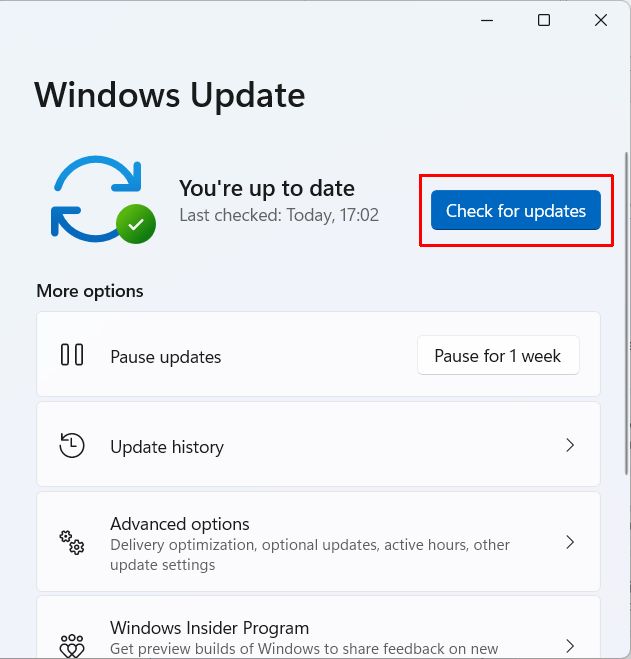
  3. Next, click the Check for updates button in the right-hand panel.
    Check for updates in Windows 11
  4. Wait for updates to be downloaded and installed.

A second option to automatically update the Intel Bluetooth drivers is to use a program like DriverFinder that will automatically find the latest version of the Bluetooth driver for your PC.

Update the Intel Bluetooth driver using the Device Manager

The last option to update the Intel Bluetooth driver is to use the Device Manager. The Device Manager has been part of Windows since the initial Windows versions. It allows you to see all devices that are present in the system. For each device, the drivers can be checked and updated.

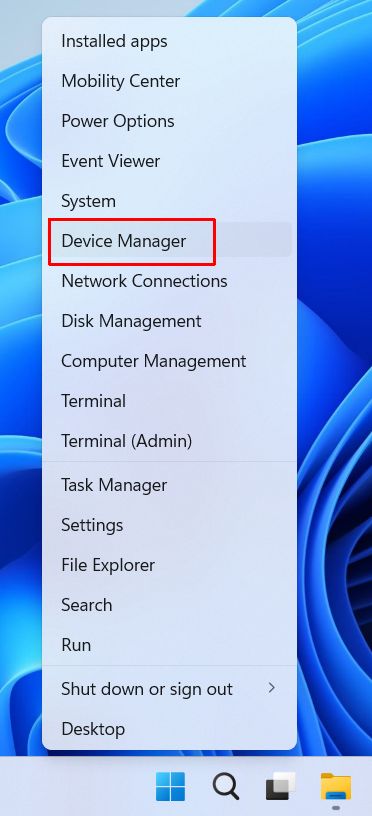
  1. Open the Device Manager by right-clicking the Start menu button and selecting Device Manager in the menu.
    Windows 11 Device Manager from Start menu
  2. In the Device Manager, expand the Bluetooth category.
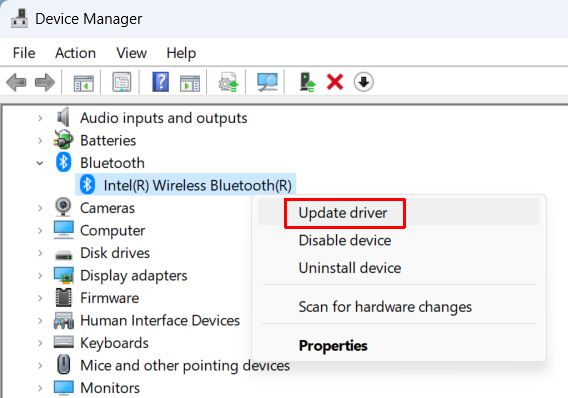
  3. Right-click the Intel® Wireless Bluetooth® device, and in the context menu select Update driver.
    Intel Bluetooth Update Driver
  4. Click the option Search automatically for drivers and wait for the driver to be updated.
  5. Click Close when done, and then close the Device Manager window.

Tip: Use the Uninstall device option to remove the device from the Windows configuration. Combined with the option to remove the driver software for the device, this can help solve problems by doing a fresh install of the driver.

With the above instructions, you can download and install the Intel Bluetooth driver for Windows. This should solve any issues you have with Intel Bluetooth not working in Windows.

How to Uninstall Intel Wireless Bluetooth Software

As mentioned in the previous section, sometimes it is necessary to remove the Intel Bluetooth driver before installing a new version. If you find that the Intel Bluetooth driver update cannot be installed, try removing the software first using these steps.

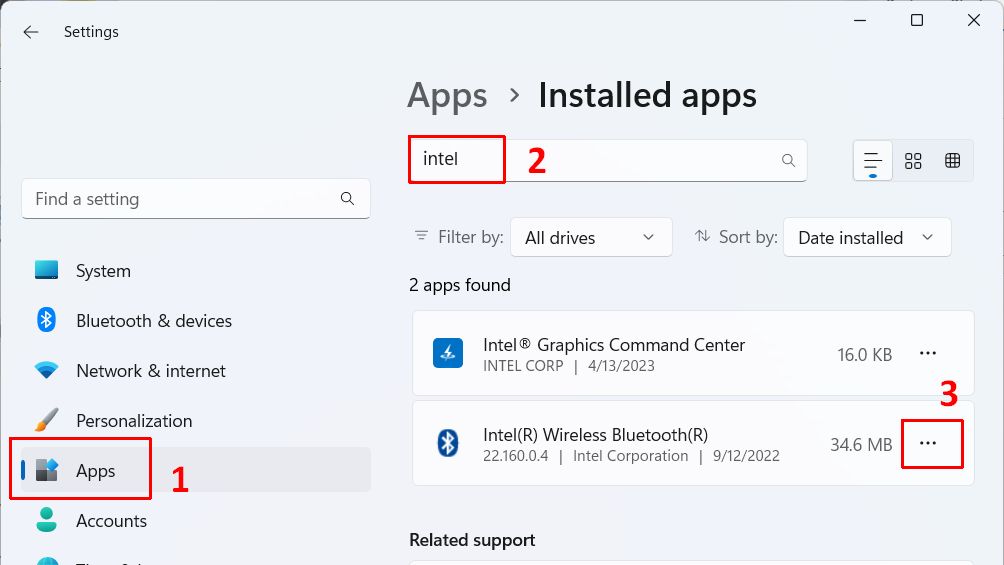
Uninstall Intel Wireless Bluetooth software
  1. Open the Settings window from the Start menu.
  2. Select Apps in the left-hand pane (1).
  3. Select Installed Apps in the right-hand pane.
  4. Type intel in the Search apps box (2).
  5. In the apps found, click the three dots icon next to Intel(R) Wireless Bluetooth(R) (3).
  6. Select Uninstall in the context menu.
  7. Click Uninstall again in the confirmation popup.

Wait for the software to be uninstalled. After that rebooting the device is recommended to make sure all components are removed. If any part of the software is in use, a reboot will make sure it gets removed when Windows restarts.

cFosSpeed Driver for Windows preventing Windows 11 update

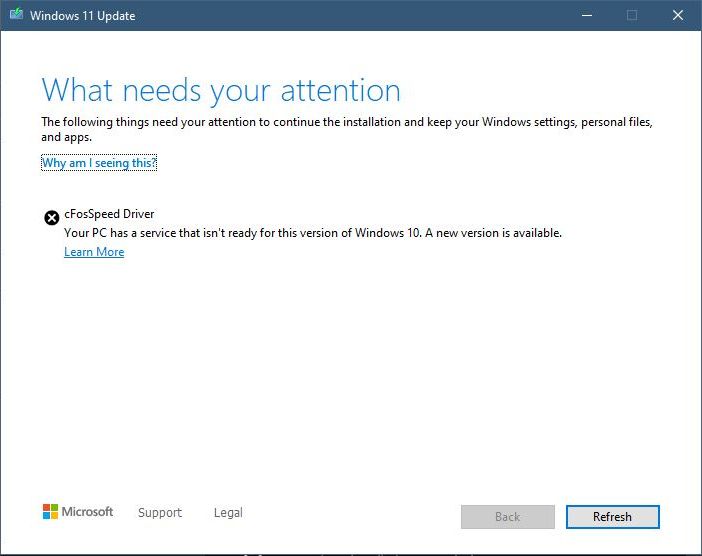
When you are finally ready to upgrade from Windows 10 to Windows 11 and your system is meeting the system requirements, you can still run into issues that prevent the upgrade. The cFosSpeed Driver can prevent the upgrade to Windows 11, as the Windows Update process will report it as something that needs your attention. Essentially it states that “a service isn’t ready for this version of Windows 10 ”.

Widnows cFosSpeed driver

What is the cFosSpeed driver?

The cFosSpeed driver is an Internet accelerator software solution. The software optimizes Internet traffic on a Windows PC by installing a device driver. The driver performs something called traffic shaping. It has some advanced network analysis and optimization integrated, but it also allows for the prioritization of streams or protocols. This is great for video streaming and gaming.

How did cFosSpeed get on my system?

The solution is integrated with quite a few OEM vendors. Manufacturers like MSI, Asus, ASRock, and Gigabyte include the cFosSpeed software in their driver bundles for their motherboards. In the case of Asus, you might know it as Turbo LAN, which is a rebranded version of the cFosSpeed software. With MSI it is part of the Dragon Center.

Fix cFosSpeed from blocking the Windows 11 Update

Considering the problem of the cFosSpeed driver blocking the Windows update, there are two solutions to the issue with the cFosSpeed driver. The first is to update the driver to a version that does not block the Windows 11 update. The second option is to uninstall the cFosSpeed driver from your Windows installation.

Update the cFosSpeed driver

The first option to update the driver is to check the OEM support site for an updated version of the software that includes the cFosSpeed driver.

For Asus, check their support site and look up your model to see if a new version is available. If so, download it and install it and then try the Windows 11 upgrade again.

For MSI, download and install the latest version of the MSI Dragon Center and after completing the installation, try the Windows 11 upgrade again.

For Gigabyte you will need to download the cFosSpeed Internet Accelerator Software from their site. Check the support section for your motherboard or model.

For ASRock, the cFosSpeed driver is part of the XFast Lan solution. It can be downloaded from here.

The last option is to download the latest cFosSpeed software from the vendor’s site and install it. Take note that this is a shareware version, which is valid for 30 days. But it should update your cFosSpeed driver so that you can upgrade to Windows 11.
Update: the software is now owned by Atlas Tech Solutions and their latest version is 13.

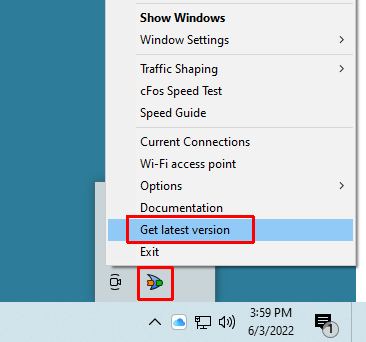
If you have the original cFosSpeed software installed and running, you can click the cFosSpeed icon in the Taskbar, and then in the popup menu select Get latest version.

Update cfosspeed driver

Uninstall the cFosSpeed driver

If the driver update did not solve your issue, and you can still not upgrade to Windows 11, the best option is to uninstall the cFosSpeed driver altogether.

Uninstall the cfosspeed APP

Steps to uninstall cFosSpeed in Windows 10:

  1. Open Settings from the Start
  2. In the Settings window, select Apps.
  3. By default, Apps & features should be selected. If not, select that option in the left-hand panel.
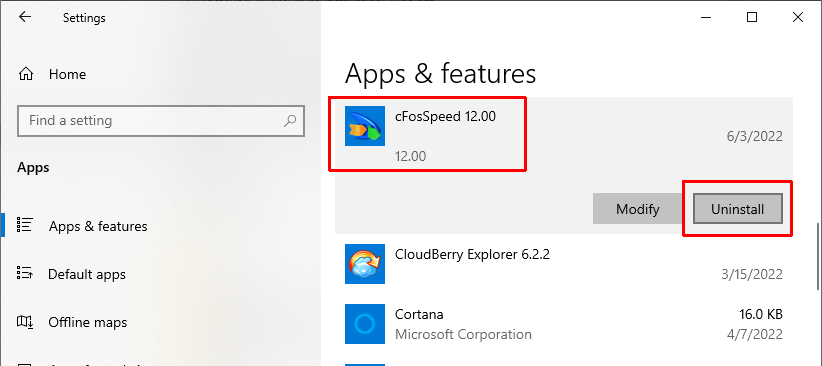
  4. Now scroll down in the apps list until you see the cFosSpeed entry (it will include a version number in the name).
  5. Click it, and then click the Uninstall
    Uninstall cfosspeed
  6. When prompted “This app and its related info will be uninstalled.”, click the Uninstall button.
  7. When the UAC (User Account Control) windows pops up, click the Yes option to allow the uninstaller to run.
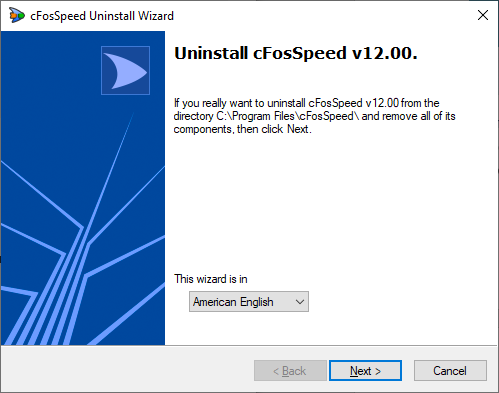
  8. Follow the instructions in the cFosSpeed Uninstall Wizard to uninstall the app.
    Uninstall cfosspeed 12If for some reason this does not work, it is also possible to uninstall the cFosSpeed from the Network Properties.

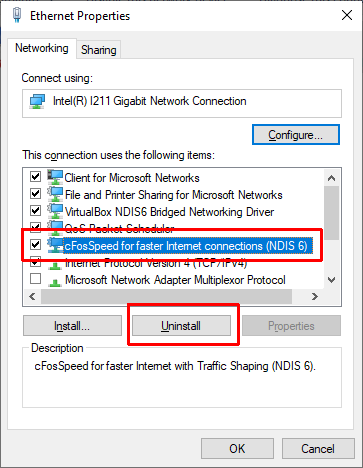
uninstall the cfosspeed driver

Open the network properties for an active adapter, select the cFosSpeed for faster Internet Connections (NDIS 6) entry, and then click the Uninstall button.

Uninstall cfosspeed network driver

You will again be prompted for a confirmation. Click the Yes option to uninstall the cFosSpeed driver.

After completion, the entry will no longer show in the Network Properties list.

There is no need to repeat this for any other active network adapters. Once uninstalled, the cFosSpeed driver will be removed from all network devices.

Note: Uninstalling the cFosSpeed software using the network option will only remove the Lan Manager component, which is the network driver. The cFosSpeed main application, if installed, will still remain. So, if possible, use the App uninstall option to uninstall cFosSpeed.

After uninstalling the software, try the Windows 11 upgrade again.

If the upgrade still fails, you may need to consider doing a fresh install of Windows 11 rather than an upgrade from Windows 10.

Make sure to also check the article about TMP drivers and how they can affect the Windows 11 upgrade.

Copyright 2009 and Beyond - DriverFinderPro.com - All Rights Reserved