Is Windows 10 waking up from sleep randomly even though you’ve put it in Sleep Mode? I hear you. Like many other people, I often leave my PC on for longer periods of time. When I’m done working, I simply put it in ‘sleep mode’ so I can easily continue where I left off the next day.
Lately, I’ve noticed that my PC ‘comes to life’ on its own even though I put it to sleep. (I know… creepy!) This brought out the geek detective in me so if you’re experiencing this, read on to find out how to stop that from happening.
Windows 10 Waking Up from Sleep Mode — Possible Reasons
There are multiple possible causes why your PC can suddenly wake up from sleep. Although they might seem random, they are actually not.
One of the most common causes is Windows itself.
Windows 10 normally checks for updates or performs scheduled maintenance tasks. To make matters worse, if the task fails, it can keep on trying the task until it succeeds. So your PC will go to sleep and come out of it multiple times!
Another possible cause is you have software installed that is scheduled to perform a task. An example of this is your anti-virus software performing a scan at a specific time.
Another reason is that a hardware device is triggering the PC to wake up. The most common device is the network device, but USB devices can also trigger power mode changes.
So Which One is Causing these Random ‘Wake Ups’
The first thing to do is… ask Windows itself! The way to do this is to use a command prompt and use the powercfg command.
Here are the steps in detail:
- On the Windows search bar, type “command prompt” (without quotes).
- In the results that show, right-click Command Prompt.
- In the popup menu that appears, click Run as administrator.

- Click the Yes button in the User Account Control dialog box when it shows.
- In the Administrator: Command Prompt window, type:
powercfg –lastwake
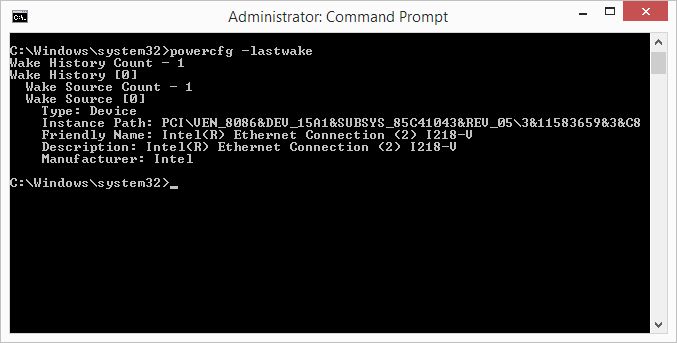
- In this specific example, you can see that a hardware device woke up the computer. The Intel(R) Ethernet Connection caused the PC to wake up from sleep.


Please note that it’s not always the fault of a hardware device :) Results of your particular powercfg –lastwake command run may show a specific software or application instead.
To give an example, I had left my email client – MS Outlook – running a few times. Not a problem in itself, but since I had scheduled it to fetch email from a specific email account at regular intervals, it woke up my PC… constantly!
Apart from the –lastwake parameter, you can also use the –waketimers parameter.

The powercfg –waketimers command will show all active wake timers. (Below in this article you can find out how to disable the Allow Wake Timers option in Windows 10.) The results of the command will show the current timers that are set on the PC. Details include the type, name, and exxpiration.
Another option to find out the reason for the wake-from-sleep issue is to check the Windows Event Viewer. The Event Viewer is a Windows app that uses a graphical user interface rather than a text based interface (command prompt).
Here are the steps:
- On the Windows search box, type “event viewer” (without quotes).
- In the search results, click the Event Viewer App.
- In the Event Viewer window, open Windows Logs, and then click System (1).
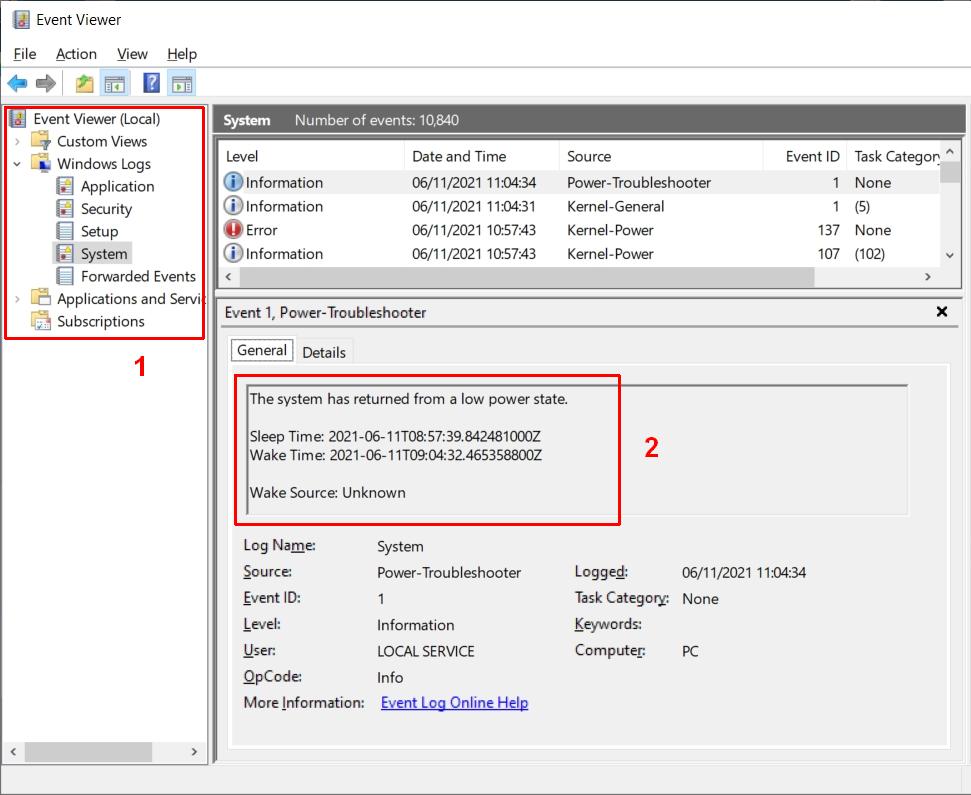
- Under System (right-side of the window), scroll through the event list and look for a Source that includes “Power”.
- For the selected event, you can see the explanation in the panel below the event list (2).

In the example screenshot above, the Wake Source is listed as Unknown. Not very helpful, but there will be list entries that do tell you the reason. You can click the Details tab for more information on the event.
How to Stop Windows 10 Waking Up from Sleep On Its Own
Once you know what causes your PC from waking up from sleep, you can take action to prevent it from happening again.
Windows Update
Let’s start with Windows Update since it’s a common cause of the wake-from-sleep behavior. Also, updates do not only wake up your PC from sleep, they can also result in (multiple) reboots.
If you leave your browser, files, and documents open to continue where you left off, you do not want your PC to reboot in the middle of the night (even if you HAVE saved your open work).
Here are the steps to change Windows Update settings:
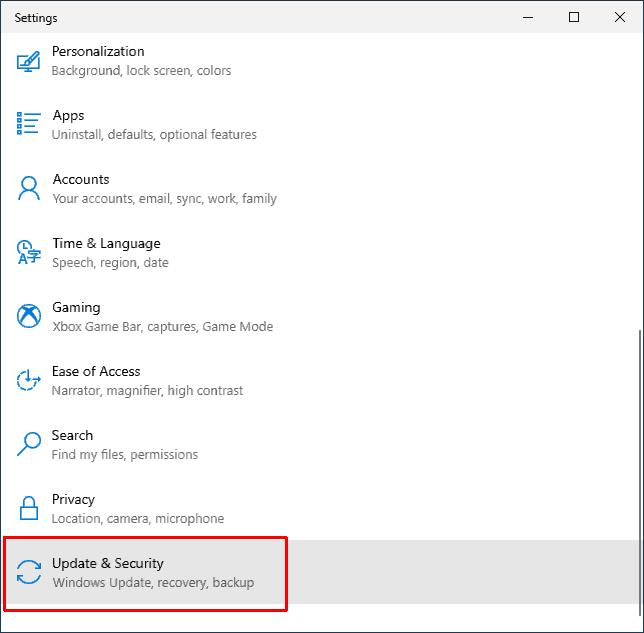
- Click the Start menu button, then click Settings.

- In the Settings window, scroll down and select Update & Security.
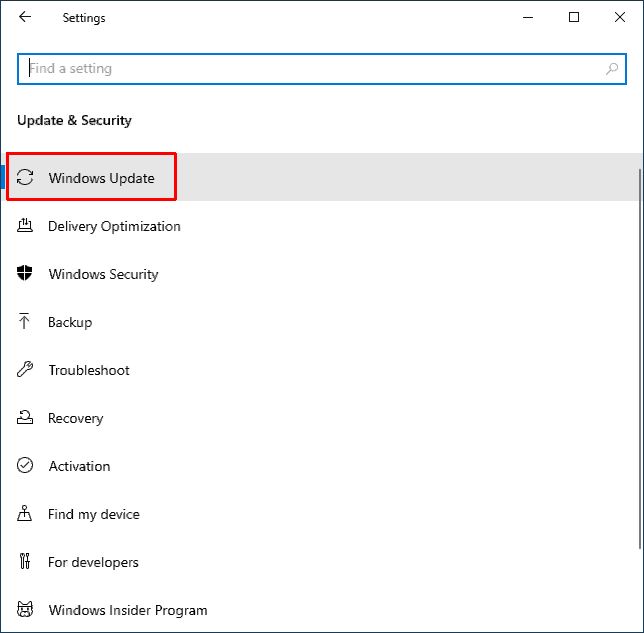
- Now click the Windows Update option.
- Wait for the Windows Update check to complete and for the Windows Update results to show.


There are two things you can do here.
#1. Change your PC ‘active hours’ to suit your situation. This controls when updates and reboots will not take place. So what if we define active hours as all hours of the day? Although that looks like a great way to prevent Windows Update from running, you can only define a maximum period of 18 hours as active hours :(

After all, you can’t be working 24 hours, right?!? Still, an 18-hour limitation gives you a lot of control when updates should not be installed.
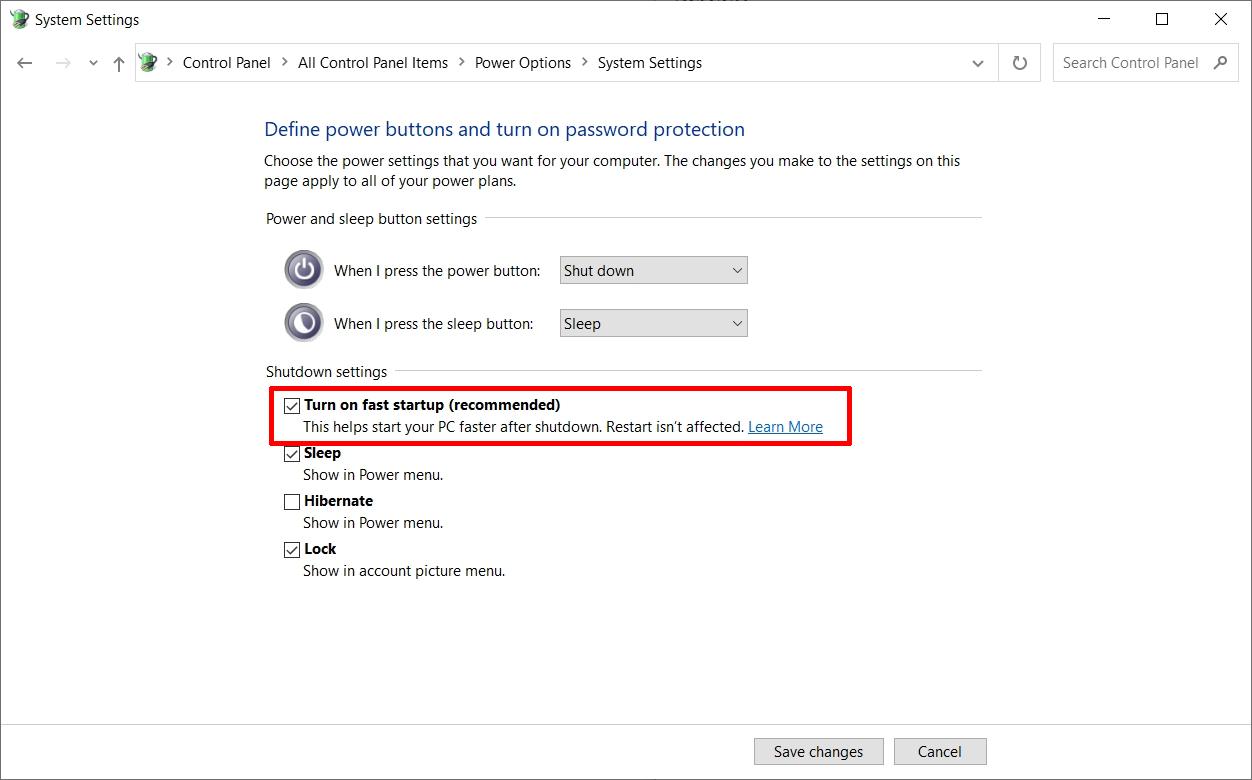
#2. Completely pause Windows Updates from happening.

Click the Advanced options in the Windows Update window.
Now you can select a date until which the updates should be paused.
Tip: Since you are already there, you should click the Delivery Optimization option too, and disable the option to Allow downloads from other PCs.

Do this for all PCs on your local network, so they won’t wake each other up distributing Windows Updates files to each other.
Disable Scheduled Maintenance
Windows 10 has a few automatic maintenance functions at a scheduled interval. Security, diagnostics, updates, all things that help keep your PC in good shape.
Apart from the ability to schedule when this maintenance is allowed to run, it is also possible to tell it not to wake up the PC.
Here are the steps to prevent scheduled maintenance to wake your PC:
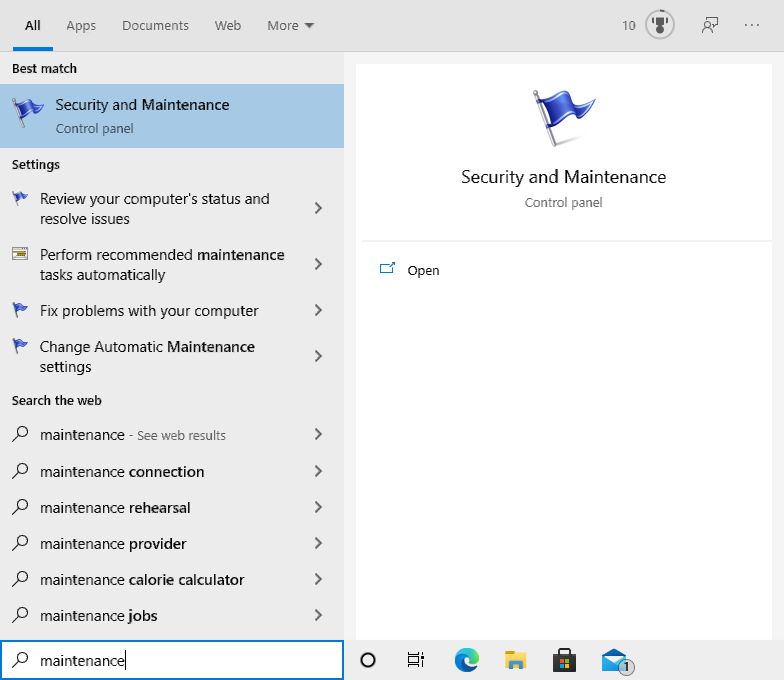
- In the Windows search box, type “maintenance” (without quotes).
- In the search results, click Security and Maintenance.
- In the Security and Maintenance window that appears, open the Maintenance group (1).
- Now click the option Change maintenance settings (2).
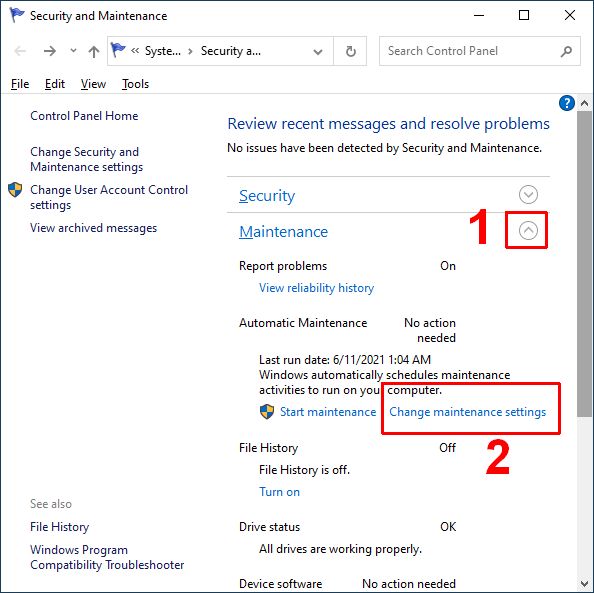
- Clear the checkbox for Allow scheduled maintenance to wake up my computer at the scheduled time.
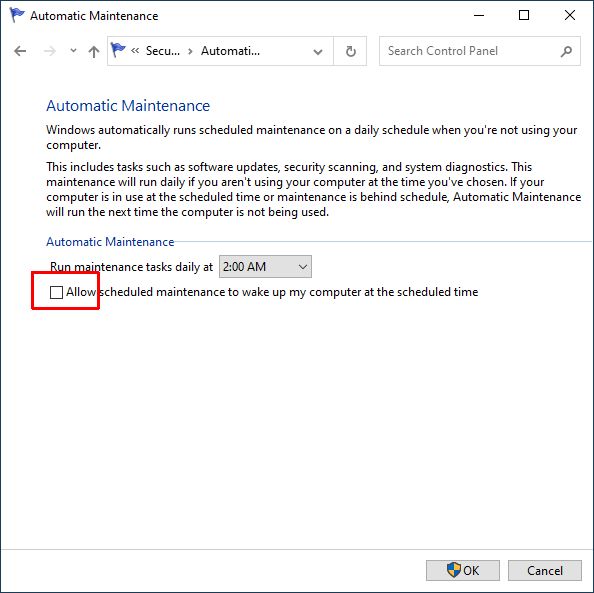
- Click OK.


After this, scheduled maintenance tasks will no longer be able to wake up your Windows 10 computer from sleep mode. (You can always run the maintenance manually by selecting the Start maintenance option.)
Network Controller (Wake-on-LAN)
As we saw in the earlier screenshot for the powercfg example, network connectors (or adapters) can trigger the PC to wake up from sleep.
Although there are valid scenarios for this option, it might not be what you want if it results in your computer waking up from sleep.
The steps to disable the Wake-on-LAN function are:
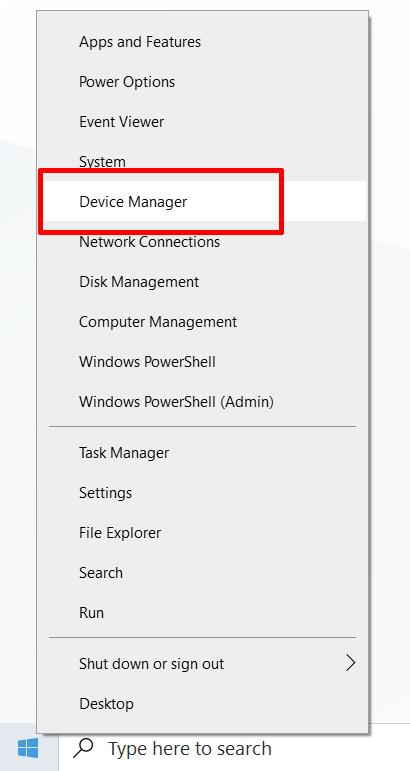
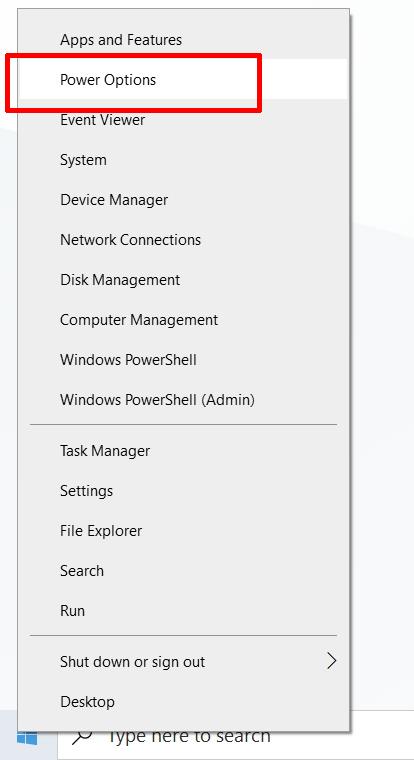
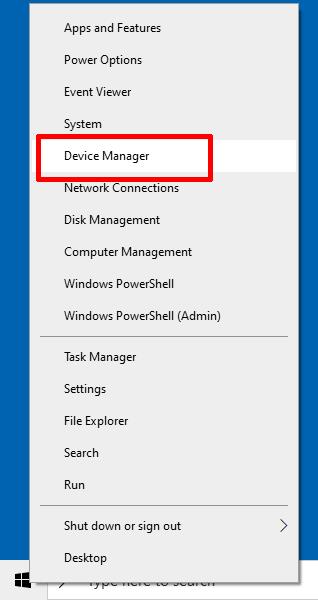
- Right-click the Start menu button.
- In the popup menu, click Device Manager.
- In Device Manager, open the group called Network adapters by clicking the arrow in front of it (1).
- Right-click the network adapter in the list, and in the popup menu select Properties (2).
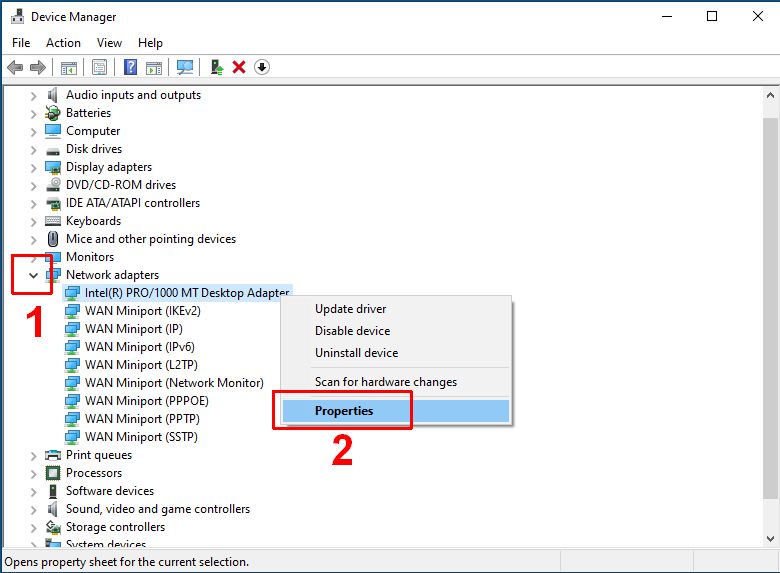
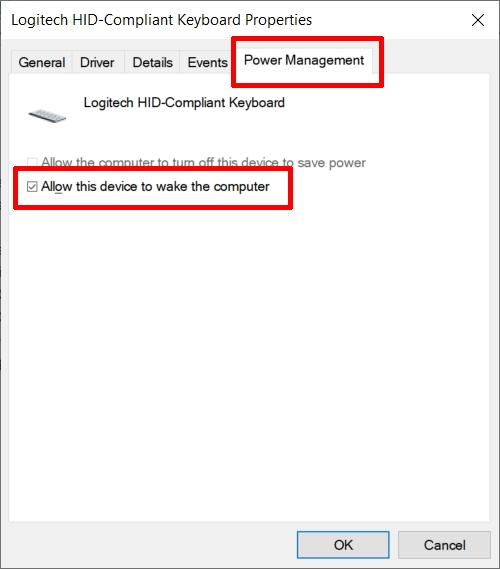
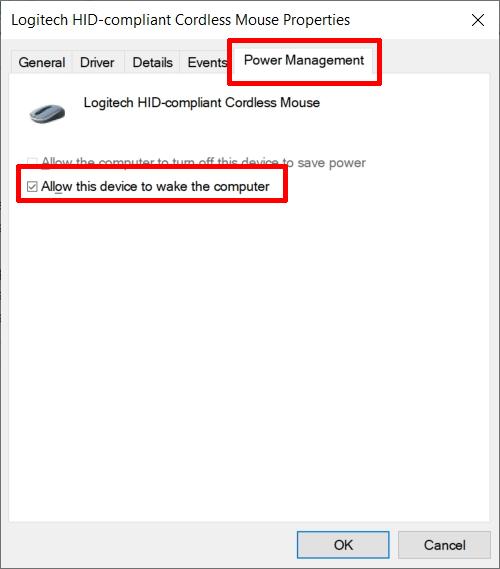
- In the Properties window for the network adapter, select the Power Management tab.
- Uncheck or clear the checkbox named Allow this device to wake the computer.
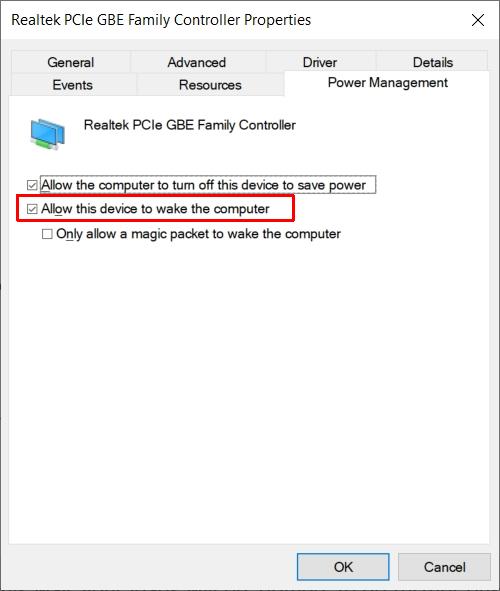
- Click OK.


One thing to keep in mind here is that the Wake-on-LAN feature is available for each network adapter. So if your PC has multiple Ethernet connections, or maybe even a wireless connection, these steps need to be repeated for each network adapter.
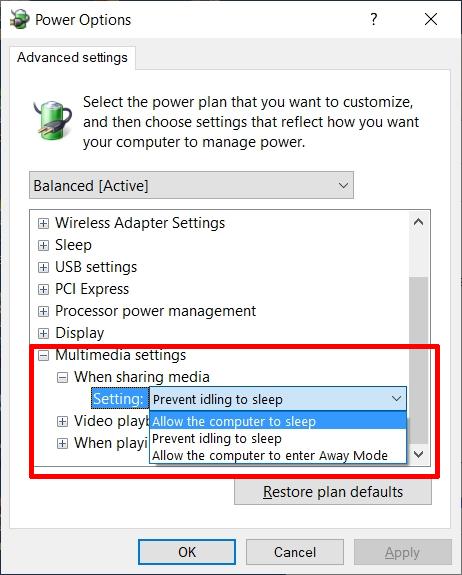
Disallow Wake Timers
In the start of this article, you read that Windows 10 has the possibility to use wake timers. Wake timers are scheduled events that can wake the PC from sleep (or hibernation).
The Windows Task Scheduler has a checkbox option to Wake the computer to run this task for scheduled tasks. That will result in a wake timer to be used.
To prevent wake timers from waking up Windows 10 from sleep, you can disable this option.
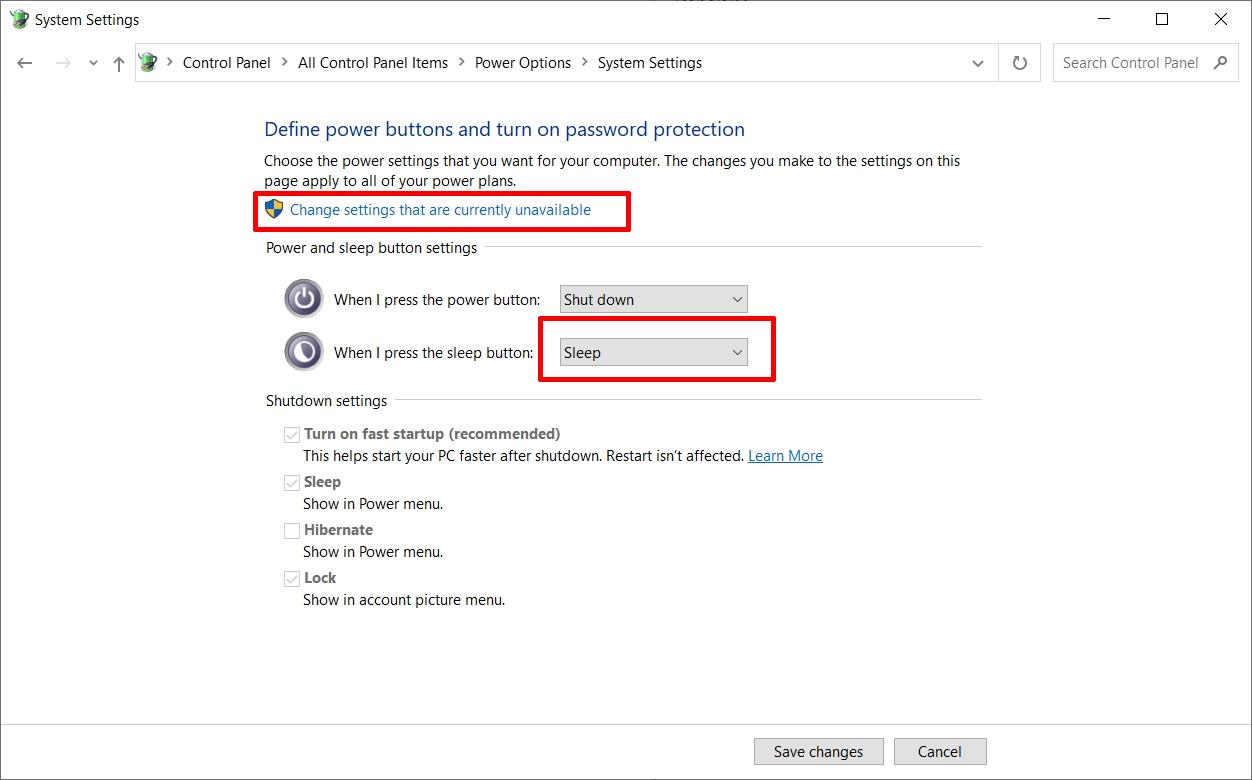
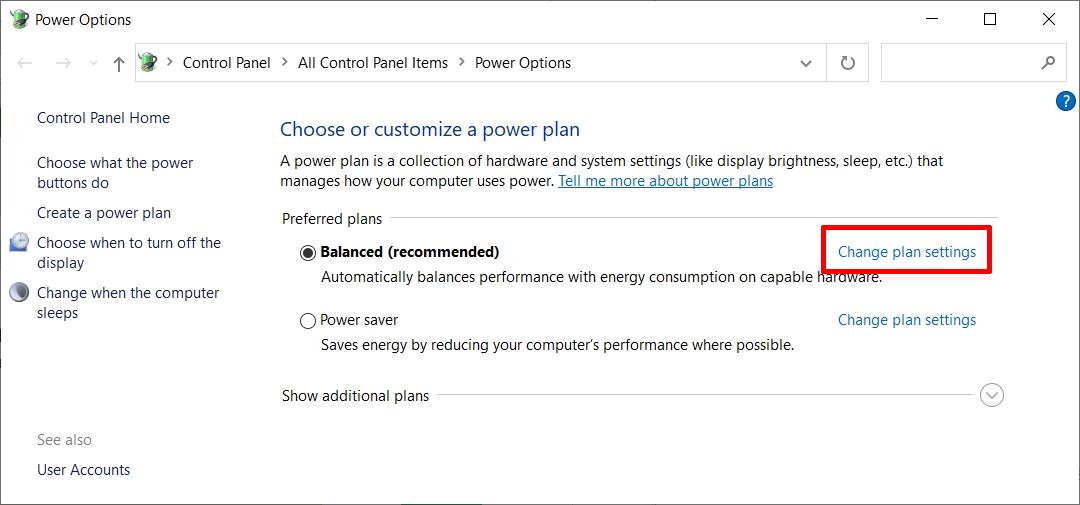
- In the Windows search box, type “power option” (without quotes).
- In the search result, click Power & sleep settings.
- Click Additional power settings.

- Select Change plan settings for the selected power plan.

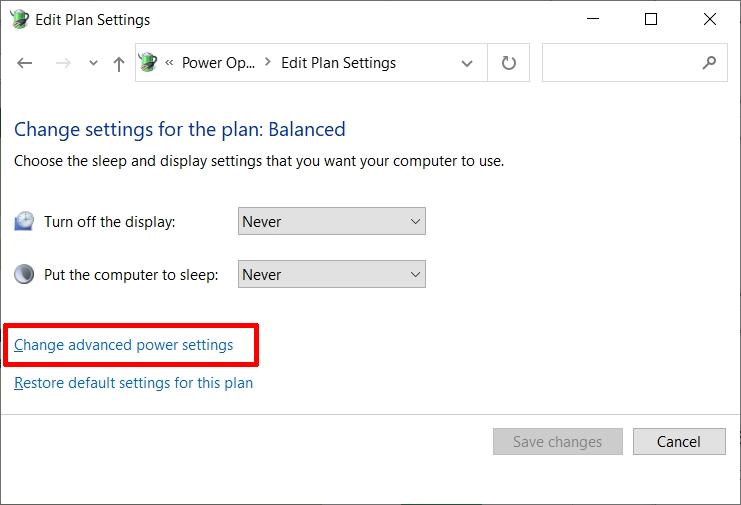
- In the Edit Plan Settings window, click Change advanced power settings
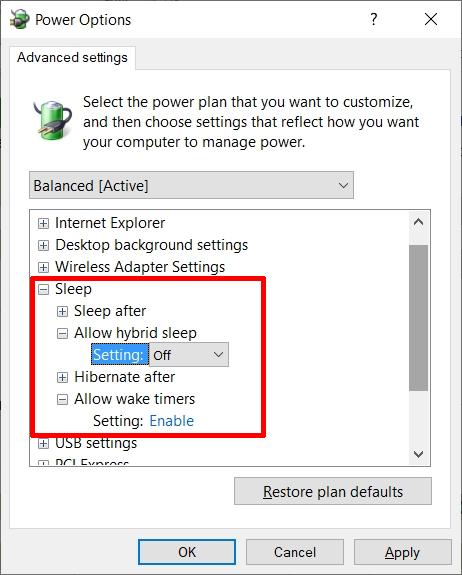
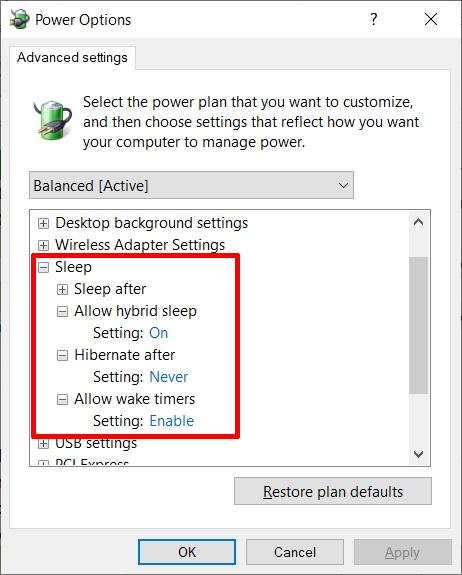
- This will bring up the Power Options dialog box. Open the Sleep option.
- Click Allow wake timers and then change the Setting. You can either completely Disable the Allow wake timers, or allow Important Wake Timers Only.
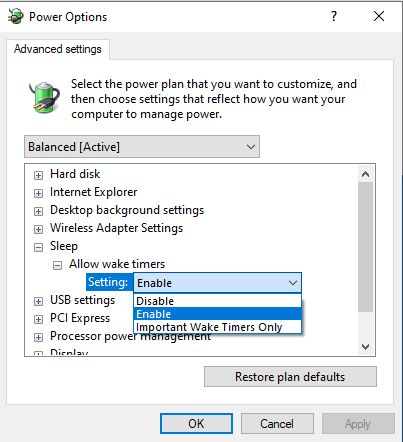
- Click the OK button to confirm the change.


Do realize that this setting affects all wake timers. If you have identified a specific task that causes your PC to wake up from sleep, it might be better to open the Task Manager and disable the option to Wake the computer to run this task.
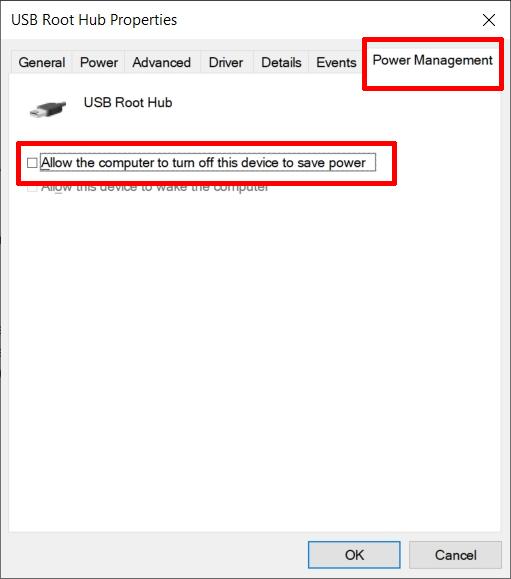
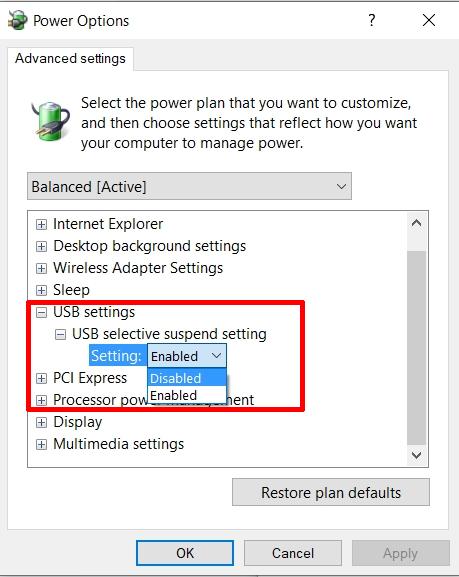
USB Devices
This is probably the most uncommon reason why your Windows 10 PC is waking up on its own. But since it is possible for USB devices to wake your PC from sleep, it needs to be mentioned.
In normal circumstances, when a Windows PC goes to sleep, you want to be able to wake it up using the mouse or keyboard (or even a mousepad on laptops).
This is one of the reasons why it’s possible for hardware devices to wake up the PC. In most cases these input devices are USB-based. (Even a web camera with motion detection can be connected on a USB port and trigger wake-up events.)
Configuring the power options for USB devices is very similar to the configuration for network adapters.
- Right-click the Start menu button.
- In the popup menu, click Device Manager.
- In the Device Manager locate the USB device, right-click it and select Properties in the popup menu.
- Click the Power Management tab.
- Clear the checkbox named Allow this device to wake the computer.
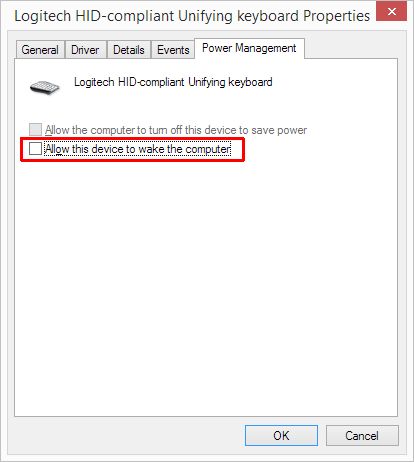
- Click the OK button to confirm, and OK again to close the USB device Properties dialog box.

These steps need to be repeated for all USB devices. (Unless you know which particular USB device is triggering the wake-up event.)
If you are not sure which USB device is the culprit, you can try removing them one-by-one and see if the PC still wakes up. This is only possible for external USB devices, so be aware that some integrated devices (like webcams) often also use a USB connection.
Device Drivers
Considering the potential of hardware devices to contribute to the wake-up-from-sleep issue, this story would not be complete without mentioning the importance of up-to-date device drivers.
Device drivers enable Windows 10 to interact with PC hardware such as network adapters and USB devices. As such, the most updated device drivers will ensure Windows 10 can accurately control the devices and their power behavior. You can download DriverFinder here and run a driver scan to check if you have the latest drivers for your Windows 10 PC.