webcam | DriverFinder - We Make Drivers Work for You

How to Fix Problems with a Logitech Webcam in Windows

Logitech webcams have been a popular choice for external webcam solutions on Windows PCs. Not only are the newer models popular, but even the older Logitech c270 webcam and Logitech C920 webcam models are still in use. Particularly with older models, there can be issues with newer Windows versions. Logitech webcam drivers for older models and newer Windows versions are not available.

So how do we still get the webcam working? We’ll have a look at the possible solutions to get the Logitech webcam working in Windows.

Hardware

If you are certain your webcam is still in good working order, it is still worth having a look at the setup. Most webcams are connected to a PC using a USB connection. And for the older Logitech webcam models, like the c270 and c920, this is a USB 2.0 connection.

To have the best chance of a working webcam on a Windows PC, make sure to connect the webcam to a USB 2.0 port. Although USB 3.0 and USB 3.1 ports should be compatible, the best guarantee to a working webcam is to use the USB 2.0 port for older webcams.

For modern laptops, this may be a challenge, since they would only have a USB 3 port available, but chances are you would have a built-in webcam anyway.

A second thing to avoid is using a USB hub to connect the webcam to your PC. Although it may work in some cases, if you are having problems, plug the webcam into a USB port that is directly connected to your PC (motherboard). If you do need to use a USB hub, use a USB hub with external power to increase the chance of success.

Similarly, avoid using USB cable extensions. If the webcam cable is too short for your requirement, it is easy to get a USB extension cable to get the required length. This might have worked in the past, but with all electronics using low-power components, the cable length may pose a problem for an error-free connection.

Software

When we are talking about software for webcams there are really only three things: the driver, the recording/viewing software, and the Windows setting. Both can play a role in solving problems with webcams.

Logitech Webcam drivers

Depending on the Windows version, separate drivers for a Logitech webcam may not be required. The latest Windows versions, like Windows 10 and Windows 11, have compatible drivers installed. Most webcams will be plug-and-play.

Download and install Logitech Webcam drivers

For older webcam models or older Windows versions, this will be different. Simply visit the Logitech webcam support website, and choose your model to download and install the required driver.

Logitech Webcam Support site

If you do not see your model, type it in the search box to find the webcam.

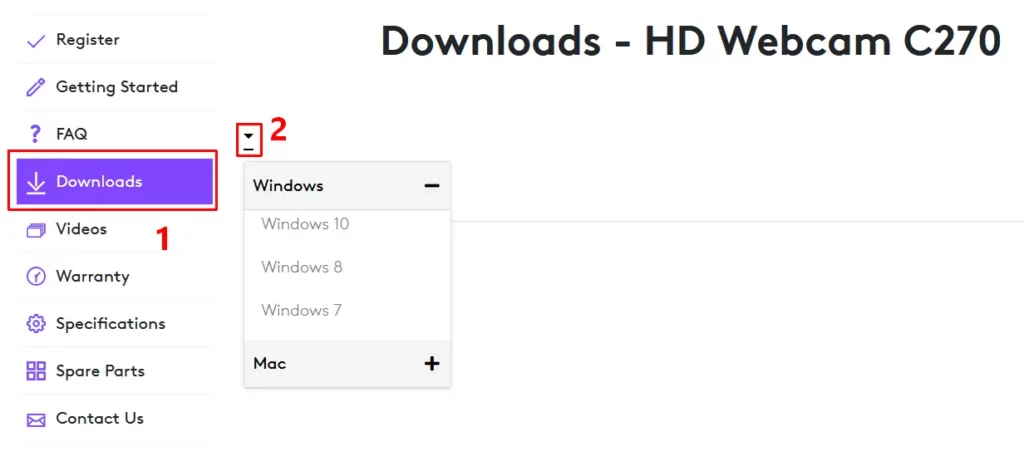
In the Logitech webcam details page, select the Download option on the left (1), and then pick the Windows version in the drop-down list (2). Next, you will see the available downloads for your webcam.

Download Logiech webcam driver

Reinstalling the Webcam device

If the driver is present on your system, and the webcam is still not working, it can help to reinstall the device. For this, we uninstall the device from the Device Manager and then use the Scan for hardware changes in the Action menu to reinstall it. A restart of the PC will also let Windows reinstall the device and the driver.

Uninstall Logitech webcam device

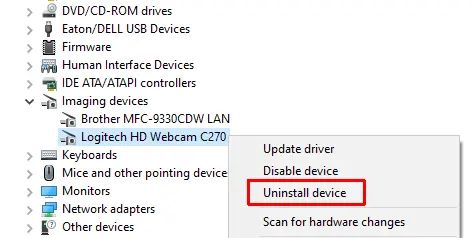
Please note that depending on the Windows version, the Logitech webcam will be listed under either the Cameras or Imaging devices category.

Uninstall the driver for the webcam

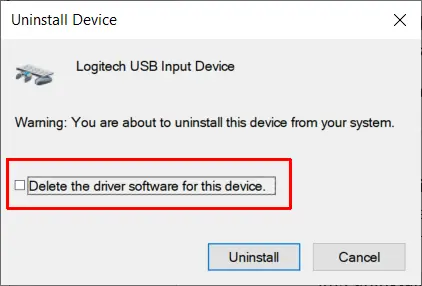
Most newer Logitech webcams use the standard USB Video Class (UVC) driver. During installation of the device, a copy of the standard driver is made for the webcam to function. To solve problems with the webcam, it can help to uninstall the device and the UVC webcam driver and have Windows reinstall it.

This is similar to the previous step, but in this case, make sure to select the option to uninstall the driver for the device to ensure a fresh copy gets installed and configured when the Webcam is detected again.

Uninstall Logitech webcam driver

Manually switch to the UVC driver

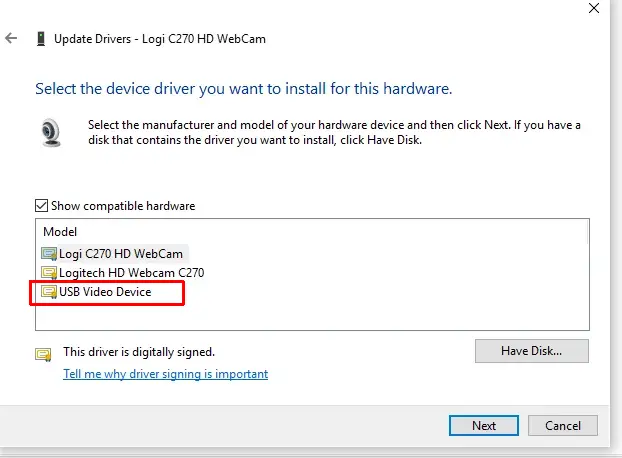
If the webcam uses a driver that is not working with your Windows version, and the webcam is compatible with the standard USB Video Class, it is possible to manually switch to the UVC driver for the webcam. This can help solve the webcam issue.

  1. In the Device Manager, right-click the webcam device.
  2. Next, click the Update driver option in the popup menu.
  3. Select the Browse my computer for drivers option.
  4. Now click the Let me pick from a list of available drivers on my computer.
  5. In the Model list, select the USB Video Device option and click Next.
Logitech C270 HD webcam driver

After this, open the camera app or recording software and check if the webcam is working.

Logitech Webcam software

To check the proper functioning of the webcam in Windows, try different software programs. In general, it is best to use programs that are installed with Windows itself to ensure maximum compatibility. In the latest Windows versions, the Microsoft Camera app is the best place to start.

But it is also possible to test with other camera software. For Logitech webcams, the Logitech Capture software is recommended. It is compatible with Windows 7 up to Windows 11 and supports the C92x, BRIO, and StreamCam models. ManyCam and YouCam are other popular programs.

But, of course, you can also use your favorite video chat app to test your webcam. Skype, Teams, and Google Meet, all directly support your webcam if it is working.

Specifically for Logitech webcams though, it is sometimes useful to install additional specific Logitech software to configure and test the webcam. Logitech Camera Settings is a little older program that can be used to configure the specific settings of your Logitech webcam. Logi Tune is the more recent version of the Logitech software to use for Logitech webcams. Both these programs can quickly tell you if the webcam is working and allow control over various webcam display and recording settings.

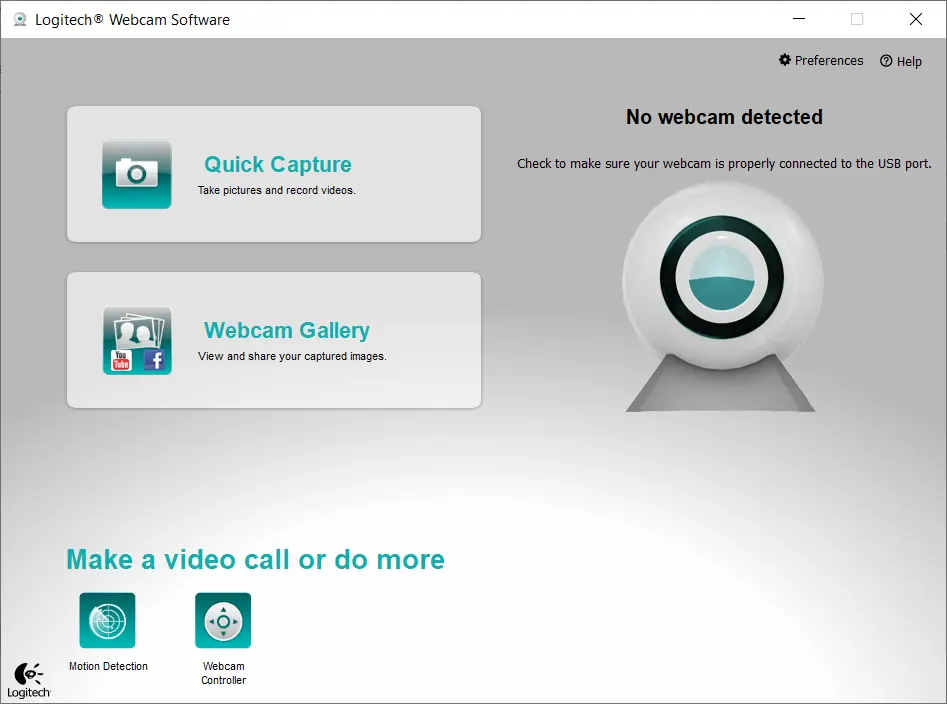
If nothing works, the last option is to install the older Logitech Webcam Software (LWS). The latest version is 2.8 and can still be downloaded from the Logitech support site. Especially for older Logitech webcam models, this software can provide a solution on the latest Windows versions if nothing else works. You may need to run it in compatibility mode to get it working on Windows 11.

Logitech Webcam Software 2.8

Windows settings

Something that can easily be overlooked when troubleshooting Logitech webcam problems is a setting in Windows. The latest Windows versions have more settings for privacy than earlier versions. That means you need to allow applications to access the camera device.

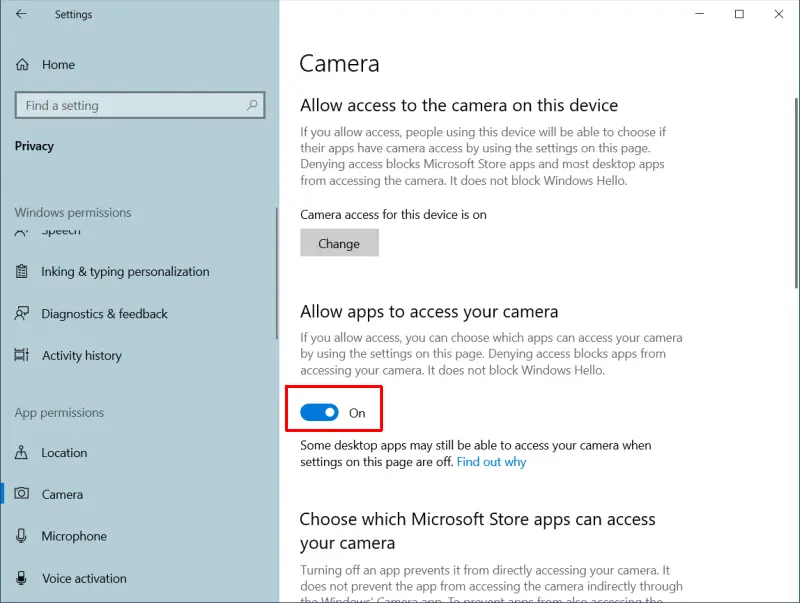
  • In Windows 10, open the Settings window and go to Privacy.
  • Under Privacy, click Camera.
  • Now make sure the Allow apps to access your camera is enabled.
Allow camera access in Windows 10

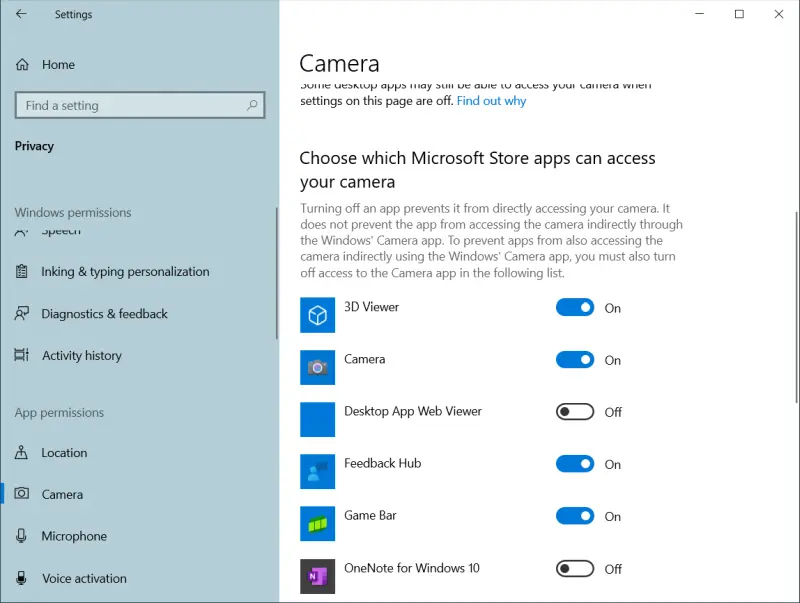
If you scroll down further, you can even pick which apps on your system can access the camera.

Select apps for camera access in Windows 10

For more tips on fixing webcam issues, check out this article on how to fix webcam problems.

As always, make sure you check for regular driver updates using our DriverFinder application to make sure you have the latest device drivers installed for all your devices!

Lenovo Camera Driver for Windows 11

Using Windows 11 on a laptop can be great, assuming everything is working. And if you want to use your Lenovo laptop for video chat or video conferencing, you need the audio features and camera to be working. To make sure the Lenovo Integrated Camera is working, the right Lenovo camera driver needs to be installed.

Download and install the Lenovo camera driver

Since Lenovo uses different camera components in its laptops (Sonix, Realtek, and others), it is important to get the right driver for your device. The first place to look for the right Lenovo camera driver is the Lenovo support website.

  1. Open an Internet browser and visit the Lenovo support website.
  2. The website will automatically direct you to your local support site (region and language). If not, make sure to disable any VPN software you might be using.
  3. On the webpage, click the SUPPORT menu and then click PC.
    Lenovo PC support
  4. On the next page, enter the serial number or the model name of your Lenovo laptop and press Enter.
    Find Lenovo Laptop
    Tip: If you do not know either, you can use the Browse Product option, although that will also require you to know the model name/number.
  5. Once you selected your product, you will see the Product Home page for your Lenovo laptop. Click the View Product Details link to show the extra options.
    Lenovo Product Details
  6. Next, click the Drivers and Software link.
    Lenovo manual driver update
  7. On the Drivers & Software page, select the option Manual Update.
  8. Then click the option Camera and Card Reader.
  9. On the Camera and Card Reader page, click the downward pointing arrow to the right of the first entry of the Integrated Camera Driver for your Windows version.
    Note: If no Windows 11 driver is available, try the Windows 10 driver since they are compatible. The entries in the list are sorted by date, newest on top, so you want the first entry for the newest Lenovo camera driver.
    Download Lenovo Integrated Camera Driver
  10. Now click the download icon next to the Integrated Camera driver to start the download.
  11. Once the download completes, run the downloaded file to install the driver and follow the on-screen instructions.
    Install Lenovo Camera Driver


Update the Lenovo Camera Driver from the Device Manager

If a camera device is already recognized by Windows 11, it will show up in the Device Manager. In that case, updating the integrated camera driver directly from within Windows 11 is also possible.

  1. Press the Windows + R keys and type “devmgmt.msc” in the Run box. Press Enter to confirm, or click OK. This will start the Device Manager.
    Windows 11 Start Device Manager
  2. In the Device Manager, expand the category Cameras or Imaging devices.
  3. Right-click the webcam device that is present, and then select Update driver in the popup menu.
    Update Integrated Camera Driver
  4. Next, click the option Search automatically for drivers to let Windows 11 use the Microsoft update catalog for finding and updating the Lenovo camera driver.
  5. Click the Close button and then close the Device Manager window.

If no new version of the integrated camera driver is found, Windows 11 will show a message stating that “The best drivers for your device are already installed”. Windows 11 depends on manufacturers providing the latest drivers for their devices to Microsoft for inclusion in the Update Catalog. Depending on the age of your laptop and support for Windows 11 for it, this method may or may not find an updated driver.

Using a Driver Update Program

As mentioned earlier in this article, Lenovo and other laptop manufacturers use third-party components for their integrated webcams. A common component these days is the Realtek webcam device, but other webcam components are also used. Sonix, Sunplus, and Ricoh are other common choices.

This means that if no camera driver for Windows 11 is available from Lenovo for your integrated camera, another manufacturer may have a driver available for Windows 11. The easiest way to find the right driver, in that case, is to use our driver finder program. The software will automatically scan for all devices on your computer, including webcams, and find any suitable driver for your device matching your Windows version.

If your Lenovo webcam is still not working, maybe this guide to solving webcam problems is of help.

Lenovo Webcam Driver for Windows

Most Lenovo notebooks and laptops come with integrated webcams. As such, it’s important to install the correct Lenovo webcam driver for Windows.

Different Lenovo devices use different webcams. This means they require require different drivers too. Depending on the Windows version installed on your device, drivers may be included with Windows itself – or require a separate download and install.

Lenovo uses multiple hardware vendors for integrated webcams. So depending on your device model, you might need a Realtek, SunPlus, LiteOn, Chicony, Vimicro, or Ricoh camera driver. Lenovo itself will refer to the camera as an Integrated Camera driver, Easy Camera driver, or even just USB Camera driver.

Manual: Download Lenovo Webcam Drivers from Lenovo PC Support

To download drivers for your Lenovo ThinkPad, IdeaPad, Yoga, or other portable device from the Lenovo Support site, follow these steps.

  1. Open a web browser.
  2. In the URL, type “pcsupport.lenovo.com” and press Enter.
  3. Wait for the support site to load. The URL should redirect to your localized version of the Lenovo support website. If not, you can change the country and language in the top-right corner of the website.
    Lenovo PC Support site
  4. Next, enter the device model in the search box, or click the Detect Product or Browse Product to locate the support page for your Lenovo device model.
  5. On the device support page, select the Windows version.
    Lenovo Select Windows Version
  6. On the updated page, click the Drivers and Software link (1) on the left-hand side, then select Manual Update (2) and pick the driver category.
  7. Click the symbol (3) to show the files, and then click the download button (4).
    Download Lenovo Webcam Driver
  8. Once the download is complete, execute the downloaded file to install the Lenovo webcam driver.

Automated: Find and Download Lenovo Webcam Drivers Using DriverFinder

If you cannot find the webcam driver for your Lenovo device, you can use DriverFinder to find the driver for you. DriverFinder automatically scans your computer devices (working or not working) and finds the right driver for your device and Windows version.

Using a third-party application can be very useful, especially when Lenovo doesn’t support your device anymore nor the Windows version you have installed your device.

Simply download the DriverFinder program installer and execute the downloaded file to install the program. Activate the program after installation, and then run a scan (click the Start Scan button).

DriverFinder Start Scan

DriverFinder will show a list of devices found in (or connected to) your computer and a list of suitable drivers for download.

Click the Download button for the Lenovo Webcam and install the driver.

Troubleshooting: Lenovo Webcam Problems

If your webcam still not working after you’ve downloaded and installed the appropriate driver?

Here are some quick troubleshooting tips to get your Lenovo webcam to work.

  • Make sure nothing is blocking the device. Some devices have a protection/privacy slider. (It’s also possible that someone put a protection sticker on it for privacy reasons.) Remove it.
  • Use the Fn key on your keyboard to turn on the webcam device. This is not applicable to all devices. Just check your keyboard for a camera symbol (in most cases it is F8).
  • Both Windows 8.1 and Windows 10 have Privacy Settings that can prevent access to the webcam. Settings -> Privacy -> Camera: Let Apps use my camera should be On.
  • After installing the driver, the device should automatically start using the driver. If not, it can help to run a Scan for hardware changes in the Device Manager (in the Action menu). This option is not available in all Windows versions.
  • In Device Manager, right-click the camera device and in the popup menu, select Uninstall. Reboot the device and the camera should get reinstalled. This resets the driver configuration, and can help fix the issue.


Copyright 2009 and Beyond - DriverFinderPro.com - All Rights Reserved