Many Windows 10 settings are configured through the Control Panel. The Device Manager for example, which is used for driver settings, is accessed through this panel. As such, it’s important to know how to open the Control Panel in Windows 10.
In Windows 7 and 8.1, opening the Control Panel was easy. All you had to do was click or right-click the Windows Start button. However, in Windows 10, this is no longer the case.
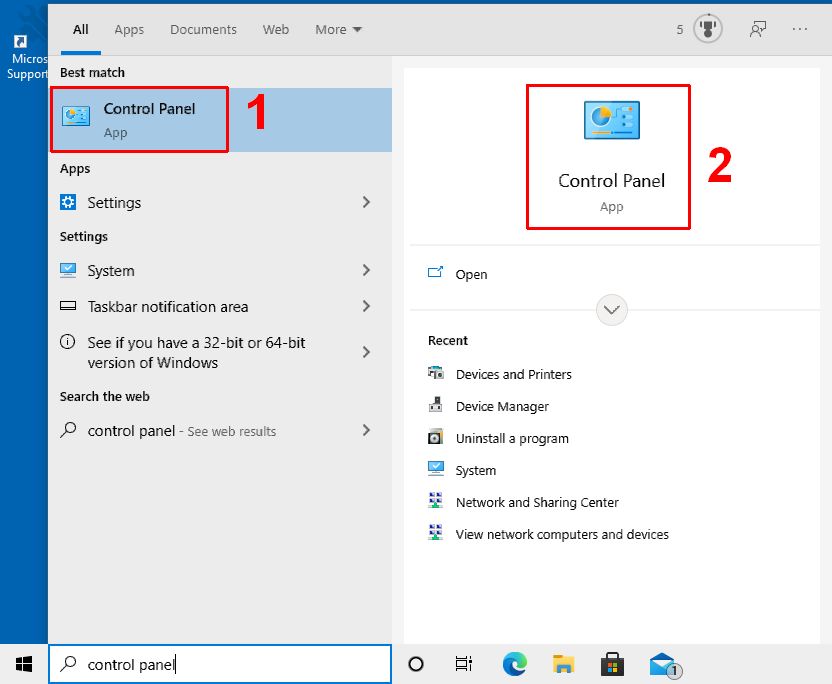
Open the Control Panel Using the Search Box
This is generally the preferred, and easiest way to open the Control Panel. Simply type “control panel” in the search box on the Taskbar.
In the Search results screen, you can click the Control Panel App under best match (1), or click the Control Panel icon in the right-hand window (2).
Open the Control Panel from the Taskbar
If you want even easier access to the Control Panel in Windows 10, you should ‘pin’ it it to the Taskbar, thereby creating a shortcut.
Follow the steps above to open then Control Panel.
On the Taskbar, right-click the Control Panel icon.
In the popup windows that opens, click Pin to taskbar.
After this, the Control Panel icon will permanently show on the Taskbar. So even when you close the Control Panel, you can quickly open it again by clicking the icon on the Taskbar!
Why Use the Control Panel?
Since it seems that Microsoft has made it a bit more difficult to open the Control Panel, you would expect that it is not needed that much. Not true!
For example, for device driver related actions (e.g., driver updates, troubleshooting, driver roll-backs, etc.) the Device Manager is needed.
To get to the Device Manager, you need to open the Control Panel. From there, select the Hardware and Sound option, and then click the Device Manager option.
Another common task performed via the Control Panel is program uninstalls.
Many applications create a Program Group in the Start menu, where they normally put a link to an uninstall option. But if that is not available, then the easiest method to uninstall a program is the Uninstall a program feature in the Control Panel.
What to do to ‘make’ Windows 10 auto adjust the audio volume levels of music you’re playing or video you’re watching, when you want to make or take a phone call.
Automatically adjust audio volume during phone calls in Windows 10? Why would anyone want to do that?
Here are some scenarios…
It’s your habit to listen to music while you’re on your computer. However, you sometimes need to make online calls during the day and you don’t want to constantly start and stop your music each and every time you make a phone call.
You’re listening to some grrrreat music, or you’re watching a really amazing video… but you’re expecting an incoming phone call sometime today and you don’t want to miss it. You want to hear that incoming call loud and clear OVER whatever music you’re listening to, or video you may be watching.
Please note that a 'call' in this context means either an audio or a video call made using a communications app installed on your computer such as Skype, WhatsApp, Zoom, Viber, Messenger etc.
So that’s clear… NO to manually muting or lowering the sound volume for whatever it is you’re playing when making or receiving computer calls. You want these ‘other sounds’ to automatically lower down during phone calls.
Luckily, Windows 10 has a feature to automatically lower audio volume when making or receiving phone calls. And there are a few options to configure this feature to your personal preference too!
Change the Audio Level for Communications
To configure what should happen during telephone calls:
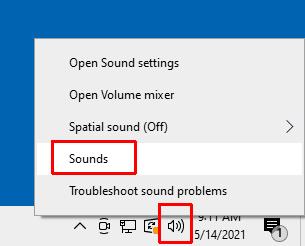
Right-click the sound icon in the system tray.
In the popup window, click Sounds.
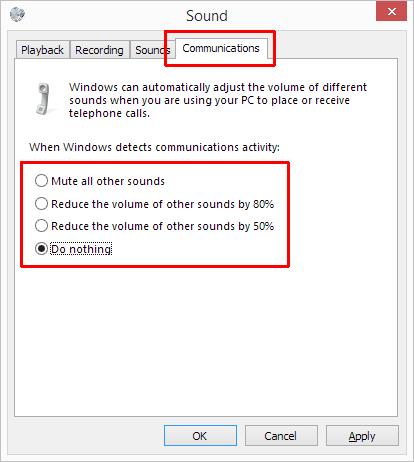
In the Sound dialog box, click the Communications tab.
Now, select what should happen to other sounds when you use your Windows 10 PC to make or take telephone calls.
Note: Click Mute all other sounds if you want Windows to out all other playing audio to silent when you’re in a call.
Note: Click Do nothing if you want all other sounds to stay at the same volume during calls.
Click OK to confirm.
The next time you make or receive a PC phone call, the audio level for other sounds will adjust according to the option you selected.
How to Disable Automatic Audio Level Adjustment
So after giving you the above steps on how to use Windows’ automatic audio level adjustment feature, why would you now disable it?!?
Well, it turns out the method of detecting “communications” as Microsoft calls it… is not fool proof. 😅
In some cases, this feature is triggered when it should not. Since there are so many programs using VoIP for audio communication, it is very possible that audio is muted when you do not want it!
In games for example, you can configure the audio channels the way you want them. So when you are starting a chat with another player, you do not want Windows to suddenly change the volume level.
Whatever the reason, now you know the steps to configure the audio volume level adjustment in Windows 10 to your own preference!
Other Causes of Audio Volume Level Problems
If the Windows 10 settings for automatic volume adjustment does not solve your problem, or you deem it unreliable, you may want to try something else.
There are a few more settings in Windows 10 that can affect audio playback behavior. Another key component in all this is the audio hardware and audio devices you have with Windows 10. There are specific settings in audio playback software that can affect audio volume level behavior too.
Read on to learn more about why audio volume levels are not working the way you might expect.
Disable Enhancements and Exclusive Device Access
Audio enhancements allow an audio driver to perform adjustments to the audio, like an equalizer. But these enhancements can also be the reason why audio levels behave in a way you do not want.
To disable audio enhancements, follow these steps:
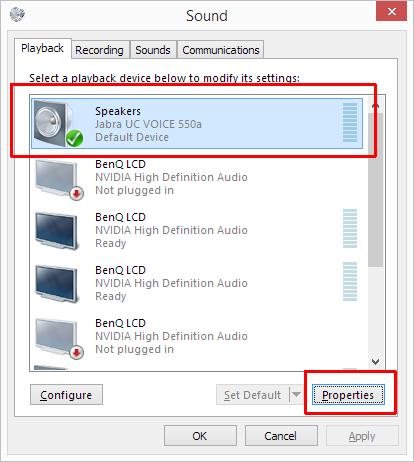
Right-click the sound icon in the system tray.
In the popup window, click Sounds.
In the Sound dialog, select the Playback tab.
Select the Speakers option, and then click the Properties button. Note: There can be multiple Speakers options. Select the one you are experiencing problems with, or repeat the steps for each one.
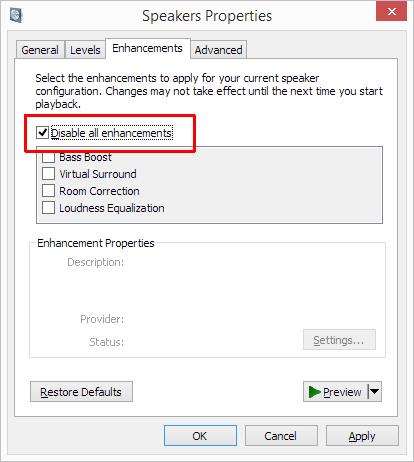
In the Speaker Properties dialog box, select the Enhancements tab.
Next, make sure the checkbox Disable all enhancements is selected, and then click OK.
If this does not help with the audio level problem, you can also disable exclusive control of the audio device. After step 6 above, select the Advanced tab and then clear the checkbox that says Allow applications to take exclusive control of this device.
Audio Device Hardware
Hardware is not the first to be mentioned, but it is certainly important. For audio hardware to work as intended, Windows needs the proper device drivers for the audio device. Updating your audio drivers is a good idea to ensure outdated driver software is not causing the problems. We suggest you download DriverFinder to update your audio drivers.
If your problems are with a USB headset, a good tip is to change the USB port the headset is plugged into. USB configuration is device and port specific, so plugging the headset in a different USB port may help fix audio volume problems. Preferably, use a USB port directly on the motherboard.
Application Specific Audio Level Settings
Apart from Windows 10 itself, many audio and video applications have settings that can affect audio volume behavior. If your application is listed below, check the settings to ensure the behavior is as you want it.
Discord
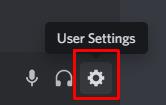
If you are experiencing problems with audio levels in discord, try this.
Click the Settings icon in the main window (bottom left).
In the left-hand panel, select the Voice & Video option.
In the right-hand panel, scroll down to the ATTENUATION section.
Disable the options When I speak and When others speak.
Press Esc to close the settings and go back to the main window.
VLC Media Player
VLC is an excellent and popular tool for audio and video playback. Check its audio settings using these steps:
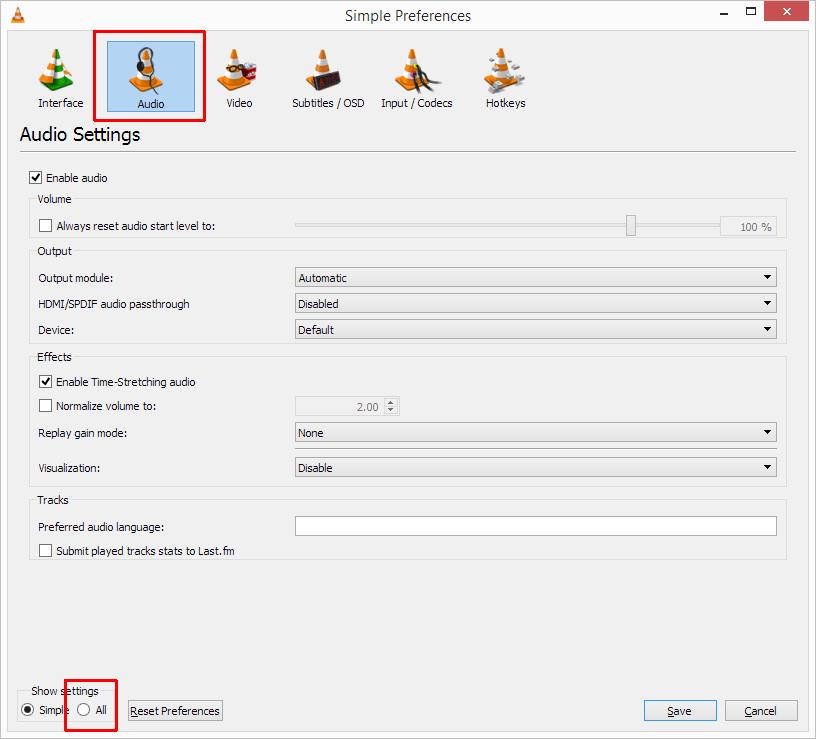
Open VLC.
In the Tools menu, select Preferences.
In the Preferences window, click the Audio icon, and then click the All radio button in the button left.
The window will change from Simple Preferences to Advanced Preferences.
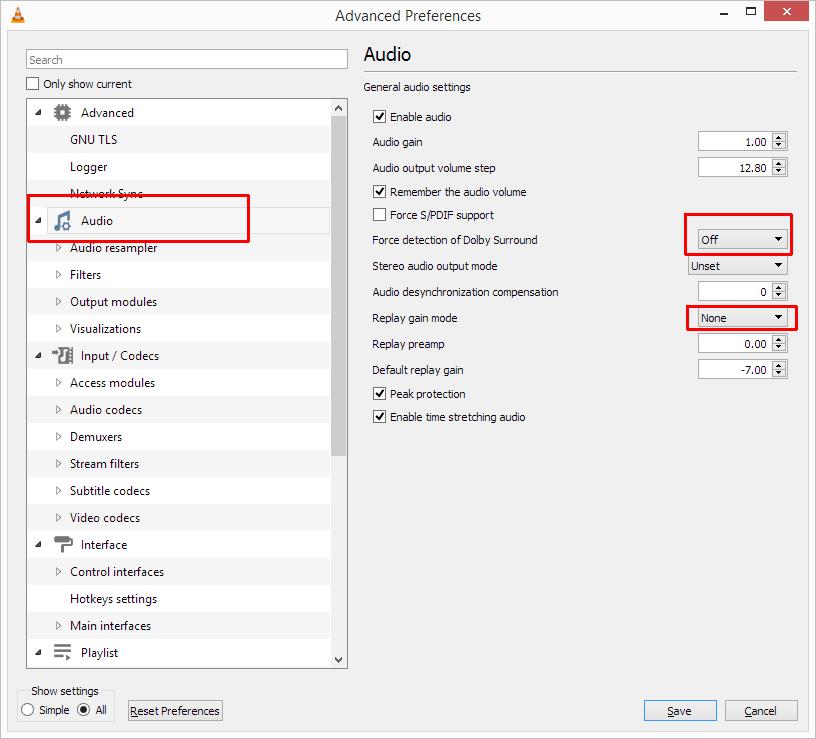
Now select Audio in the list on the left.
Turn the Force detection of Dolby Surround option to Off, and make sure the Replay gain mode is set to None.
Click Save.
I hope you enjoyed reading this article!
If you have experienced audio level problems with other applications and you have a solution, let me know and I’ll add it!
Curious about how to set up a VPN connection? That’s not surprising. With privacy and security so important these days, it is a good idea to use a VPN connection in Windows 10.
VPN is short for Virtual Private Network. It helps protect your personal data and shields your location whenever you’re online. But how do you go about this in Windows 10? This article will help you set up a VPN and connect it to Windows 10.
Set Up a VPN Connection in Windows 10
Before you can use a VPN connection in Windows 10, you must first create the VPN connection itself.
To create a VPN connection:
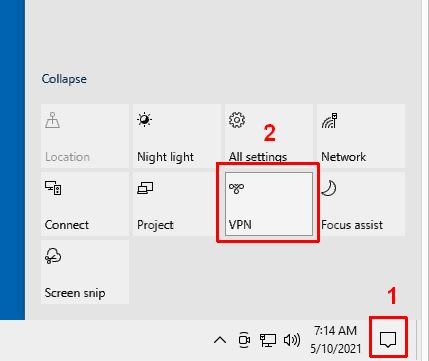
Click on the notification area in the Windows 10 Taskbar (1).
Next, click on the VPN block in the popup window (2).
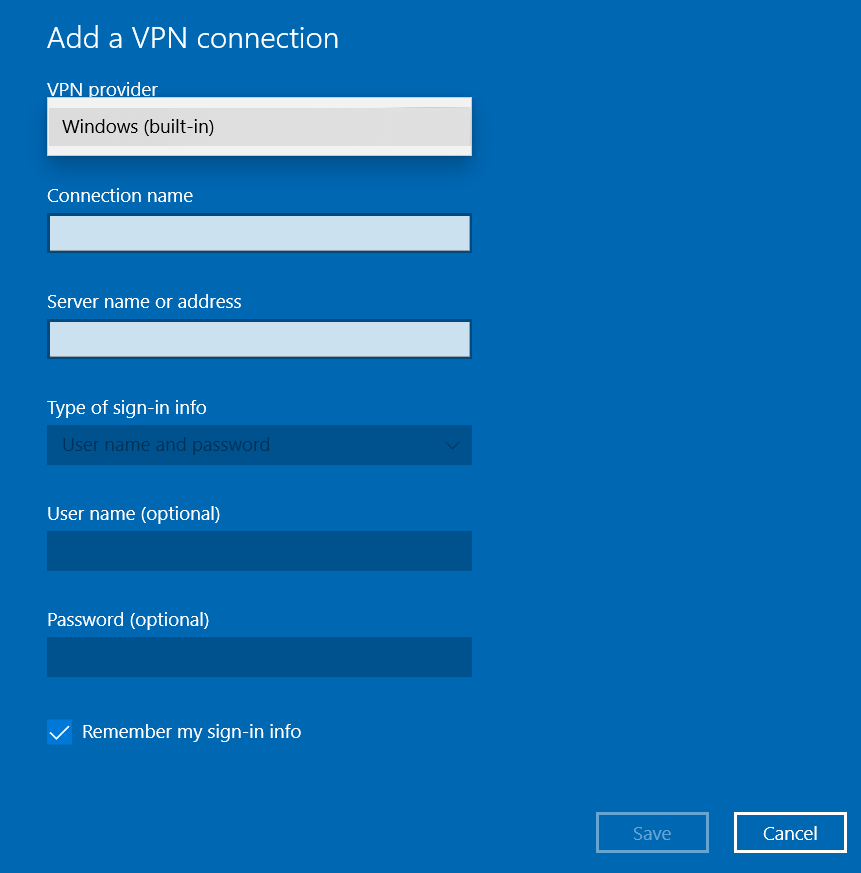
This will bring up VPN Settings. In this window, click Add a VPN connection.
Now you will need to enter the details for the VPN connection.
For the VPN provider, select Windows (built-in). For the Connection name, you can enter any convenient name for the connection (e.g. Personal Connection, or Work Connection).
For the server name or address, enter the name or address of the VPN server.
Then select the type of sign-in info, or leave the default User name and password.
Enter the details for the sign-in authorization (User name and password, or other means of authorization). Note: For work type of connections, simply request the necessary configuration details from the IT administrator. For Paid VPN services, the VPN provider will give you the configuration details.
Click Save to finalize the creation of the VPN connection.
Connect to a VPN in Windows 10
Once you have created a VPN connection in Windows 10, you need to connect to it to make sure your privacy is shielded when you go online.
To connect to an existing VPN connection:
Click on the notification area in the Windows 10 Taskbar.
Click the VPN block in the popup window.
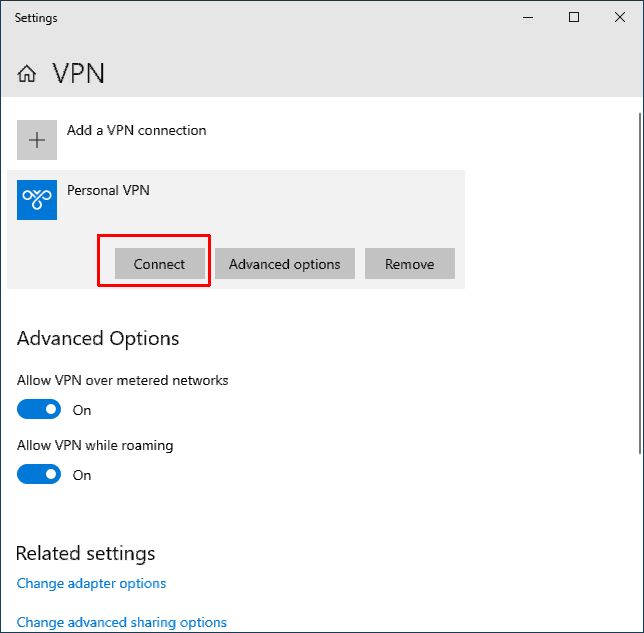
In the VPN Settings window, click the VPN connection you want to use.
Click Connect.
Optionally, enter the authorization details for the VPN connection to complete the sign-in.
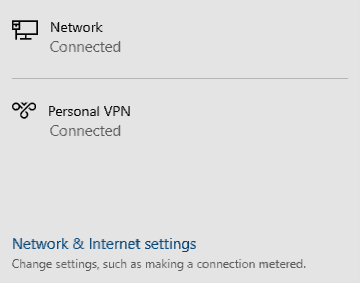
Once you are connected to the VPN, you should be able to see this from the Taskbar. Click the WiFi or Network icon. The VPN connection should show Connected below it.
Use a Browser-Based VPN Connection
Apart from the above described method of using a VPN connection in Windows 10, it is also possible to use a VPN connection through your browser.
Both Chrome and Firefox have extensions or add-ons that offer VPN connections.
I hope you enjoyed reading this article!
Having other problems with your network connection? Easily check if you have the latest drivers for your wireless or network card by downloading DriverFinder.
Need to add a printer in Windows 10? In this article, I’ll show you the steps on how you can add or link a printer to your computer, whether that printer is brand spanking new, or an old one that you’ve had for years.
Add a Printer Automatically in Windows 10
Firstly, make sure your printer is turned on and connected to your computer. Next, follow the steps below to install the printer in Windows 10.
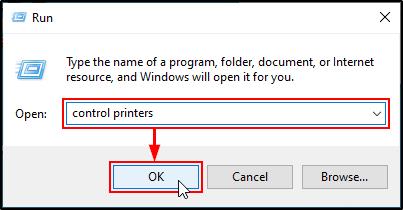
Simultaneously press the Win + R key to open the Run dialog box.
In the Run dialog box, type the following command: control printers, and then click the OK button
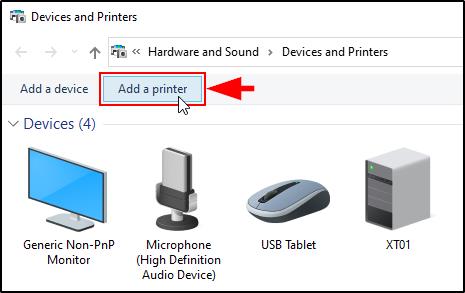
Next, click the Add a printer button.
Windows will scan for your plugged printers. Select your printer and then click Next.
Windows will install a printer driver for the device. Once done, click the Finish button. Tip: Click the Print a test page button to test your printer before clicking Finish.
Check if your new printer is added in the list of Devices and Printers.
Use an Older Printer with Windows 10
So, what if you end up getting a new computer, or you upgraded an existing computer to Windows 10, and you still want to use your old printer?
Manufacturers often don’t make new Windows 10 drivers for older printer models. To use an older printer in Windows 10, you start by following the Steps 1-3 above.
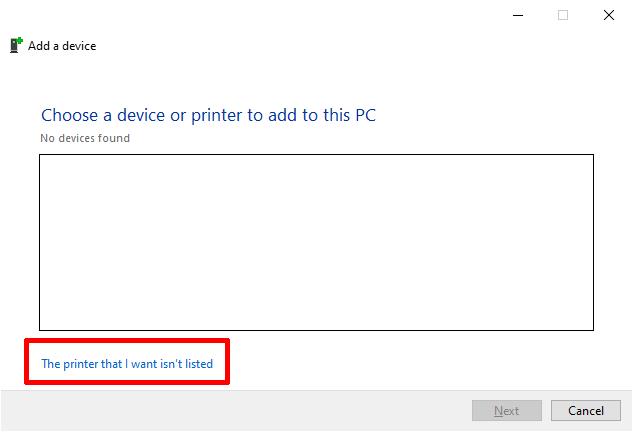
When no printer is found, click the link The printer that I want isn’t listed link.
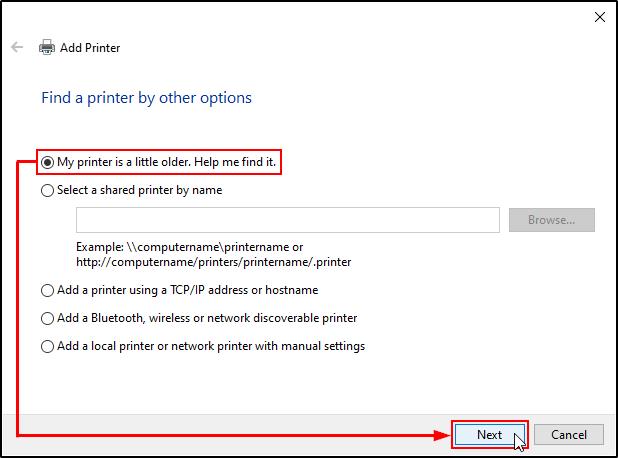
Next, select the option My printer is a little older. Help me find it. And then click Next.
Windows 10 will search for available printers and compatible drivers. Once found, select the compatible printer model, and click Next.
Now type a name for the printer, and click Next.
Skip the Printer Sharing option by clicking Next again.
Use the Print a test page button to check if the printer is working, and then click Finish.
Add a Printer Manually in Windows 10
If both previous options did not enable you to install or connect your printer to Windows 10, you can try to install the printer manually. Here are the steps to follow:
Follow the previous instructions to click the link The printer that I want isn’t listed.
Now select the option Add a local printer or network printer with manual settings, and click Next.
The next step is to choose a printer port. Select the option Use an existing port (this is for a printer connected locally to your computer). In the drop-down list next to it, select the port. For a printer connected through a USB cable, select the USB option. For a printer connected with a parallel cable, select the LPT1 option. Then click Next.
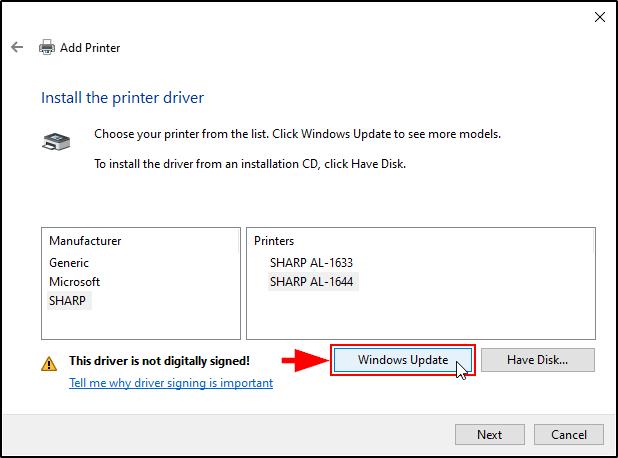
Next, click the Windows Update button. This will make sure Windows 10 checks the online repository for compatible drivers (Microsoft Update Catalog).
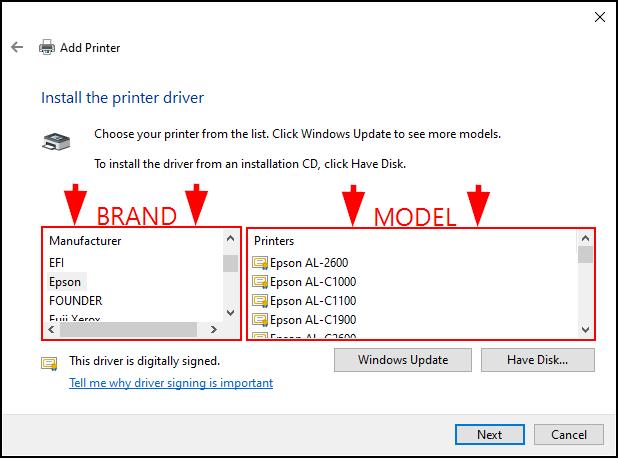
Wait for Windows to finish scanning the devices and driver catalog. In the next windows, select the printer manufacturer and then the printer model. Note: If the exact model for your printer is not listed, try selecting a model similar to your printer model. Or, if you have a driver disk for the printer, click the Have Disk option and select the INF file location for the printer driver.
Click Next.
The final steps are the same as before. Type a name for the printer, skip the printer sharing option and print a test page.
Click Finish.
Note:Is finding the right printer driver getting a bit too technical for you? No sweat. Download DriverFinder to find the EXACT printer driver your PC needs with just one click.
Install an Old Printer Driver in Windows 10, Using Compatibility Mode
If you have a driver installer for an older version of Windows for your printer, you can still try to use it with Windows 10. Just like some earlier Windows versions, Windows 10 has the ability to run programs in compatibility mode.
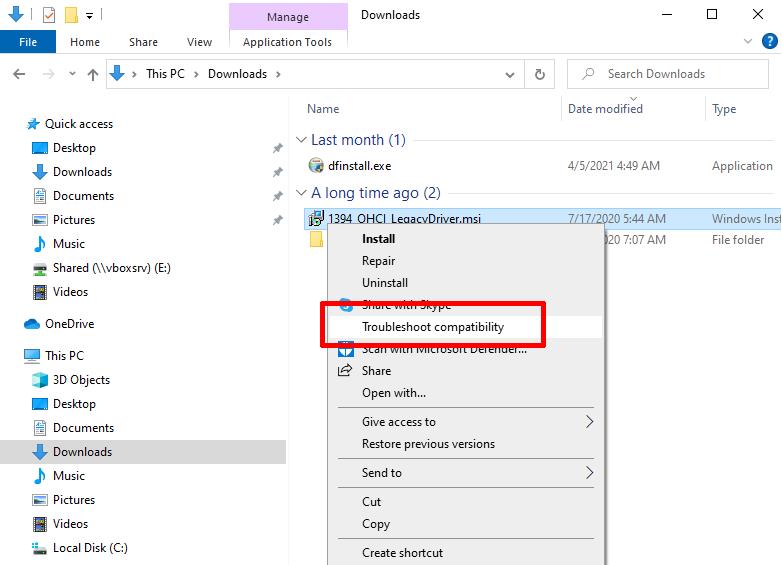
Open a File Explorer window and browse to the driver installer file.
Right-click the file and in the popup menu, select the option Troubleshoot compatibility.
Wait for the Program Compatibility Troubleshooter to analyze the file. Once complete, click Test the program to see if the installer will run under Windows 10.
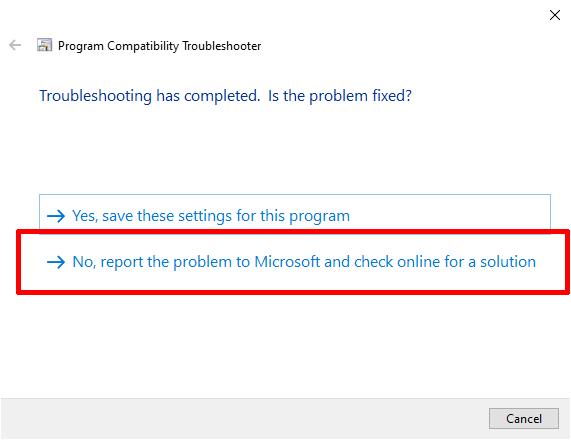
If the printer driver was installed by the program, you can select Next, and then click Yes, save the settings for this program.
If the program failed, and the printer driver was not installed, click Next.
Now click No, report the problem to Microsoft and check online for a solution.
If an online solution is available, you can try the option presented.
In many cases the online troubleshooter will not give you a viable solution for older printers. But if you know which version of Windows the installer is compatible with, you can manually set the Compatibility mode instead of letting Windows 10 analyze it.
Simply right-click the driver installer program, and click Properties in the popup menu.
In the properties dialog box, select the checkbox named Run this program in compatibility mode for:
In the drop-down list below it, select the Windows version that you know the installer is compatible with.
Click OK.
Now double-click the installer in the Explorer window to run it. The program will now be executed with compatibility settings for the selected Windows version. Note: Some installers need to be executed with Administrator rights. So if, running the installer fails. Right-click the file, and in the the popup menu select Run as administrator.
Follow the instructions in the printer driver installer program to finish the printer installation.
The Printer is too old for Windows
It may turn out to be impossible to get your printer working on Windows 10 or Windows 11 because it is too old. In that case, there are only two real options.
The first option is to use a Virtual Machine solution (VMware or VirtualBox), install an older version of Windows, and install the printer software in that.
Using the virtual machine sharing options you can then access and use the printer in Windows 10 or Windows 11.
The second option is to use OpenPrinting with Linux. This is a lot more technical to implement, but it is a good option for older printers. For example, if the old Windows software for the printer is no longer available. Linux has better support for older hardware than the new Windows versions. This method uses the Windows Subsystem for Linux (WSL) to install a Linux distribution in Windows first.


![[FREE]: How to Backup and Restore Drivers](https://driverfinderpro.com/driver-guide/wp-content/webp-express/webp-images/uploads/driver-backup.jpg.webp)