Windows 11 | DriverFinder - We Make Drivers Work for You

How to Fix Unknown USB Device – Device Descriptor Request Failed

Problematic USB devices in Windows can be a real puzzle sometimes. Several reasons can cause a USB device to not be recognized and shown as an unknown USB device. Windows will show an error code with a message. One such error message is Device Descriptor Request Failed, and it shows error code 43.

Device Descriptor Request Failed

We covered device manager error codes in an earlier article, but here we focus on solving the code 43 error specifically.

What does the Device Descriptor Request Failed error mean?

For USB devices, this error generally means a failure to initialize the USB device. Configuration conflicts or a wrong setting can be responsible. Often the trigger for the error is not even clear. One moment a USB device functions and the next it does not!

In one of my cases, the code 43 error occurred with a USB headset that I had plugged into a USB 3.0 hub. After putting the PC to sleep and waking it up, the headset was not working. But in this case, it was not even the headset that was the problem, it was the USB hub that was not recognized and shown as an unknown USB device!

Checking the error details

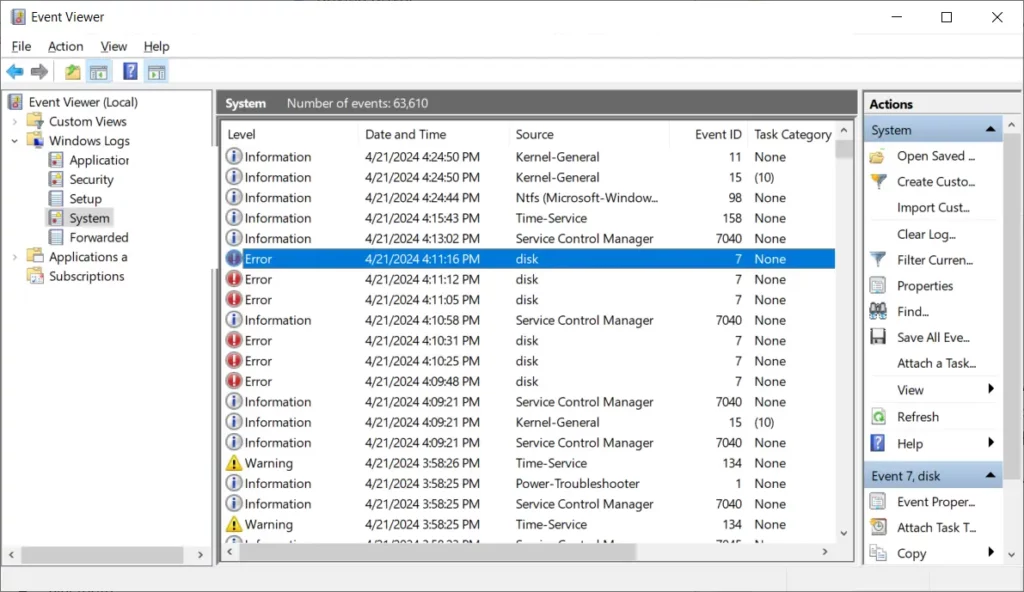
The first thing to do with any device error in Windows is to open the Device Manager and check the details. Right-clicking the device and clicking properties shows the General tab with the Device status.

USB device ocde 43 error

All this does is confirm the error, code 43, with a more specific “A request for the USB device descriptor failed”.

In normal cases, I also check the device ID to see which device is actually causing the error. You can select the Details tab in the device properties to see the various device properties. In this case, I select the Hardware Ids property.

USB device descriptor failure

But unlike a normal situation, the hardware ID does not show the unique identification information. Windows was not able to get the proper details, and as a result, the device could not be configured properly.

More useful information can be retrieved from the Events tab in the device properties.

USB device events

Here we can see more details about the device and the actions Windows took in getting the device to work. Click the various events for more information. Using this information, it should be possible to figure out what device is causing the error.

In most cases, the problematic device is already clear. It is not working, is it? But if you are dealing with a USB hub or USB port, then the actual USB device that is not working may not be the culprit.

Fixing the Device Descriptor Request Failed error

So, if the device was working before, how come it does not now? And how do we fix it?

Luckily, in the case of USB devices, this code 43 error can often be fixed easily!

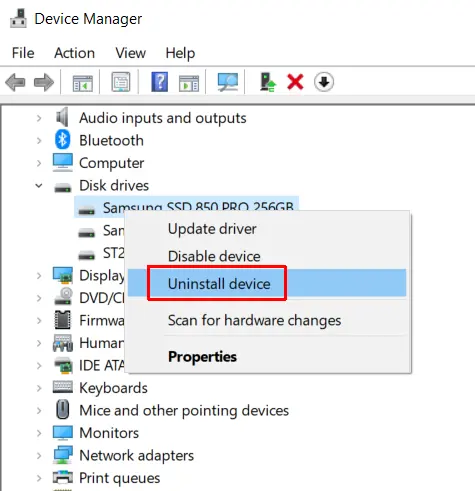
Uninstall the device from the Device Manager

Since the problem is a software or configuration error, it can help to simply have Windows re-detect and reinstall the device. In the Device Manager, right-click the device and select the Uninstall device option.

Uninstall unknown USB device

Then click the Uninstall button to confirm uninstalling the USB device.

Confirm unknown USB device uninstall

This will remove the device from the Device Manager.

Next, use the Scan for hardware changes option in the Action menu of the Device Manager to detect the device again. The device will be added again and shown under the Universal Serial Bus controller category.

Alternatively, you can restart your PC. Windows will automatically scan for hardware changes and reinstall the device on restart.

Did not fix it? Read on.

Unplug the USB device

In my case, with the USB hub and external USB headset, the uninstall option did not work.

So, the next thing to do is to unplug the device completely, wait for it to disappear in the Device Manager, and then plug it in again. Make sure you give Windows enough time to actually remove the device. In a default configuration, Windows will show a taskbar notification when a device is removed.

To clarify, if you are using an external USB hub, like in my case, also unplug that as well.

If the USB device has an external power supply, unplug that as well. Unplugging just the USB hub did not fix the issue for me. Unplugging both the USB cable and the external USB hub power did solve it for me. After that, plugging the headset worked flawlessly.

External power supplies will typically be found on things like external USB hubs, older external hard disks, and other devices that require more power than the standard USB port can provide.

Restart Windows

This is a step that unfortunately is part of many Windows troubleshooting guides. But like with any software, a restart can do wonders! Rebooting the PC will ensure Windows reinitializes the software, including all device drivers.

Update or install USB device drivers

Many USB devices use the default USB drivers included with Windows. Especially in Windows 10 and Windows 11, a lot of drivers are included.

You can see the Driver File Details in the Device Manager as well. Right-click the device, and select Properties. Then click the Driver Details button in the General tab.

drivers provided by Microsoft

The Driver File Details window will show the Provider. In the example, Microsoft Corporation.

If the provider is not Microsoft, the device uses an external, manufacturer-provided driver. In these cases, it can help to install the latest driver to ensure the device is working properly.

You can use the Update driver option in the Device Manager popup menu to update the driver automatically. Alternatively, locate the driver manually, or use our DriverFinder program, to install the latest version.

Note: even if the driver is provided by Microsoft, it may be helpful to check for device-specific drivers from the manufacturer. Default Windows drivers do not always offer full support for all device features.

Preventing the device descriptor request failed problem

The device descriptor request failed error is often the result of a non-specific scenario. That means it can happen without a typical reason. In my case, the problem sometimes happens when the PC comes back from sleep mode, but not always.

It is recommended to let Windows power management power down devices to save power. For USB devices, this can be configured in the Device Manager. Select the Power Management tab in the Properties window (if the tab does not show, power management is not available for that device).

Make sure the checkbox for Allow the computer to turn off this device to save power is checked.

Device power management

If, however, the problems always seem to be related to a change in power (sleep mode, longer time of no use of the device), then it is worthwhile to change this setting and actually disable the power control.

Other than that, we recommend keeping your device drivers up-to-date with DriverFinder to prevent device issues, maximize device performance, and hopefully prevent device descriptor request failed errors!

Fix the Thread Stuck in Device Driver error in Windows

Out of all the errors you can get with Windows device drivers, the thread stuck in device driver error is one of the most serious ones. The reason is that this error results in a blue screen of death (BSOD), which requires a PC restart.

What is the Thread Stuck in Device Driver error?

As the name suggests, the error basically means that the device driver software is stuck in a loop waiting for a hardware device to respond. Although this could be caused by the hardware device itself, in most cases, it is the result of a problem with the device driver software.

Thread Stuck in Device Driver Error

The error can occur on all Windows versions and is often seen with high-utilization types of processing, like gaming, or high CPU or GPU type of processing.

Once you see the error, you’ll want to fix the error.

Here is what you can try.

Steps to Fix the Thread Stuck in Device Driver error

There are a number of things you can try to solve the error. We’ll list them in sequence, so you can spend the least amount of time possible in solving the driver error.

1 – Update Windows

This may look like an obvious step, but it is so easy to overlook pending updates in Windows, especially in the latest Windows versions. So, make sure to go into the Settings (or Control Panel), and check for Windows Updates (1) and (2).

Check for Windows Updates

Tip: make sure to check for any optional updates (3), as Microsoft does not push all driver updates as mandatory! Optional driver updates will show here.

2 – Run the Troubleshooter

If you are running Windows 10 or Windows 11, you can try running the Troubleshooter from the Windows Settings. These built-in troubleshooters will check your system for common, known problems.

If a recommended troubleshooter is shown, (like the BSOD Troubleshooter), click the Run the troubleshooter button. If there is no recommendation, click the Additional troubleshooters link to pick one manually.

Apart from running the troubleshooter, Microsoft also recommends using the GetHelp app.

3 – Update your drivers

Even though you ran Windows Update, you may still be missing some important driver updates. Examples are:

  • drivers that are not distributed by Microsoft (non-WHQL)
  • drivers with newer generic device support that are not limited to specific hardware manufactures
  • drivers that are incompatible with the supporting software (like control panels)

It is best to check for additional driver updates. You can manually visit your PC manufacturer’s website and look for your PC model and any available driver update.

We recommend using our free driver finder software. DriverFinder will scan your PC for hardware devices and find the latest version of available drivers compatible with your Windows version. Simply download and install to make sure the latest driver is available for the device.

Tip: In some cases, it can be required to update the BIOS of your PC. Older BIOS versions may limit compatibility with newer Windows versions. Simply visit your PC manufacturer’s support website and see if an updated BIOS version is available for your model.

4 – Reinstall the device

Using the Windows Device Manager, it is possible to uninstall a device (and optionally the driver). When Windows restarts, the device is then reinstalled. This can sometimes help with the device and driver configuration.

Simply start the Device Manager by searching for it in the Windows search bar. Then select the device that is causing the device error. Right-click the device, and in the popup menu select Uninstall device.

Next, restart your PC and check if the error persists.

5 – Analyze the system logs

Unfortunately, this process requires technical skills. The first step is to look at the event viewer. This Windows software can help you pinpoint the cause of the thread stuck in device driver error. Looking through the System events, you can often pinpoint the device linked to the error. This in turn can then let you know which troubleshooter to run, or which driver to update.

Apart from the Event viewer, you can look at the minidump.

When a serious error occurs, like the thread stuck in device driver error, Windows creates a log file called a minidump. These files are stored in a folder called Minidump in the system root (typically C:\Windows\Minidump). The minidump filename will have the date in it and have an extension .dmp. If no such file is created, check the configuration for creating minidumps.

These crash dump files when generated as a result of the THREAD STUCK IN DEVICE DRIVER ERROR will often contain the filename, which in turn can help pinpoint the driver.

Reading and analyzing a minidump file is a rather technical process. Luckily, tools are available that can read minidump files and show the result in a more user-friendly way. Try BlueScreenView or WhoCrashed.

6 – Check the hardware

As mentioned earlier, the error is not often caused by a hardware error. But if you recently made changes to your system, like changing the video card, or adding memory, it is good to double-check. Make sure all hardware is properly inserted and compatible with your motherboard.

For disks, check the cables that connect them to the motherboard or disk controller.

7 – Disable GPU acceleration

The graphics processor is used for hardware acceleration by default. Disabling it, and effectively switching to CPU-based processing, can help solve the problem as well.

In Windows, open the Settings, and then select System -> Display. Then scroll down and select Graphics or Graphics settings.

Toggle the option Hardware-accelerated GPU scheduling from On to Off.

It is possible that this option is overruled by your display control software. For Nvidia, you can check the PhysX settings in the NVIDIA Control Panel. Switch it to CPU to disable the use of the GPU.

Note: disabling hardware acceleration can have a significant impact on the graphics performance. Even if this is a solution, it is best to look for an updated, compatible driver to enable the hardware acceleration again.

Hopefully with all these steps you will be able to solve the thread stuck in device driver error and prevent further blue screen occurences.

Microsoft Printer Support is Changing

In order to use a printer, like any device, in Windows, a printer driver is required. With Windows 10, Microsoft introduced a new concept for printer support using an integrated driver. This is called the Microsoft IPP Class driver, and it supports Mopria-compliant printers over a network (ethernet, Wi-Fi, Bluetooth) or USB connection.

Windows printer support

The idea is that printer manufacturers will no longer need to create, maintain, and provide their own printer drivers. Knowing Microsoft, there is always the possibility that an aspect of control on their end also plays a role.

All device experience customizations would need to be done through a print support app, which printer manufacturers should then develop instead of a driver. This is already the recommended way for Windows 11.

The motivation for this is stated as improved reliability and performance, which is never a bad thing, especially in the context of Microsoft Windows.

As a result of this change, or plan of changes, Microsoft will phase out their servicing of legacy Windows printer drivers (version 3 and version 4). Due to the nature of the impact, the changes will take place over a period of several years. Following the announcement this year, from 2025 onwards, no new printer drivers will be published to Windows Update. In 20260, printer driver update recommendations will start favoring the IPP driver, and in 2027 third-party printer driver updates will no longer be allowed.

Mopria

Even though printer manufacturers can submit drivers for certification through the Windows Hardware Compatibility Program, from 2025 onwards the drivers will not be available through Windows Update. In addition, the Mopria certification will be required. A direct benefit is that all printers will be supported on various devices.

One of the main questions resulting from this is whether existing or even new third-party printer drivers will still be allowed. And according to Microsoft, they will be. They must have realized that this is critical, as many people make use of printers for a long time.

Even if there is no direct printer support for a specific printer on a new Windows version, a virtual machine with an older version of Windows can offer a solution. But that is really a last resort since it is much simpler to use a (older) printer driver directly.

HP Printer Error 83C0000B

Hewlett-Packard has done it again. Agrevate users with firmware updates (this seems to be the cause) that result in printer problems. Error 83C0000B is shown with a blue screen on the printer.

Error 83C0000B

Like before, it appears that this is the result of a firmware update that includes dynamic security features. In the past, this has resulted in printers suddenly not working anymore if non-original ink or toner cartridges were used.

In the current case, it appears the error pertains to the OfficeJet 902x series printers. Resetting, disconnecting and reconnecting, unplugging, and plugging all seem to have no effect. As it would not be the case with a firmware issue.

Solving error 83C0000B

The only real solution would be an update from HP for the printer. That means you need to check the HP support website for a newer firmware version than the current version 002.2313A, dated May 16, 2023.

Visit the HP site for your printer model, for an OfficeJet Pro 9020 AiO for example. Then open the section with the firmware updates. Click Download to download the firmware installer file, and execute it after the download completes.

HP Error 83C0000B

Note: You may need to change the OS selection to show the firmware option in the list.

The installer will show the HP Printer Update window where you need to select your printer and click the Update button.

Let’s hope HP releases an update soon! You are not alone with this problem.

In any case, make sure to contact HP support, as they might be able to offer a solution or replacement. Their generic instuctions for a full power down and reset do not seem to help. But specific instuctions for your model to do a SemiFull reset, as they call it, might be helpful.

Going back to a previous firmware version

In theory, downgrading the firmware would be a viable option as well to solve error 83C0000B. It was a solution in the past when HP first started using dynamic security to ensure people used original cartridges and toners from HP (the first law suits are already being filed over this).

Using a USB stick, you can load older firmware (.ful2 extension) on the HP printer to install an older version. The process has a few challenges though. You need the exact match of firmware for your printer, and the steps need to be followed exactly to prevent problems during the downgrade process.

Related: How to solve HP printer installation errors.

FT232R USB UART Driver for Windows

The FT232R UART device is a USB to serial interface chip from a company called Future Technology Devices International, or FTDI. The chip is used in a lot of USB-to-serial dongles that are needed for devices with a serial port. Since most modern computers don’t have a serial port (COM port) anymore, using a USB dongle enables such devices to connect to a computer. For this type of dongle to be used with Windows, an FT232R USB UART driver for Windows will be required.

Installing an FT232R USB UART driver

To manually install a Windows driver for this type of device, you will first need to download the driver. In some cases, the dongle manufacturer will offer a driver download. Just visit the support site for the manufacturer and download the driver for your specific Windows version.

After downloading, run the driver executable, or follow the manual driver installation instructions to install the driver.

If the dongle manufacturer does not offer drivers, visit the FTDI site for the latest generic FT232R USB UART Drivers. You can use either the Virtual COM port drivers or the D2XX Direct drivers. After downloading, extract the ZIP file contents to a folder. Next, use the instructions from the link above to manually install the driver in Windows.

FT232R USB UART Driver

In the Device Manager, the dongle may show as an Unknown device, a FT232R USB UART device, or as a USB Serial Converter. If the device does not show, use the option Show hidden devices in the View menu, or add a setting to the System variables to show non-present devices.

FT232R USB UART device


USB serial convertor

If want to automatically find and download the latest FT232R USB UART driver for Windows, we recommend using our DriverFinder program. Based on all the hardware devices in your PC, the program will find the latest drivers for those devices and recommend driver updates.

For more on USB to serial converters and their drivers, also check the article on the Prolific PL2303 driver for Windows.

Copyright 2009 and Beyond - DriverFinderPro.com - All Rights Reserved