Windows 11 | DriverFinder - We Make Drivers Work for You - Part 2

Windows BCM20702A0 driver

Bluetooth problems in Windows computers are often related to incorrect or missing drivers for a Bluetooth device. In the case of the Broadcom BCM20702A0 device, the right BCM20702A0 driver is required for the device to function in Windows. Otherwise, the device will not work and show an error. Any other Bluetooth devices depending on the BCM20702A0 device will most likely also not work or not be recognized.

What is BCM20702A0?

BCM20702A0 refers to a Broadcom Bluetooth 4.0 chip. It is often used in USB Bluetooth dongles, but can also be embedded directly in a computer (laptop, desktop, or all-in-one PC). The chip implements Bluetooth communication which allows a Windows-based PC with this device to connect to external, wireless devices that support Bluetooth. Examples are headsets, game controllers, printers, mice, mobile phones, and similar.

BCM20702A0 driver

Since the BCM20702A0 chip is used on hardware solutions from different manufacturers, a driver specific to the manufacturer may be required to ensure the BCM20702A0 device is recognized by Windows. Dell, Lenovo, Asus, and others all have drivers available for hardware using the Broadcom BCM20702A0 chip.

BCM20702A0 Related Problems

If the BCM20702A0 driver is not installed, or not compatible with the installed device or Windows version, there will be an error. In the Windows Device Manager, the device will be listed under the Other devices category. An exclamation mark on the device icon indicates it is not working properly.

The possible error message for not working Bluetooth devices in Windows:

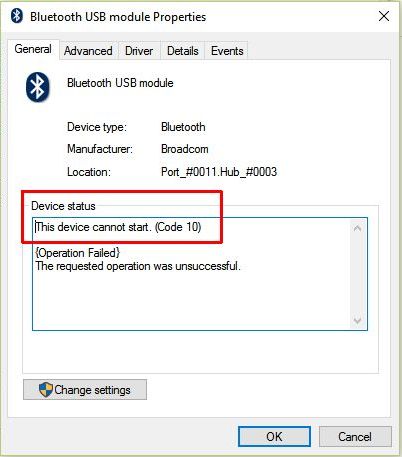
  • This device cannot start. (Code 10)
    Bluetooth code 10 error
  • The drivers for this device are not installed. (Code 28)
    Bluetooth code 28 error
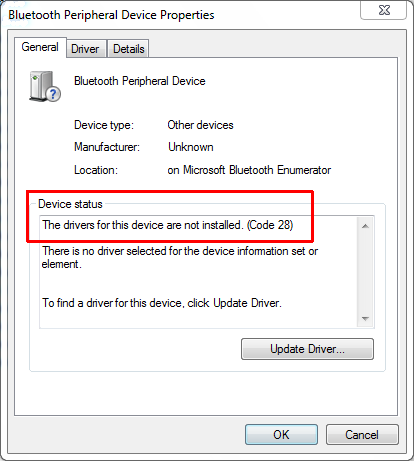
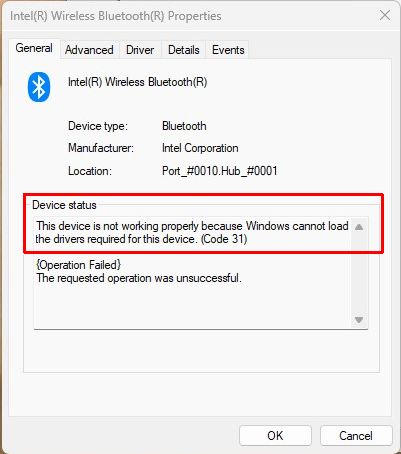
    In Windows 10 and Windows 11, the message will say “There are no compatible drivers for this device”. Instead of “There is no driver selected for the device information set or element”.
  • This device is not working properly because Windows cannot load the drivers required for this device. (Code 31)
    Bluetooth code 31 error

In normal circumstances, all working Bluetooth devices will show in the Bluetooth category in the Device Manager. But if the right driver is not installed, this category might not show at all.

Bluetooth USB Module device

The result of a non-working Bluetooth module is that Windows will not be able to connect to any Bluetooth devices. Pairing with Bluetooth devices will be impossible.

Steps to solve BCM20702A0 problems in Windows

The most common cause of the problems related to the BCM20702A0 device is a driver problem. So, in solving the error, the first steps are focused on getting the right driver installed. If after that, the device still does not work, try the other methods to fix the issue.

Before starting with the steps, make sure that the Bluetooth USB dongle is plugged (in case an external Bluetooth solution is used). Trying to solve the Bluetooth problem without the device physically present in the computer will not work. This sounds silly but it is better to check than wasting time trying to fix a non-issue. Also, make sure you reboot your computer. Pending restarts after updates can be the source of problems.

Update the BCM20702A0 driver from the Device Manager

The Device Manager is the most common method to install and update drivers for devices in all Windows versions. So, try these steps to update the driver.

  1. Press the Windows + R keys to open the Run dialog box.
  2. Type devmgmt.msc in the Run box and press Enter or click OK. This will open the Device Manager.
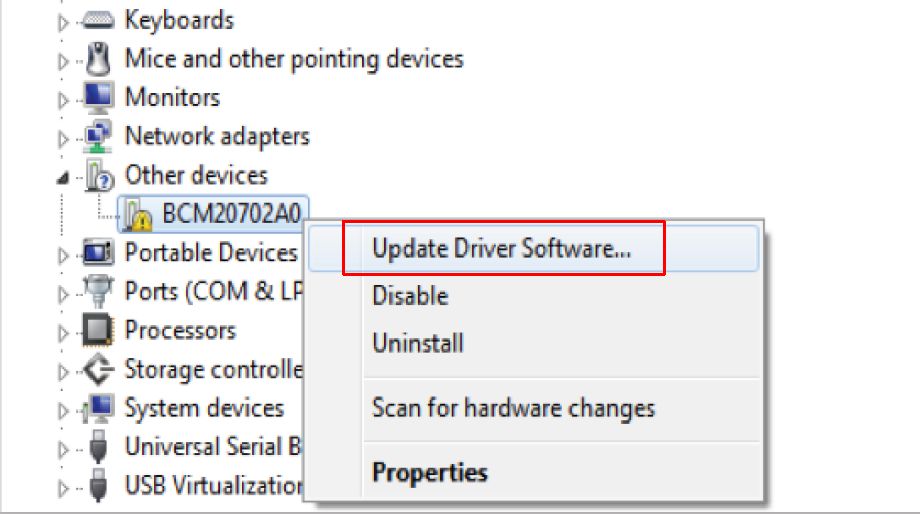
  3. In the Device Manager window, locate the problematic Bluetooth device in either the Other devices category or the Bluetooth category.
  4. Right-click the BCM20702A0 device and in the popup menu, select Update Driver Software (Update driver in Windows 10 and Windows 11).
    BCM20702a0 driver update
  5. Use the Search automatically for drivers option to let Windows find the correct driver for the device. Click Close when the driver has been installed.

In case Windows does find a driver for the device, a driver will need to be manually downloaded from the manufacturer’s website.

Manually download the BCM20702A0 driver

If Microsoft has not included a driver for the BCM20702A0 device in the version of Windows that you are running, a driver will need to be added manually. This means a Bluetooth interface driver needs to be downloaded from the manufacturer’s website. Check your computer brand and model and locate the manufacturer’s support website to search for the driver.

Note: Broadcom used to support their own version of the Bluetooth software, including drivers. This generic WIDCOMM Bluetooth Software is no longer maintained and supported.

Once downloaded, run the setup or install program for the driver package to install the driver in Windows. Note that a user account with administrator privileges is required to install drivers.

If a driver is not available for your Windows version, you can try running an driver for an older Windows version in compatibility mode. For example, say we are running Windows 10, but the Dell installer for the Bluetooth module is suited only for Windows 7. If there is no Windows 10 driver available, we run the Windows 7 installer as follows:

  1. Right-click the downloaded installer file.
  2. In the popup menu, select Properties.
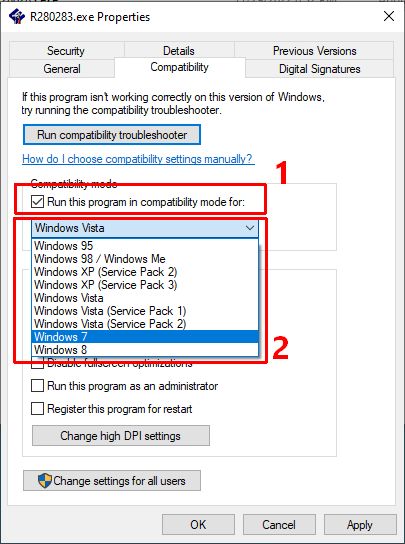
  3. In the file properties dialog box, select the Compatibility tab.
  4. Under Compatibility mode, select the checkbox for Run this program in compatibility mode for (1), and select Windows 7 in the dropdown box (2).
    Compatibility mode Dell BT installer
  5. Click OK to confirm and close the properties dialog box.
  6. Now execute the driver installer again.

Important: The driver needs to match the Windows architecture in order to work. Installing a 32-bit driver on a 64-bit system will not work, even in compatibility mode.

If the downloaded driver package does not have a setup or install program, you need to manually install the driver using the Device Manager.

Update drivers using Microsoft Update

Microsoft has included support for many devices in every updated version of Windows. Although that means that many devices are detected and supported directly, some devices require optional updates. In Windows 10 and Windows 11, optional updates often include updated drivers for devices. To check if the Broadcom BCM20702A0 driver is available, follow these steps.

  1. Open the Settings windows from the Start menu.
  2. In the Settings window, select Windows Update.
  3. In Windows 11, click Advanced options (skip this step in Windows 10).
  4. Next, click View optional updates.
  5. Under Optional updates, click the Driver updates entry to expand the list and see the available driver updates.
    Windows 10 Optional Driver Updates
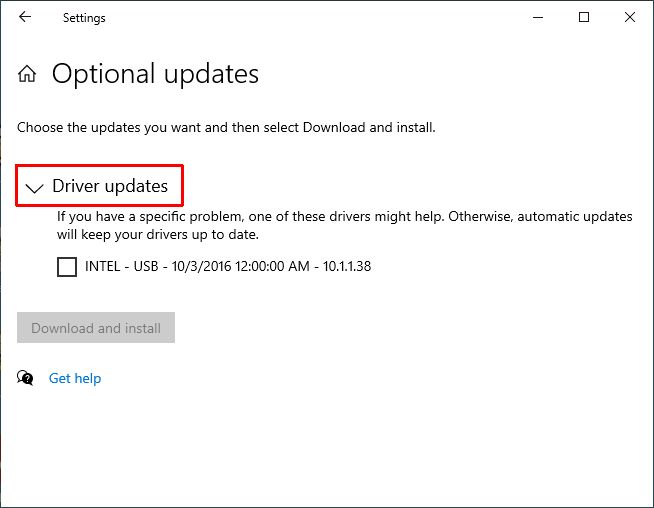
  6. If there is an entry for the BCM20702A0 driver, select it and click the Download and install button.

If no driver update is available for the Bluetooth device, the BCM20702A0 device is not supported in Windows. At least not by Microsoft directly. You will need to use the steps to manually download the driver to get it to work.

Restart the Bluetooth Services

This is the first of the steps that do not directly relate to the BCM20702A0 driver. Even if the driver is installed, the device can still give an error. The error might be solved by one of the following solutions.

Windows uses several services (background tasks) for making sure the Bluetooth devices and functions can work. In some cases, a service may have a problem, and manually starting or restarting the service can fix the problem.

Here are the steps to restart the Bluetooth services in Windows.

  1. Press the Windows + R keys to open the Run dialog box.
  2. Type services.msc in the Run box and press Enter or click OK. This will open the Services window.
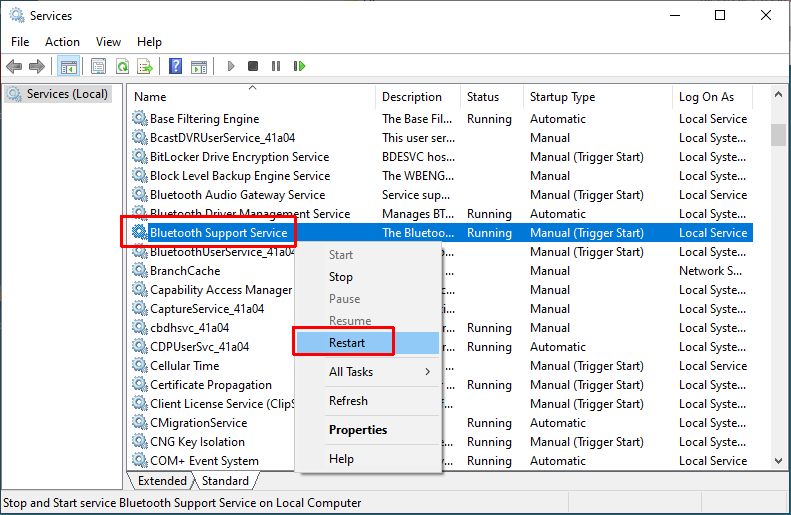
  3. In the Services window, locate the Bluetooth Support Service and right-click it.
  4. In the popup menu, click Restart.
    Restart Bluetooth Services
  5. Close the Services window when done.

You can repeat these steps for other Bluetooth services, like the Bluetooth Driver Management Service. If the services are not in a Running state, simply try starting them instead of restarting them. Not all Bluetooth services need to be running for the BCM20702A0 device to be detected and installed. Some are for support tasks, like audio over Bluetooth. But starting or restarting them manually ensures that they are not the reason the device is not working.

Run the Bluetooth troubleshooter

In Windows 10 and Windows 11, there is the possibility to run a Windows troubleshooter for a number of problems. Microsoft has included a troubleshooter function for common problems that can be automatically solved. One such troubleshooter is the Bluetooth troubleshooter.

To execute the Bluetooth troubleshooter in Windows 10, follow these steps.

  1. Open the Settings window from the Start menu.
  2. In the Settings window, select Update & security.
  3. Next, click Troubleshoot in the left-hand pane.
  4. In the right-hand pane, click the Additional troubleshooters link.
  5. Next, under Find and fix other problems, click the Bluetooth option.
    Bluetooth troubleshooter in Windows 10
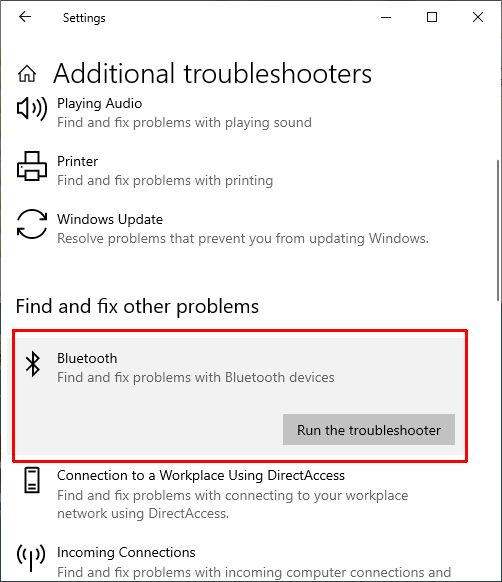
  6. This will show the button Run the troubleshooter. Click it to start the troubleshooter.
  7. A new window will come up showing Windows is Detecting problems with Bluetooth. Wait for the process to finish analyzing and fixing any Bluetooth-related issues.
  8. Click Close when done.

In Windows 11, the steps are a little different.

  1. Open the Settings window from the Start menu (or press the Windows + I keys).
  2. In the Settings window, click System.
  3. Next, click Troubleshoot in the right-hand pane.
  4. Click the Other troubleshooters link.
  5. Click the Run button next to Bluetooth under Other.
    Bluetooth troubleshooter in Windows 11
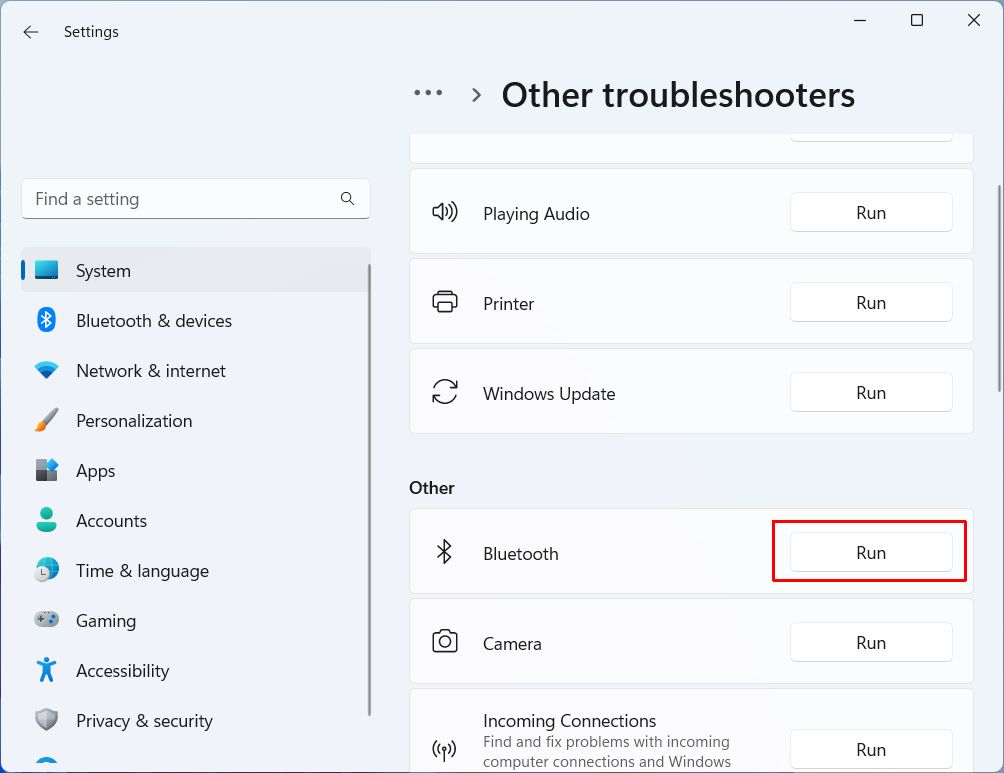
  6. Wait for the troubleshooter to finish analyzing and fixing any Bluetooth-related problems.

Note: The Bluetooth troubleshooter can take considerable time to complete.

Check the Airplane mode setting

This is mentioned as one of the last solutions since the option would normally only be used on portable devices for a specific reason. But if you have been traveling with your laptop, it is a step that is worth taking.

Personally, I simply disable the Bluetooth option in Windows and only enable it when needed. Active communication on any device is a security risk these days. But if you have Bluetooth turned in normal circumstances, you can opt to use the Airplane mode in Windows to disable all communication when traveling.

In both Windows 10 and Windows 11, the Airplane mode can be enabled or disabled by clicking the network icon in the taskbar and selecting the Airplane mode in the quick access popup window.

Airplane mode in Taskbar Quick Access
Note that the Airplane mode will show active when enabled (blue in this example but that will depend on the active Windows theme). Airplane mode should be disabled for Bluetooth to work.

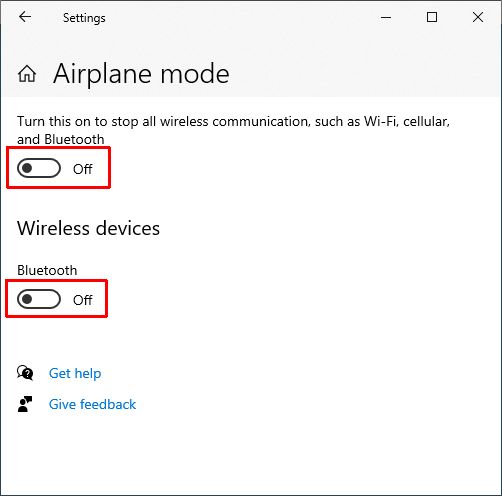
If you prefer to use the Windows Settings, follow these steps.

  1. Open the Settings window from the Start menu.
  2. In the Settings window, click the Network & internet option.
  3. Next, click the Airplane mode option.
  4. Now make sure both switches are in the Off position.
    Disable Airplane mode inWindows 10
    In Windows 11, you have the option to disable the Airplane mode directly, or like in Windows 10, select the Airplane mode option to control the individual settings.
    Airplane mode settings in Windows 11
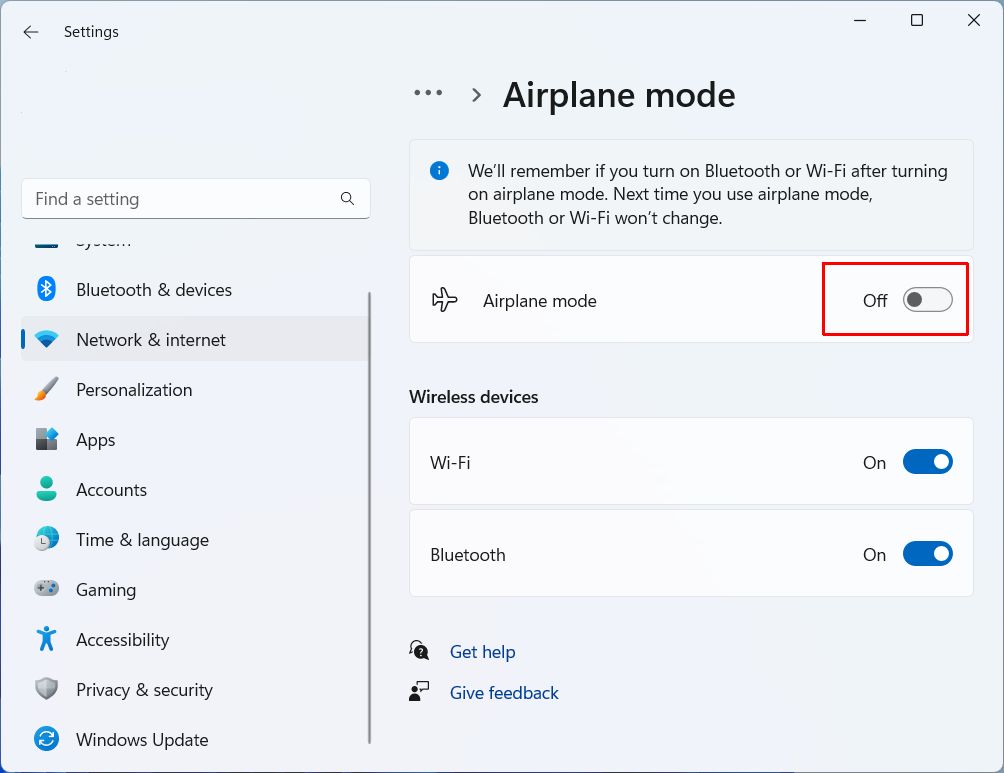
    Windows 11 remembers which communication was on when you enable and disable Airplane mode. So, if only Wi-Fi was on and Bluetooth was off when airplane mode was activated, Bluetooth would remain off when airplane mode is disabled again. This is why it is a good idea to check this setting.
  5. Close the Settings window when done.

After this, the network and Bluetooth devices should be working. There is no need to restart the computer, the changes take effect immediately.

Reset the hardware devices

Windows keeps configuration information for all devices in the computer. In rare cases, the configuration of a device can be a problem. Installing similar devices with similar drivers, or installing additional USB devices on the same controller can result in a BCM20702A0-based device to stop working.

To fix the issue, it is possible to reset the device by removing it and letting Windows reinstall the device with the proper configuration settings. These steps need to be executed from within the Device Manager.

Follow the steps to update the BCM20702A0 driver from the Device Manager, but instead of picking the Update driver option, select the Uninstall option. In the Uninstall Device confirmation window, click the Uninstall button (1). This will remove the device from Windows. After this reboot to let Windows automatically detect and reinstall the device.

First, try the uninstall option and keep the drivers installed. If that does not fix the issue, use the option Delete the driver software for this device when uninstalling it (2). That will force Windows to reload the driver for the Bluetooth device.

Unistall Bluetooth device in Windows 10

If the BCM20702A0 device is a USB dongle, it can also help to uninstall the USB Host Controllers in the Universal Serial Bus controller category. These controllers ensure that all connected USB devices are detected are installed. Resetting them can solve problems caused by the USB interface itself.

If things are still not working after this, then you might still be able to get things working again. That partly depends on whether the BCM20702A0 device was working on your system previously. If it was, a system restore or system recovery can bring back the working BCM20702A0 driver.

For help in finding the right drivers for your Windows devices, including the BCM20702A0 device, you can use the DriverFinder program. By scanning the hardware present, it will locate and offer the required device drivers.

ScanSnap iX500 Driver for Windows 10/11

If your ScanSnap iX500 scanner stopped working on Windows 10 or Windows 11, it is most likely due to a driver problem. Fujitsu updated their scanner software from ScanSnap Manager to ScanSnap Home. The latest software will also install the latest ScanSnap iX500 driver. Even though the iX500 model was introduced quite a few years ago (2013), it is still a popular and useful device.

The ScanSnap iX500 is a duplex color scanner for A4/Letter/Legal paper sizes with an automatic document feeder. Using the latest Fujitsu scanner software will allow you to to keep it working on the latest Windows versions.

Download the ScanSnap software

You can download the software driver from the Fujitsu support website to get the ScanSnap iX500 working on Windows 10 or Windows 11. Follow the steps below.

  1. Open a web browser and navigate to the Fujitsu ScanSnap software download page.
  2. Under Discontinued scanners, click the ScanSnap iX500 This will open the ScanSnap iX500 software downloads page.
    ScanSnap Software Download
  3. Next, select the Windows version in the dropdown list (1), and then click the Display software list button (2).
    ScanSnap iX500 Windows 10
  4. Under Setup Programs, click the Download link next to the SnapScan Home Download Installer 2.7.0 (the version number might be higher when you visit the page).
    Download snapscan home download Installer
  5. This will open a new page to download the installer. Make sure your browser does not have a popup blocker active, or the new window will not open. Select your location and then click the Download Installer
  6. Read the license agreement and click the Agree button to start the software download.
  7. The software installer will be downloaded (depending on your browser you may need to select a download location).
  8. Open a File Explorer window and navigate to the download location on your PC.
  9. Double-click the downloaded installer to execute it.
    Note: If you cannot execute the file, you may need to unblock it.
    • Right-click the file, and in the popup menu, select Properties.
    • In the General tab, select the checkbox Unblock (next to Security in the bottom of the window).
      Unblock ScanSnap IX500 driver installer file
    • Click the OK button.
  10. Follow the on-screen instructions to install the ScanSnap Home software.
    Note: Additional files are downloaded during installation, so make sure your Internet connection is active. Also check available disk space, as he fully installed software takes over 740 MB.
  11. Restart your computer when finished.

Reinstalling the software can also help if are facing problems scanning directly to email (like Outlook). Make sure to fully uninstall the existing version first.

Install the ScanSnap iX500 driver

After installing the ScanSnap Home software, the ScanSnap iX500 driver for the device can be installed.

  1. Execute the ScanSnap Home software.
  2. In the setup window, select the iX500 model and click the Start setup button.
    Install ScanSnap iX500 Driver
    Tip: The software not only allows installation of the iX500 driver, but also supports the ScanSnap iX1600 driver and all iX models in between.
  3. Make sure the scanner power is connected and that the scanner is connected to the computer via a USB cable.
  4. Click Next to continue.
  5. Ensure the device is powered on (blue or purple Scan button), and then click Next.
  6. Wait for the device to be installed.
  7. Click the Finish button.

After the connection setup finishes, the Windows driver for the iX500 will be installed and you can use the scanner with your Windows PC. Click the Scan button in the top-left corner to start scanning.

Need to find or update more device drivers for Windows? Download our DriverFinder program to automatically check your Windows PC for missing or outdated drivers.

For generic troubleshooting regarding the SnapScan IX500 device, you can also have a look at the Ricoh support page.

FAQ

Can I still use the ScanSnap Manager with the iX500?

Yes, the ScanSnap Manager software can still be used for the iX500 for Windows 7 up to Windows 11. There will however be no new features and no updates with this software.

Can I keep my old scan settings?

Yes, if you switch from the ScanSnap Manager software to the ScanSnap Home software, you can keep your old scan settings. This entails creating a profile in the ScanSnap Home software and migrating the settings. For details on the migration, please see the instructions on the website.

Can I Install ScanSnap Home when I have ScanSnap Manager installed?

Yes, it is possible to have both the old and new software installed on the same configuration. When you install the new software, make sure the installation path is different (use the Custom install option). After installing the new version, you can safely delete the old software. Settings -> Apps -> ScanSnap Manager -> Uninstall.

How to fix the “Unable to connect with SnapScan” error?

First, make sure the latest version of the ScanSnap software is installed. Also, check that the Windows Image Acquisition service is running (starts automatically), and try changing the Log on as to a Local System account with the checkbox Allow service to interact with the desktop enabled.

The steps:

  1. Press the Windows + R keys to bring up the Run window.
  2. Enter services.msc and press Enter or click OK.
  3. In the Services window, scroll down to the Windows Image Acquisition (WIA) service.
    Windows WIA service
  4. Double-click the service.
  5. Make sure the Startup type is Automatic, and if the service is not running, click Start.
  6. Select the Log On tab.
  7. Select the Local System account radio button and mark the checkbox to Allow service to interact with the desktop.
    WIA serive log on type
  8. Click the OK button to confirm, and close the Services window.

If this does not fix the connection error, try disabling all other Imaging devices in the Device Manager.

How to fix “Make sure that ScanSnap is not being used by another user or application, and then try again.” error

This error may show in the ScanSnap software if the program cannot access the scanner. First, try the steps from the connect error.

If that does not work, try connecting the scanner directly to a (different) USB port on the computer. Don’t use a USB hub or a WiFi connection. Also, test the USB cable if you suspect it may be faulty.

If you are using the ScanSnap Manager software, you can run the ScanSnap support tool to check the access privileges for the scanner device. Start the support tool from the Start menu in the ScanSnap Manager group. In the support tool, select the Recover tab (1) and then click the Check button (2).
Check ScanSnap connection

After this, click the Recover button to find out if the problem has been resolved.

If the ScanSnap iX500 still supported by Fujitsu?

Even though the iX500 is considered a discontinued product, it is still being supported until January 31, 2024. Until this date software updates will still support the iX500. The recommended successor model is the iX1500, but even that model is scheduled to be discontinued by December 31, 2025.

Can I use other scanning software with my ScanSnap iX500?

Unfortunately, not. The scanner uses a driver that does not support the common TWAIN or ISIS standards for scanning devices. As a result, the iX500 will not show up as a scanning or imaging device in other scan applications. The ScanSnap Manager or ScanSnap Home software is required, which uses the Windows Imaging Acquisition driver.

A company called JSE Imaging Solutions has a TWAIN driver (SnapTwain) that works in combination with Fujitsu ScanSnap Home software. At EUR 99, it is a relatively expensive solution, but if you really need TWAIN support, you could try this option.

Download HP LaserJet P1007 Driver for Windows

HP LaserJet series printers have always been a solid choice when it comes to reliable high-demand printing. The LaserJet P1007 is one such model that is a popular choice with consumers and small offices. It is a small, light-weight, monochrome laser printer. But with newer versions of Windows, it may become harder to get support. If a driver is needed for Windows 10, or even Windows 11, you may need to download and install the HP LaserJet P1007 driver manually.

Manual install of the HP LaserJet P1007 Driver

To manually install the driver, download the installer from the HP support website and execute the installer.

  1. Open a web browser and navigate to the HP support page for printer software.
  2. Enter the model number in the search box under Enter your product name.
    HP printer Support Online
  3. Click the result link under the search box.
    Note: If the result link does not show, click the Submit button and click the HP LaserJet P1007 link in the search results.
  4. On the HP product support page, check that the Detected operating system matches your Windows version (1). If it does not, click the Choose a different OS link next to it to select the correct Windows version.
  5. Click the Driver-Product Installation Software link and then the Basic Drivers link to show the available driver details and download option.
    Download HP LaserJet P1007 Driver
  6. Click the Download link to download the printer driver installer (2).
  7. Open a File Explorer window and navigate to the file location of the downloaded installer.
  8. Double-click the file to execute the HP LaserJet P1007 driver installer. In this example, the file name is ljP1000_P1500-HB-pnp-win64-en.exe.
    Note: Click Yes in the User Account Control window when it shows to confirm the execution of the installer.
  9. Follow the instructions in the installer program to complete the driver installation.
    HP driver installer

This completes the manual installation of the driver. You can now use the HP P1007 printer in Windows and applications.

Installation without running the HP Driver Installer

If for some reason you cannot use the downloaded installer to install the printer, there is another option. Use a program like 7-Zip to extract the contents of the downloaded installer file.

  1. Download and install the 7-Zip program.
  2. Right-click the downloaded installer file in the Windows File Explorer.
  3. In the popup menu, select 7-Zip and then click Extract to “ljP1000_P1500-HB-pnp-win64-en.exe \” (the suggested folder name will vary depending on the name of the downloaded file).
    Note: In Windows 11, you may need to click Show more options in the popup menu before the 7-Zip option is visible.
    Extract HP LaserJet P1007 driver files

After this, use our instructions to manually install a driver in Windows to install the printer from the Windows Device Manager.

As always, we recommend you use DriverFinder to find and download the latest drivers for your Windows devices. The drivers for the HP LaserJet P1007 are included!

Hopefully with the above instructions, you can get your HP LaserJet P1007 working again. Even though it is from 2012, it can still function as a reliable printer.

A driver cannot load on this device ene.sys

When you are updating Windows 11 to the latest version, you might see an error pertaining to the file called ENE.SYS. The error indicates that the device driver cannot load. This problem is a result of the security settings in Windows 11 in combination with an older version of the ene.sys file.

A driver cannot load on this device ene.sys

What is ene.sys?

The ene.sys file is a driver file. Like other .sys files on Windows systems, it is a device driver that enables the communication between Windows and a hardware device. The ene.sys file is part of a system called MSI Mystic Light, which controls lights in a PC. This is typically used in gaming systems and is used by MSI for their gaming systems.

Mystic Light is installed as part of the MSI Dragon Center or MSI Center.

There are a few methods to solve the error related to the ene.sys file not loading. Below you will find the details on these options with instructions on how to execute them.

Option 1 – disable the memory integrity check

To enhance security Windows 11 has an option called core isolation. You can read all about it on the Microsoft website, but in short, it is a memory security feature that helps prevent critical components from being affected by malware or crashing the system.

Disabling this feature can solve the loading problem with the ene.sys file since the driver will be allowed to load afterwards.

To disable the core isolation (memory access protection) in Windows 11, follow these steps:

  1. Open the Windows 11 Settings from the Start menu.
  2. In the Settings window, click Privacy & security option in the left-hand pane (1).
  3. Next, click Windows Security in the right-hand pane (2).
    Windows 11 Security Settings
  4. Scroll down in the list of Protection areas until you see Device security and click it. The Windows Security window will open with Device security active.
  5. Now click the Core isolation details link.
  6. Toggle the option Memory integrity to Off.
    Disable Memory Integrity in Windows 11

Changing the Memory integrity option to Off will allow incompatible drivers to be loaded. That includes the version of the ene.sys that was shown in the initial error message.

As you will realize, this change will reduce the level of security on your Windows 11 PC. So, it is not the most desired option, but if no newer driver is available, it is the only option to load the driver.

Option 2 – Updating the ene.sys driver file

The better option to deal with the incompatible driver is to install an updated version of the device driver. Installing a later version of the ene.sys file can fix the problem. This will allow the Memory integrity check to be enabled and load the ene.sys driver at the same time.

To update the Mystic Light version for MSI, you use the MSI Gaming Center software. Or for Windows 11, the new MSI Center software. The MSI Center can be downloaded from the MSI website.

After downloading and installing the MSI Center, run it to find the Mystic Light option and click the Update button. If the Mystic Light is not in the Installed list, find it under the Installable items and install it to get the latest version.

Mystic Light in MSI Center

Once the installation of the new Mystic Light version is complete, enable the Memory integrity option in Windows 11 again.

Windows 11 will check the drivers installed on the system for compatibility.

Enable Memory integrity in Windows 11

If all drivers are compatible, the option will be enabled and the Core isolation will function properly.

In case a driver is found not to be compatible, Windows 11 will show a message in the notification area.

Incompatible drivers for core isolation

Click the Review incompatible drivers link in Windows Security to find out which drivers are incompatible.

Non-MSI vendors

What if you never used an MSI hardware product? There are other light control products used by different vendors that use the ENE solution as well. Have a look at Trident Z Lighting Control by G.SKILL, ASUS Aura, Gigabyte RGB Fusion, and NZXT CAM. SignalRGB is a non-vendor solution for RGB sync.

It is important to only install one of these solutions though, as they can use similar software components that interfere with each other’s operation.

In general, we recommend keeping device drivers up to date. Using the latest versions ensures the most recent digital certificates on the driver files and the best compatibility with Windows 11. Use our DriverFinder program if you have trouble finding an updated driver.

Manually remove ene.sys and related files

In case you cannot fix the problem by installing, updating, or uninstalling software related to light sync, you might need to do a manual cleanup of anything related to ENE.SYS.

That means checking the Program Files folders on your system for any ENE subfolders and deleting them. Then search for ENE.SYS and ENE.DLL on the system disk and remove those files as well.

It can even be enough to simply rename the ene.sys file in the Windows driver folder. Just do a file search in the C:\Windows\System32\Drivers or C:\Windows\System32\DriverStore\FileRepository folder for the ene.sys file and rename it to ene.sys.old or something similar. You will need administrator access level for this.

The last step is to search for ENE in the Windows Registry and remove any entries related to the driver. Make sure to make a backup of the Registry first by using the Export option in the Registry Editor! Adter creating a backup, use the Edit -> Find menu option to search for any ene.sys entries and remove them.

Search ene.sys in Windows registry

Note: Make sure to repeat the search after every occurance found and deleted using the Edit-> Find Next option (F3).

Windows 11 – Direct RGB Support

The best solution to the problem would of course be that there is no need for the ene.sys driver. At the moment there is no direct support for RGB lighting control for gaming in Windows 11. Microsoft seems to be working on this though. In Windows 11 build 25295, lightning controls have been found in the settings that seem to indicate Microsoft is implementing things directly into Windows 11! Original Microsoft specifications for this are from 2018.

Canon Printer Driver for Windows

Although Canon is known for cameras, its product range also includes printers. Canon offers printers for both the home user, as well as professional office users. Inkjets, laser printers, photo printers, and multi-function devices for scanning, copying, and printing. A Canon printer driver is required to enable Windows to use your printer if you are using a Canon printer in combination with a Windows PC.

Which Canon printer driver is required is determined by the printer model and connection type. Older Canon printers like the Canon PIXMA MG2522, can use a USB port (or even a parallel port), while modern models often use a wireless connection or ethernet connection.

Download a Driver from Canon

As with many computer devices, the software for these devices can be obtained either directly from Microsoft or the product manufacturer. In the case of Canon, the best place to start for finding a printer driver is the Canon website.

  1. Open a web browser and visit the Canon printer website.
  2. Select the type of user you are in the top menu (1).
  3. Next, click the Support option in the main menu (2).
    Canon support website
  4. In the Search field, type the model number for your printer.
    Note: With most Canon printers, the model number is clearly visible on the front or top of the device. If not, look at the sticker on the back or bottom of the device.
  5. In the search result click the link for the product support (2).
    Canon printer model selection
  6. The web page shown next is specific to the selected product. Click the Software & Drivers option next to the printer image.
    Canon printer driver software
  7. Before you can download the Canon printer driver for your model, you need to select the Operating System (1) and Version of the operating system (2).
    Select Windows version
    Note: If your Windows version is not listed, the printer might not be supported on that version. You can try a driver for an earlier Windows version (make sure the architecture is correct – 32/64 bit), but there is no guarantee that it will work.
  8. Next, change the Type to Drivers, so the Results will only list the Canon printer drivers rather than all software.
    Canon printer drivers support
  9. Now click the DOWNLOAD button next to the top recommended entry in the result list. The top recommendation will be the latest version of the Canon printer driver for your printer model.
  10. Click the Yes button to confirm the License Agreement for the driver software if requested.
  11. Wait for the driver file to be downloaded. If required, select the destination on disk for the file when prompted (browser dependent).
  12. Click the Close button on the Canon web page to close the download page.
  13. Open a File Explorer window (Windows + E keys), and navigate to the Download location.
  14. To start the installation of the downloaded Canon printer driver, double-click the downloaded file (or select it and press Enter).
    Execute Canon Driver Installer File
  15. Click Yes in the UAC window to confirm the start of the setup program.
  16. If the printer setup starts automatically, follow the on-screen instructions to install the Canon printer driver (and software).
  17. In some cases, especially for older printer models, the downloaded file is a self-extracting executable. When executing the program, the installation files are extracted into a subfolder.
    Canon extracted driver files
  18. In this case, open the subfolder and navigate into the further subfolders (1) until you see the Setup.exe for the driver. Double-click Setup.exe to install the driver (2).
    Execute Canon driver installer
  19. Next, follow the on-screen instructions to install the driver.
    Canon Printer driver setup

After these steps, your Canon printer driver is installed, and Windows should be able to communicate with the device.

In Windows 11, use Settings -> Bluetooth & devices -> Printers & scanners to see the installed printers on the PC. Click the printer to print a test page, change the preferences or run the troubleshooter.

Find a Canon Printer driver elsewhere

If you cannot find a driver for your Canon printer on the Canon support site, first make sure you have the right country selection. Not all Canon printers are sold and supported in all regions, so it is important to select the right region.

But for older Canon printers, support is no longer available directly from Canon. Canon offers support up to 10 years after the first release of its products. In that case, you will need to find a driver elsewhere. The best location is an original installation CD since you are certain it is a trusted source. The problem with that (apart from that they often get lost over time), is that it might not be the latest version. Compatibility with newer versions of Windows can be a problem.

Searching online for a driver can give you the right driver if you know how to look for it. But a better solution in most cases is to use a Driver Finder program to locate the driver for you. This program will scan your PC for all devices present and suggest the latest, correct drivers for your version of Windows.

Copyright 2009 and Beyond - DriverFinderPro.com - All Rights Reserved