The MediaTek MT7921 Wi-Fi card from Taiwanese manufacturer MediaTek was introduced in 2021. The wireless card was first used by Asus in their ROG and TUF gaming laptops. The new MediaTek chipset has improved wireless network connectivity, offering better performance and improved battery life.
All great of course, but with Windows 11, there are reports that the MediaTek MT7921 is not working after the June 2022 update of Windows 11. Problems vary from intermittent connectivity, no Wi-Fi device showing at all, and device errors (This device cannot start. (Code 10).
Install the MediaTek MT7921 Driver
The primary cause of such problems is the device driver. So the first thing to try is to uninstall the MediaTek MT7921 device in the Device Manager and reinstall the driver.
To uninstall and reinstall the MediaTek MT7921 driver:
Open the Device Manager from the Start menu.
In the Device Manager, click on Network adapters to expand the category and show the devices.
Next, right-click the WIFI 6 MediaTek MT7921 device, and in the popup menu select Uninstall.
After this you have a few options:
Restart the PC, in which case Windows will reinstall the device (but most likely using the same driver). You can also use the Action menu and select Scan for hardware changes to reinstall the device.
– or –
Use the MyASUS app (available in the Microsoft Store). Note:The screenshot is for illustration only, and shows the Intel WLAN Driver instead of the MediaTek MT7921 Driver.
Go to the Customer Support section (1).
Select LiveUpdate. (2)
Select Latest. (3)
Under Networking, locate the wireless driver and click the download icon. (4)
Select a folder to download the driver to and click OK.
Once the download completes, the download icon will change into a folder icon. Click it to open a File Explorer window with the downloaded file.
Click the downloaded driver installer to install the driver.
If the device re-install or the driver update did not fix the problem, you might need to reset the BIOS. This was reported as having worked for a system with BIOS version 310. It is not certain this will work for other versions, but it is a possible solution.
To load the Asus default BIOS settings:
With the system showing the Windows 11 desktop, press the power button and hold it for 20 seconds.
Press and hold the F2 key, and then press the power button again to turn on the computer. This will get you into the BIOS.
Click Default(F9) at the bottom of the screen, or press the F9 key on the keyboard.
Next, click the OK button to confirm.
Click Save & Exit(F10) at the bottom of the screen, or press the F10 key on the keyboard.
And finally, click OK again to confirm saving the changes with the default settings loaded.
The computer will reboot and start Windows 11.
Use a third-party driver
In general, is best to use a Microsoft driver or a driver from the computer or hardware manufacturer. But there is a difference in how fast different manufacturers release updated drivers for devices. And in the case of the MediaTek MT7921, the driver from ASUS might not be the latest driver.
If the Windows driver or the ASUS driver do not fix the problems with your MediaTek MT7921 Wi-Fi 6 card, try downloading and installing the Lenovo driver. This might sound weird, but the driver installer is the only real difference. The driver itself is for the exact same MediaTek device.
After the download completes, run the installer, and follow the on-screen instructions to extract and install the driver. If this does not help, you can uninstall it again after, or use a driver rollback to go back to the previous version.
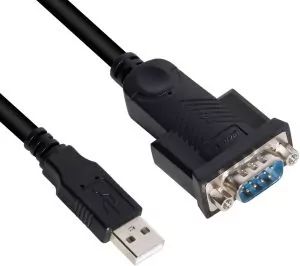
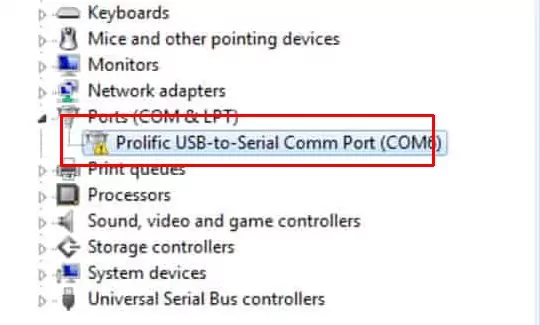
When you use a device that connects to the computer through a serial port, you’ll probably use a USB to serial cable solution. The most common solution for this from Prolific is the PL2303-based solution. In Windows 11 the device would show up in the device manager under the Ports (COM & LPT) category. If it does not, or it shows an error, you will need to manually install a Prolific PL2303 driver in Windows 11 to get it to work.
What is Prolific PL 2303?
Prolific is a company that offers a Smart-IO chip that offers a solution for communication with serial ports (like RS232) through USB. This allows a modern computer with only USB ports to use legacy equipment with a serial port. The chipsets from Prolific are the PL23xx and PL25xx chipsets and they are available in different versions for UART, RS232, RS485, I2C, and even IEEE1284 (parallel ports).
Prolific chips are also used by other vendors in their cable solutions. The Sabrent USB to serial cable for example is also using the PL2303 chip and hence the same driver.
Some examples of the types of products that use a serial connection are:
If your PC does not have a serial port, many of these devices can still work with a Windows 11-based computer using a USB-to-serial cable. Since the cables are available for USB Type-A ports as well as USB Type-C ports, a solution is available for most Windows 11-based systems.
An alternative solution is available from Silicon Labs. Their chips in the CP210x series also offer USB to UART solutions (the CP2102 is often used). For Windows drivers, check their support site. Another popular solution for USB to RS232 is the TrippLite USA19HS or Keyspan USA-19hs.
What if Windows does not have a Prolific PL2303 driver?
If the driver for the Prolific PL 2303 device is not installed in Windows 11, you can either get an error message like “Please install corresponding PL2303 driver to support Windows 11 and further OS”, or the device will show with an error in the Device Manager (typically with a yellow exclamation mark).
The error code for the device will be “The device cannot start (Code 10)”.
The result in both cases is that Windows 11 cannot communicate with the device that is connected through the USB to serial cable and any programs trying to use it will not find the device.
Detect the PL2303 Chip Type
Like with many hardware vendors, not all variations of their products are supported on all platforms. In most cases, updates to hardware are indicated with revision numbers. With chip manufacturers, it is sometimes type indicators.
For Windows, Prolific also specifies which types are no longer supported on Windows 11. So it is important to know which variation of the PL2303 chip is in use on your system. Since it is not always possible to see the chip and read the type number, you can use the Prolific utility to determine the version.
After downloading the ZIP file, open it and run the EXE file inside it (e.g. PL2303_CheckChipVersion_v1006.exe). There is no need to install anything, simply run the chip check program.
In the program interface, select the COM port in the drop-down field and then click the Check button to get the details of the PL2303 chip connected to the port.
Download and install the Prolific PL2303 driver in Windows 11
To get the latest PL2303 driver, download it from the Prolific website.
Make sure to pick the latest version and take note of the chipsets it supports. If the chipset your cable is using is not included in the Windows 11 version, you can try downloading and installing the previous version for Windows 10.
After downloading the ZIP file (PL23XX_Prolific_DriverInstaller_v402.zip at the time of writing), extract the ZIP file contents, and run the setup program in the subfolder (PL23XX-M_LogoDriver_Setup_402_20220309.exe at the time of writing).
If the User Account Control window shows, click the Yes button to confirm running the installer.
Follow the on-screen instruction in the PL23XX-USB-to-Serial Driver Installer Program window to install the PL2303 driver.
Once the installation is complete, you should see the Prolific device in the Device Manager under Ports without any error. Connect the serial device to your serial-to-USB cable and test the device in Windows 11.
For more details about manually installing drivers in Windows 11, check this article.
Changing the COM port
When the PL2303 driver is properly installed, a program might still not detect the device that is connected through the USB-to-Serial cable. The reason in many cases is that the program requires the serial device to be connected to a specific COM port. Especially older software often does not support higher COM-port numbers, but expects the device to be connected on COM1 or COM2.
In Windows 11, you can change the COM port number using the Device Manager. Here are the steps:
Right-clicking the Start icon in the Taskbar.
In the menu, click Device Manager. Tip: You can also use the Run option. For this, press the Windows Key + R, then type “devmgmt.msc” and press the Enter key.
In the Device Manager window, click the Ports (COM & LPT) section to open it and show the ports. Note: If the Ports section is not shown, clicking Show hidden devices in the View menu might bring it up.
Now right-click the COM port to change, and in the popup menu select Properties.
Select the Port Settings tab.
Click the Advanced button.
Change the COM Port Number to the desired COM port number (it will only allow selection of unassigned port numbers).
Click the OK button to confirm.
Click the OK button on the Properties
Close the Device Manager.
Next, try the program that uses the device on the COM port again. If it does not work immediately, restart Windows first.
Solving Prolific PL2303 serial-to-USB problems
In some cases, installing the driver alone does not solve your problem. As mentioned in the previous section, changing the COM-port can be necessary for a program to find the device connected through the PL2303 cable.
But there are other possible causes of problems with the Prolific PL2303 cables too.
Specific driver version required
For some devices, installing the latest Prolific driver might actually cause the device to stop being recognized or working. This can be the result of the device no longer being supported by the new driver version. Examples are the PL2303HXA, PL2303TA, and PL2303X, which will require an older driver version. For Windows 11 compatibility the recommended chip type is PL-2303GC.
In the Device Manager, use the Roll Back Driver option on the Prolific device, or use the Update Driver option to manually select a different version.
To prevent Windows from re-installing a new version when the new version is installed through Windows Update, you can disable Windows driver updates. Either disable driver updates altogether or just prevent the specific update that pertains to the Prolific driver.
Install a Serial port expansion card
This solution is only possible if you have a desktop computer. But if you do, and the Prolific cable-based solution is not working for your serial device, consider the option to install a serial port expansion card into the PC.
Once installed, you can connect your serial device directly to a serial port rather than using a serial-to-USB conversion solution.
Prolific PL2303 and FTDI cables
Apart from installing the correct device driver for the PL2303-based cable, it is also important to consider the quality of the cable. Most USB-to-serial cables these days are either Prolific PL2303 based or FTDI based. But even though these are the most common chipsets, there are quality differences in the cables sold online. So, if you are facing problems with a serial device, do consider trying an alternative USB-to-serial cable.
When you are finally ready to upgrade from Windows 10 to Windows 11 and your system is meeting the system requirements, you can still run into issues that prevent the upgrade. The cFosSpeed Driver can prevent the upgrade to Windows 11, as the Windows compatibility check will report it as something that needs your attention. Essentially it states that “a service isn’t ready for this version of Windows 10 ”.
What is the cFosSpeed driver?
The cFosSpeed driver is an Internet accelerator software solution. The software optimizes Internet traffic on a Windows PC by installing a device driver. The driver performs something called traffic shaping. It has some advanced network analysis and optimization integrated, but it also allows for the prioritization of streams or protocols. This is great for video streaming and gaming.
How did cFosSpeed get on my system?
The solution is integrated with quite a few OEM vendors. Manufacturers like MSI, Asus, ASRock, and Gigabyte include the cFosSpeed software in their driver bundles for their motherboards. In the case of Asus, you might know it as Turbo LAN, which is a rebranded version of the cFosSpeed software. With MSI it is part of the Dragon Center.
Fix cFosSpeed from blocking the Windows 11 Update
Considering the problem of the cFosSpeed driver blocking the Windows update, there are two solutions to the issue with the cFosSpeed driver. The first is to update the driver to a version that does not block the Windows 11 update. The second option is to uninstall the cFosSpeed driver from your Windows installation.
Update the cFosSpeed driver
The first option to update the driver is to check the OEM support site for an updated version of the software that includes the cFosSpeed driver.
For Asus, check their support site and look up your model to see if a new version is available. If so, download it and install it and then try the Windows 11 upgrade again.
For MSI, download and install the latest version of the MSI Dragon Center and after completing the installation, try the Windows 11 upgrade again.
For Gigabyte you will need to download the cFosSpeed Internet Accelerator Software from their site. Check the support section for your motherboard or model.
For ASRock, the cFosSpeed driver is part of the XFast Lan solution. It can be downloaded from here.
The last option is to download the latest cFosSpeed software from the vendor’s site and install it. Take note that this is a shareware version, which is valid for 30 days. But it should update your cFosSpeed driver so that you can upgrade to Windows 11. Update for 2025: the software is now owned and maintained by Atlas Tech Solutions and their latest version is 13 with Windows 11 support.
If you have the original cFosSpeed software installed and running, you can click the cFosSpeed icon in the Taskbar, and then in the popup menu select Get latest version.
Uninstall the cFosSpeed driver
If the driver update did not solve your issue, and you can still not upgrade to Windows 11, the best option is to uninstall the cFosSpeed driver altogether.
Uninstall the cfosspeed APP
Steps to uninstall cFosSpeed in Windows 10:
Open Settings from the Start
In the Settings window, select Apps.
By default, Apps & features should be selected. If not, select that option in the left-hand panel.
Now scroll down in the apps list until you see the cFosSpeed entry (it will include a version number in the name).
Click it, and then click the Uninstall
When prompted “This app and its related info will be uninstalled.”, click the Uninstall button.
When the UAC (User Account Control) windows pops up, click the Yes option to allow the uninstaller to run.
Follow the instructions in the cFosSpeed Uninstall Wizard to uninstall the app. If for some reason this does not work, it is also possible to uninstall the cFosSpeed from the Network Properties.
uninstall the cfosspeed driver
Open the network properties for an active adapter, select the cFosSpeed for faster Internet Connections (NDIS 6) entry, and then click the Uninstall button.
You will again be prompted for a confirmation. Click the Yes option to uninstall the cFosSpeed driver.
After completion, the entry will no longer show in the Network Properties list.
There is no need to repeat this for any other active network adapters. Once uninstalled, the cFosSpeed driver will be removed from all network devices.
Note: Uninstalling the cFosSpeed software using the network option will only remove the Lan Manager component, which is the network driver. The cFosSpeed main application, if installed, will still remain. So, if possible, use the App uninstall option to uninstall cFosSpeed.
After uninstalling the software, try the Windows 11 upgrade again.
If the upgrade still fails, you may need to consider doing a fresh install of Windows 11 rather than an upgrade from Windows 10.
Make sure to also check the article about TMP drivers and how they can affect the Windows 11 upgrade.
Many computers are used for critical tasks or to process sensitive data. To protect a system, especially a portable system, that is running Windows, Microsoft has several security features in the latest Windows releases. Most people know about Microsoft Defender and biometric access, but in Windows 10 and Windows 11, there is also something called driver block rules.
Are Drivers Dangerous?
Device drivers are not dangerous per se. But device drivers, like many other critical components in the Windows operating system, run with a kernel-level execution priority. That means that even if drivers are not malicious, they can allow elevated control access.
Modern device drivers are all digitally signed, and often verified by Microsoft. And in the latest Windows versions unsigned drivers are not allowed to be installed unless special steps are taken to disable driver signature enforcement.
But even with a digital signature, there is no guarantee that the driver is completely safe. Digital signatures can be stolen (hacks of hardware/software companies, like Nvidia recently).
Recent malware attacks have leveraged the vulnerabilities of drivers to compromise system security. It makes a lot of sense to increase the protection of these system components.
What are Driver Block Rules?
Driver block rules are a set of rules that are recommended by Microsoft to block drivers that are malicious or not trusted. Drivers can be submitted to Microsoft for review and analysis and bad ones are added to the vulnerable driver blocklist. Hardware manufacturers and OEM partners will play a big role in keeping the rules actual and relevant.
How to use Driver Block Rules?
Microsoft is including a setting in the Windows Defender configuration to turn on this new feature called Microsoft Vulnerable Driver Blocklist. That means turning it on will activate the protection.
This new feature will be only activated by default on special Windows editions. Windows 10 S mode, and devices that have the Memory Code Integrity feature (or HyperVisor-protected Code Integrity – HVCI).
For Windows systems where the S mode or HVCI is not possible there is another option, which is using the Windows Defender Application Control (WDAC) policy. Details about how to use WDAC and the list of rules can be found on the Microsoft website.
WDAC is all about preventing apps or processes to run kernel level. Use and deployment of the rules is something that will typically be used by organizations with IT staff to implement this.
Driver BlockList Limitations
Although the concept the blocklist is good, the method strongly depends on the quality of the list. It was already found that the blocklist is not including all drivers that need to be blocked. Apparently new Windows versions were being issues a list from 2019! Microsoft already confirmed the issue and will address the problem in the Windows October updates to ensure the list is new and in sync across Windows 10 and Windows 11.
In addition, the block list is now on by default in Windows 11 (version 22H2). It also seems the option to disable the list is no longer present. Is Microsoft finally able to prevent the Blue Screens showing Stop errors caused by drivers?
For people still wanting to disable the list on Windows 11 version 22H2, there might be a workaround through the registry. But it is not an official and documented option.
With each new version of Windows, more devices are automatically supported. This is also the case for Windows 11. But if your device is not supported, or not automatically installed, you may need to manually install drivers.
The need to manually install drivers in Windows 11 can also come up when a non-supported device needs to be installed. If hardware is not compatible with Windows 11, but there are drivers for the hardware for previous Windows versions, these older drivers can often be used.
For Windows 11, Windows 10 drivers are almost always compatible. But even Windows 8 or Windows 7 drivers can often be used. Just make sure the right architecture is supported. For Windows 11 all drivers need to be 64-bit since that is the only Windows 11 version available.
Steps to manually install drivers in Windows 11
First, make sure you have the driver file available on your Windows 11 system. Download it from the hardware manufacturer’s website. If possible, use the installer that came with the driver. If that does not work, the manual install process is required.
Make the driver files available in the installable format. That means you need to see files with a .SYS, .CAB, and .INF file extension. File extensions can be made visible in the File Explorer by clicking the View menu, followed by clicking Show in the dropdown menu, and finally selecting File name extensions. Depending on the file format of the downloaded drivers, the driver files need to be extracted. For archived files, Windows 11 offers direct support. But other formats might need a separate program to extract them. (.7Z file extension – 7-Zip; .RAR file extension – WinRAR). I would recommend installing the 7-Zip program, as it actually supports many archive and compression formats. Even .ISO and some .EXE files can be extracted with it.
Once the driver files are available, open the Device Manager. Press the Windows + R keys, and type devmgmt.msc in the Run window. Then press Enter or click OK.
In the Device Manager, select the device for which you need to install the driver.
Right-click the device, and in the popup menu click Update driver.
In the window that shows next, click the option Browse my computer for drivers.
Next, use the Browse button to select the file location that contains the driver files (as downloaded and extracted earlier).
Once selected, click the Next button.
Windows will analyze the driver files and match them with the selected device. If the drivers are compatible with the device, the drivers will be installed and the device should work after this.
Click the Close button to close the window.
Finally, close the Device Manager.
Hopefully with above steps you can find and install the required drivers for Windows 11. This way you can often keep using older hardware, even not directly supported by Windows 11.
As always, if you have trouble finding support for your hardware in Windows, try using our DriverFinder software to automatically analyze the hardware devices and look for available and compatible drivers.