Microsoft Windows uses device drivers to communicate with hardware devices in the computer. One of the important devices in a computer is the PCI simple communications controller. If the PCI simple communications controller driver is not installed, the device will show an error. In addition, it can result in other devices depending on this device failing or not being recognized by Windows.
What is a PCI Simple Communications Controller?
PCI is short for Peripheral Component Interconnect and it is a hardware bus that is used to connect hardware devices to a computer. The bus is inside the computer, on the motherboard, so you will not see it, like a printer or mouse. But it is a critical component to enable communication between the CPU and hardware devices. The PCI simple communications controller is a controller chip that is part of the motherboard chipset. The device manufacturer is Intel.
PCI Simple Communications Controller Driver Errors
If the right driver for the PCI simple communications controller is not installed, this will be visible in the Device Manager in Windows. The device will show an error or warning.

The device will be shown in the Other devices category instead of the System devices category. When you right-click the device and check the Properties, the error will often show “The drivers for this device are not installed. (Code 28)”.
Apart from this, other devices might not be recognized and show up as Unknown devices in the Other devices category as well.

Once the right driver for the PCI simple communications controller is installed, the other devices can be recognized by Windows as well and drivers for them can also be installed.
Download PCI Simple Communications Controller Driver
Solving the problem with the PCI simple communications controller is a matter of installing the right driver. The driver needed is the Intel Management Engine driver, which is a chipset driver.
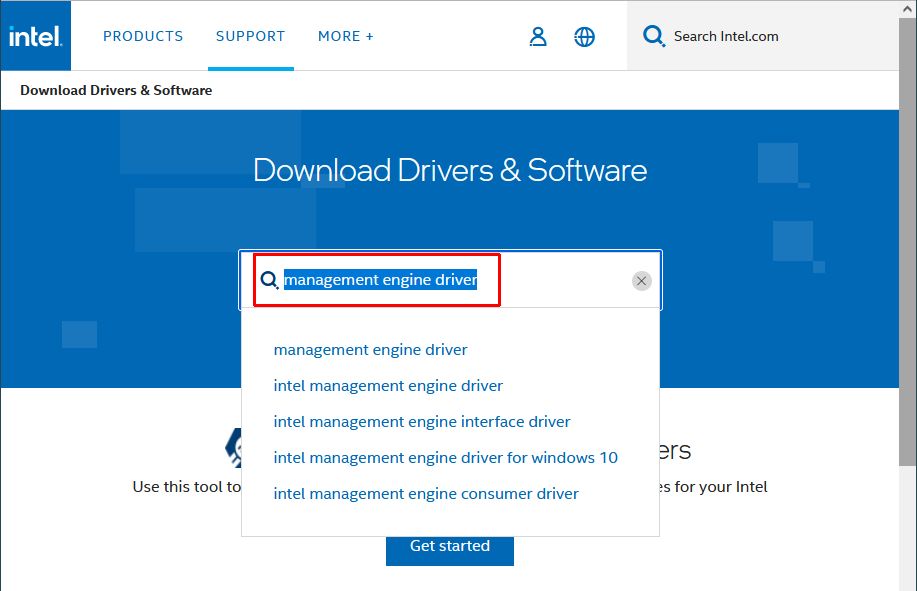
- To download the driver from the Intel support website, make sure you have a working Internet connection and visit the Intel download page.
- In the search box, type “management engine driver” and then click the appropriate entry for your Windows version in the result list.
- In the next page, select the driver that is right for your Windows version and click the link.
- This will bring up the download page. Click the Download button to download the ZIP file to your computer. After agreeing to the Intel Software License Agreement, the download will start.
- Unzip the downloaded file to extract the driver files.
Navigate into the extracted folder (ME_SW_2216.16.0.2805 in this example) and then into the subfolder named ME_SE_DCH.
- Install the drivers by executing the SetupME.exe file.


Once installed, restart your computer for the changes to take effect. Any devices depending on the PCI Simple Communications Controller should now also be recognized and their drivers installed.
Update the Driver from the Device Manager
Instead of manually downloading and installing the drivers for devices like the PCS Simple Communications Controller, you can also use the Device Manager to update the driver. Especially in later Windows versions, many drivers are automatically installed.
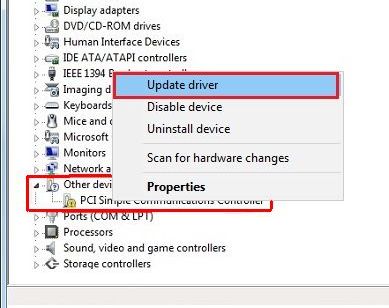
- Open the Device Manager from the Start menu, or type devmgmt.msc in the Run box after pressing the Windows + R keys.
- In the Device Manager, open the Other devices category.
- Right-click the PCI Simple Communications Controller, and in the popup menu click Update driver (or Update Driver Software depending on your Windows version).
- Choose the option to let Windows Search automatically for drivers (or Search automatically for updated driver software, again, depending on the Windows version).
- Wait for the driver to be installed and then click Close to finish the driver update.

After this, reboot your PC to have the changes take effect and let Windows find any other hardware devices that may now be detected.
If the automatic update fails, make sure you have an active Internet connection. If that is the case, the other option is to choose the option Browse my computer for drivers in step 4 and select the path where you manually downloaded the latest driver for the device.
For finding the right drivers for your computer system, we recommend you use the DriverFinder utility. It scans your hardware devices and allows you to download the latest drivers for all devices.
When I'm not writing 'tech stuff', I'm mostly likely to be found in the kitchen testing recipes, or outside sporting (to get rid of those calories I consumed while in the kitchen).
- DriverFinder Version 5.0.0 - March 4, 2024
- Vulnerable Windows Drivers Could Allow Device Takeover - November 7, 2023
- Microsoft Printer Support is Changing - September 12, 2023
