Most Lenovo notebooks and laptops come with integrated webcams. As such, it’s important to install the correct Lenovo webcam driver for Windows.
Different Lenovo devices use different webcams. This means they require require different drivers too. Depending on the Windows version installed on your device, drivers may be included with Windows itself – or require a separate download and install.
Lenovo uses multiple hardware vendors for integrated webcams. So depending on your device model, you might need a Realtek, SunPlus, LiteOn, Chicony, Vimicro, or Ricoh camera driver. Lenovo itself will refer to the camera as an Integrated Camera driver, Easy Camera driver, or even just USB Camera driver.
Manual: Download Lenovo Webcam Drivers from Lenovo PC Support
To download drivers for your Lenovo ThinkPad, IdeaPad, Yoga, or other portable device from the Lenovo Support site, follow these steps.
Open a web browser.
In the URL, type “pcsupport.lenovo.com” and press Enter.
Wait for the support site to load. The URL should redirect to your localized version of the Lenovo support website. If not, you can change the country and language in the top-right corner of the website.
Next, enter the device model in the search box, or click the Detect Product or Browse Product to locate the support page for your Lenovo device model.
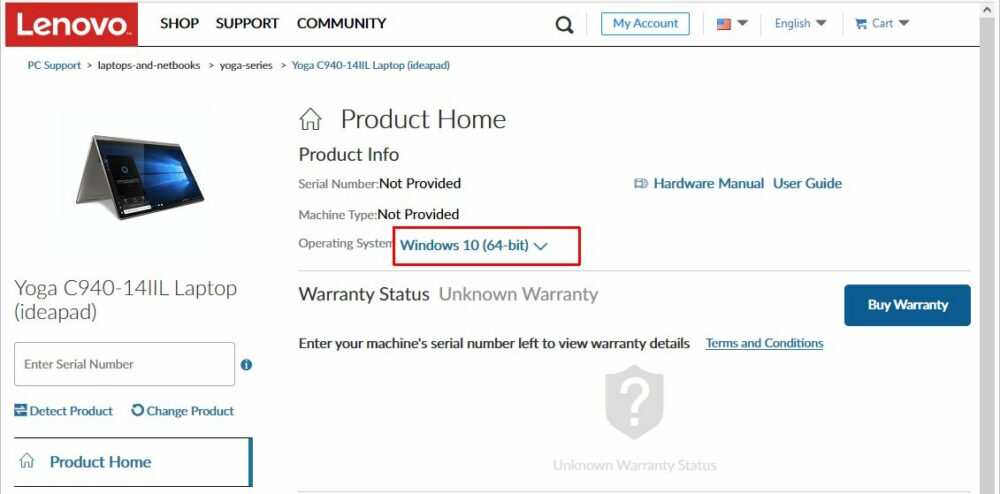
On the device support page, select the Windows version.
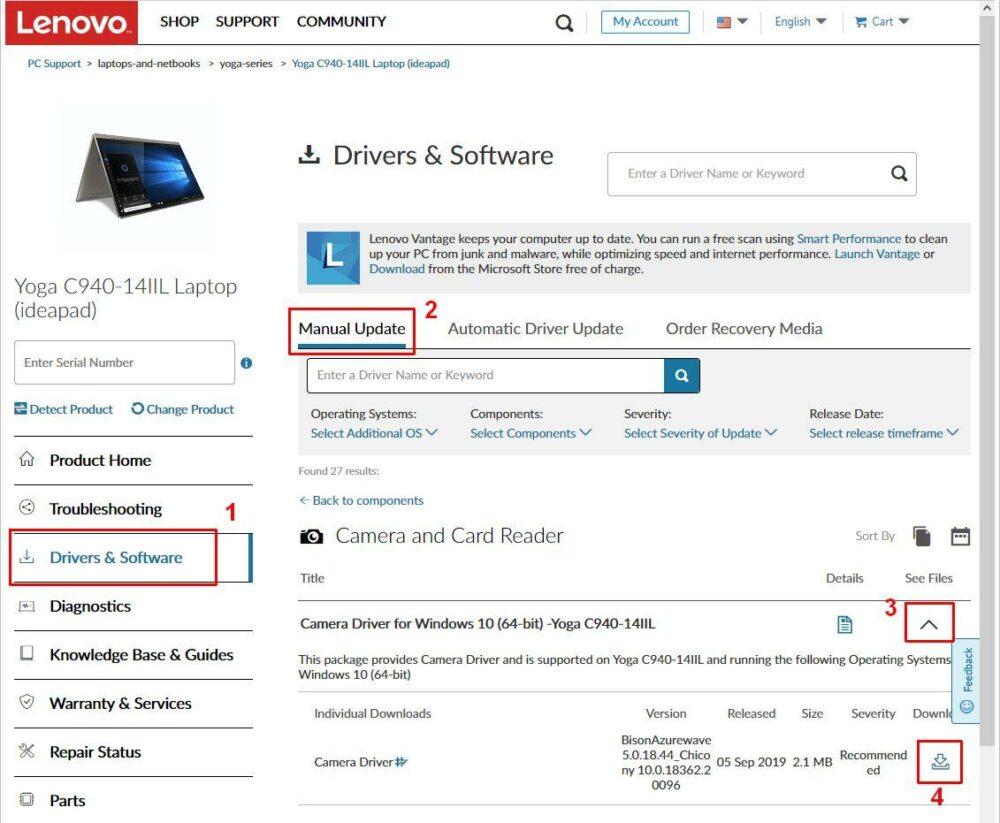
On the updated page, click the Drivers and Software link (1) on the left-hand side, then select Manual Update (2) and pick the driver category.
Click the ᐯ symbol (3) to show the files, and then click the download button (4).
Once the download is complete, execute the downloaded file to install the Lenovo webcam driver.
Automated: Find and Download Lenovo Webcam Drivers Using DriverFinder
If you cannot find the webcam driver for your Lenovo device, you can use DriverFinder to find the driver for you. DriverFinder automatically scans your computer devices (working or not working) and finds the right driver for your device and Windows version.
Using a third-party application can be very useful, especially when Lenovo doesn’t support your device anymore nor the Windows version you have installed your device.
Simply download the DriverFinder program installer and execute the downloaded file to install the program. Activate the program after installation, and then run a scan (click the Start Scan button).
DriverFinder will show a list of devices found in (or connected to) your computer and a list of suitable drivers for download.
Click the Download button for the Lenovo Webcam and install the driver.
Troubleshooting: Lenovo Webcam Problems
If your webcam still not working after you’ve downloaded and installed the appropriate driver?
Here are some quick troubleshooting tips to get your Lenovo webcam to work.
Make sure nothing is blocking the device. Some devices have a protection/privacy slider. (It’s also possible that someone put a protection sticker on it for privacy reasons.) Remove it.
Use the Fn key on your keyboard to turn on the webcam device. This is not applicable to all devices. Just check your keyboard for a camera symbol (in most cases it is F8).
Both Windows 8.1 and Windows 10 have Privacy Settings that can prevent access to the webcam. Settings -> Privacy -> Camera:Let Apps use my camera should be On.
After installing the driver, the device should automatically start using the driver. If not, it can help to run a Scan for hardware changes in the Device Manager (in the Action menu). This option is not available in all Windows versions.
In Device Manager, right-click the camera device and in the popup menu, select Uninstall. Reboot the device and the camera should get reinstalled. This resets the driver configuration, and can help fix the issue.
If you have been working with Windows for some time, you will probably have faced this scenario: Windows Update Failed. For some reason, the updates failed partially, or did not get installed altogether.
And although Microsoft has been trying to improve things, failed updates happen will all versions of Windows, up to Windows 10.
Windows Update Failed – Common Error Codes
The reasons why Windows Update Failed are various. And as a result, there are many error codes associated with this problem. Some are generic, while others pertain to a specific update or specific problem.
Here are some examples of error codes that are linked to failed Windows updates:
0x800705b4 – related to Windows Defender 0x800F0906, 0x800F081F, 0x800F0907 – .NET framework related 0x800F0922 – Windows 10 upgrade related 0x80240034 – downloading of update(s) failed 0x80242006 – update contains invalid metadata 0x80244018 – Internet connection related 0x80070070 – disk space related 0x80070103 – driver related
Some other examples are: 0x8007000E, 0x80D02002, 0x8007000D, 0x80246008, 0x80096004.
This list is definitely not complete. Sometimes there is a useful error description, but often it is not quite clear what caused the Windows Update process to fail.
Windows Update Failed – Common Causes
The obvious question to ask is: what caused the Windows Update to fail?
As in many cases with complex software, there can be quite a few causes. It is important to realize that the update process is basically a sequence of downloading and installing software. So availability of the source, a reliable connection for the download, and storage space for the download are the first essentials. But after that, the execution of the update installation can still cause problems.
To sum it up, the common causes for Windows Update to fail are:
Insufficient disk space – space is needed for storing the downloaded updates, as well as for the execution of the update installation.
Dependencies– An update can depend on something like a specific version of the .NET framework being installed, or a specific service having been started.
Failed previous updates – If a previous update has failed, it might have left (partial) installation files behind, or installed only partially causing problems with the next update.
Install sequence – If you have a lot of updates pending, all are downloaded in one go and installed once downloaded. If a specific sequence is required for some updates, this might fail.
Hardware incompatibility – In general, Windows prevents installing updates on incompatible systems. But there is a reason why Windows 10 is not supported on older systems. Hardware conflicts and limitations can definitely cause problems with software being installed.
Driver incompatibility – Windows 10, by default, includes device driver updates in the install process. If a new driver version is incompatible with the hardware version present, the update may fail. Trying to install a driver that is a lesser match than the installed driver can cause error 0x80070103.
Corrupt update files – This can be the result of download issues, where the update files did not completely download correctly.
Given the possible causes above, this also means that there are some relatively simple steps that can help solve Windows Update Failed situations.
Windows Update Failed – SIMPLE FIXES to Try Immediately
Try these steps – preferably in this sequence – to see if they are the cause of your Windows Update problem.
Check your disk space and free up space if needed. Although Windows Update reserves space for update files, it is still possible that a disk space limitation is the cause of the problem. Just check the available disk space on the system drive (check the Properties for the C: drive in most cases). And run a disk cleanup to free up some more space.
Restart your PC and try again – If the installation sequence is important for the updates being installed, simply reboot your computer and restart Windows Update to fix the issue.
Select which updates to install – If you are running other Microsoft software (like Office), it can help to limit Windows Update to the core only.
Using the Advanced options in Windows Update, you can tell Windows to not Receive updates for other Microsoft products when you update Windows.
Unplug external devices – In most cases, this will pertain to USB devices. Examples are printers, scanners, webcams, end external drives. Make sure not to unplug the mouse and keyboard if they are connected through a USB port, because then you can’t reboot the PC anymore.
Unplugging external devices can also help in case the Windows Update failed as a result of driver updates, or hardware incompatibility. It is also possible to disable automatic driver updates in Windows. That will prevent new driver updates from being downloaded automatically. Simply update the drivers after the Windows Update problems are resolved.
We recommend downloading DriverFinder for this. DriverFinder is a separate driver update program that will find the right – and latest – drivers for all your hardware.
After unplugging the devices, restart your PC and try Windows Update again.
Windows Update Failed – DEEP DIVE Fixes
Reset the Windows Update Cache
As with many computer actions, the Windows Update process uses temporary storage. One such element is called the Windows Update Cache. It is also referred to as the SoftwareDistribution directory.
Clearing the Windows Update cache is really nothing more than deleting the SoftwareDistribution directory (or its content). But since this file location is used by the Windows Update service, you can’t delete it when this service is running.
To delete the SoftwareDistribution directory:
In the Search box on the taskbar, type ‘command’.
In the Search results, right-click the Command Prompt.
In the popup menu, click Run as administrator.
When the User Account Control window shows, click the Yes button.
Once the Command Prompt window shows, type the following commands (press Enter after each command). net stop wuauserv net stop bits rd /s /q %windir%SoftwareDistribution net start wuauserv net start bits Note: If you are not comfortable deleting the SoftwareDistribution directory, you can rename it rather than deleting it (ren %windir%SoftwareDistribution SoftwareDistribution.bak).
Close the Command Prompt window, and then retry Windows Update.
If for some reason these steps fail or seem too complicated for you, there is another way.
To ensure the SoftwareDistribution directory can be deleted, you can start your PC in Safe Mode.
Click the Start menu icon, and in the Start menu click Settings.
In the Settings window, click the Update & Security option (last entry, so depending on the size of the window, you might need to scroll down).
Next, select the Recovery option.
And finally, click the Restart now button in the Recovery window.
Once your PC restarts, you will see the Choose an option screen. Select Troubleshoot.
In the Troubleshoot screen (next step), select Advanced options.
In the Advanced options screen, select Startup Settings.
The last step here is to click the Restart button in the Startup Settings screen.
Again the PC will reboot, after which you will see a list of options. Press the 4 or F4 key on your keyboard to start the PC in Safe Mode.
Once Windows starts, you can open a File Explorer window, navigate to the Windows folder (typically C:Windows) and delete the SoftwareDistribution folder. Tip: Press and hold Shift and then Delete to permanently delete the folder rather than moving it to the recycle bin.
After this, reboot your PC again (it will start in normal boot mode), and retry the Windows Update.
Run the System File Checker
The System File Checker, or SFC, does exactly what the name says: it will check and repair system files. This tool has been part of Windows since Windows XP and is still present in Windows 10.
The exact function of the tools is described as “Scans the integrity of all protected system files and replaces incorrect versions with Microsoft versions”. This is a useful tool to use for many Windows problems, not just if Windows Updates failed.
How to run the System File Checker.
Open a Command Prompt window with Administrator access.
For Windows 8 and later it is recommended to run the DSIM tool before running the SFC tool. DSIM (or full: Deployment Image Servicing and Management) can be executed using the command: DISM /online /cleanup-image /restorehealth Note: Like the SFC command, the DSIM command can take a bit of time to complete.
In the Command Prompt window type the command: SFC /SCANNOW and press the Enter key.
Now, wait for the command to complete. This can take some time.
Once the command completes, close the Command Prompt window and restart the computer.
Run the Windows Update again after this to check if the issue is resolved.
Download and Install Updates Manually
Although it is best to have the automatic update process install Windows updates, it is possible to download and install them manually.
Microsoft has a download page for Windows 10. This page can be used to download the Windows 10 upgrade tool and Windows 10 installation media. Useful if you need a copy of Windows 10 installation files to recover corrupted system files, or if you need to reinstall Windows 10.
Apart from that, major updates can also be downloaded from there.
For individual Windows Updates, you need to visit the Windows Update Catalog. There you can search for individual updates (KB numbers).
To know which updates to search for, simply go to the View update history (in the Windows Update settings).
Look for the entries that show “Failed” instead of “Successfully” and take note of the KBxxxxxxx number.
Now visit the Windows Update Catalog in a browser. Type the KB number in the search field, and click Search.
Use the Download button to download the update manually. If more than one result shows, you typically want to download the top one (newest date).
After you click the Download button, a new window will show with a link to the .CAB file. Click the link to download the file.
Once the file completes downloading, you can open the file. In this example, which uses an Edge browser update, simply click the Open file link. This will open a Windows Explorer window with the default download folder selected.
The file should be an .MSI file (Microsoft Installer), which can be executed by double-clicking it. You can also select it and press Enter on the keyboard.
Follow the installation instructions presented to complete the installation of the Windows Update.
Disable Your Anti-Virus Software
This solution should really only be used if all others fail since you will put your PC at risk for a short while. But in some cases, the download of Windows Update files does not complete due to Windows Defender or another AV program.
IMPORTANT: Make sure you re-enable the your anti-virus software immediately after completing the Windows Update!
How to disable Windows Defender in Windows 10.
In the Search box on the taskbar, type ‘windows defender’.
In the Search results, click the Windows Defender Firewall icon.
This will bring up the Windows Defender Firewall windows. Click the link named Turn Windows Defender Firewall on or off.
In the Customize Settings window, select the radio button labeled Turn off Windows Defender Firewall (not recommended) in the Private network settings section.
Click the OK button to confirm.
Close the Windows Defender Firewall window.
With Windows Defender disabled, run Windows Update again to see if the problem is resolved.
For other Anti Virus software, please check the vendor’s instructions on how to temporarily disable their software. Many solutions have a taskbar icon which shows a popup menu when clicked (or right-clicked). The menu often has an option to disable the AV software for a limited time.
Check Your PC’s Download Settings
Disable LAN-Proxy Settings
If you’re using a proxy, try disabling it to see if it will fix the update failure issue.
In the Search box on the taskbar, type ‘internet options’.
In the Search results, click the Internet Options icon.
This will open the Internet Properties dialog box. Select the Connection tab (1).
Now click the LAN settings button (2).
This will bring up the Local Area Network (LAN) Settings window. Make sure you have the checkbox named Automatically detect settings selected.
In the same window, also make sure you have the checkbox named Use a proxy server for your LAN (…) unchecked.
Click the OK button to confirm.
Click the OK button in the Internet Properties dialog box.
After this, try Windows Update again.
Background Intelligent Transfer Service
BITS is short for Background Intelligent Transfer Service. Windows update uses this service to download updates in the background, while you can still actively use your Internet connection.
So just make sure the BITS service is running properly on your system using these steps:
In the Search box on the taskbar, type ‘services’
In the Search results, click the Services App icon.
This will bring up the Services window. Scroll down in the list until you see the Background Intelligent Transfer Service. Tip: You can widen the Name column by clicking and dragging the header separator (1).
Right-click the Background Intelligent Transfer Service line, and in the popup menu, select Properties (2).
This will bring up the BITS Properties window, with the General tab selected. Change the Startup type to Automatic (Delayed Start). Note: This change will ensure the BITS service is started automatically when the computer starts. The Delayed Start option will result in the service being started after all other services, which can reduce startup times.
Click the OK button to confirm.
Finally, close the Services window.
After this, restart your system and try Windows Update.
Hardware Devices and Drivers
As mentioned earlier, hardware device and driver compatibility issues can Windows Updates to fail.
Drivers are a critical part of the Windows operating system as they ensure all devices function properly. But that also results in driver problems often being the cause for failed Windows Updates.
Unplugging external, non-essential devices is a first step in trying to fix Windows Update failed errors (if caused by devices or drivers).
Disabling automatic driver updates in Windowsis another step to exclude drivers from being updated by Windows. This will help if the hardware device that is causing problems cannot be disconnected/removed.
After either of these two steps, run Windows Update again to see if the problem is fixed.
If none of the above works, try the Windows Update Driver Cleanup feature.
If driver updates are a reason for a Windows Update to fail, you can try to clean up existing or old driver installation files. It can be done with a single command.
Simply open a command prompt with administrator-level access (see earlier instructions in this article).
In the Command Prompt window type the command: rundll32.exe pnpclean.dll,RunDLL_PnpClean /DEVICES /DRIVERS /FILES /MAXCLEAN And then press the Enter key. Note: The command will complete without showing any output in the Command Prompt window. The result of this command is actually added to a log file C:WindowsINFsetupapi.dev.log. So if you are interested in the details, open that file and scroll down to the bottom of the file for the latest changes.
Close the Command Prompt window.
After that, run the Windows Update process again to see if your problem is solved.
Specific Tips for Windows 10
NOTE: ALL of the above troubleshooting tips can also be tried if you’re using Windows 10. The following though are specific to this particular Windows version.
In Windows 10, Microsoft has incorporated a special Update Troubleshooter. It analyzes the system for common causes and problems related to failed Windows Updates. If it finds a problem, it will try to fix it automatically.
Run the Windows Update Troubleshooter
Click the Start menu button, and in the Start menu, click Settings.
In the Settings window, select Update & Security.
Next, select Troubleshoot, and then click the link called Additional troubleshooters.
Now, click the Windows Update option under Get up and running, and then click the Run the troubleshooter button.
The Windows Update troubleshooter will start analyzing the system. Wait for it to complete. Any problems that were found (and fixed) are shown in the window.
After completion, click the option to Close the troubleshooter.
Although this might seem like a strange suggestion, pausing the updates will clear the downloaded updates. So un-pausing the updates after this might fix your problems with Windows Update.
In Windows 10 follow these instructions:
Click the Windows Start button, and then click Settings.
In the Settings window, click Update & Recovery.
Next, select Windows Update.
In the Window Update window, select Advanced options.
In the Advanced options screen, scroll down until you see the Pause updates option.
Click the Select date control and simply select a date in the future. Since we are just pausing the updates briefly, the duration of the pause period does not matter.
No need to save anything. Once you changed the date, close the Settings window and restart your PC.
After the PC restarts, go to the Settings again, select Update & Recovery, and then Windows Update.
It will show Updates paused. Click the Resume updates button to un-pause the Windows Update process.
Windows will immediately start checking for updates again and hopefully complete downloading and installing updates after this.
Windows Update Failed – Still Not Solved?!?
If Windows Update still keeps failing, try skipping an update.
Of course, this needs to be assessed on an individual scenario basis. Critical security updates should not be skipped, while optional, non-essential updates can be.
If nothing works, and critical updates fail, or too many updates fail, the only real solution might be to do a fresh install of Windows on your system.
Many Windows 10 settings are configured through the Control Panel. The Device Manager for example, which is used for driver settings, is accessed through this panel. As such, it’s important to know how to open the Control Panel in Windows 10.
In Windows 7 and 8.1, opening the Control Panel was easy. All you had to do was click or right-click the Windows Start button. However, in Windows 10, this is no longer the case.
Open the Control Panel Using the Search Box
This is generally the preferred, and easiest way to open the Control Panel. Simply type “control panel” in the search box on the Taskbar.
In the Search results screen, you can click the Control Panel App under best match (1), or click the Control Panel icon in the right-hand window (2).
Open the Control Panel from the Taskbar
If you want even easier access to the Control Panel in Windows 10, you should ‘pin’ it it to the Taskbar, thereby creating a shortcut.
Follow the steps above to open then Control Panel.
On the Taskbar, right-click the Control Panel icon.
In the popup windows that opens, click Pin to taskbar.
After this, the Control Panel icon will permanently show on the Taskbar. So even when you close the Control Panel, you can quickly open it again by clicking the icon on the Taskbar!
Why Use the Control Panel?
Since it seems that Microsoft has made it a bit more difficult to open the Control Panel, you would expect that it is not needed that much. Not true!
For example, for device driver related actions (e.g., driver updates, troubleshooting, driver roll-backs, etc.) the Device Manager is needed.
To get to the Device Manager, you need to open the Control Panel. From there, select the Hardware and Sound option, and then click the Device Manager option.
Another common task performed via the Control Panel is program uninstalls.
Many applications create a Program Group in the Start menu, where they normally put a link to an uninstall option. But if that is not available, then the easiest method to uninstall a program is the Uninstall a program feature in the Control Panel.
What to do to ‘make’ Windows 10 auto adjust the audio volume levels of music you’re playing or video you’re watching, when you want to make or take a phone call.
Automatically adjust audio volume during phone calls in Windows 10? Why would anyone want to do that?
Here are some scenarios…
It’s your habit to listen to music while you’re on your computer. However, you sometimes need to make online calls during the day and you don’t want to constantly start and stop your music each and every time you make a phone call.
You’re listening to some grrrreat music, or you’re watching a really amazing video… but you’re expecting an incoming phone call sometime today and you don’t want to miss it. You want to hear that incoming call loud and clear OVER whatever music you’re listening to, or video you may be watching.
Please note that a 'call' in this context means either an audio or a video call made using a communications app installed on your computer such as Skype, WhatsApp, Zoom, Viber, Messenger etc.
So that’s clear… NO to manually muting or lowering the sound volume for whatever it is you’re playing when making or receiving computer calls. You want these ‘other sounds’ to automatically lower down during phone calls.
Luckily, Windows 10 has a feature to automatically lower audio volume when making or receiving phone calls. And there are a few options to configure this feature to your personal preference too!
Change the Audio Level for Communications
To configure what should happen during telephone calls:
Right-click the sound icon in the system tray.
In the popup window, click Sounds.
In the Sound dialog box, click the Communications tab.
Now, select what should happen to other sounds when you use your Windows 10 PC to make or take telephone calls.
Note: Click Mute all other sounds if you want Windows to out all other playing audio to silent when you’re in a call.
Note: Click Do nothing if you want all other sounds to stay at the same volume during calls.
Click OK to confirm.
The next time you make or receive a PC phone call, the audio level for other sounds will adjust according to the option you selected.
How to Disable Automatic Audio Level Adjustment
So after giving you the above steps on how to use Windows’ automatic audio level adjustment feature, why would you now disable it?!?
Well, it turns out the method of detecting “communications” as Microsoft calls it… is not fool proof. 😅
In some cases, this feature is triggered when it should not. Since there are so many programs using VoIP for audio communication, it is very possible that audio is muted when you do not want it!
In games for example, you can configure the audio channels the way you want them. So when you are starting a chat with another player, you do not want Windows to suddenly change the volume level.
Whatever the reason, now you know the steps to configure the audio volume level adjustment in Windows 10 to your own preference!
Other Causes of Audio Volume Level Problems
If the Windows 10 settings for automatic volume adjustment does not solve your problem, or you deem it unreliable, you may want to try something else.
There are a few more settings in Windows 10 that can affect audio playback behavior. Another key component in all this is the audio hardware and audio devices you have with Windows 10. There are specific settings in audio playback software that can affect audio volume level behavior too.
Read on to learn more about why audio volume levels are not working the way you might expect.
Disable Enhancements and Exclusive Device Access
Audio enhancements allow an audio driver to perform adjustments to the audio, like an equalizer. But these enhancements can also be the reason why audio levels behave in a way you do not want.
To disable audio enhancements, follow these steps:
Right-click the sound icon in the system tray.
In the popup window, click Sounds.
In the Sound dialog, select the Playback tab.
Select the Speakers option, and then click the Properties button. Note: There can be multiple Speakers options. Select the one you are experiencing problems with, or repeat the steps for each one.
In the Speaker Properties dialog box, select the Enhancements tab.
Next, make sure the checkbox Disable all enhancements is selected, and then click OK.
If this does not help with the audio level problem, you can also disable exclusive control of the audio device. After step 6 above, select the Advanced tab and then clear the checkbox that says Allow applications to take exclusive control of this device.
Audio Device Hardware
Hardware is not the first to be mentioned, but it is certainly important. For audio hardware to work as intended, Windows needs the proper device drivers for the audio device. Updating your audio drivers is a good idea to ensure outdated driver software is not causing the problems. We suggest you download DriverFinder to update your audio drivers.
If your problems are with a USB headset, a good tip is to change the USB port the headset is plugged into. USB configuration is device and port specific, so plugging the headset in a different USB port may help fix audio volume problems. Preferably, use a USB port directly on the motherboard.
Application Specific Audio Level Settings
Apart from Windows 10 itself, many audio and video applications have settings that can affect audio volume behavior. If your application is listed below, check the settings to ensure the behavior is as you want it.
Discord
If you are experiencing problems with audio levels in discord, try this.
Click the Settings icon in the main window (bottom left).
In the left-hand panel, select the Voice & Video option.
In the right-hand panel, scroll down to the ATTENUATION section.
Disable the options When I speak and When others speak.
Press Esc to close the settings and go back to the main window.
VLC Media Player
VLC is an excellent and popular tool for audio and video playback. Check its audio settings using these steps:
Open VLC.
In the Tools menu, select Preferences.
In the Preferences window, click the Audio icon, and then click the All radio button in the button left.
The window will change from Simple Preferences to Advanced Preferences.
Now select Audio in the list on the left.
Turn the Force detection of Dolby Surround option to Off, and make sure the Replay gain mode is set to None.
Click Save.
I hope you enjoyed reading this article!
If you have experienced audio level problems with other applications and you have a solution, let me know and I’ll add it!


![[Easy Fixes] Windows Update Failed](https://driverfinderpro.com/driver-guide/wp-content/webp-express/webp-images/uploads/windows-update-failed.jpg.webp)


![[FREE]: How to Backup and Restore Drivers](https://driverfinderpro.com/driver-guide/wp-content/webp-express/webp-images/uploads/driver-backup.jpg.webp)